Sweater Embroidery Ideas: 15 Cozy Designs for Knit Sweaters (Free Printable Patterns)
A plain knit sweater is one of the nicest things you can embroider. The stitches sit on top of the soft texture, a small motif goes a long way, and you end up with something that looks hand-made in the best sense. Below are 15 sweater embroidery ideas, from a single red bow to a full floral yoke, and each one comes with a free printable pattern, a colour key and step-by-step stitching notes.
Knitwear behaves differently from denim or cotton, though. It stretches, the needle can slip between the knit stitches, and a hoop can leave marks. So before the designs there is a short section on how to embroider on a knit sweater without puckering or pulling it out of shape.
In This Post
- What You Will Need
- How to Embroider on a Knit Sweater
- 1. Red Mushroom Scatter
- 2. Bumblebee Trio
- 3. Wildflower Cuff Vine
- 4. Daisy Sprigs Below the Neckline
- 5. Floral Yoke Garland
- 6. Tiny Red Bow
- 7. Night Sky Stars
- 8. Planet Orbit Cuff
- 9. Christmas Tree Trio
- 10. Potted Houseplants Row
- 11. Woodland Mushroom Cluster
- 12. Chunky Yarn Lazy Daisies
- 13. Flower Patch for a Cardigan Sleeve
- 14. Name in Chain Stitch
- 15. Falling Autumn Leaves
- Caring for Embroidered Sweaters
- Sweater Embroidery FAQ
What You Will Need
What You Will Need
- A knit sweater – smooth wool, cotton or a wool blend is easiest; prewash it if it is new
- Six-strand embroidery floss (cotton) or fine wool embroidery thread
- Worsted or DK wool yarn for the chunky yarn idea
- Size 22 chenille needles (sharp point, large eye) and a blunt tapestry needle for yarn
- Printable, self-adhesive wash-away stabilizer sheets
- Embroidery hoops: 10-13 cm (4-5 in) and 15-18 cm (6-7 in)
- Small sharp embroidery scissors
- A removable fabric marker or chalk pencil
- Soft iron-on or fusible backing for the inside of the design (optional)
How to Embroider on a Knit Sweater
Use wash-away stabilizer on top. You cannot trace a design onto a bumpy knit, so print or trace the pattern onto a self-adhesive wash-away stabilizer sheet, stick it on the sweater and stitch straight through it. It also keeps the needle from sinking between the knit stitches. When you finish, soak the sweater in lukewarm water and the sheet dissolves.
Hoop loosely, never stretched. Close the hoop just enough to hold the knit flat. If you pull the fabric tight like cotton, it springs back when you unhoop it and the stitches pucker. Do not leave the hoop clamped between sessions.
Stitch sleeves and cuffs in hand. A sleeve is too narrow for a hoop. Slide one hand inside so you only catch the top layer, and keep the stitches a little looser so the cuff still stretches over your fist.
Use more strands. Three or four strands of floss sit on top of the knit better than two. Thin threads disappear into the texture.
Avoid long jumps on the back. Finish each small element and start again rather than carrying thread behind the knit – long floats snag on fingers and rings.
Read next: Hand Embroidery Stitches: 20 Basic Stitches for Beginners (Free Printable Cheat Sheet)
From Maker Warmth
Looking for your next stitch project?
Every pattern on this blog is free to print, from tiny bows to full denim jacket designs. Save this one, then browse the whole collection.
See all free patterns →1. Red Mushroom Scatter
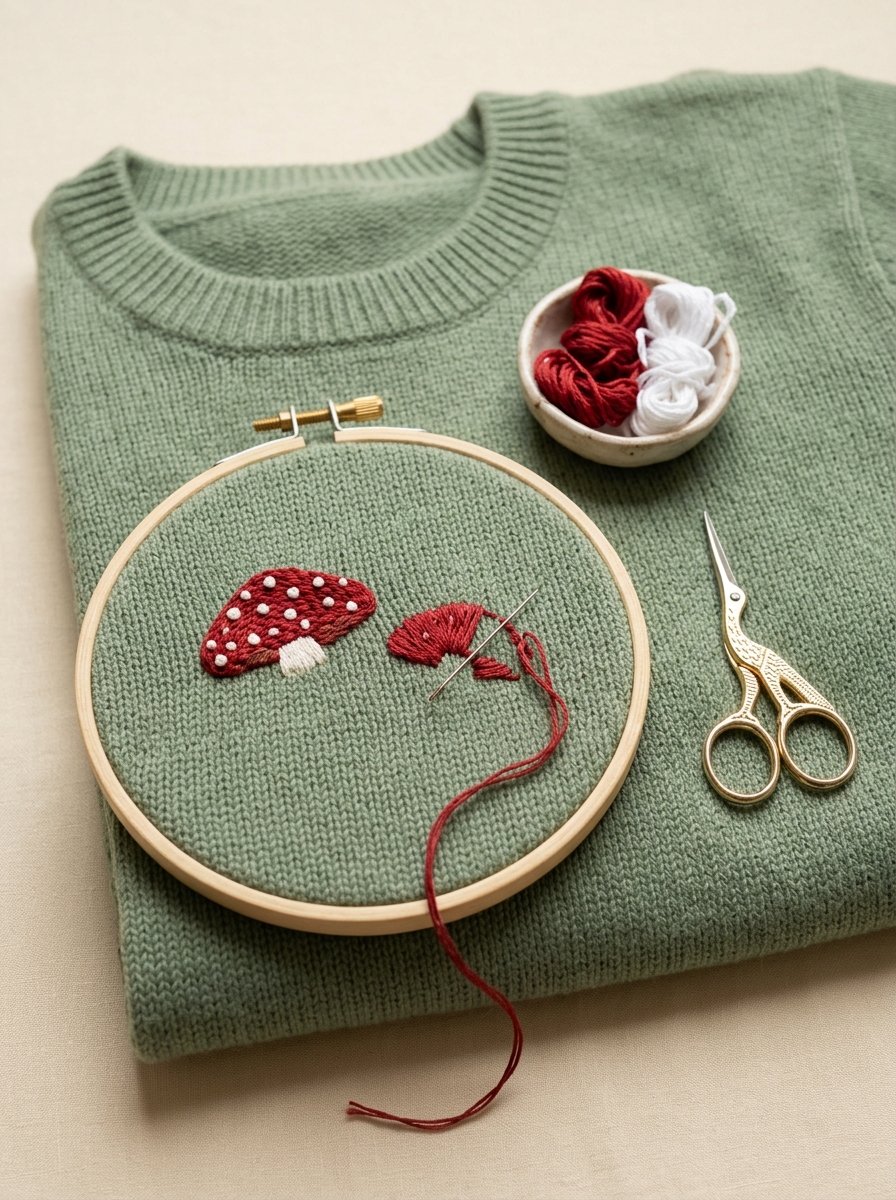
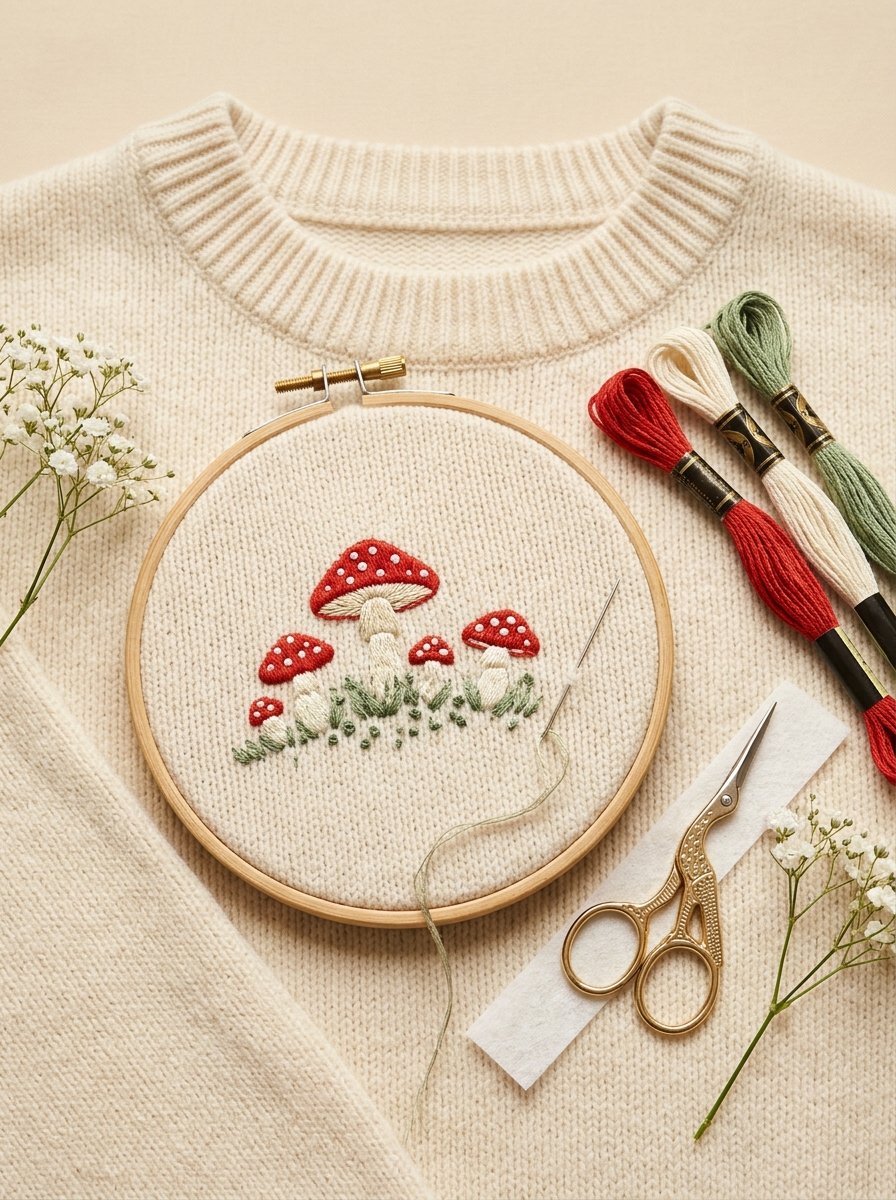
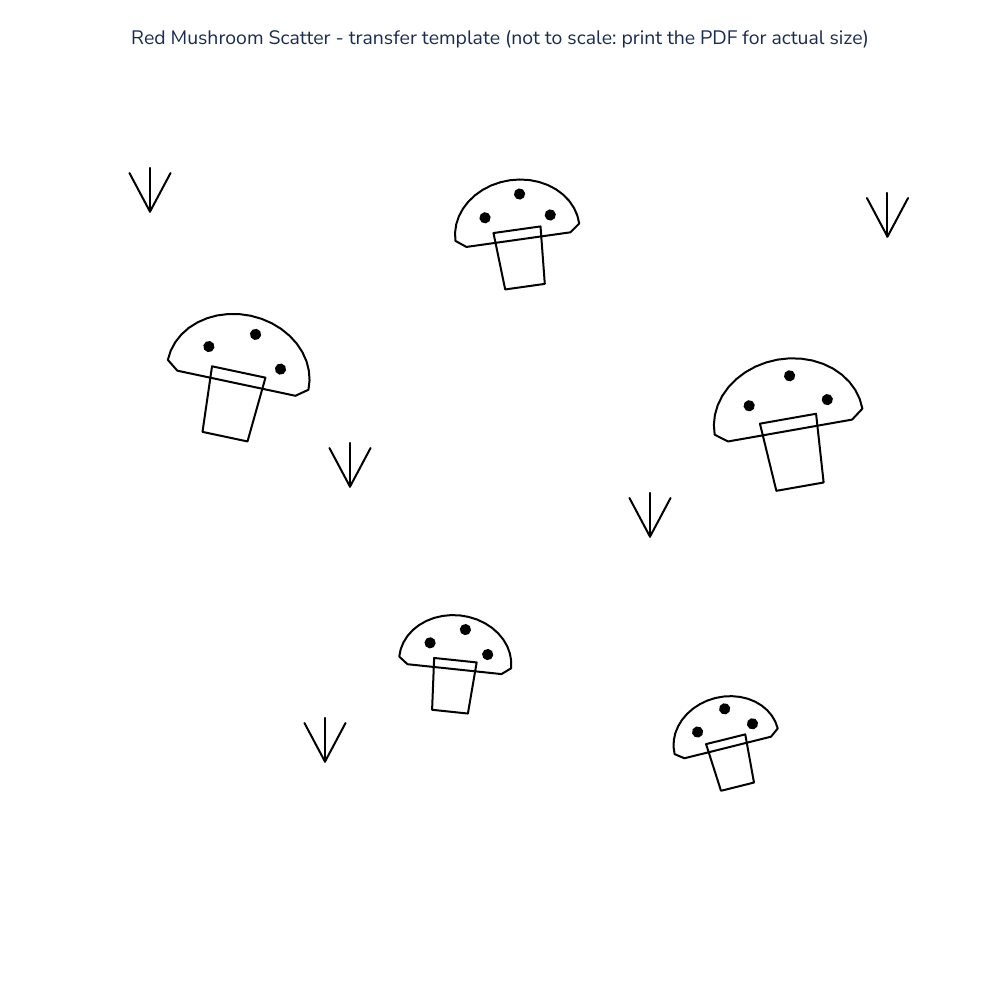
Little red toadstools are one of the most saved sweater motifs on Pinterest, and it is easy to see why: five tiny caps scattered across a green knit look playful without taking over the whole sweater. The caps are simple satin-stitch domes, so this is a good first project on knitwear.

Pattern details
- Difficulty: Beginner
- Design size: about 72 x 60 mm (2.8 x 2.4 in)
- Fabric: A smooth, medium-weight knit sweater (wool, cotton or a wool blend). Stitch through a printable wash-away stabilizer sheet on top of the knit.
- Needle: Size 22 chenille needle (sharp point, large eye)
- Hoop: 15 cm (6 in) hoop, closed just enough to hold the knit flat – never stretched
Colour key
- R: Tomato red; 3 strands
- C: Warm ivory; 3 strands
- W: White; 3 strands
- G: Sage green; 2 strands
Thread and stitch guide (numbers match the pattern card)
- Mushroom caps: satin stitch, colour R, 3 strands. Fill each dome with stitches running from the flat lower edge to the curved top. Work from the centre outward so the stitches stay upright.
- Mushroom stems: satin stitch, colour C, 3 strands. Fill each stem with short horizontal stitches, tucking the top row just under the cap edge.
- Cap spots: French knot, colour W, 3 strands. One two-wrap knot on each dot, worked over the finished red satin.
- Grass tufts: straight stitch, colour G, 2 strands. Three short stitches fanning up from one point at each tuft.
View the transfer template
This preview is not to scale. For tracing, download the PDF and print it at 100% / Actual Size.
Satin stitch guide
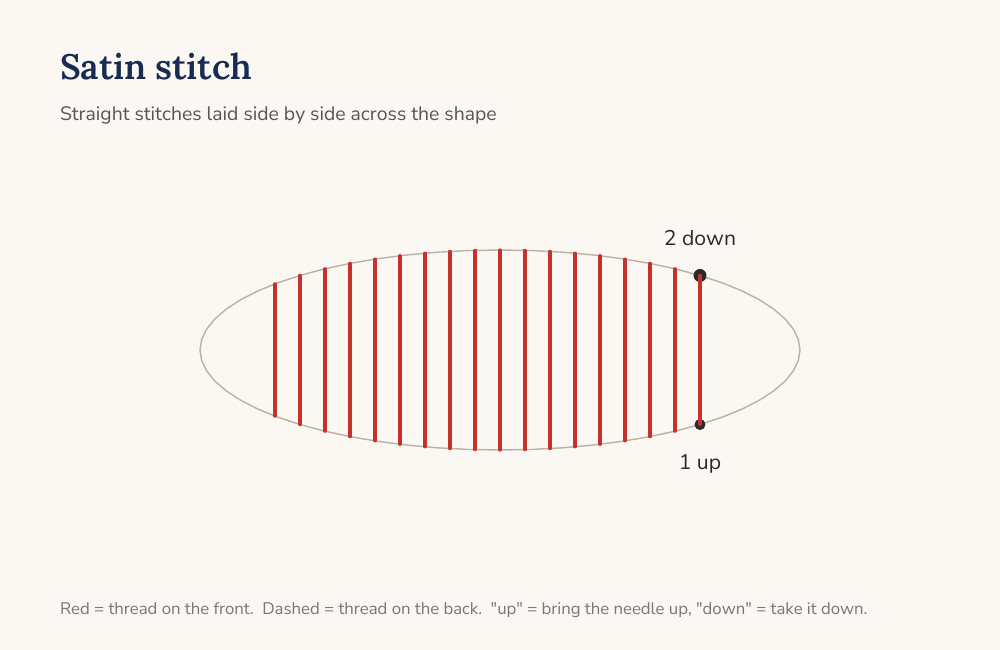
- Come up at 1 on one edge of the shape.
- Go down at 2 directly across on the opposite edge.
- Come up right beside 1 and repeat, laying each stitch snugly next to the last.
- Follow the lines on the pattern card for the stitch direction. Keep stitches no longer than about 8 mm; on wider shapes split the area in two.
French knot stitch guide
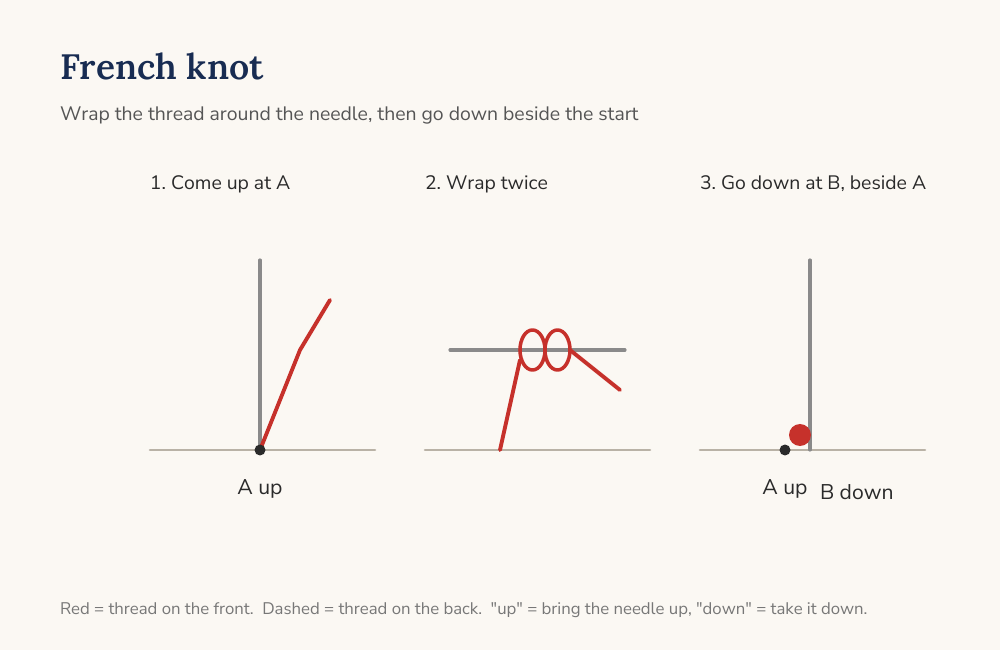
- Come up at A where the knot belongs.
- Hold the thread taut and wrap it once or twice around the needle.
- Go down at B, right beside A (not in the same hole), sliding the wraps down to the fabric.
- Keep holding the thread until the needle is through, then let the knot settle.
Straight stitch guide
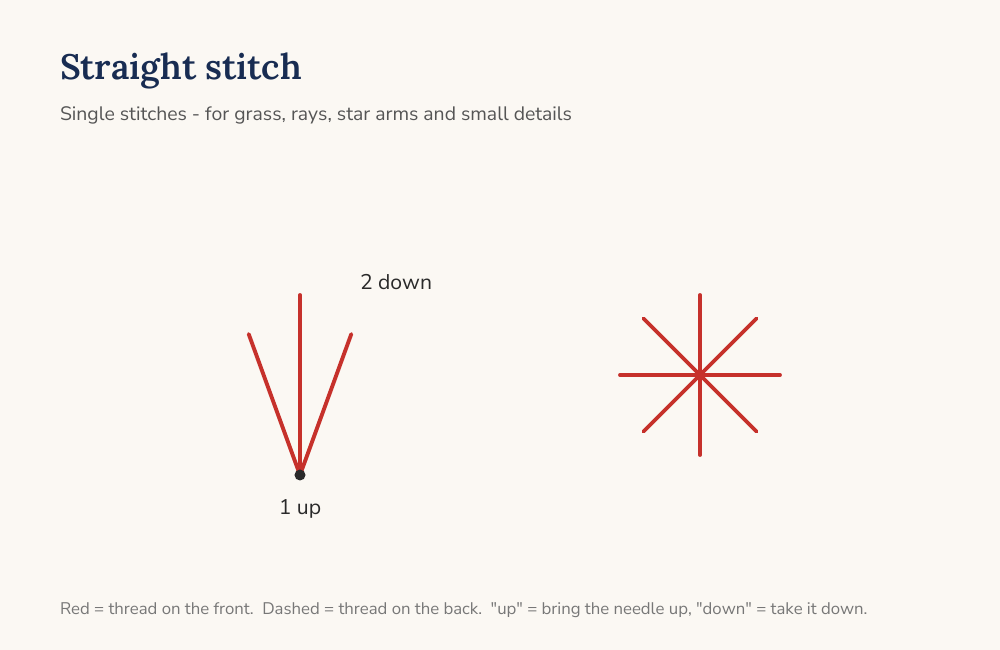
- Come up at 1 at one end of the line.
- Go down at 2 at the other end.
- Keep straight stitches short on knits (under 8 mm) so they do not snag.
How to stitch this design
- Print the template at 100% / Actual Size and check the 50 mm scale line. Trace or print the design onto a self-adhesive wash-away stabilizer sheet and smooth it onto the sweater front.
- Turn the sweater inside out to check that only one layer is under the design area, then hoop it loosely. If the area will not fit a hoop, stitch in hand and keep the tension relaxed.
- Satin-stitch the five ivory stems first, then the red caps over their top edges.
- Add the white French knot spots on top of each cap.
- Work the sage grass tufts with three straight stitches each.
- Weave all thread tails under nearby stitches on the back. Soak away the stabilizer in lukewarm water, press gently in a towel and dry flat.
2. Bumblebee Trio
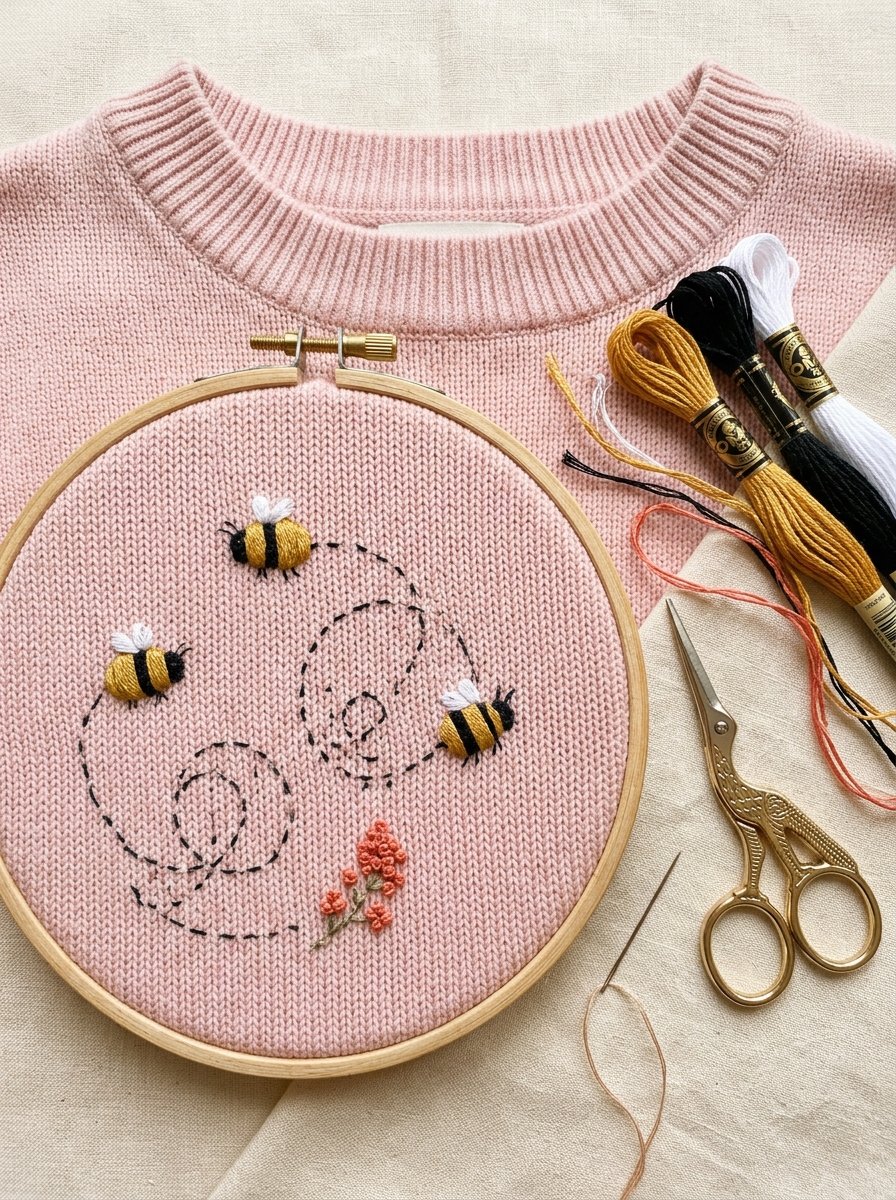
Three bees loop across the chest on a dotted flight trail, with one tiny coral flower for them to head toward. On blush pink knit the yellow and black stripes stand out clearly, and each bee is small enough to finish in one sitting.
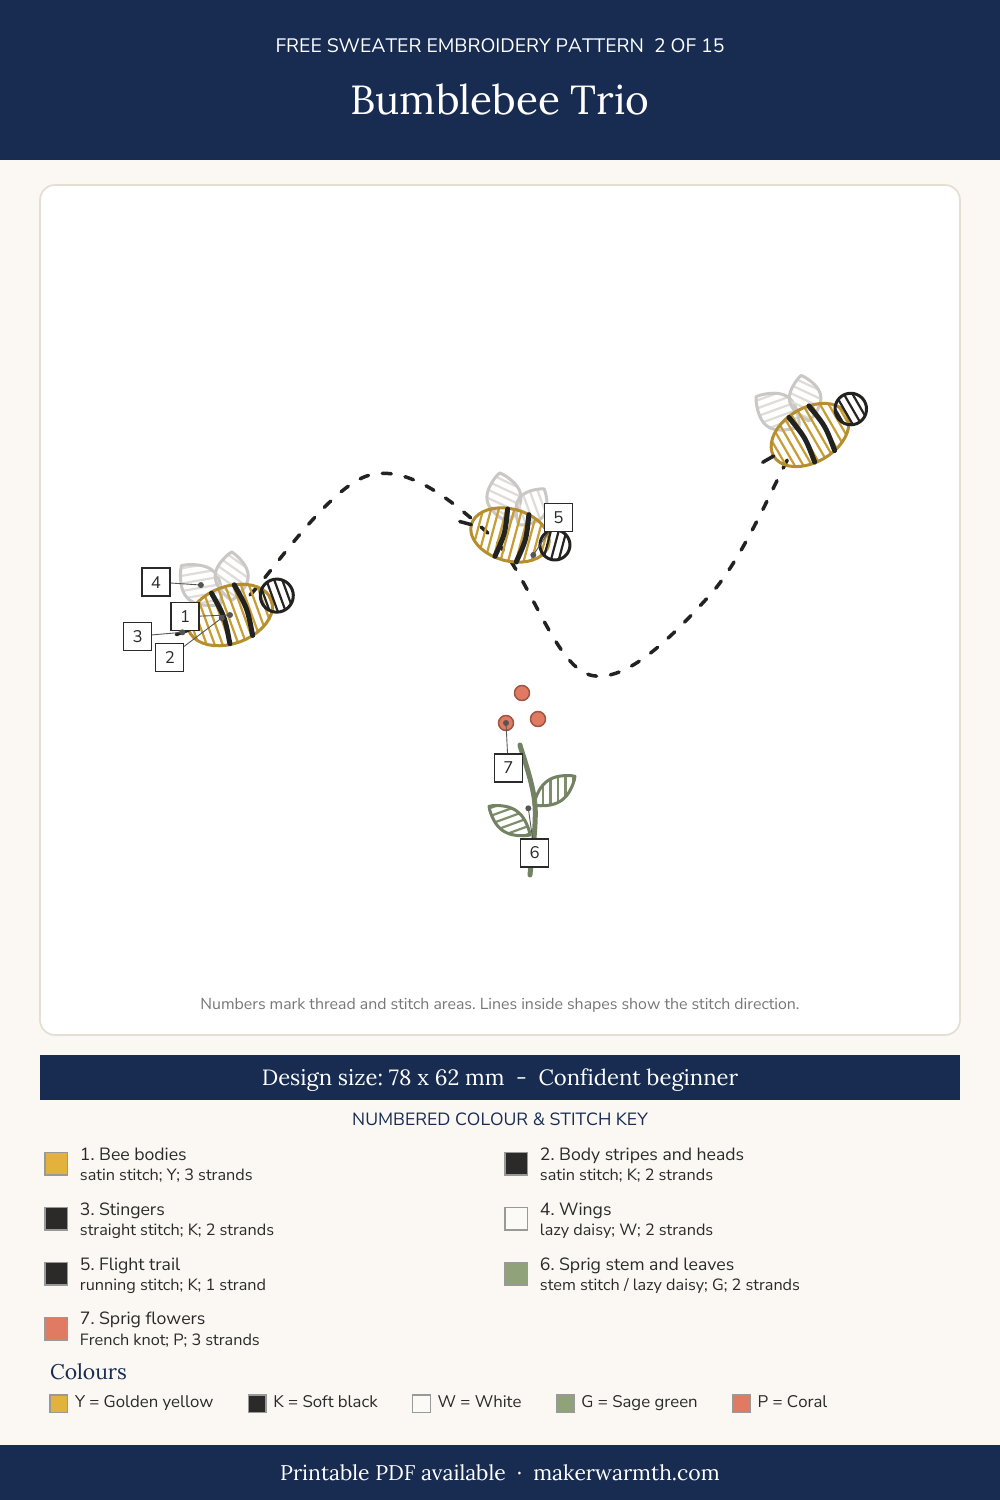
Pattern details
- Difficulty: Confident beginner
- Design size: about 78 x 62 mm (3.1 x 2.4 in)
- Fabric: A smooth, medium-weight knit sweater (wool, cotton or a wool blend). Stitch through a printable wash-away stabilizer sheet on top of the knit.
- Needle: Size 22 chenille needle (sharp point, large eye)
- Hoop: 15 cm (6 in) hoop, loosely tightened
Colour key
- Y: Golden yellow; 3 strands
- K: Soft black; 2 strands
- W: White; 2 strands
- G: Sage green; 2 strands
- P: Coral; 3 strands
Thread and stitch guide (numbers match the pattern card)
- Bee bodies: satin stitch, colour Y, 3 strands. Fill each oval body with stitches across its short width.
- Body stripes and heads: satin stitch, colour K, 2 strands. Work the two curved stripes over the yellow, then fill the round head.
- Stingers: straight stitch, colour K, 2 strands. One short stitch at the back of each body.
- Wings: lazy daisy, colour W, 2 strands. One detached chain loop per wing, anchored with a tiny tie stitch at the tip.
- Flight trail: running stitch, colour K, 1 strand. Follow the dashed line with short, evenly spaced stitches.
- Sprig stem and leaves: stem stitch / lazy daisy, colour G, 2 strands. Stem-stitch the short stem, then one lazy daisy per leaf.
- Sprig flowers: French knot, colour P, 3 strands. Three two-wrap knots at the top of the stem.
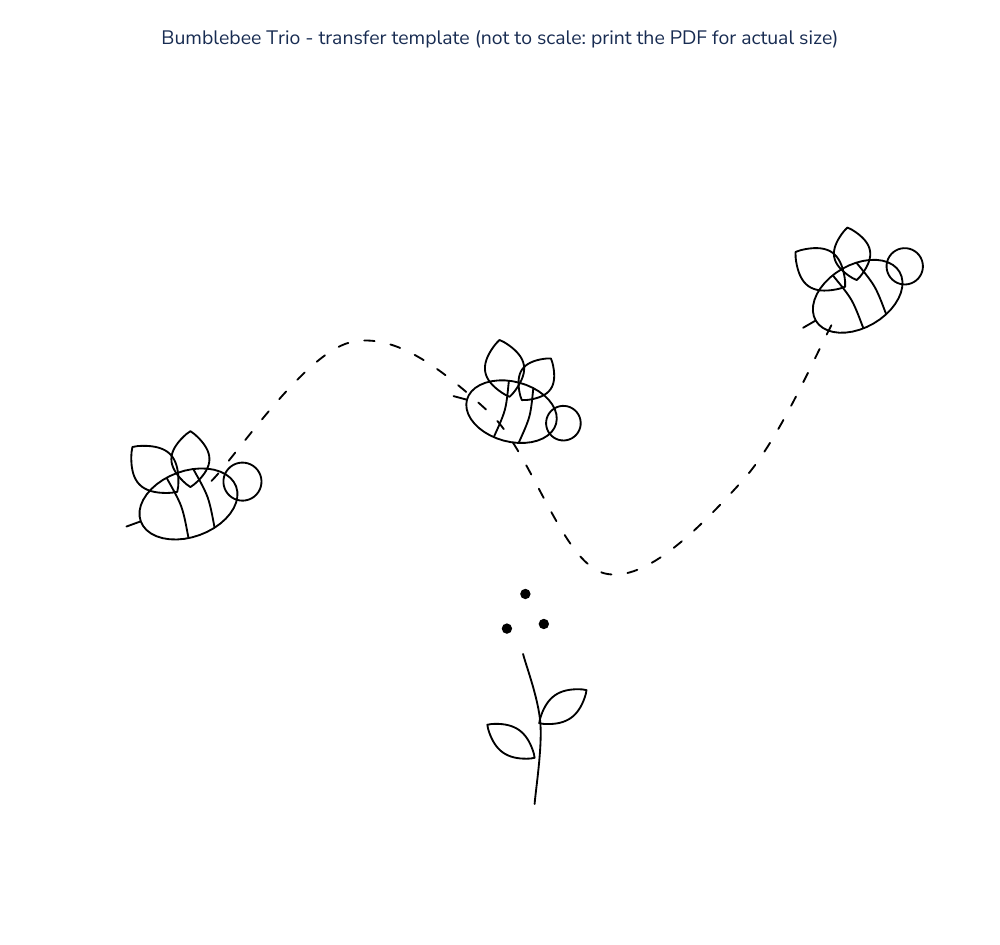
View the transfer template
This preview is not to scale. For tracing, download the PDF and print it at 100% / Actual Size.
Satin stitch guide
- Come up at 1 on one edge of the shape.
- Go down at 2 directly across on the opposite edge.
- Come up right beside 1 and repeat, laying each stitch snugly next to the last.
- Follow the lines on the pattern card for the stitch direction. Keep stitches no longer than about 8 mm; on wider shapes split the area in two.
Straight stitch guide
- Come up at 1 at one end of the line.
- Go down at 2 at the other end.
- Keep straight stitches short on knits (under 8 mm) so they do not snag.
Lazy daisy stitch guide
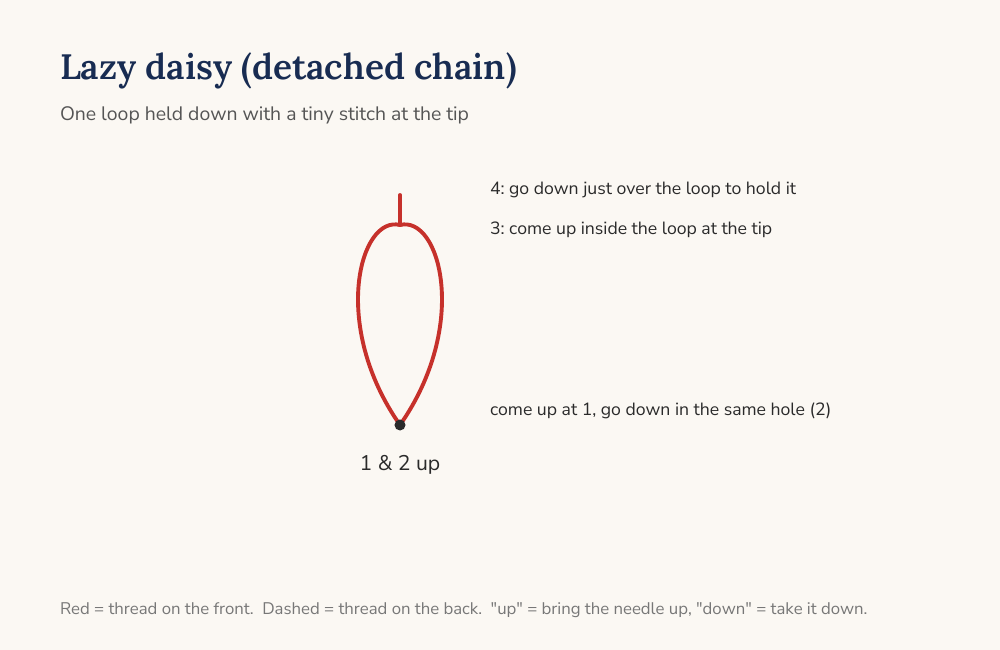
- Come up at 1 at the base of the petal or leaf.
- Go down in the same hole, leaving a small loop on the front.
- Come up at 3, at the tip, inside the loop.
- Go down at 4 just over the loop to tie it in place.
Running stitch guide
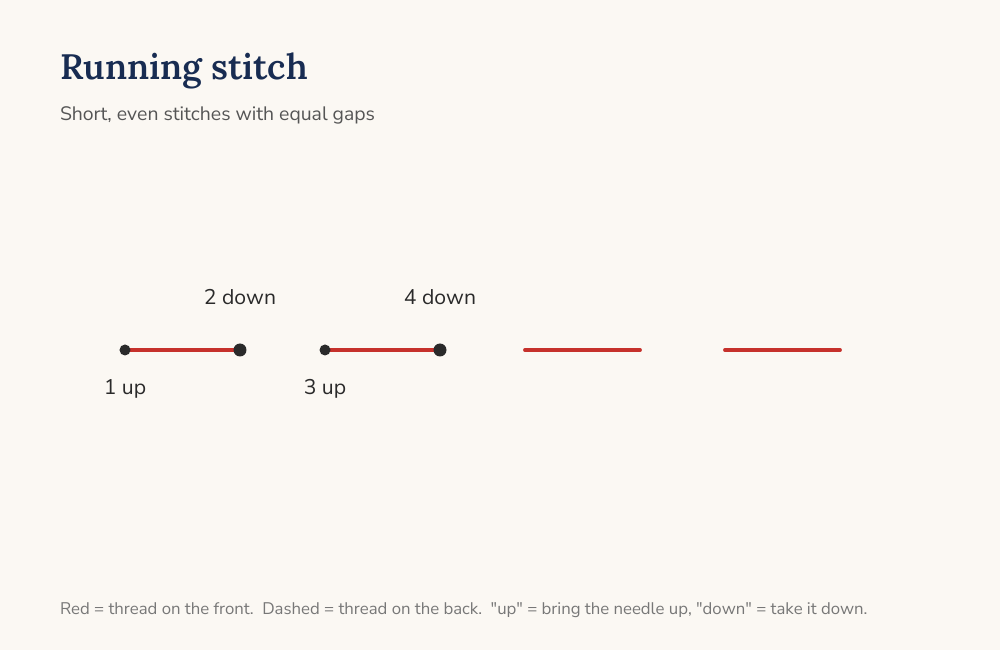
- Come up at 1 and go down at 2.
- Leave a gap the same length as the stitch.
- Come up at 3 and go down at 4, keeping all stitches and gaps even.
Stem stitch guide

- Come up at A and go down at B, one stitch length along the line.
- Come up at C, halfway back along A-B, right beside the stitch.
- Keep the working thread on the same side of the line every time.
- Shorten the stitches around tight curves.
French knot stitch guide
- Come up at A where the knot belongs.
- Hold the thread taut and wrap it once or twice around the needle.
- Go down at B, right beside A (not in the same hole), sliding the wraps down to the fabric.
- Keep holding the thread until the needle is through, then let the knot settle.
How to stitch this design
- Print at 100% / Actual Size and check the scale line. Transfer the design onto wash-away stabilizer and stick it on the chest area.
- Hoop loosely without pulling the knit. Start threads with a waste knot on top and weave the tail in later; knots on the back can work through the knit.
- Satin-stitch the yellow bodies, then the black stripes and heads over them. Add a stinger to each bee.
- Work each wing as one lazy daisy loop in white.
- Stitch the flight trail in running stitch with one strand, keeping stitches the length of the printed dashes.
- Stitch the coral sprig: stem, two leaves, then three French knots.
- Secure tails, dissolve the stabilizer and dry the sweater flat.
3. Wildflower Cuff Vine

A vine that climbs up from the cuff is one of the quietest ways to embroider a sweater: you see it every time you reach for your coffee, and the front stays plain. Pink and peach flowers alternate along the stem.

Pattern details
- Difficulty: Beginner
- Design size: about 36 x 116 mm (1.4 x 4.6 in)
- Fabric: A smooth, medium-weight knit sweater (wool, cotton or a wool blend). Stitch through a printable wash-away stabilizer sheet on top of the knit.
- Needle: Size 22 chenille needle (sharp point, large eye)
- Hoop: No hoop – a sleeve is too narrow; stitch in hand with a hand inside the sleeve
Colour key
- G: Sage green; 3 strands
- P: Dusty pink; 3 strands
- A: Peach; 3 strands
- Y: Mustard; 2 strands
Thread and stitch guide (numbers match the pattern card)
- Vine: stem stitch, colour G, 3 strands. Start at the cuff seam and work up the sleeve along the wavy line.
- Leaves: lazy daisy, colour G, 3 strands. One detached chain per leaf, tip pointing away from the vine.
- Flower petals: lazy daisy, colour P / A, 3 strands. Five loops per flower, pink and peach flowers alternating as marked.
- Flower centres: French knot, colour Y, 2 strands. One two-wrap knot in the middle of each flower.
View the transfer template
This preview is not to scale. For tracing, download the PDF and print it at 100% / Actual Size.

Stem stitch guide
- Come up at A and go down at B, one stitch length along the line.
- Come up at C, halfway back along A-B, right beside the stitch.
- Keep the working thread on the same side of the line every time.
- Shorten the stitches around tight curves.
Lazy daisy stitch guide
- Come up at 1 at the base of the petal or leaf.
- Go down in the same hole, leaving a small loop on the front.
- Come up at 3, at the tip, inside the loop.
- Go down at 4 just over the loop to tie it in place.
French knot stitch guide
- Come up at A where the knot belongs.
- Hold the thread taut and wrap it once or twice around the needle.
- Go down at B, right beside A (not in the same hole), sliding the wraps down to the fabric.
- Keep holding the thread until the needle is through, then let the knot settle.
How to stitch this design
- Print at 100% / Actual Size and check the scale line. Transfer onto wash-away stabilizer and stick it from the top of the ribbed cuff upward, on the outer side of the sleeve.
- Slide one hand inside the sleeve so you only catch the top layer. Keep the stitches slightly looser than on woven fabric so the sleeve still stretches over your hand.
- Stem-stitch the vine from the cuff upward, then work the short flower stalks.
- Add the leaves as single lazy daisy stitches.
- Work the five-petal flowers, then a mustard French knot in each centre.
- Before finishing, pull the cuff gently over your fist to check the stitches stretch. Secure tails, wash away the stabilizer and dry flat. Repeat mirrored on the second sleeve if you like.
4. Daisy Sprigs Below the Neckline
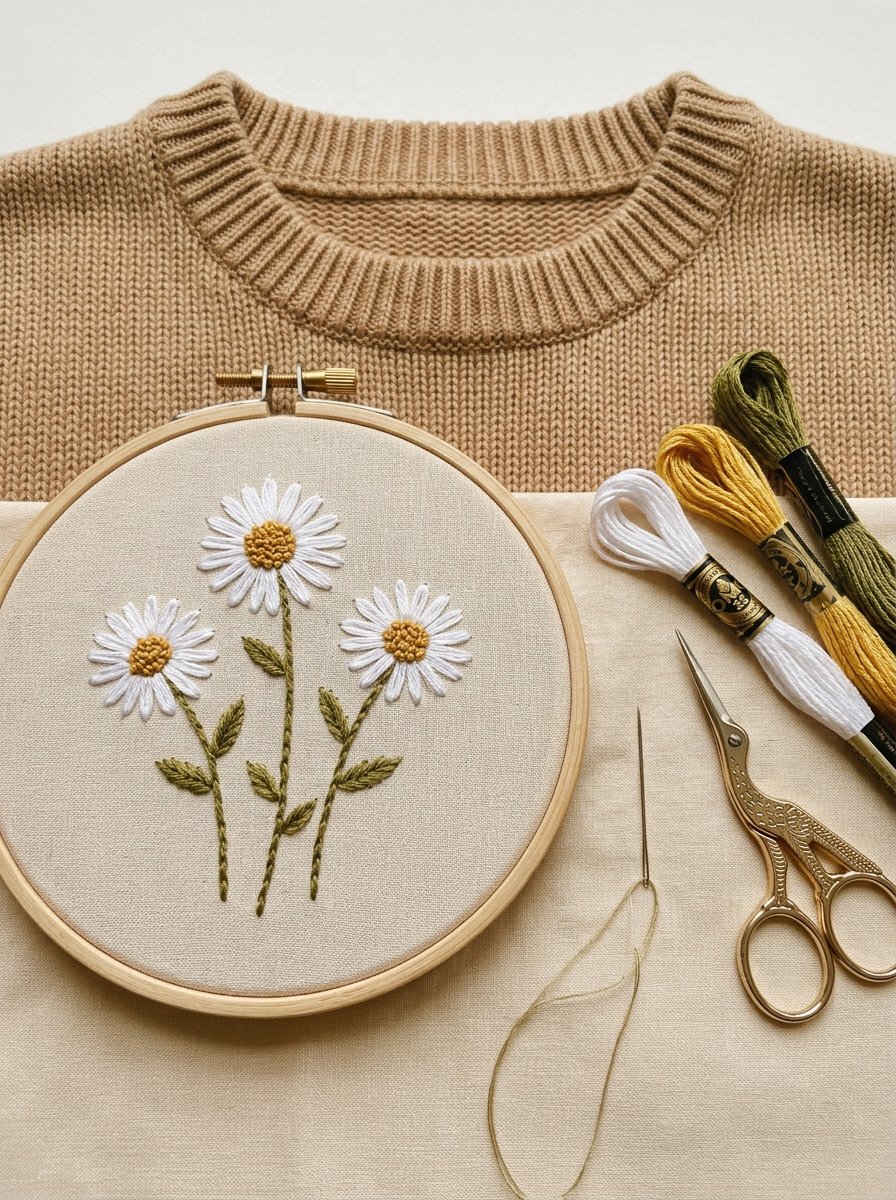
Three daisy sprigs sitting just under the ribbed collar frame the face the way a necklace would. White petals on camel knit give a soft, classic contrast, and the whole design uses only three thread colours.

Pattern details
- Difficulty: Beginner
- Design size: about 112 x 54 mm (4.4 x 2.1 in)
- Fabric: A smooth, medium-weight knit sweater (wool, cotton or a wool blend). Stitch through a printable wash-away stabilizer sheet on top of the knit.
- Needle: Size 22 chenille needle (sharp point, large eye)
- Hoop: 15-18 cm (6-7 in) hoop placed below the ribbed collar
Colour key
- W: White; 3 strands
- Y: Golden yellow; 3 strands
- O: Olive green; 3 strands
Thread and stitch guide (numbers match the pattern card)
- Daisy petals: lazy daisy, colour W, 3 strands. Eight loops for each large daisy, six for each bud flower, all radiating from the centre.
- Daisy centres: French knot, colour Y, 3 strands. One two-wrap knot per flower, or three small knots for the large daisies if you want a fuller centre.
- Stems: stem stitch, colour O, 3 strands. Work each stem from the bottom up, including the short side stems.
- Leaves: lazy daisy, colour O, 3 strands. One detached chain per leaf.
- Collar line: guide only – do not stitch. The dashed curve marks where the ribbed collar seam sits.
View the transfer template
This preview is not to scale. For tracing, download the PDF and print it at 100% / Actual Size.

Lazy daisy stitch guide
- Come up at 1 at the base of the petal or leaf.
- Go down in the same hole, leaving a small loop on the front.
- Come up at 3, at the tip, inside the loop.
- Go down at 4 just over the loop to tie it in place.
French knot stitch guide
- Come up at A where the knot belongs.
- Hold the thread taut and wrap it once or twice around the needle.
- Go down at B, right beside A (not in the same hole), sliding the wraps down to the fabric.
- Keep holding the thread until the needle is through, then let the knot settle.
Stem stitch guide
- Come up at A and go down at B, one stitch length along the line.
- Come up at C, halfway back along A-B, right beside the stitch.
- Keep the working thread on the same side of the line every time.
- Shorten the stitches around tight curves.
How to stitch this design
- Print at 100% / Actual Size and check the scale line. Line the dashed curve up with the collar seam, about 1 cm below it, and transfer onto wash-away stabilizer.
- Hoop below the collar without catching the ribbing. Keep the knit relaxed.
- Stem-stitch the three main stems and their side stems, then add the leaves.
- Work the white petals of each daisy and bud flower, then the yellow centres.
- Secure all tails on the back, dissolve the stabilizer and dry flat.
5. Floral Yoke Garland
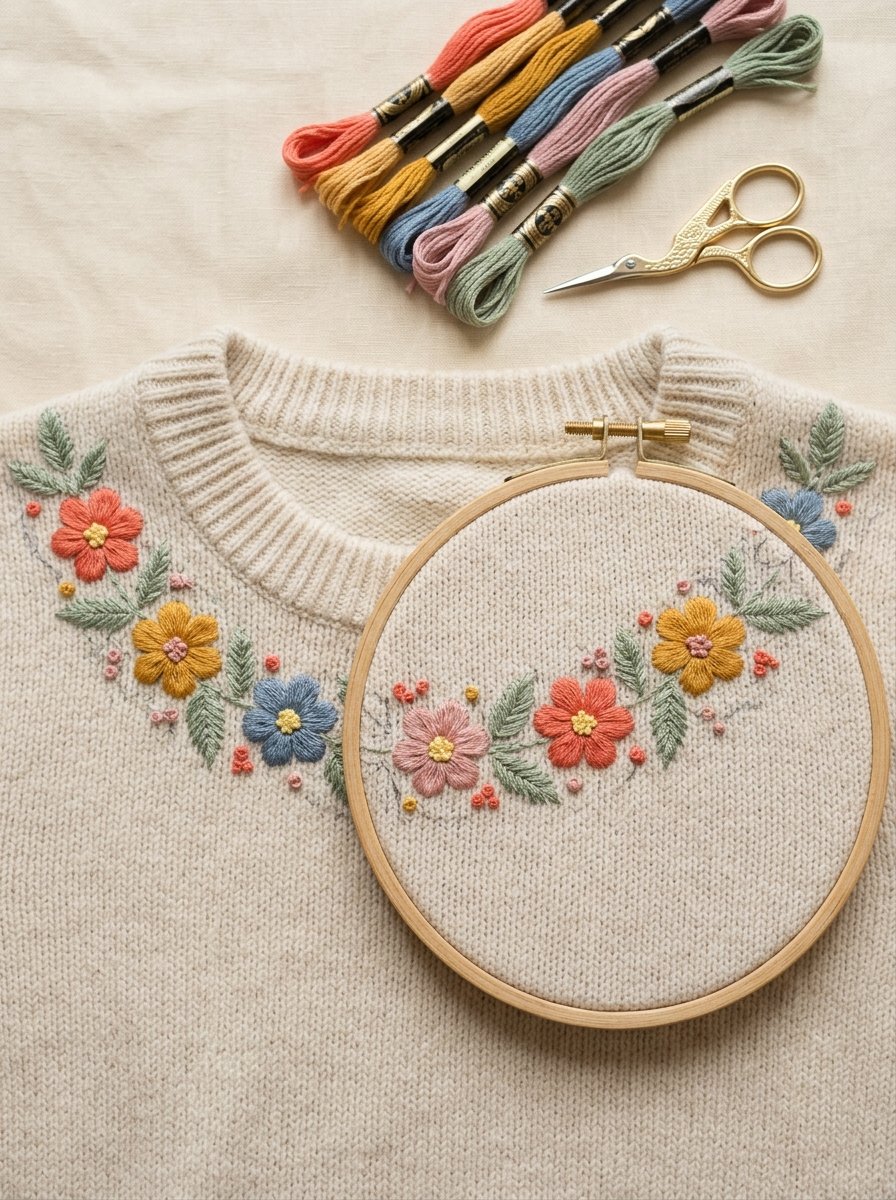
A garland of flowers that follows the round yoke turns a plain crew neck into something that looks like a Nordic heirloom. The pattern gives one section of the garland; you repeat it around the neckline, moving the hoop as you go.
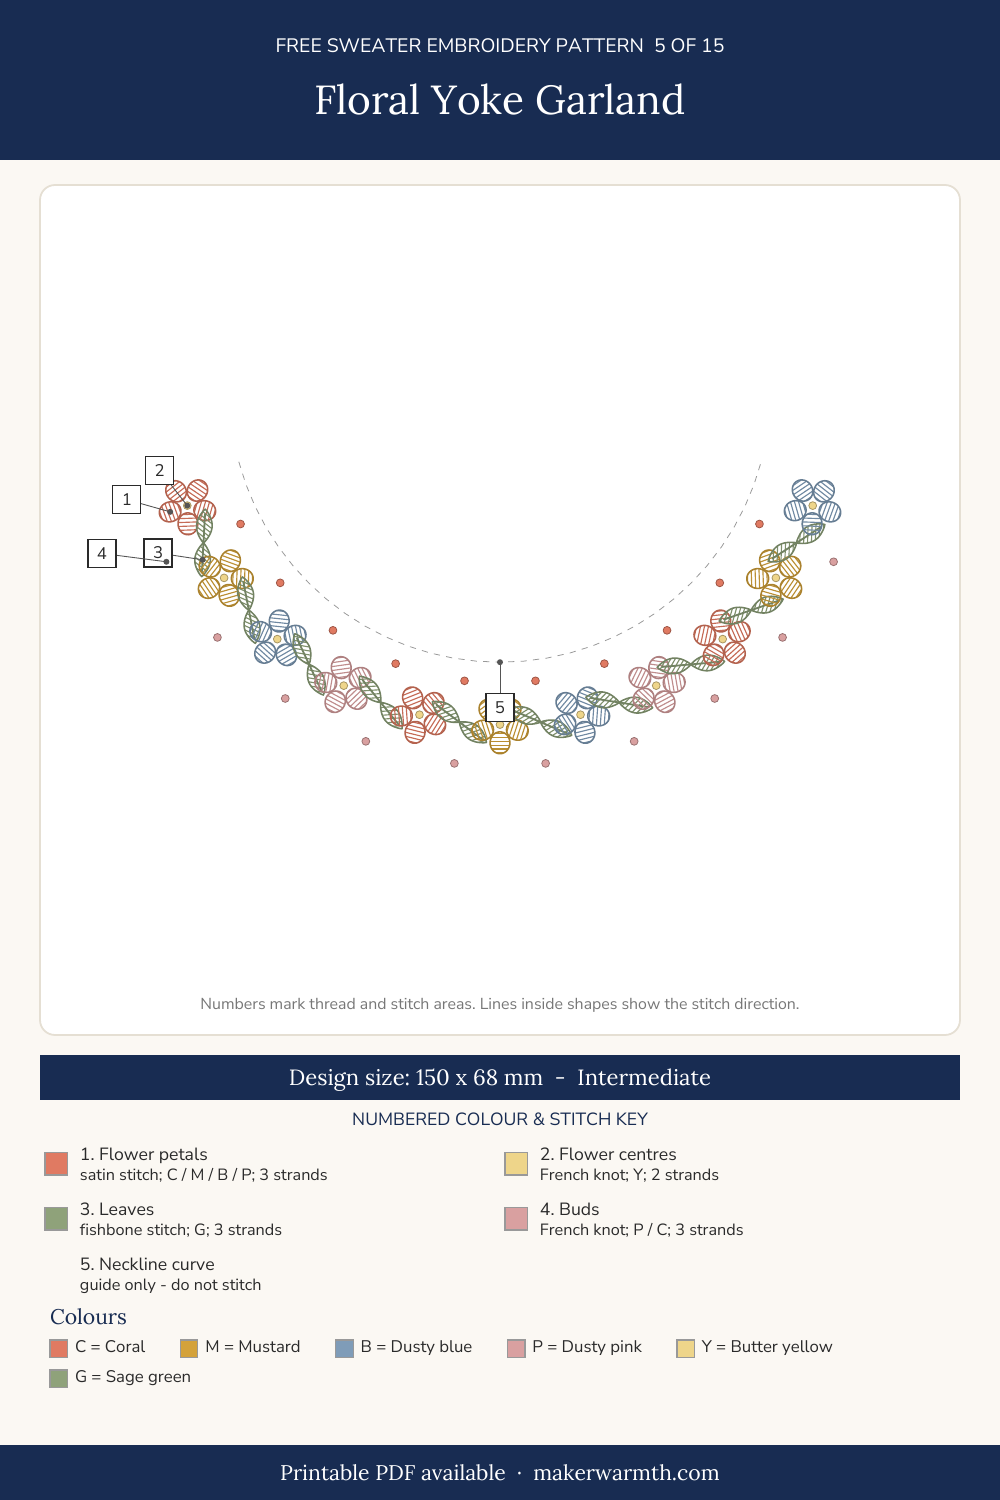
Pattern details
- Difficulty: Intermediate
- Design size: about 150 x 68 mm (5.9 x 2.7 in)
- Fabric: A smooth, medium-weight knit sweater (wool, cotton or a wool blend). Stitch through a printable wash-away stabilizer sheet on top of the knit.
- Needle: Size 22 chenille needle (sharp point, large eye)
- Hoop: 15 cm (6 in) hoop, moved along the garland section by section
Colour key
- C: Coral; 3 strands
- M: Mustard; 3 strands
- B: Dusty blue; 3 strands
- P: Dusty pink; 3 strands
- Y: Butter yellow; 2 strands
- G: Sage green; 3 strands
Thread and stitch guide (numbers match the pattern card)
- Flower petals: satin stitch, colour C / M / B / P, 3 strands. Fill each petal from tip to centre, colours repeating coral, mustard, blue, pink around the garland.
- Flower centres: French knot, colour Y, 2 strands. One two-wrap knot in each flower.
- Leaves: fishbone stitch, colour G, 3 strands. Alternate slanted stitches from each edge, meeting along the centre vein.
- Buds: French knot, colour P / C, 3 strands. Pink knots on the outer side of the garland, coral knots on the inner side.
- Neckline curve: guide only – do not stitch. The dashed curve is the collar seam, used for placement only.
View the transfer template
This preview is not to scale. For tracing, download the PDF and print it at 100% / Actual Size.

Satin stitch guide
- Come up at 1 on one edge of the shape.
- Go down at 2 directly across on the opposite edge.
- Come up right beside 1 and repeat, laying each stitch snugly next to the last.
- Follow the lines on the pattern card for the stitch direction. Keep stitches no longer than about 8 mm; on wider shapes split the area in two.
French knot stitch guide
- Come up at A where the knot belongs.
- Hold the thread taut and wrap it once or twice around the needle.
- Go down at B, right beside A (not in the same hole), sliding the wraps down to the fabric.
- Keep holding the thread until the needle is through, then let the knot settle.
Fishbone stitch guide
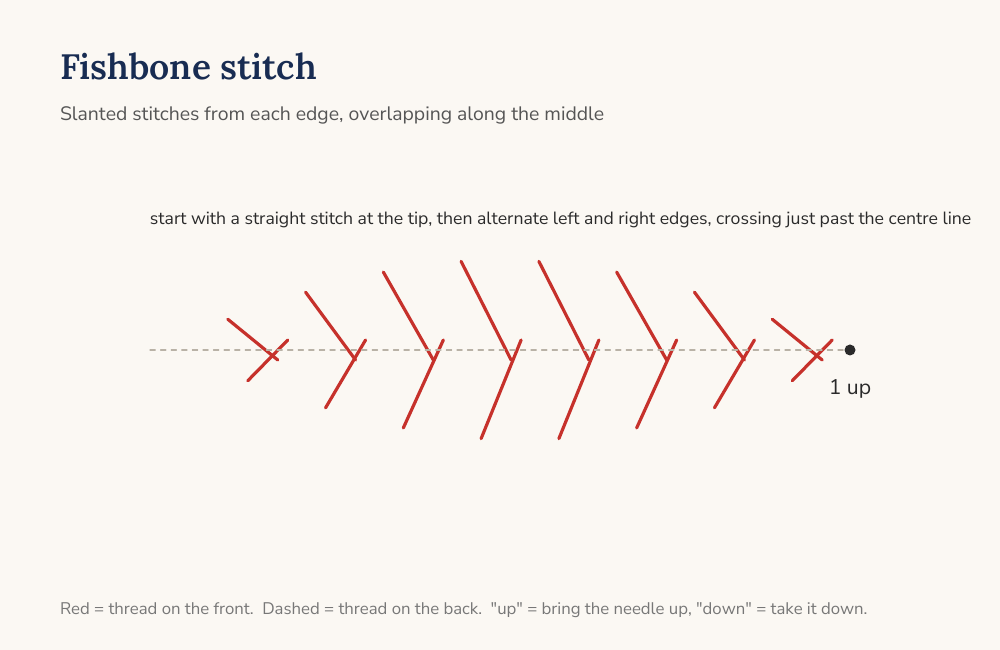
- Start with one short straight stitch at the leaf tip along the centre line.
- Come up on the left edge and go down just past the centre line.
- Come up on the right edge and go down just past the centre line, crossing the previous stitch.
- Keep alternating sides down to the base of the leaf.
How to stitch this design
- Print at 100% / Actual Size and check the scale line. Lay the sweater flat and match the dashed curve to the collar seam so the garland sits evenly on both shoulders. Transfer onto wash-away stabilizer.
- Hoop one section at a time and move the hoop gently; never leave it clamped overnight, as it can mark the knit.
- Stitch all leaves first in fishbone stitch.
- Satin-stitch the flowers in their colours, then add the yellow centres.
- Add the bud knots between the leaves.
- Secure tails, dissolve the stabilizer and dry the sweater flat, shaping the neckline with your hands while damp.
Read next: Sunflower Embroidery on Clothes: 8 Ideas for Denim, Shirts and Sweatshirts
6. Tiny Red Bow

One small red bow on an ivory sweater is the easiest idea in this list and one of the most popular. Four strands of thread cover fluffy knits better than the usual two, so the satin stays smooth.

Pattern details
- Difficulty: Beginner
- Design size: about 46 x 40 mm (1.8 x 1.6 in)
- Fabric: A smooth, medium-weight knit sweater (wool, cotton or a wool blend). Stitch through a printable wash-away stabilizer sheet on top of the knit.
- Needle: Size 22 chenille needle (sharp point, large eye)
- Hoop: 10-13 cm (4-5 in) hoop
Colour key
- R: Classic red; 4 strands
- D: Deep red; 3 strands
Thread and stitch guide (numbers match the pattern card)
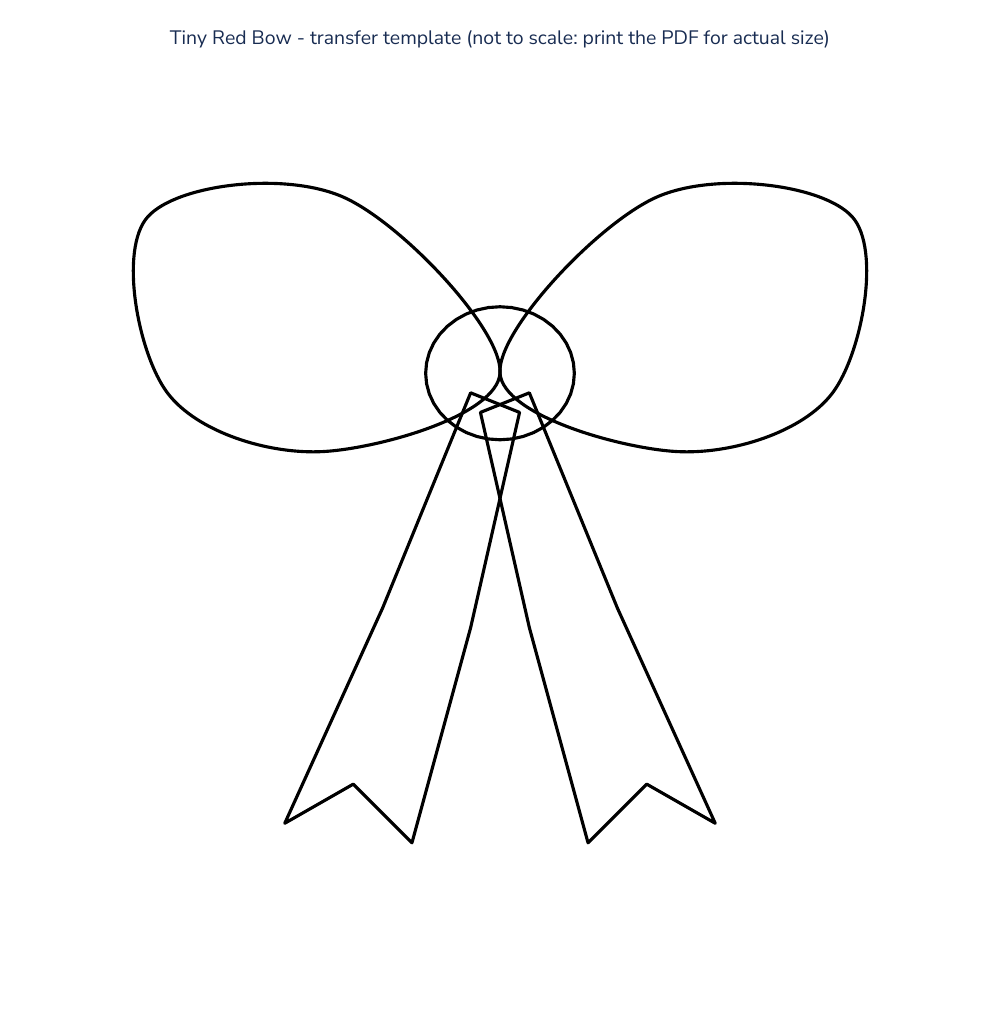
- Bow loops: satin stitch, colour R, 4 strands. Fill each loop with stitches running from the knot outward; four strands cover fluffy knits better.
- Tails: satin stitch, colour R, 4 strands. Fill each tail with slanted stitches, following its angle.
- Knot: satin stitch, colour D, 3 strands. Fill the small centre oval last, over the inner ends of the loops and tails.
View the transfer template
This preview is not to scale. For tracing, download the PDF and print it at 100% / Actual Size.
Satin stitch guide
- Come up at 1 on one edge of the shape.
- Go down at 2 directly across on the opposite edge.
- Come up right beside 1 and repeat, laying each stitch snugly next to the last.
- Follow the lines on the pattern card for the stitch direction. Keep stitches no longer than about 8 mm; on wider shapes split the area in two.
How to stitch this design
- Print at 100% / Actual Size and check the scale line. Transfer onto wash-away stabilizer and place it on the chest, or repeat it in a scatter across the front.
- Hoop loosely. On a fluffy or mohair knit, keep the stabilizer on top – it stops the needle from disappearing into the fibres.
- Satin-stitch the two loops, then the two tails.
- Fill the centre knot in the deeper red so the bow reads as tied.
- Secure tails, dissolve the stabilizer and dry flat.
7. Night Sky Stars
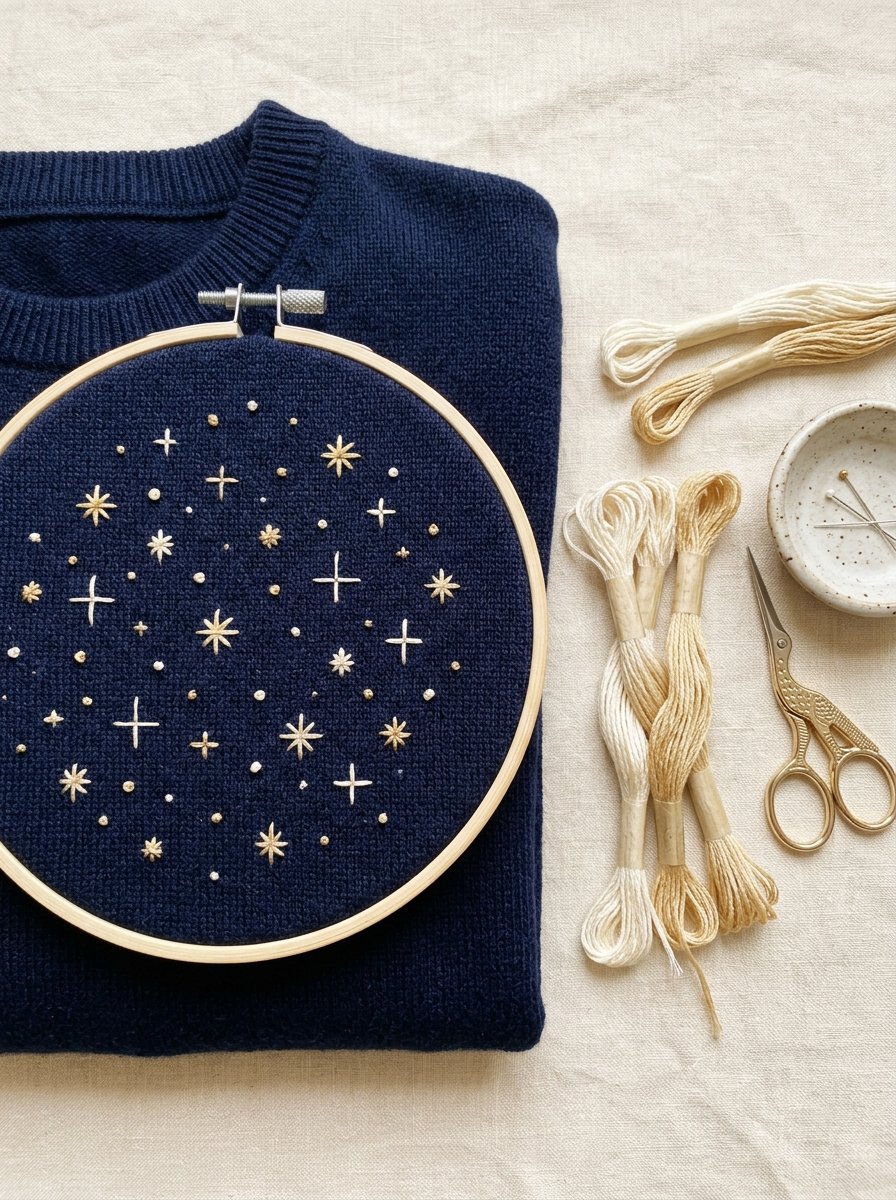
Scattered gold and ivory stars on navy knit read like a night sky. Every star is made of a few straight stitches, so there is nothing to fill and you can extend the pattern across the front or down the sleeves.

Pattern details
- Difficulty: Beginner
- Design size: about 100 x 90 mm (3.9 x 3.5 in)
- Fabric: A smooth, medium-weight knit sweater (wool, cotton or a wool blend). Stitch through a printable wash-away stabilizer sheet on top of the knit.
- Needle: Size 22 chenille needle (sharp point, large eye)
- Hoop: 15-18 cm (6-7 in) hoop
Colour key
- I: Ivory; 3 strands
- Y: Pale gold; 3 strands
Thread and stitch guide (numbers match the pattern card)
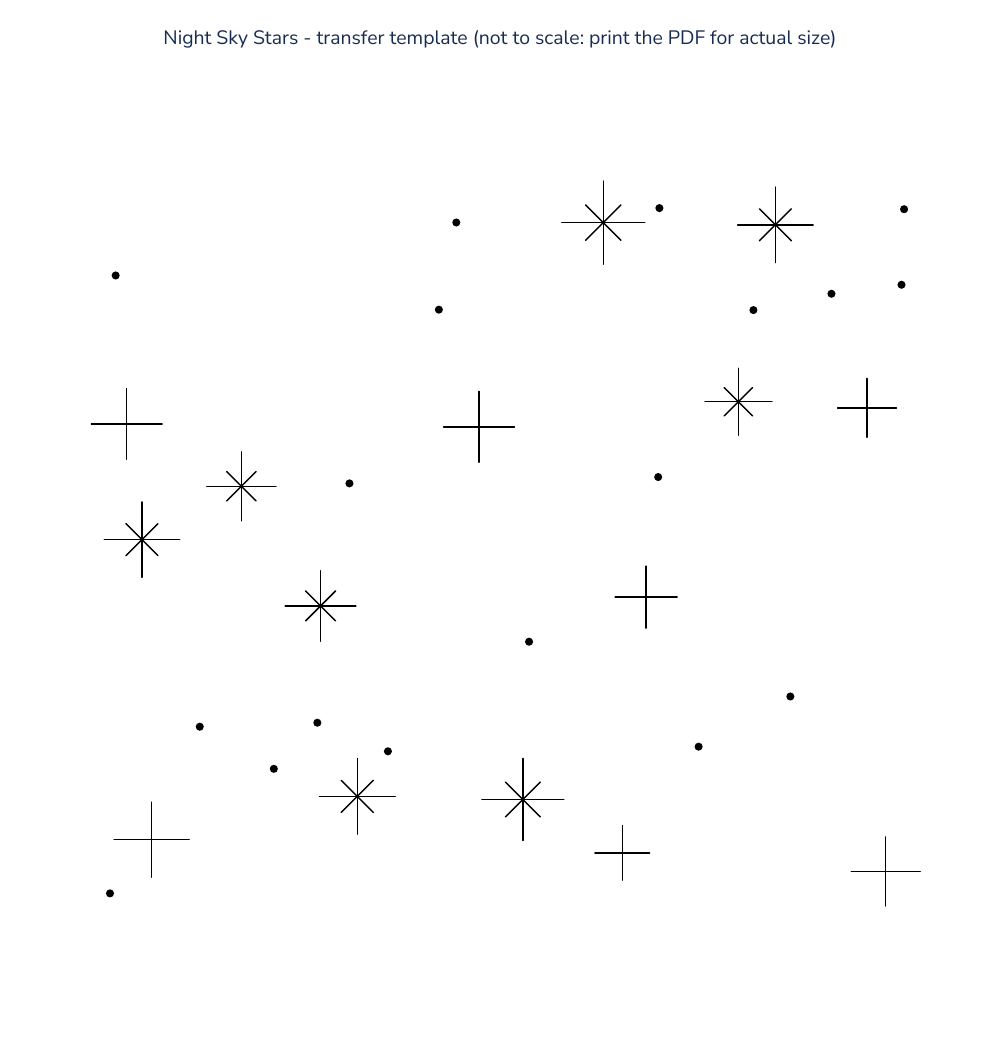
- Eight-point stars: straight stitch, colour Y, 3 strands. Work each long arm from the tip into the centre, then the shorter arms.
- Four-point stars: straight stitch, colour I, 3 strands. Two crossing straight stitches, plus a tiny tie stitch over the centre if the knit is loose.
- Ivory dots: French knot, colour I, 3 strands. One two-wrap knot per larger dot.
- Gold dots: French knot, colour Y, 2 strands. One-wrap knots on the smaller dots.
View the transfer template
This preview is not to scale. For tracing, download the PDF and print it at 100% / Actual Size.
Straight stitch guide
- Come up at 1 at one end of the line.
- Go down at 2 at the other end.
- Keep straight stitches short on knits (under 8 mm) so they do not snag.
French knot stitch guide
- Come up at A where the knot belongs.
- Hold the thread taut and wrap it once or twice around the needle.
- Go down at B, right beside A (not in the same hole), sliding the wraps down to the fabric.
- Keep holding the thread until the needle is through, then let the knot settle.
How to stitch this design
- Print at 100% / Actual Size and check the scale line. Transfer onto wash-away stabilizer; repeat the sheet to cover more of the front or sleeves.
- Hoop loosely. Start and end each star separately – long jumps behind a knit snag fingers and rings.
- Stitch the eight-point gold stars, then the four-point ivory stars.
- Add the French knot dots last.
- Secure tails, dissolve the stabilizer and dry flat.
8. Planet Orbit Cuff
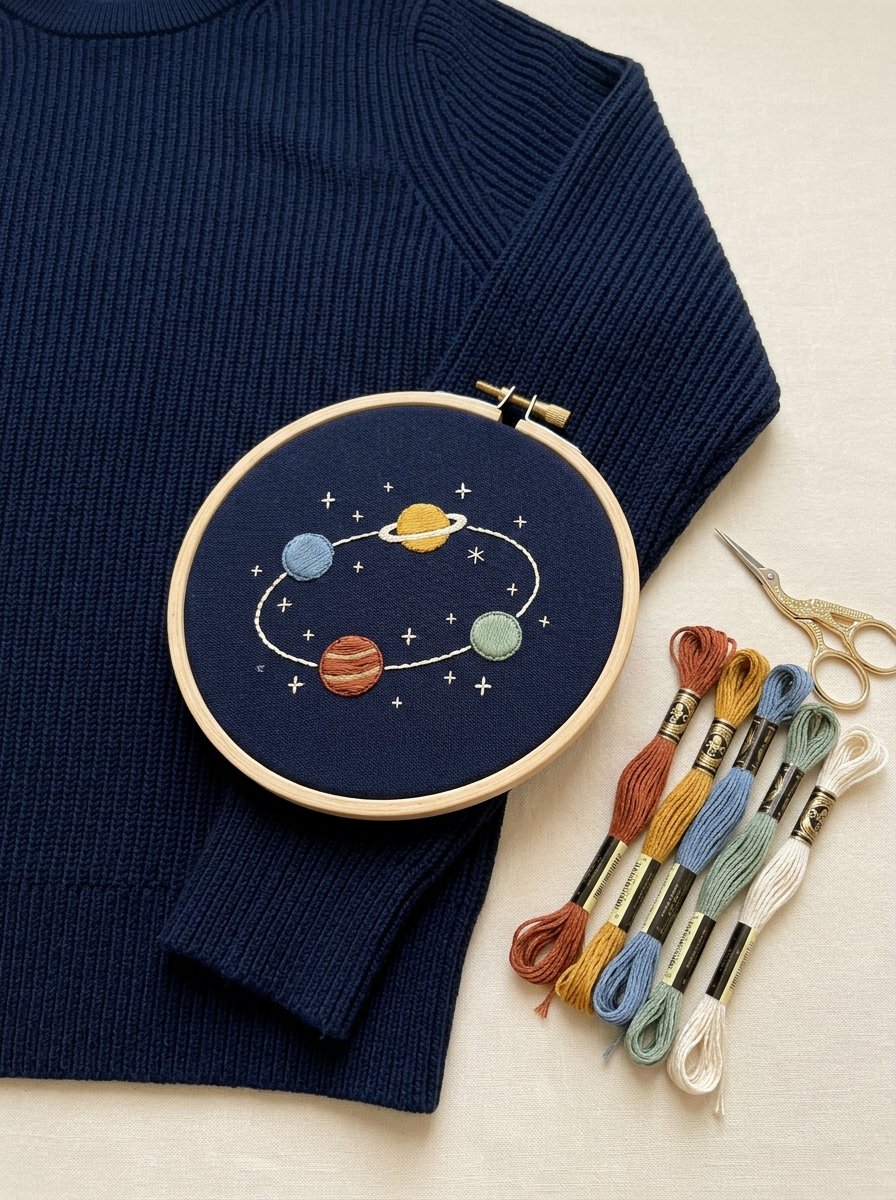
Four little planets on an orbit line wrap around a navy cuff. It is a fun detail for anyone who loves space themes, and it works well on a man's sweater too.
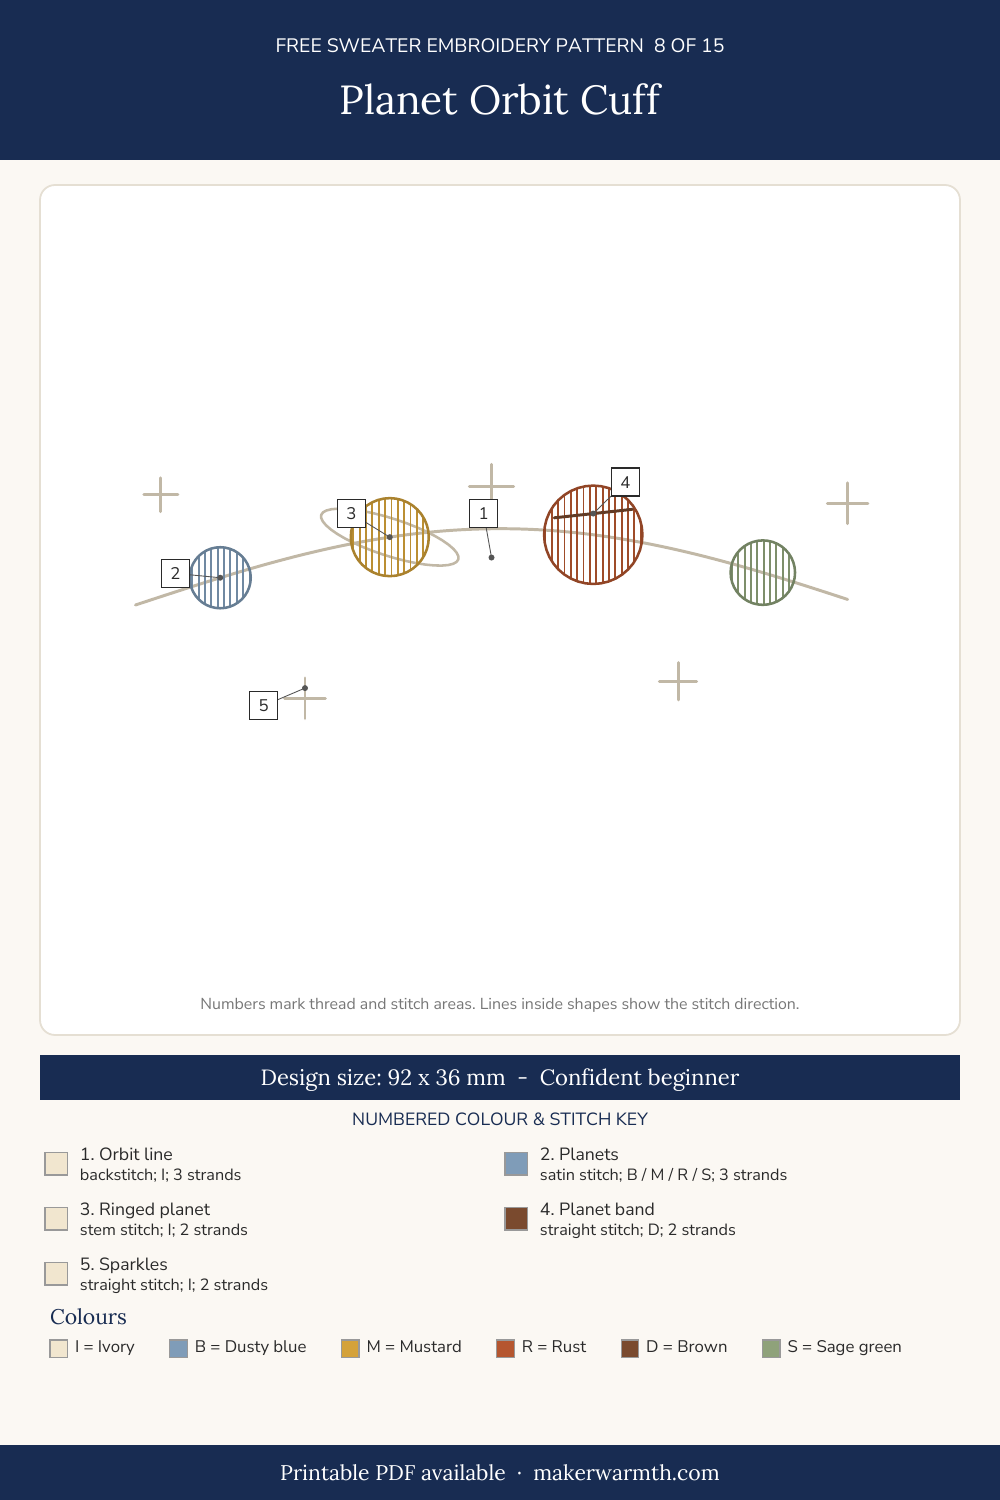
Pattern details
- Difficulty: Confident beginner
- Design size: about 92 x 36 mm (3.6 x 1.4 in)
- Fabric: A smooth, medium-weight knit sweater (wool, cotton or a wool blend). Stitch through a printable wash-away stabilizer sheet on top of the knit.
- Needle: Size 22 chenille needle (sharp point, large eye)
- Hoop: No hoop – stitch the cuff in hand
Colour key
- I: Ivory; 3 strands
- B: Dusty blue; 3 strands
- M: Mustard; 3 strands
- R: Rust; 3 strands
- D: Brown; 2 strands
- S: Sage green; 3 strands
Thread and stitch guide (numbers match the pattern card)
- Orbit line: backstitch, colour I, 3 strands. Follow the curve in short, even backstitches.
- Planets: satin stitch, colour B / M / R / S, 3 strands. Fill each circle with stitches across its width.
- Ringed planet: stem stitch, colour I, 2 strands. Work the ring ellipse over the mustard planet.
- Planet band: straight stitch, colour D, 2 strands. One long straight stitch across the rust planet, worked over the satin.
- Sparkles: straight stitch, colour I, 2 strands. Two crossing straight stitches per sparkle.
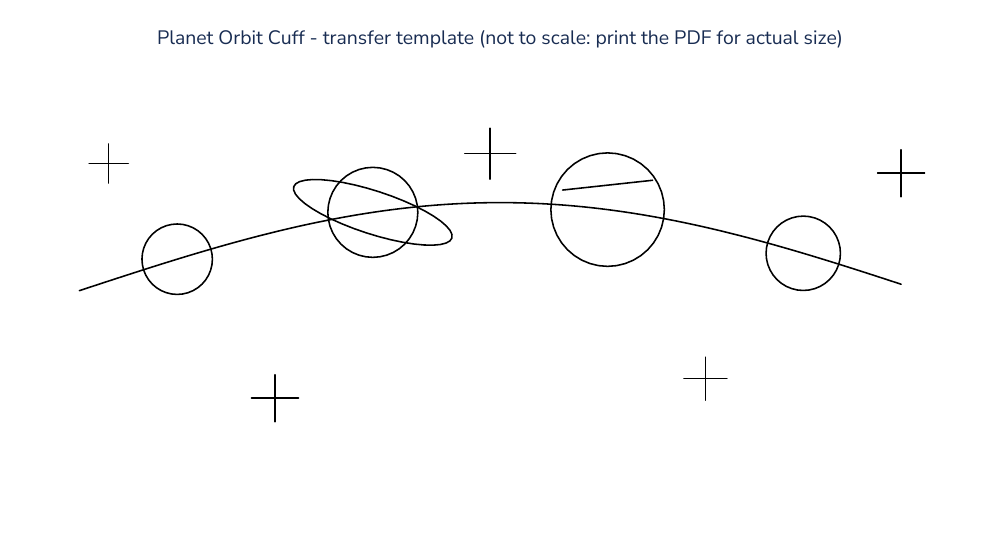
View the transfer template
This preview is not to scale. For tracing, download the PDF and print it at 100% / Actual Size.
Backstitch stitch guide
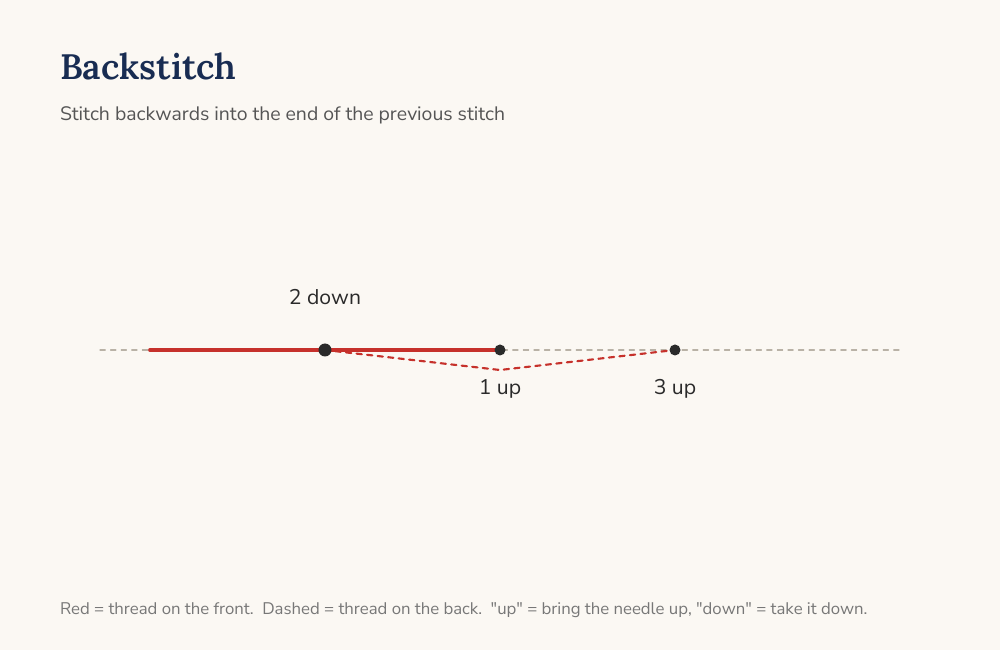
- Come up at 1, one stitch length along the line.
- Go down at 2, the end of the previous stitch (or the start of the line).
- Come up at 3, one stitch length ahead of 1, and repeat.
Satin stitch guide
- Come up at 1 on one edge of the shape.
- Go down at 2 directly across on the opposite edge.
- Come up right beside 1 and repeat, laying each stitch snugly next to the last.
- Follow the lines on the pattern card for the stitch direction. Keep stitches no longer than about 8 mm; on wider shapes split the area in two.
Stem stitch guide
- Come up at A and go down at B, one stitch length along the line.
- Come up at C, halfway back along A-B, right beside the stitch.
- Keep the working thread on the same side of the line every time.
- Shorten the stitches around tight curves.
Straight stitch guide
- Come up at 1 at one end of the line.
- Go down at 2 at the other end.
- Keep straight stitches short on knits (under 8 mm) so they do not snag.
How to stitch this design
- Print at 100% / Actual Size and check the scale line. Transfer onto wash-away stabilizer and wrap it around the cuff above the ribbing.
- Keep one hand inside the sleeve so you catch only the top layer.
- Satin-stitch the four planets, then backstitch the orbit line between them.
- Add the ring around the mustard planet, the bands on the rust planet and the sparkles.
- Check that the cuff still stretches over your hand, secure tails, dissolve the stabilizer and dry flat.
9. Christmas Tree Trio
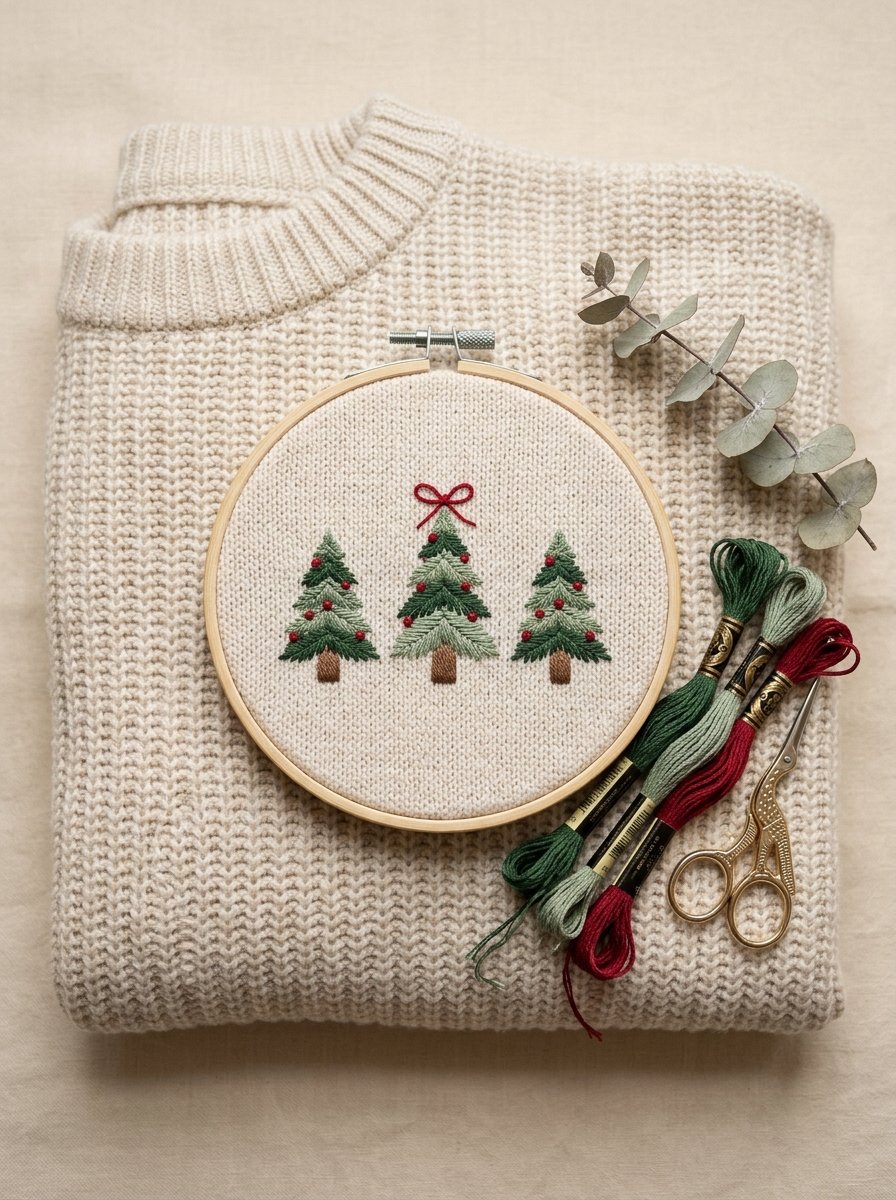
Three fishbone-stitch trees with a tiny red bow on the tallest one make a Christmas sweater you can still wear in January. Pine and sage tiers alternate, so the trees look layered without any shading.

Pattern details
- Difficulty: Beginner
- Design size: about 86 x 48 mm (3.4 x 1.9 in)
- Fabric: A smooth, medium-weight knit sweater (wool, cotton or a wool blend). Stitch through a printable wash-away stabilizer sheet on top of the knit.
- Needle: Size 22 chenille needle (sharp point, large eye)
- Hoop: 15-18 cm (6-7 in) hoop
Colour key
- G: Pine green; 3 strands
- S: Sage green; 3 strands
- D: Deep green; 2 strands
- B: Brown; 3 strands
- R: Berry red; 3 strands
Thread and stitch guide (numbers match the pattern card)
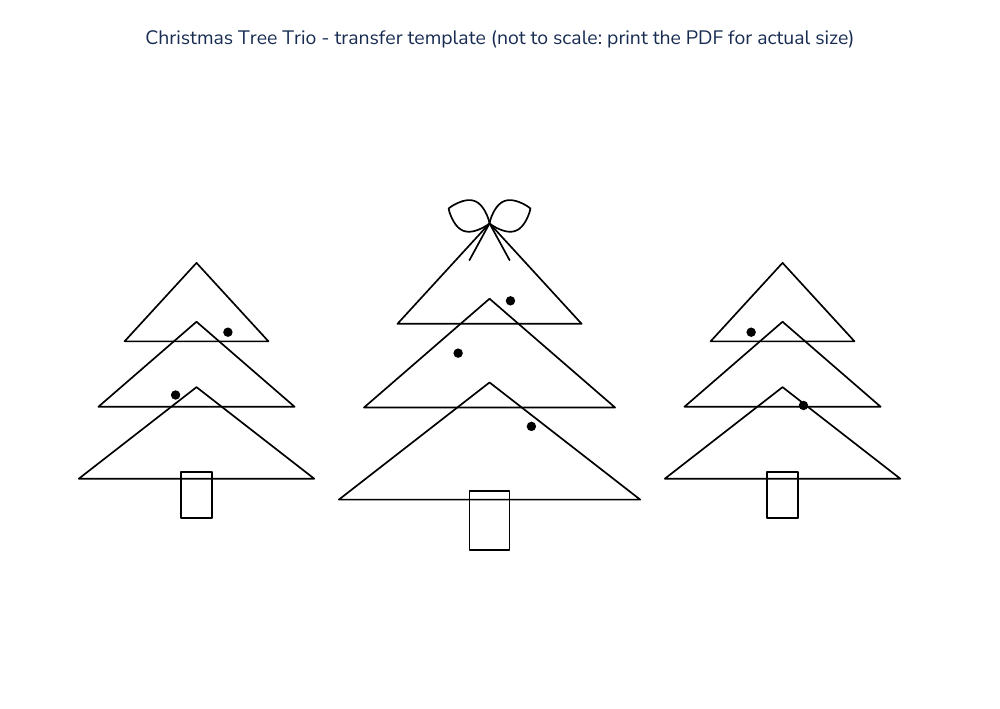
- Tree tiers: fishbone stitch, colour G / S, 3 strands. Fill each triangle with slanted stitches that meet along an imagined line down the middle; tiers alternate pine and sage.
- Trunks: satin stitch, colour B, 3 strands. Fill each small rectangle with vertical stitches.
- Bow: lazy daisy / straight stitch, colour R, 3 strands. Two lazy daisy loops and two straight-stitch tails on top of the middle tree.
- Baubles: French knot, colour R, 3 strands. One two-wrap knot per dot.
View the transfer template
This preview is not to scale. For tracing, download the PDF and print it at 100% / Actual Size.
Fishbone stitch guide
- Start with one short straight stitch at the leaf tip along the centre line.
- Come up on the left edge and go down just past the centre line.
- Come up on the right edge and go down just past the centre line, crossing the previous stitch.
- Keep alternating sides down to the base of the leaf.
Satin stitch guide
- Come up at 1 on one edge of the shape.
- Go down at 2 directly across on the opposite edge.
- Come up right beside 1 and repeat, laying each stitch snugly next to the last.
- Follow the lines on the pattern card for the stitch direction. Keep stitches no longer than about 8 mm; on wider shapes split the area in two.
Lazy daisy stitch guide
- Come up at 1 at the base of the petal or leaf.
- Go down in the same hole, leaving a small loop on the front.
- Come up at 3, at the tip, inside the loop.
- Go down at 4 just over the loop to tie it in place.
Straight stitch guide
- Come up at 1 at one end of the line.
- Go down at 2 at the other end.
- Keep straight stitches short on knits (under 8 mm) so they do not snag.
French knot stitch guide
- Come up at A where the knot belongs.
- Hold the thread taut and wrap it once or twice around the needle.
- Go down at B, right beside A (not in the same hole), sliding the wraps down to the fabric.
- Keep holding the thread until the needle is through, then let the knot settle.
How to stitch this design
- Print at 100% / Actual Size and check the scale line. Transfer onto wash-away stabilizer and place it centred on the chest.
- Hoop loosely without stretching the knit.
- Satin-stitch the three trunks first.
- Work each tier in fishbone stitch from the top point down, bottom tier last so it overlaps the trunk.
- Add the red bow on the middle tree and the bauble knots.
- Secure tails, dissolve the stabilizer and dry flat.
10. Potted Houseplants Row

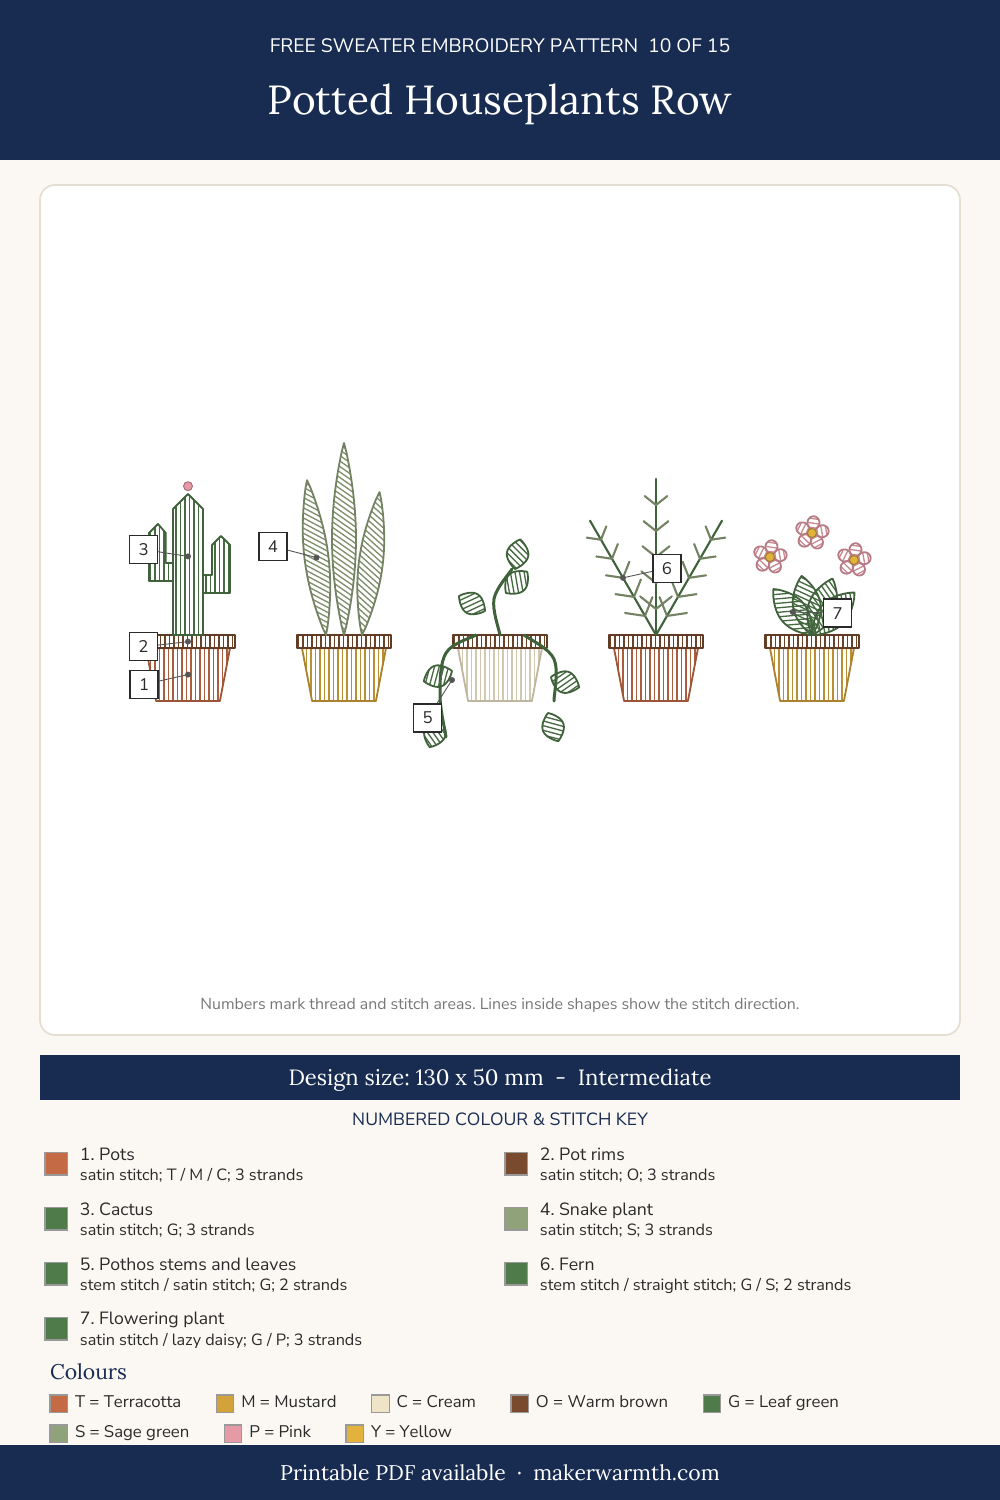
A windowsill row of five potted plants is a favourite with plant lovers: a cactus, a snake plant, a trailing pothos, a fern and a flowering pot. Teal knit makes the terracotta and mustard pots glow.
Pattern details
- Difficulty: Intermediate
- Design size: about 130 x 50 mm (5.1 x 2.0 in)
- Fabric: A smooth, medium-weight knit sweater (wool, cotton or a wool blend). Stitch through a printable wash-away stabilizer sheet on top of the knit.
- Needle: Size 22 chenille needle (sharp point, large eye)
- Hoop: 15-18 cm (6-7 in) hoop, moved once for the row
Colour key
- T: Terracotta; 3 strands
- M: Mustard; 3 strands
- C: Cream; 3 strands
- O: Warm brown; 3 strands
- G: Leaf green; 3 strands
- S: Sage green; 3 strands
- P: Pink; 3 strands
- Y: Yellow; 2 strands
Thread and stitch guide (numbers match the pattern card)
- Pots: satin stitch, colour T / M / C, 3 strands. Fill each pot body with vertical stitches.
- Pot rims: satin stitch, colour O, 3 strands. Fill each rim band with vertical stitches.
- Cactus: satin stitch, colour G, 3 strands. Fill the trunk and arms with vertical stitches; add one pink French knot flower on top.
- Snake plant: satin stitch, colour S, 3 strands. Fill each tall leaf with slanted stitches.
- Pothos stems and leaves: stem stitch / satin stitch, colour G, 2 strands. Stem-stitch the trailing stems, then satin-stitch each small leaf.
- Fern: stem stitch / straight stitch, colour G / S, 2 strands. Stem-stitch three fronds, then a pair of straight stitches per leaflet.
- Flowering plant: satin stitch / lazy daisy, colour G / P, 3 strands. Satin-stitch four leaves, then three small five-petal flowers with yellow knot centres.
View the transfer template
This preview is not to scale. For tracing, download the PDF and print it at 100% / Actual Size.

Satin stitch guide
- Come up at 1 on one edge of the shape.
- Go down at 2 directly across on the opposite edge.
- Come up right beside 1 and repeat, laying each stitch snugly next to the last.
- Follow the lines on the pattern card for the stitch direction. Keep stitches no longer than about 8 mm; on wider shapes split the area in two.
Stem stitch guide
- Come up at A and go down at B, one stitch length along the line.
- Come up at C, halfway back along A-B, right beside the stitch.
- Keep the working thread on the same side of the line every time.
- Shorten the stitches around tight curves.
Straight stitch guide
- Come up at 1 at one end of the line.
- Go down at 2 at the other end.
- Keep straight stitches short on knits (under 8 mm) so they do not snag.
Lazy daisy stitch guide
- Come up at 1 at the base of the petal or leaf.
- Go down in the same hole, leaving a small loop on the front.
- Come up at 3, at the tip, inside the loop.
- Go down at 4 just over the loop to tie it in place.
How to stitch this design
- Print at 100% / Actual Size and check the scale line. Transfer onto wash-away stabilizer and place the row straight across the chest.
- Hoop the left half loosely; move the hoop once to finish the right half.
- Satin-stitch the five pots, then their rims.
- Stitch the plants from left to right: cactus, snake plant, pothos, fern and flowering plant.
- Secure tails, dissolve the stabilizer and dry flat.
Read next: Embroidered Clothes: 20 Hand Embroidery Ideas for Shirts, Sweaters, Tees and Jeans
11. Woodland Mushroom Cluster

A tiny woodland cluster just above the cuff is the brown-sweater cousin of the red toadstools. Rust, tan and cream caps with fine gill lines look like something found on a forest walk.

Pattern details
- Difficulty: Beginner
- Design size: about 72 x 28 mm (2.8 x 1.1 in)
- Fabric: A smooth, medium-weight knit sweater (wool, cotton or a wool blend). Stitch through a printable wash-away stabilizer sheet on top of the knit.
- Needle: Size 22 chenille needle (sharp point, large eye)
- Hoop: No hoop on a sleeve – stitch in hand
Colour key
- R: Rust; 3 strands
- T: Warm tan; 3 strands
- C: Cream; 3 strands
- B: Brown; 2 strands
- G: Moss green; 2 strands
Thread and stitch guide (numbers match the pattern card)
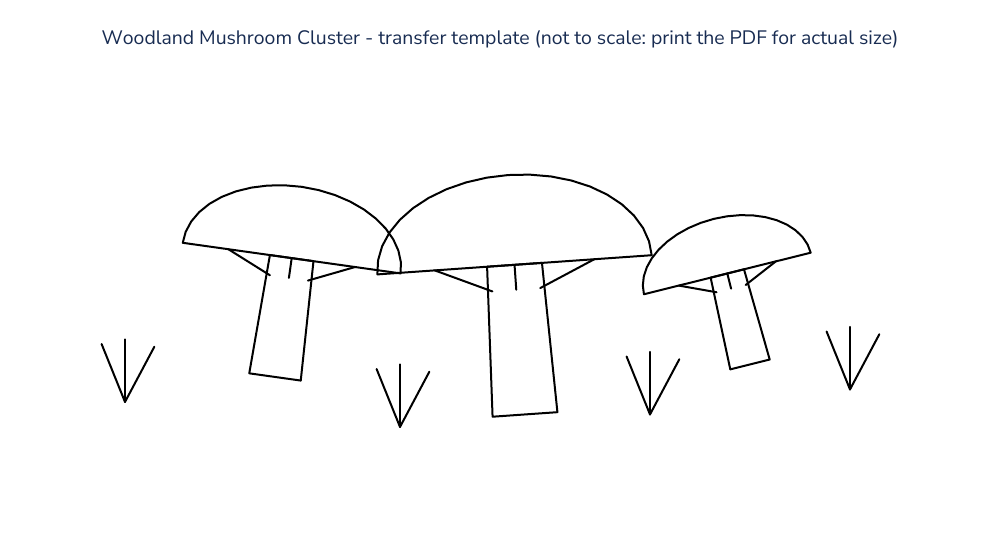
- Caps: satin stitch, colour R / T / C, 3 strands. Fill each cap with stitches running from the lower edge up and over the dome.
- Stems: satin stitch, colour C / T, 3 strands. Fill with short horizontal stitches; the small mushroom has a tan stem.
- Gills: straight stitch, colour B, 2 strands. Three short stitches fanning out under each cap.
- Grass: straight stitch, colour G, 2 strands. Three stitches per tuft.
View the transfer template
This preview is not to scale. For tracing, download the PDF and print it at 100% / Actual Size.
Satin stitch guide
- Come up at 1 on one edge of the shape.
- Go down at 2 directly across on the opposite edge.
- Come up right beside 1 and repeat, laying each stitch snugly next to the last.
- Follow the lines on the pattern card for the stitch direction. Keep stitches no longer than about 8 mm; on wider shapes split the area in two.
Straight stitch guide
- Come up at 1 at one end of the line.
- Go down at 2 at the other end.
- Keep straight stitches short on knits (under 8 mm) so they do not snag.
How to stitch this design
- Print at 100% / Actual Size and check the scale line. Transfer onto wash-away stabilizer and place it just above the ribbed cuff.
- Work with one hand inside the sleeve so only the top layer is caught.
- Satin-stitch the stems, then the caps.
- Add the brown gill lines under each cap and the grass tufts.
- Check the cuff still stretches, secure tails, dissolve the stabilizer and dry flat.
12. Chunky Yarn Lazy Daisies
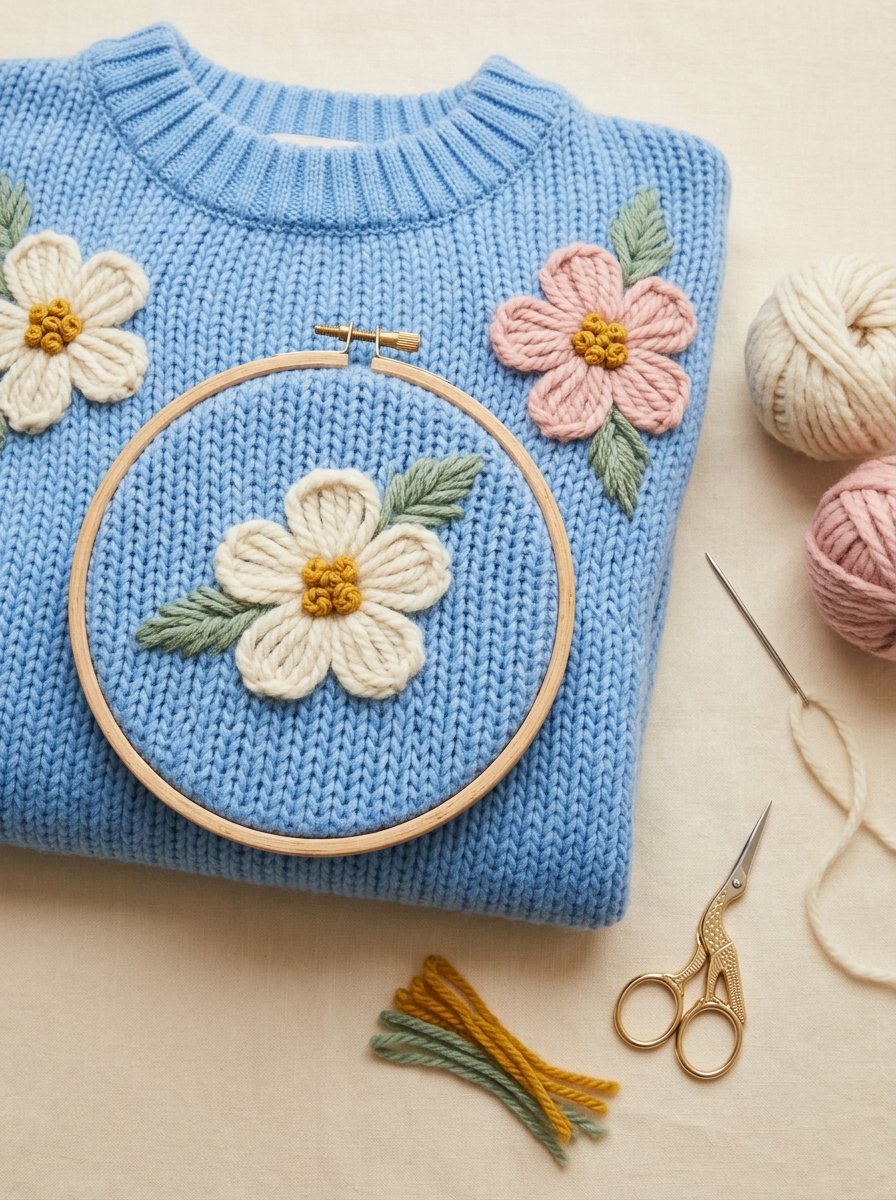
On a chunky knit, thin embroidery floss sinks between the stitches, so here the flowers are worked with wool yarn instead. Big lazy daisy petals cover a lot of space quickly – this is a one-evening project.

Pattern details
- Difficulty: Beginner
- Design size: about 150 x 116 mm (5.9 x 4.6 in)
- Fabric: A chunky or bulky knit sweater. No stabilizer needed: mark the flower centres with pins or a chalk pencil.
- Needle: Blunt tapestry needle, size 16-18, with an eye large enough for the yarn
- Hoop: No hoop – chunky knit is too thick; work flat on a table
Colour key
- C: Cream wool yarn; 1 strand
- P: Blush wool yarn; 1 strand
- M: Mustard wool yarn; 1 strand
- G: Sage wool yarn; 1 strand
Thread and stitch guide (numbers match the pattern card)
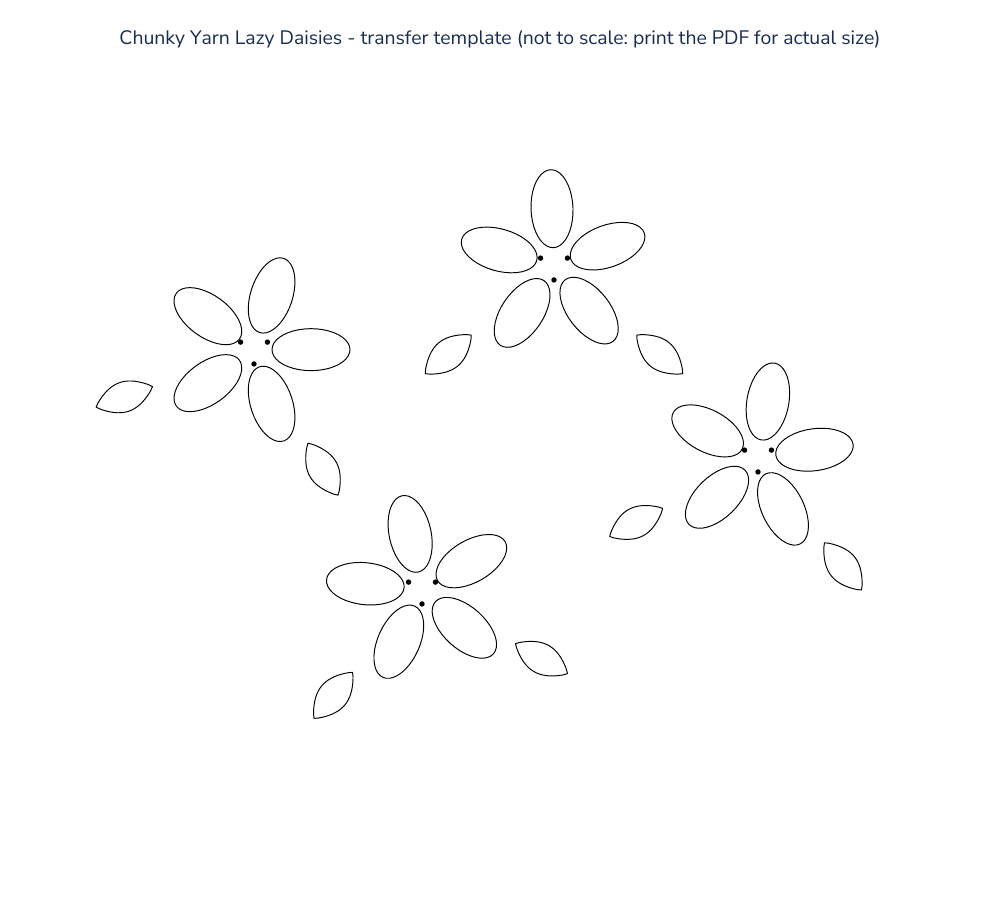
- Petals: lazy daisy, colour C / P, 1 strand. Five loops per flower in worsted or DK wool yarn (one strand of yarn), each anchored with a small tie stitch.
- Centres: French knot, colour M, 1 strand. Three one-wrap knots in each centre.
- Leaves: lazy daisy, colour G, 1 strand. Two single loops per flower.
View the transfer template
This preview is not to scale. For tracing, download the PDF and print it at 100% / Actual Size.
Lazy daisy stitch guide
- Come up at 1 at the base of the petal or leaf.
- Go down in the same hole, leaving a small loop on the front.
- Come up at 3, at the tip, inside the loop.
- Go down at 4 just over the loop to tie it in place.
French knot stitch guide
- Come up at A where the knot belongs.
- Hold the thread taut and wrap it once or twice around the needle.
- Go down at B, right beside A (not in the same hole), sliding the wraps down to the fabric.
- Keep holding the thread until the needle is through, then let the knot settle.
How to stitch this design
- Print at 100% / Actual Size and check the scale line. Lay the sweater flat, place the printout underneath the front for reference and mark each flower centre and petal tip with pins.
- Thread about 50 cm of yarn and tie a knot; on chunky knits the knot can sit on the back and weave in later.
- Work each petal as a lazy daisy: come up at the centre, go back down in the same spot, come up at the petal tip catching the loop, and tie it down. Keep the loops relaxed.
- Add three mustard knots in each centre and two green leaves per flower.
- Weave tails through the back of the knit for 4-5 cm in different directions. Hand wash and dry flat.
13. Flower Patch for a Cardigan Sleeve

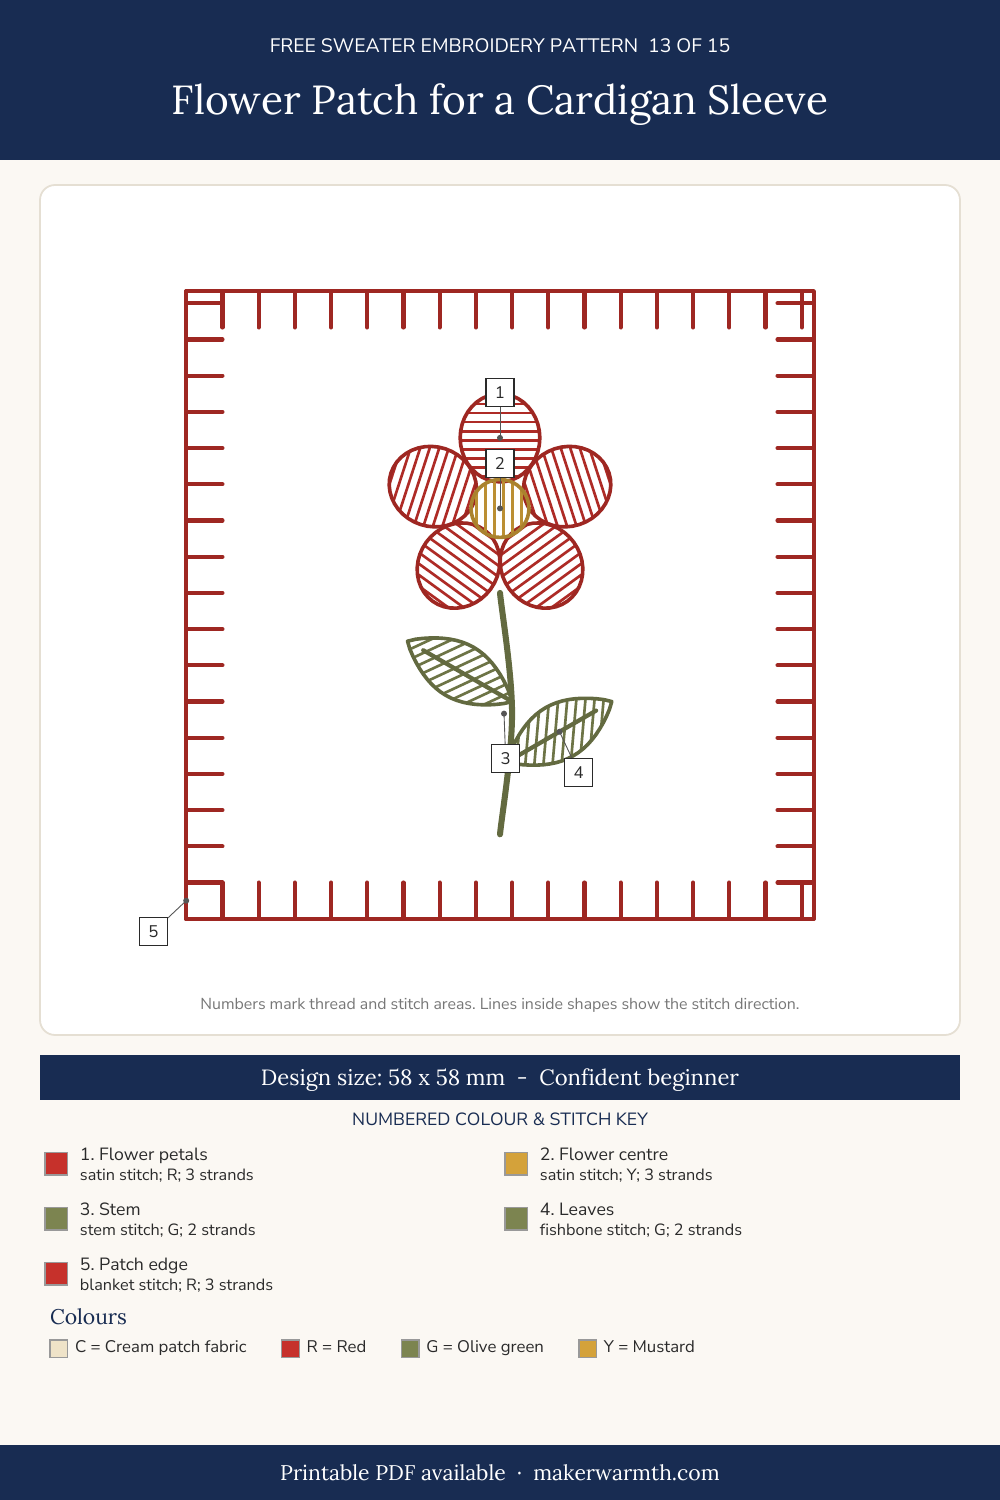
If stitching straight into a knit feels risky, embroider a small cotton patch first and sew it onto the sleeve. It also covers a worn elbow, so it is a pretty fix for a favourite cardigan.
Pattern details
- Difficulty: Confident beginner
- Design size: about 58 x 58 mm (2.3 x 2.3 in)
- Fabric: Cream cotton or linen for the patch (cut 70 mm square, 6 mm turned under); sewn onto a knit cardigan.
- Needle: Size 7 embroidery needle for the patch; size 22 chenille needle to attach it
- Hoop: 12-15 cm (5-6 in) hoop for the cotton patch fabric
Colour key
- C: Cream patch fabric
- R: Red; 3 strands
- G: Olive green; 2 strands
- Y: Mustard; 3 strands
Thread and stitch guide (numbers match the pattern card)
- Flower petals: satin stitch, colour R, 3 strands. Fill each petal from the tip toward the centre.
- Flower centre: satin stitch, colour Y, 3 strands. Fill the small circle.
- Stem: stem stitch, colour G, 2 strands. Work from the bottom up.
- Leaves: fishbone stitch, colour G, 2 strands. Slanted stitches meeting along the vein.
- Patch edge: blanket stitch, colour R, 3 strands. Sews the patch to the sweater; the ticks mark each stitch.
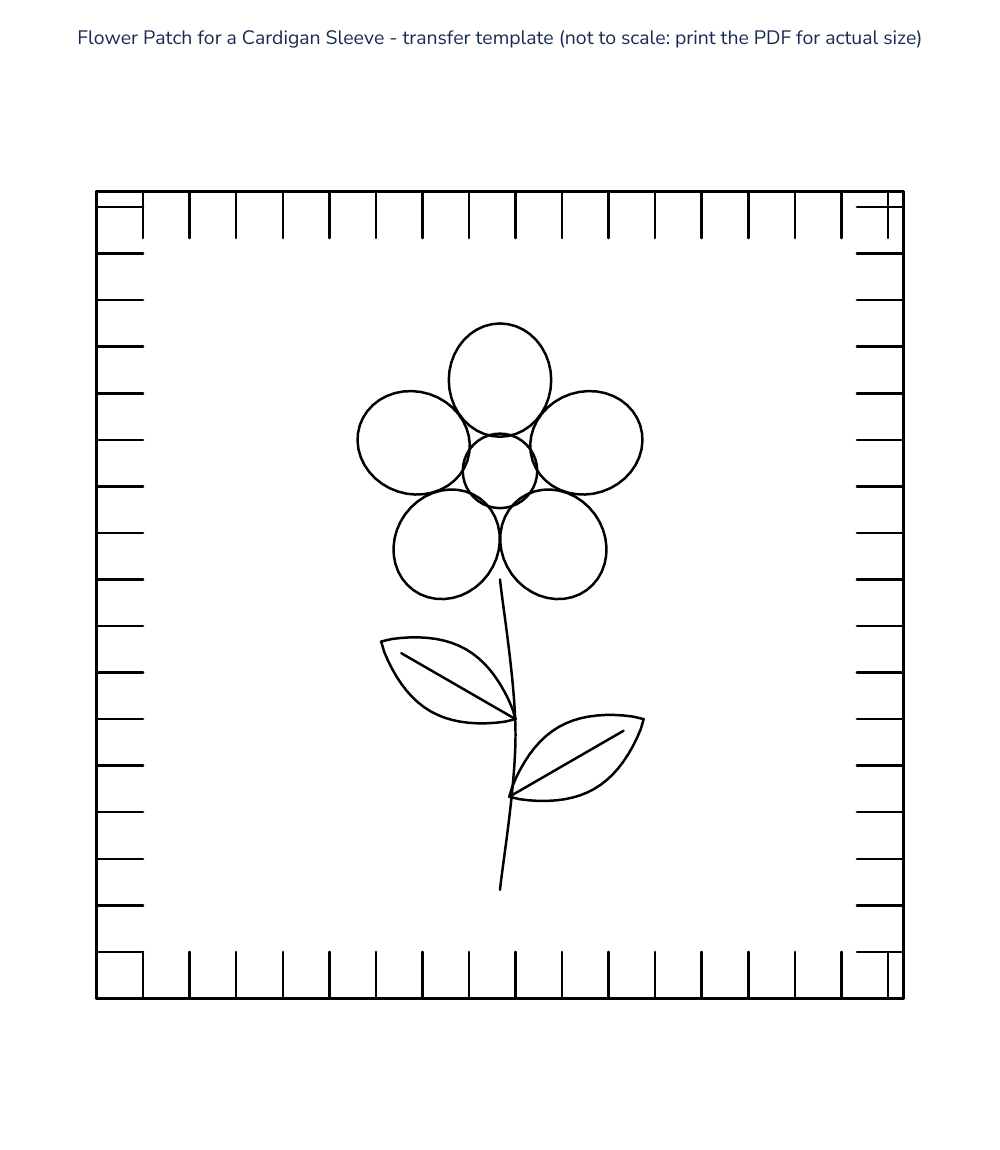
View the transfer template
This preview is not to scale. For tracing, download the PDF and print it at 100% / Actual Size.
Satin stitch guide
- Come up at 1 on one edge of the shape.
- Go down at 2 directly across on the opposite edge.
- Come up right beside 1 and repeat, laying each stitch snugly next to the last.
- Follow the lines on the pattern card for the stitch direction. Keep stitches no longer than about 8 mm; on wider shapes split the area in two.
Stem stitch guide
- Come up at A and go down at B, one stitch length along the line.
- Come up at C, halfway back along A-B, right beside the stitch.
- Keep the working thread on the same side of the line every time.
- Shorten the stitches around tight curves.
Fishbone stitch guide
- Start with one short straight stitch at the leaf tip along the centre line.
- Come up on the left edge and go down just past the centre line.
- Come up on the right edge and go down just past the centre line, crossing the previous stitch.
- Keep alternating sides down to the base of the leaf.
Blanket stitch guide

- Come up at 1 on the patch edge.
- Go down at 2, above and to the right, through the patch and sweater.
- Come up at 3 on the edge directly below 2, with the thread under the needle.
- Pull gently so the thread lies along the edge, and repeat.
How to stitch this design
- Print at 100% / Actual Size and check the scale line. Trace the flower onto the cotton square with a removable fabric pen.
- Hoop the cotton and stitch the stem, leaves, petals and centre.
- Press the patch from the back, turn the edges under 6 mm and press again.
- Pin the patch to the cardigan sleeve or elbow with the sleeve lying flat and relaxed; put a hand inside to avoid catching the back.
- Sew it on with red blanket stitch around the edge, one stitch at each tick mark.
- Secure tails and dry flat after washing.
14. Name in Chain Stitch

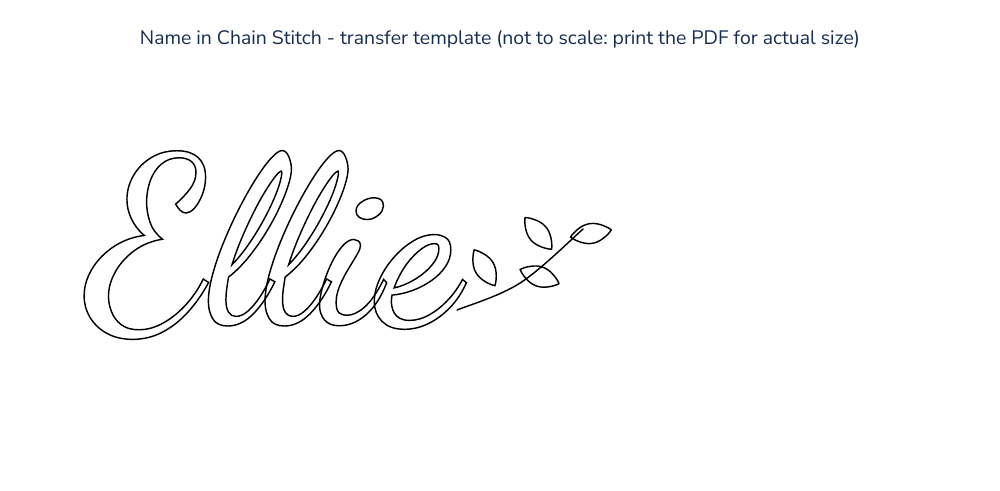
A name in flowing chain stitch makes a sweater a personal gift. The pattern spells Ellie; the steps explain how to swap in any name at the same size.

Pattern details
- Difficulty: Confident beginner
- Design size: about 100 x 34 mm (3.9 x 1.3 in)
- Fabric: A smooth, medium-weight knit sweater (wool, cotton or a wool blend). Stitch through a printable wash-away stabilizer sheet on top of the knit.
- Needle: Size 22 chenille needle (sharp point, large eye)
- Hoop: 15 cm (6 in) hoop
Colour key
- P: Dusty rose; 4 strands
- G: Sage green; 2 strands
Thread and stitch guide (numbers match the pattern card)
- Letters: chain stitch, colour P, 4 strands. Work along the middle of each letter stroke; stitch thicker downstrokes with two rows side by side.
- Leaf sprig: stem stitch / lazy daisy, colour G, 2 strands. Stem-stitch the stem, then one lazy daisy per leaf.
View the transfer template
This preview is not to scale. For tracing, download the PDF and print it at 100% / Actual Size.
Chain stitch guide
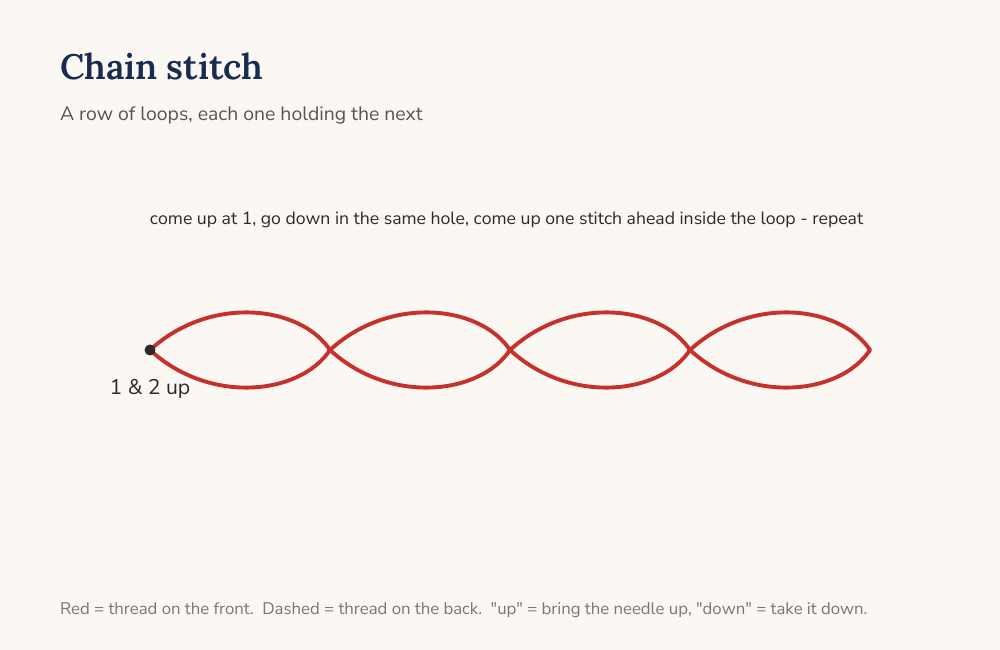
- Come up at 1 and go down in the same hole, leaving a loop.
- Come up one stitch length ahead, inside the loop, and pull gently.
- Go down in the same hole you just came up from to make the next loop.
- At the end, tie the last loop down with a tiny stitch.
Stem stitch guide
- Come up at A and go down at B, one stitch length along the line.
- Come up at C, halfway back along A-B, right beside the stitch.
- Keep the working thread on the same side of the line every time.
- Shorten the stitches around tight curves.
Lazy daisy stitch guide
- Come up at 1 at the base of the petal or leaf.
- Go down in the same hole, leaving a small loop on the front.
- Come up at 3, at the tip, inside the loop.
- Go down at 4 just over the loop to tie it in place.
How to stitch this design
- Print at 100% / Actual Size and check the scale line. To use a different name, type it in a script font at about 26 mm cap height, print it and trace that instead.
- Transfer onto wash-away stabilizer and place it on the chest or centred under the collar.
- Hoop loosely and work the letters in chain stitch, following each stroke in the order you would write it.
- Add the leaf sprig after the last letter.
- Secure tails, dissolve the stabilizer and dry flat.
15. Falling Autumn Leaves
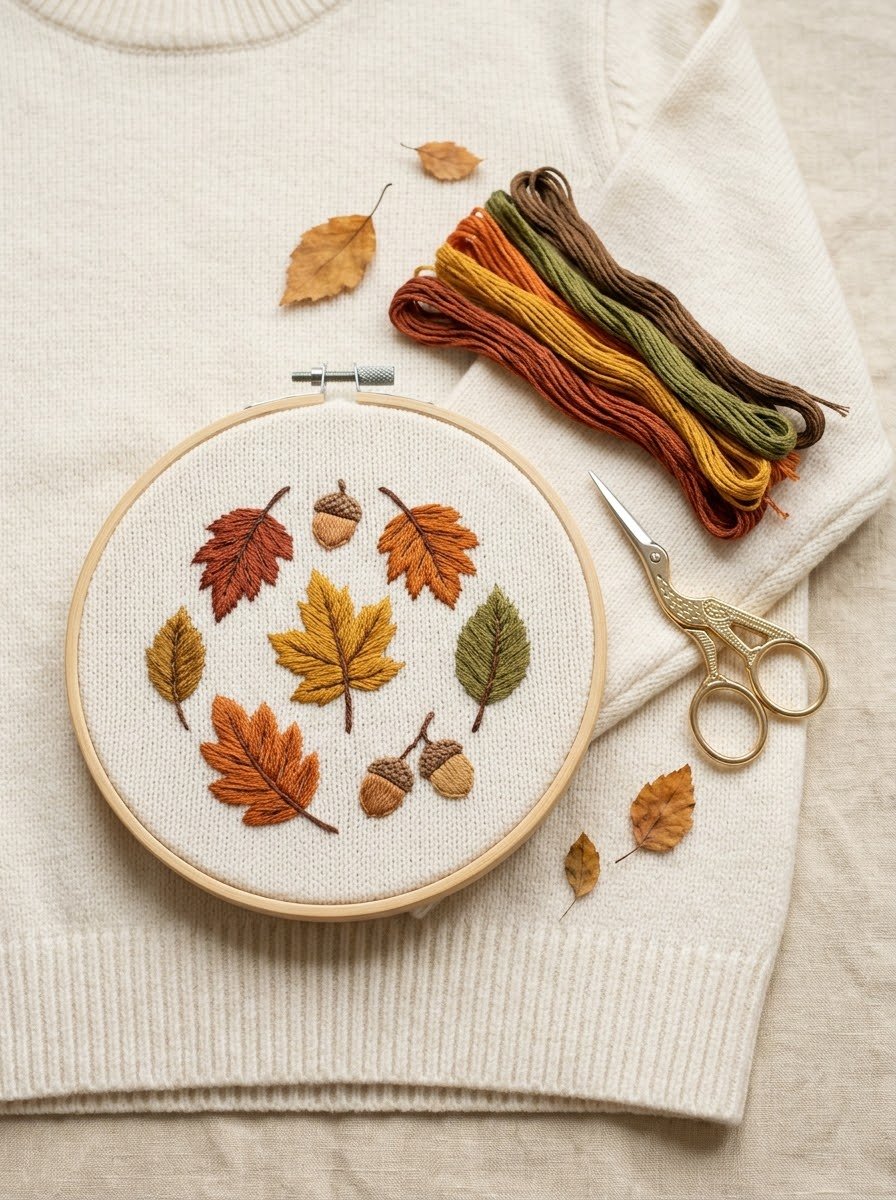
Rust, mustard, orange and olive leaves drift across the hem with two little acorns. It is the motif for fall sweater embroidery ideas, and fishbone stitch makes each leaf look veined without extra work.

Pattern details
- Difficulty: Beginner
- Design size: about 118 x 80 mm (4.6 x 3.1 in)
- Fabric: A smooth, medium-weight knit sweater (wool, cotton or a wool blend). Stitch through a printable wash-away stabilizer sheet on top of the knit.
- Needle: Size 22 chenille needle (sharp point, large eye)
- Hoop: 15-18 cm (6-7 in) hoop, moved as needed
Colour key
- R: Rust; 3 strands
- M: Mustard; 3 strands
- O: Burnt orange; 3 strands
- G: Olive green; 3 strands
- B: Brown; 2 strands
- T: Warm tan; 3 strands
Thread and stitch guide (numbers match the pattern card)
- Leaves: fishbone stitch, colour R / M / O / G, 3 strands. Slanted stitches from each edge meeting along the vein line.
- Leaf stalks: straight stitch, colour B, 2 strands. One short stitch at the base of each leaf.
- Acorn nuts: satin stitch, colour T, 3 strands. Fill each oval with vertical stitches.
- Acorn caps and stalks: satin stitch / straight stitch, colour B, 3 strands. Fill the cap over the top of the nut, then one straight stitch for the stalk.
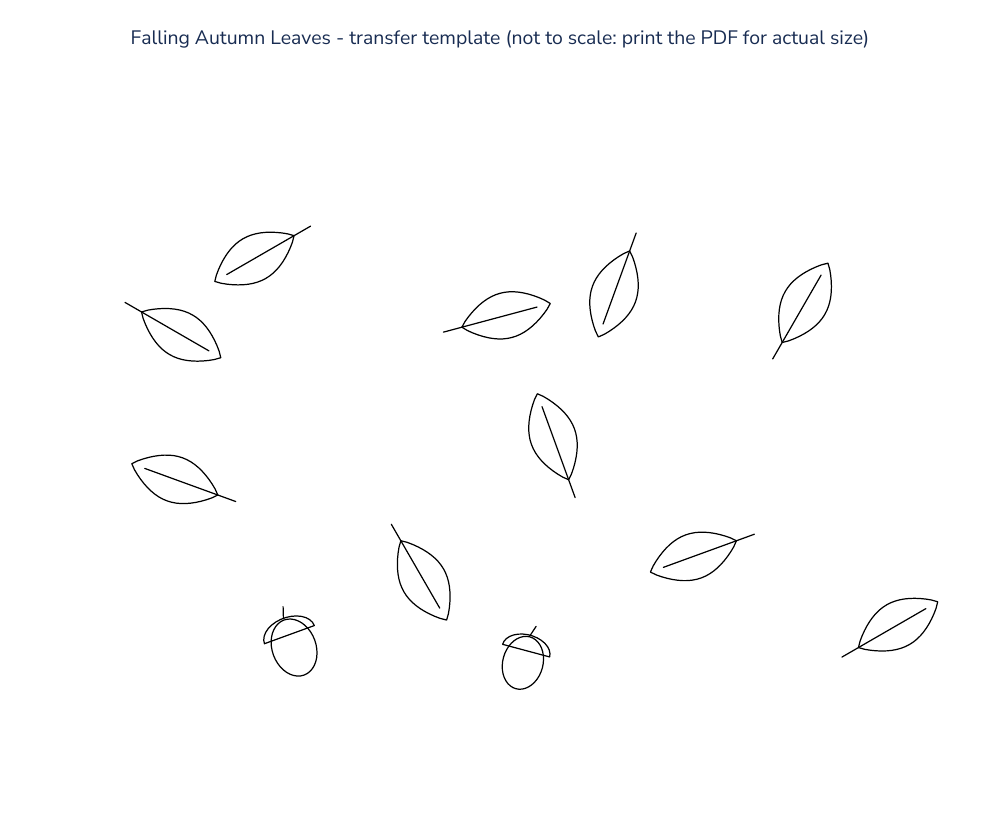
View the transfer template
This preview is not to scale. For tracing, download the PDF and print it at 100% / Actual Size.
Fishbone stitch guide
- Start with one short straight stitch at the leaf tip along the centre line.
- Come up on the left edge and go down just past the centre line.
- Come up on the right edge and go down just past the centre line, crossing the previous stitch.
- Keep alternating sides down to the base of the leaf.
Straight stitch guide
- Come up at 1 at one end of the line.
- Go down at 2 at the other end.
- Keep straight stitches short on knits (under 8 mm) so they do not snag.
Satin stitch guide
- Come up at 1 on one edge of the shape.
- Go down at 2 directly across on the opposite edge.
- Come up right beside 1 and repeat, laying each stitch snugly next to the last.
- Follow the lines on the pattern card for the stitch direction. Keep stitches no longer than about 8 mm; on wider shapes split the area in two.
How to stitch this design
- Print at 100% / Actual Size and check the scale line. Transfer onto wash-away stabilizer and place it across the lower front, just above the ribbed hem.
- Hoop loosely, keeping the ribbing out of the hoop.
- Fishbone-stitch the ten leaves, then add their stalks.
- Satin-stitch the acorn nuts, then the caps and stalks.
- Secure tails, dissolve the stabilizer and dry flat.
Caring for Embroidered Sweaters
Hand wash in cool water with a wool wash, or use a gentle wool cycle inside a mesh bag. Do not wring the sweater – roll it in a towel to press out water, then dry it flat and reshape the embroidered area with your hands. If it needs pressing, iron from the inside over a thick towel so the stitches are not flattened.
For designs that touch the skin, such as on the inside of a cuff or chest, a soft fusible backing over the reverse of the stitches keeps them from scratching and protects them from snagging.
Read next: Browse all free embroidery patterns
Sweater Embroidery FAQ
Can you hand embroider on a knit sweater?
Yes. Use a wash-away stabilizer on top so the needle does not sink between the knit stitches, hoop the knit loosely without stretching it, and use three or four strands of floss so the stitches sit on top of the texture.
What is the best sweater to embroider on?
A smooth, medium-weight knit in wool, cotton or a wool blend is easiest. Very fluffy mohair hides small stitches, and chunky knits are better suited to embroidery with wool yarn, as in idea 12.
Do I need a hoop for sweater embroidery?
For flat areas like the chest, a loosely closed hoop helps keep the stitching even. Sleeves and cuffs are too narrow for a hoop, so stitch them in hand with one hand inside the sleeve.
What thread should I use on a sweater?
Cotton embroidery floss works well with three or four strands. Fine wool embroidery thread blends beautifully with wool knits, and worsted or DK yarn works for large, bold designs on chunky knits.
How do I stop the embroidery from puckering?
Do not stretch the knit in the hoop, keep your stitches relaxed, and avoid long jumps on the back. Removing the hoop between sessions also helps the knit keep its shape.