

Hand Embroidery Stitches: 20 Basic Stitches for Beginners (Free Printable Cheat Sheet)
Every embroidery design you have ever saved is built from the same small set of stitches. Learn twenty of them and you can stitch almost any flower, vine, letter or border on a jacket, a shirt or a sweatshirt.
This guide walks through 20 basic hand embroidery stitches, grouped by what they do: outline stitches, decorative and edge stitches, filling stitches, and knots and flower stitches. Each one has a photo of the finished stitch, a numbered diagram that shows exactly where the needle goes, and a note on how it behaves on clothes. At the end there is a free printable cheat sheet with all 20 stitches on one page.
In This Post
What You Will Need
- Six-strand cotton embroidery floss in a few colors you like
- Embroidery needles (a mixed pack of crewel needles, sizes 5–9, covers every stitch here)
- A 5 or 6 inch embroidery hoop
- Small sharp embroidery scissors
- A water-soluble or heat-erasable fabric marker
- A piece of medium-weight cotton or linen for practice
- Iron-on or wash-away stabilizer, if you plan to stitch on knits like sweatshirts and T-shirts
Floss comes as six thin strands twisted together. For most stitches in this guide, separate two or three strands and stitch with those. Use more strands when you want a bolder line, and fewer for fine details.
How to Read the Diagrams
Every diagram uses the same simple system. Follow the numbers in order: a number with an up arrow (1↑) means bring the needle up from the back of the fabric, and a number with a down arrow (2↓) means take it down to the back. A dashed grey line shows where the thread travels behind the fabric. Faded stitches show where the next stitch will go.
From Maker Warmth
Looking for your next stitch project?
Every pattern on this blog is free to print, from tiny bows to full denim jacket designs. Save this one, then browse the whole collection.
See all free patterns →Outline Stitches
Outline stitches draw lines: stems, vines, letters, the edges of petals and leaves. If you only learn one group, learn this one, because most embroidery on clothes is built on outlines.

1. Straight Stitch
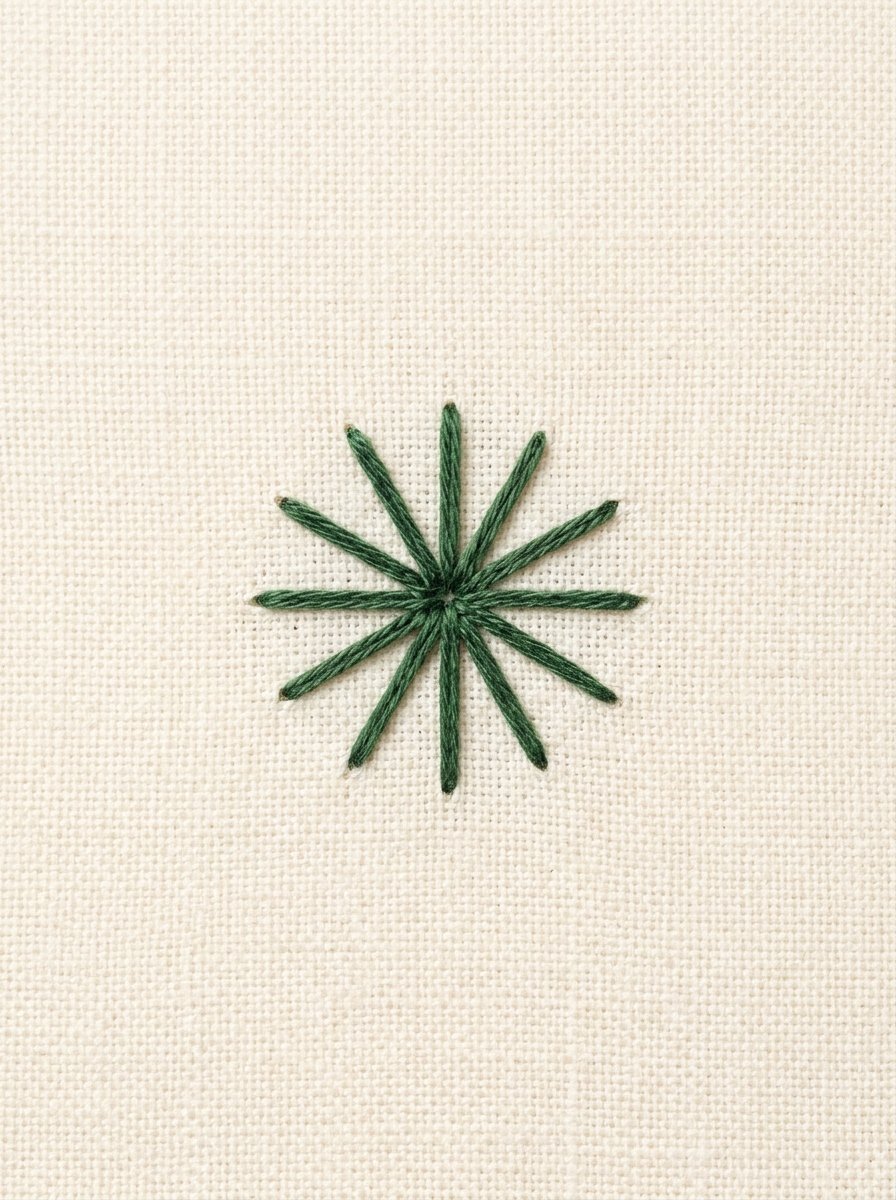
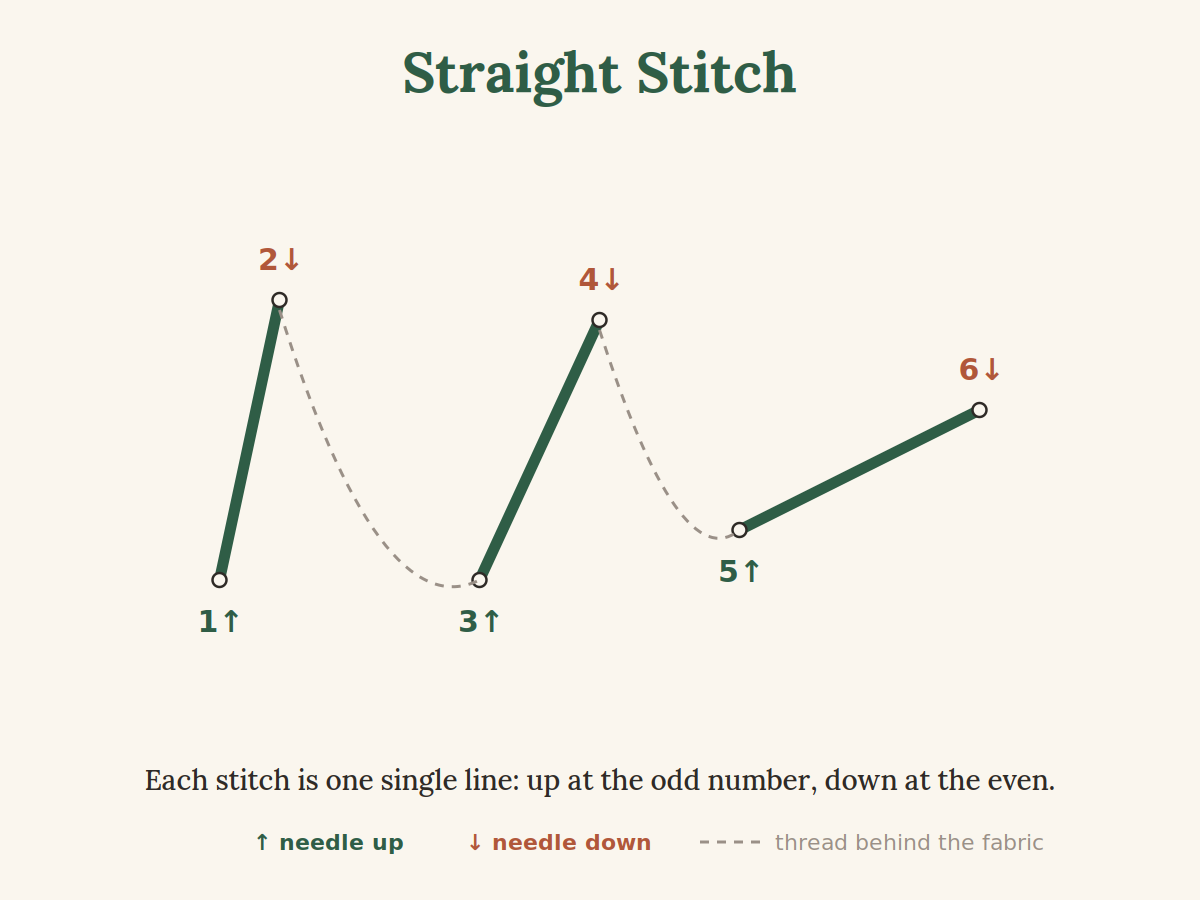
The simplest stitch there is: one single line of thread. Bring the needle up at one point and take it down at another. Straight stitches can be any length and point in any direction, so they make starbursts, grass, eyelashes, tiny petals and the spokes of a woven wheel.
Best on clothes: keep each stitch short. A long loose stitch on a sleeve or a pocket catches on rings and zippers.
2. Running Stitch
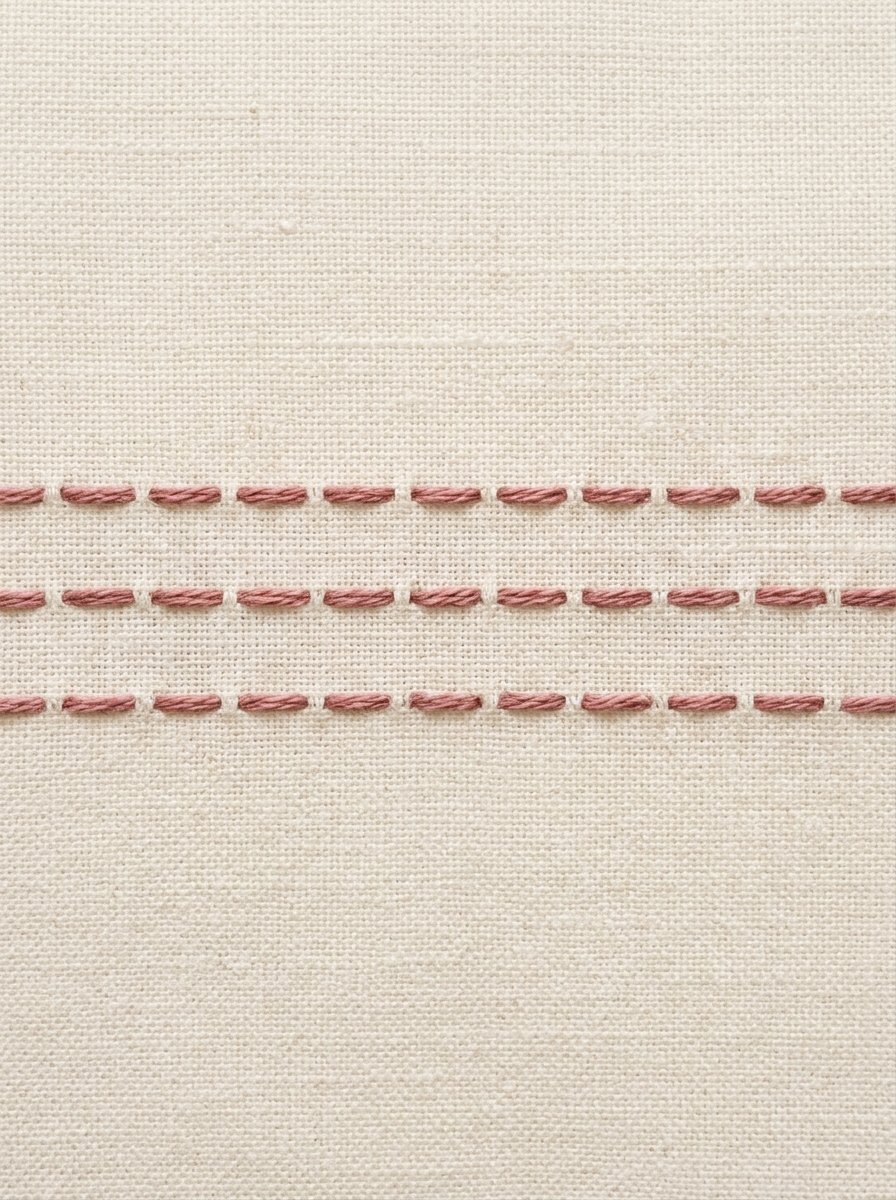
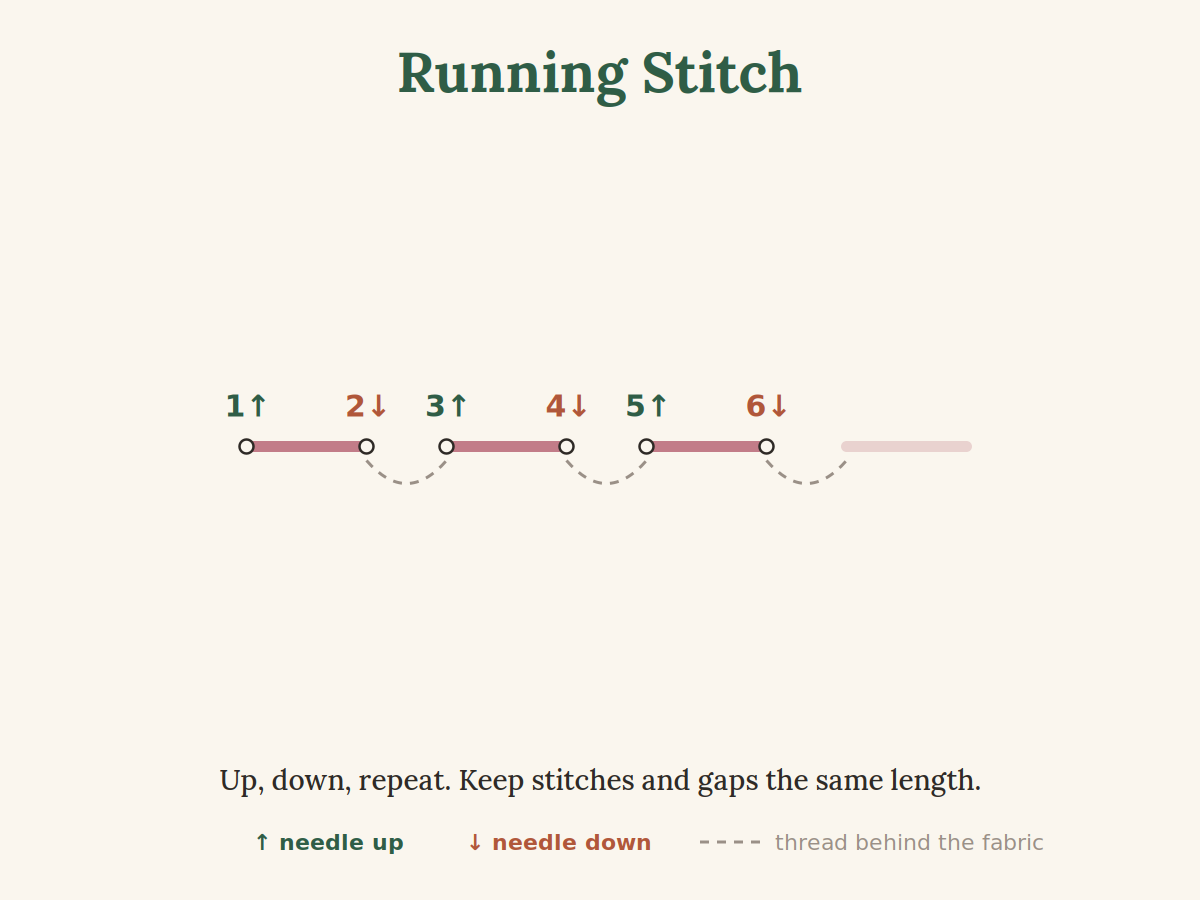
A dashed line made by weaving the needle up and down along a line. Come up at 1, go down at 2, come up at 3 and keep going. The goal is even stitches and even gaps, which takes a little practice and is very satisfying once it clicks.
Best on clothes: the go-to stitch for visible mending and sashiko-style patches on denim. Several parallel rows hold a patch in place and look intentional.
3. Backstitch
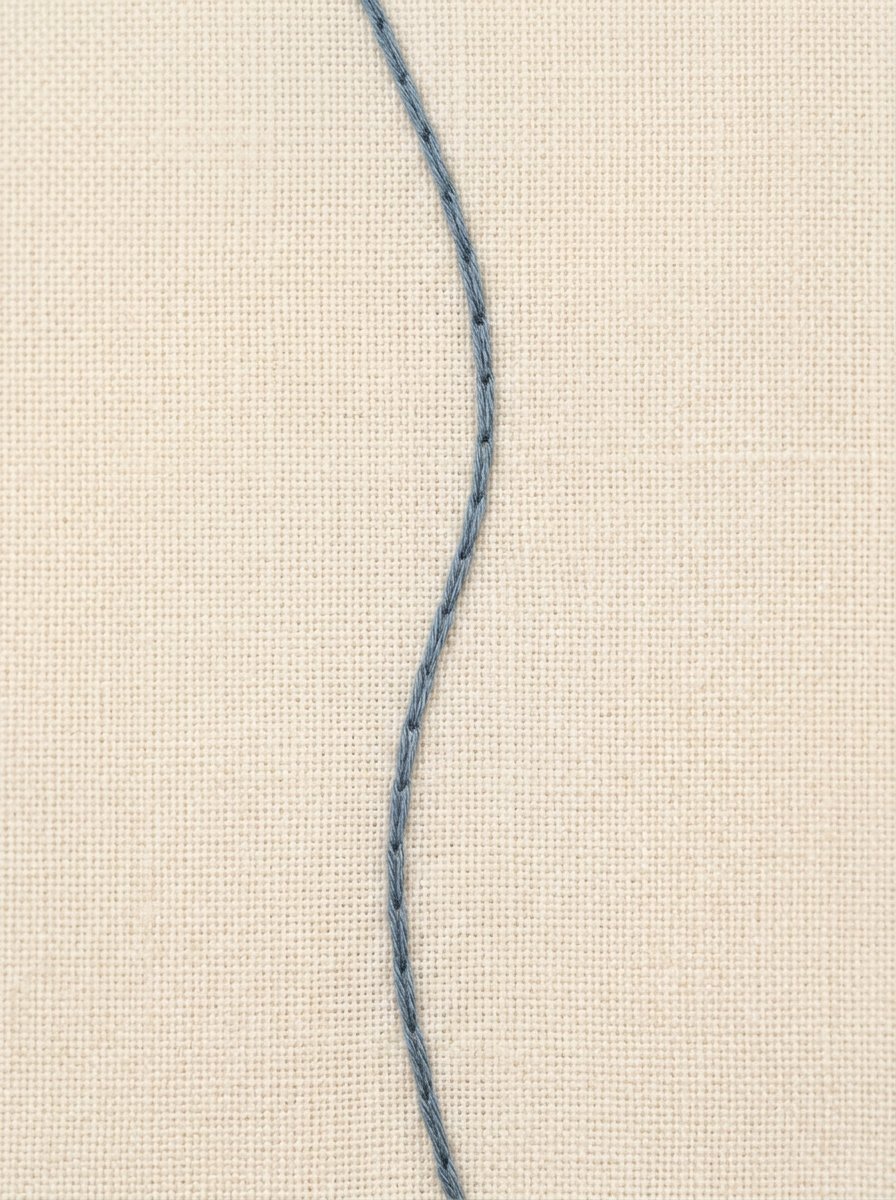
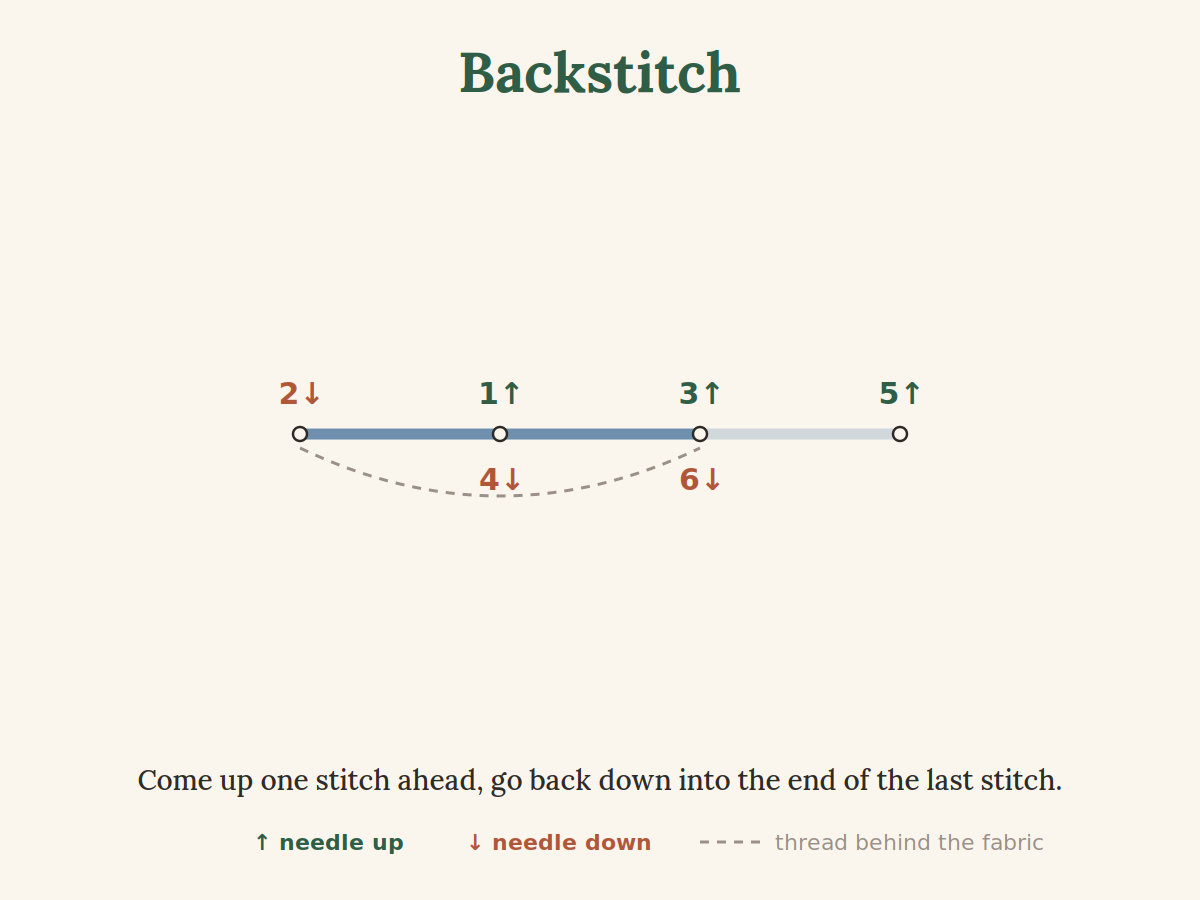
A solid, unbroken line. Come up one stitch length ahead of where you want the line to start, then go back down at the start. Come up one stitch length ahead again and go back down into the end of the last stitch. Short stitches follow curves best.
Best on clothes: the most reliable stitch for lettering, names and fine outlines. It lies flat and holds up well in the wash.
4. Whipped Backstitch
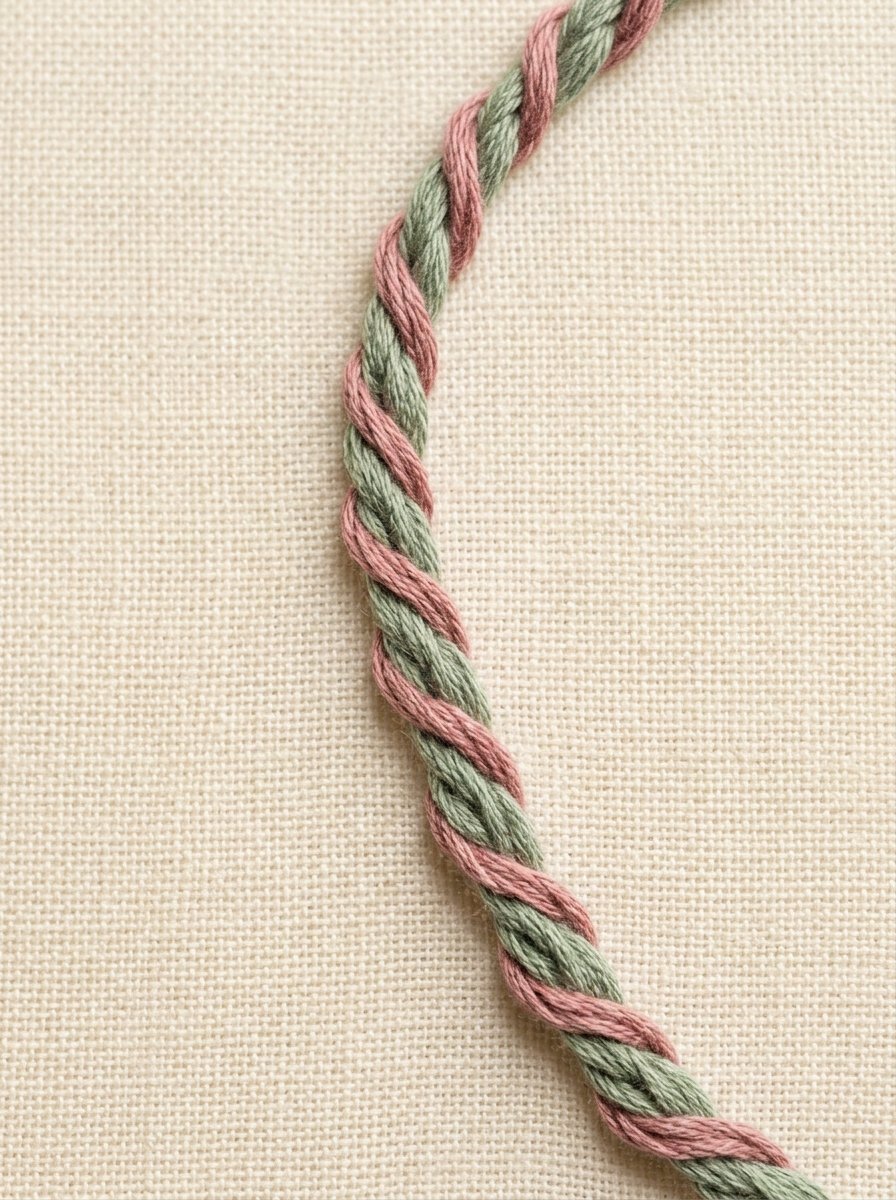
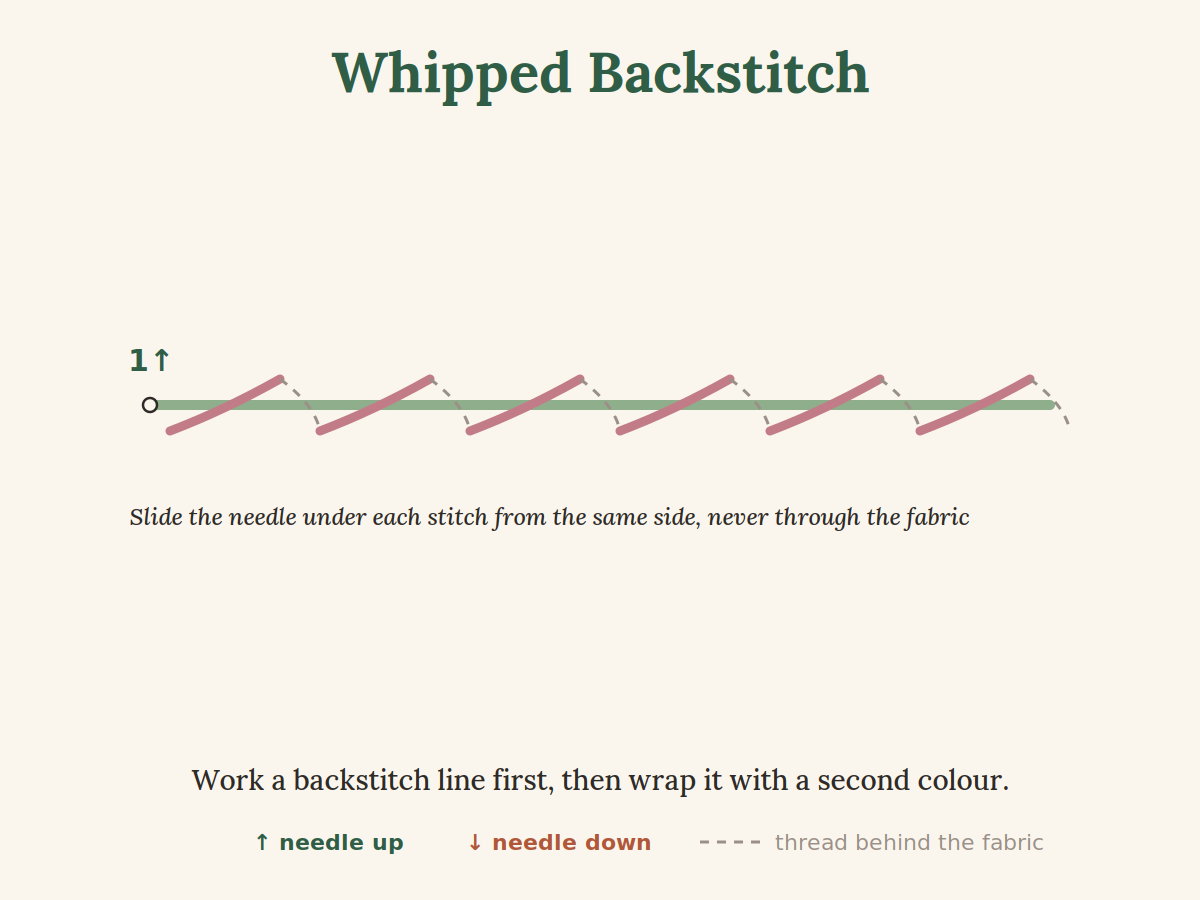
A backstitch line wrapped with a second thread, which turns it into a smooth, rounded cord. Stitch the backstitch first. Then bring a new thread up at the start and slide the needle under each stitch, always from the same side, without going through the fabric.
Best on clothes: great for stems and script letters that need to look bolder than plain backstitch. Two colors make a candy-cane twist.
5. Split Stitch
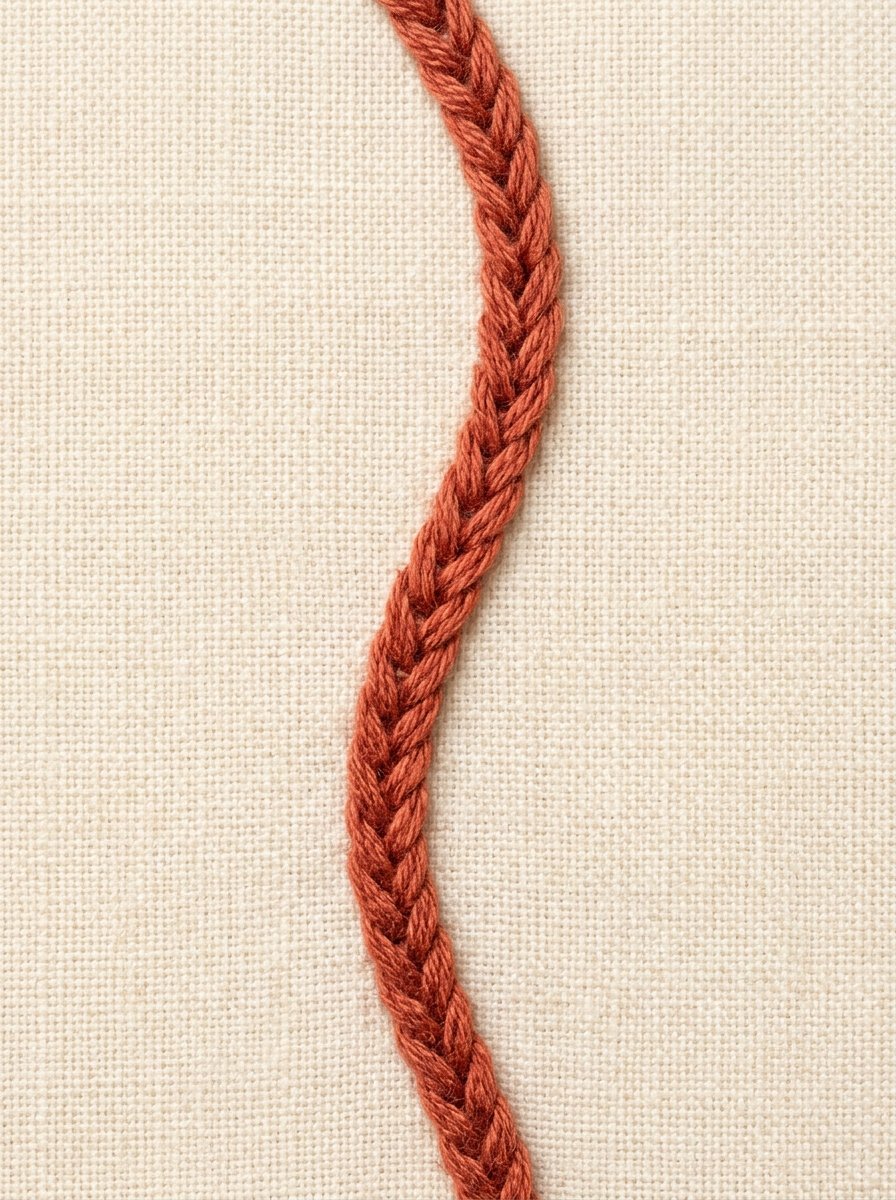
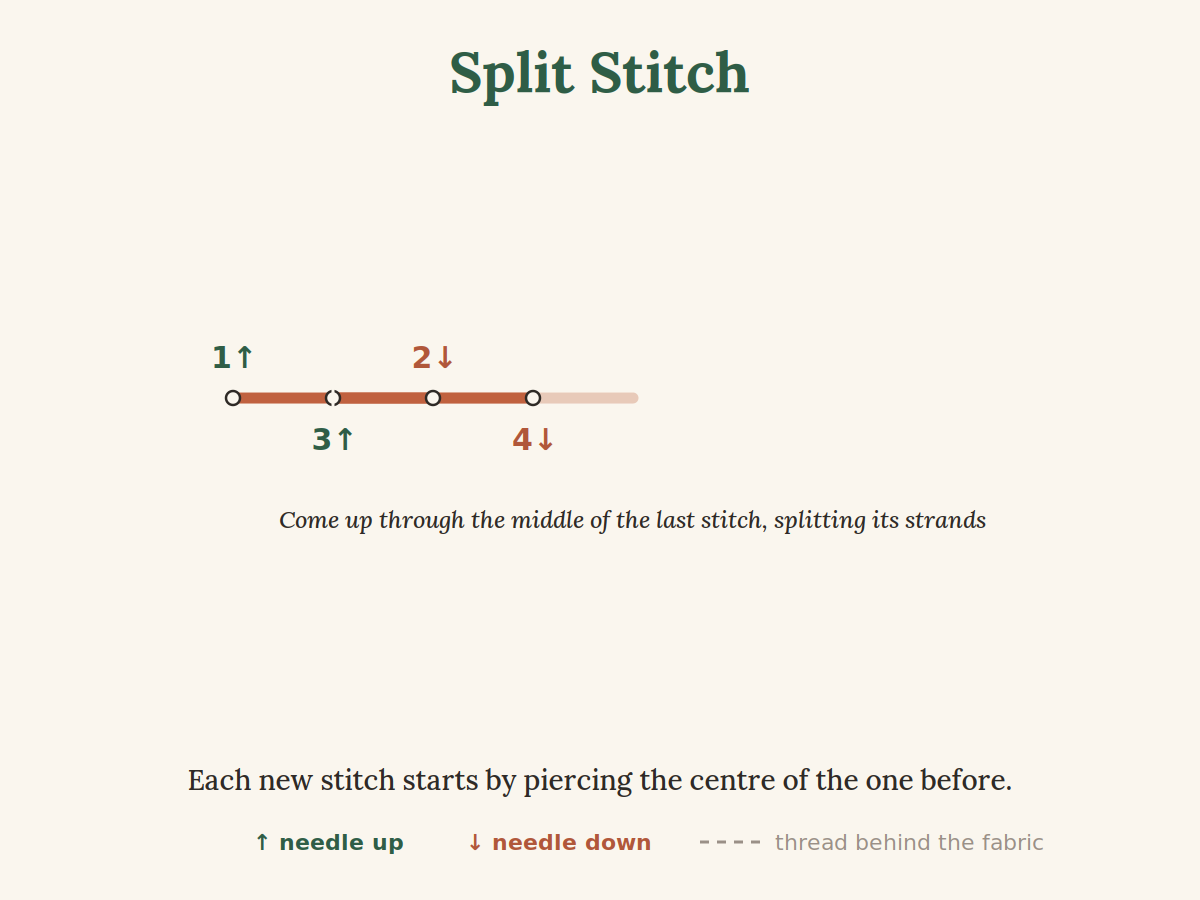
Make one straight stitch, then bring the needle up through the middle of it, splitting the strands. Take the next stitch forward and repeat. The result is a fine, slightly textured line that looks a little like a tiny braid. Use an even number of strands so the needle can split them cleanly.
Best on clothes: rows of split stitch packed side by side make a sturdy fill for small shapes, which is useful on knits where long satin stitches would snag.
6. Stem Stitch

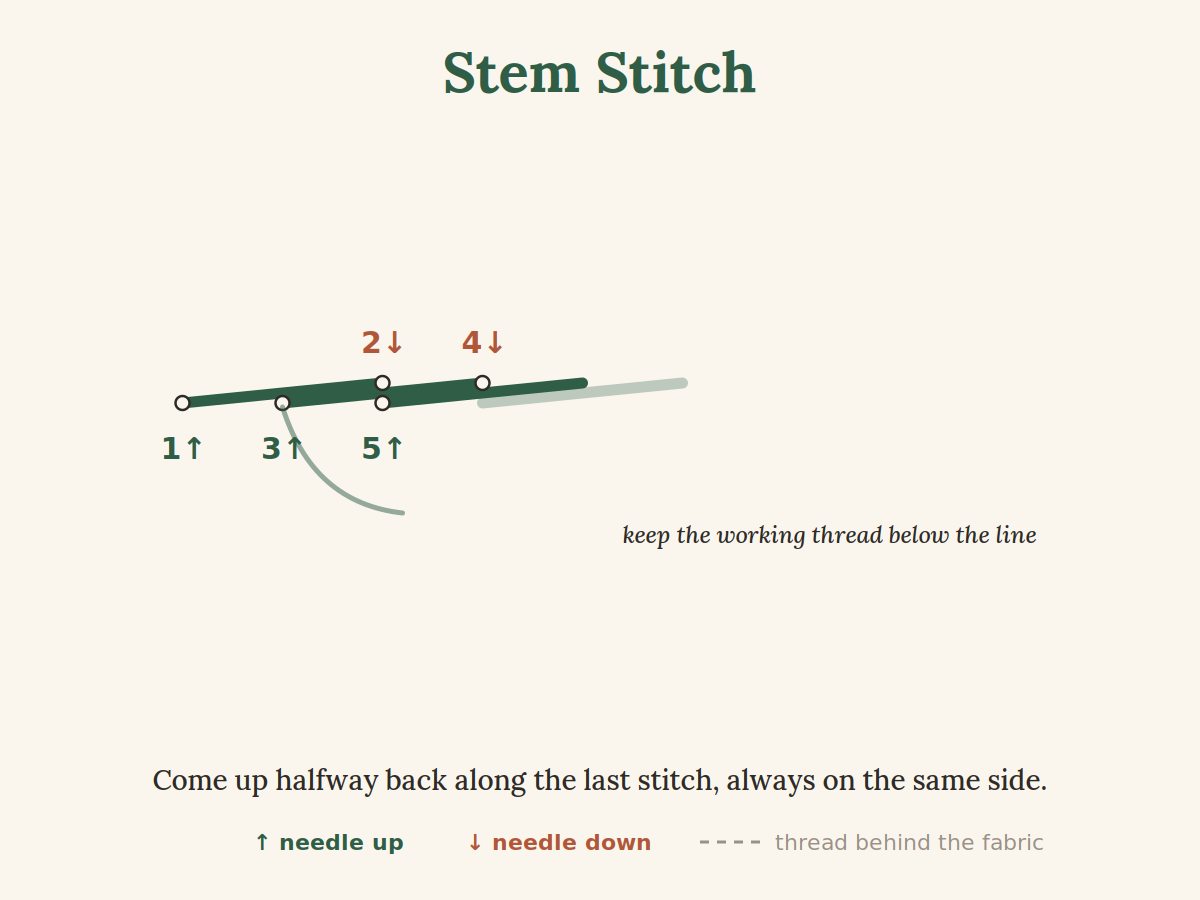
A twisted, rope-like line that is made for curves. Take a stitch forward, then come up halfway back along it, right beside the thread. Keep the working thread on the same side of the line every single time, or the twist will flip. Shorten the stitches on tight bends.
Best on clothes: the classic stitch for flower stems and vines on denim. It reads well from a distance, so it suits jacket backs and jeans legs.
7. Chain Stitch
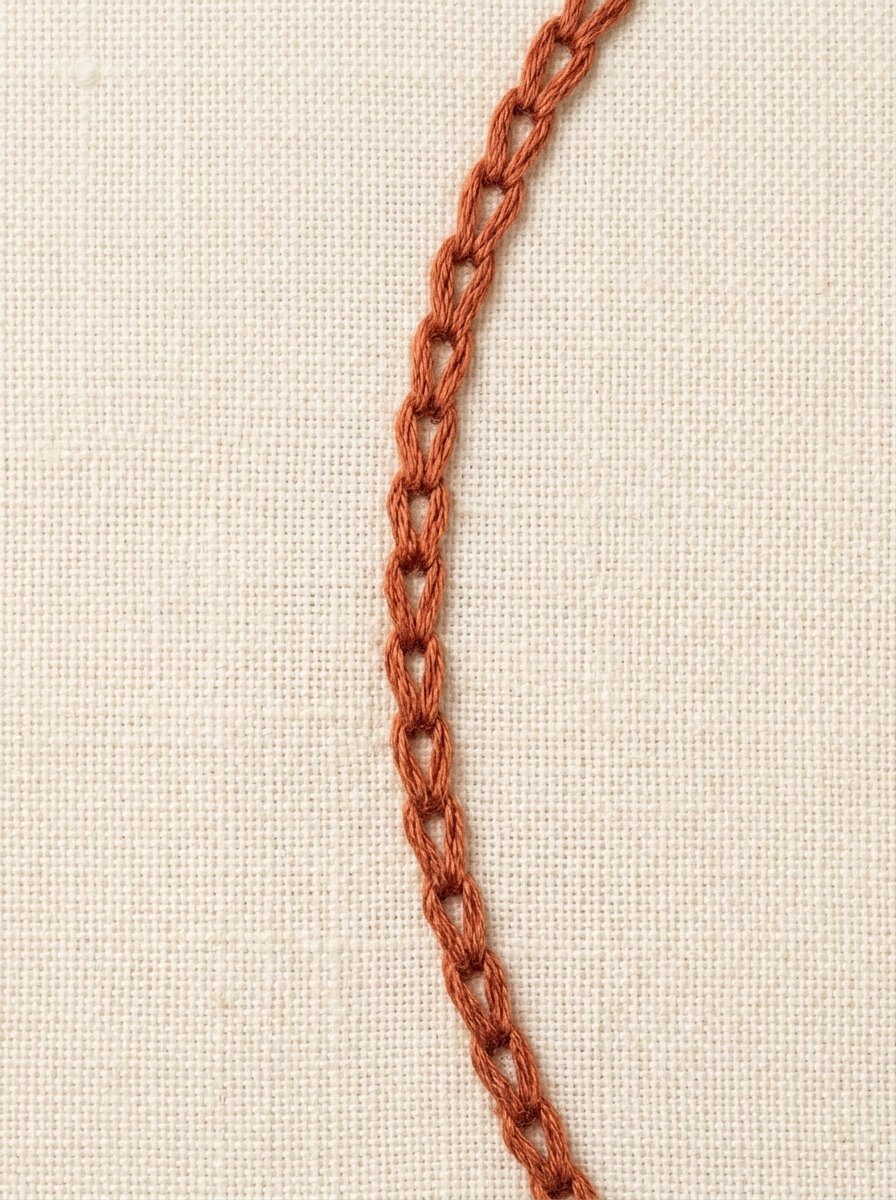

A line of linked loops. Come up at 1, go back down into the same hole, and come up a short distance ahead with the thread looped under the needle. Pull gently to form the first link, then start the next loop inside it. Finish with a tiny stitch over the last loop to hold it.
Best on clothes: chain stitch is the look of vintage western shirts and varsity script. It is bold and covers a lot of line quickly.
8. Couching
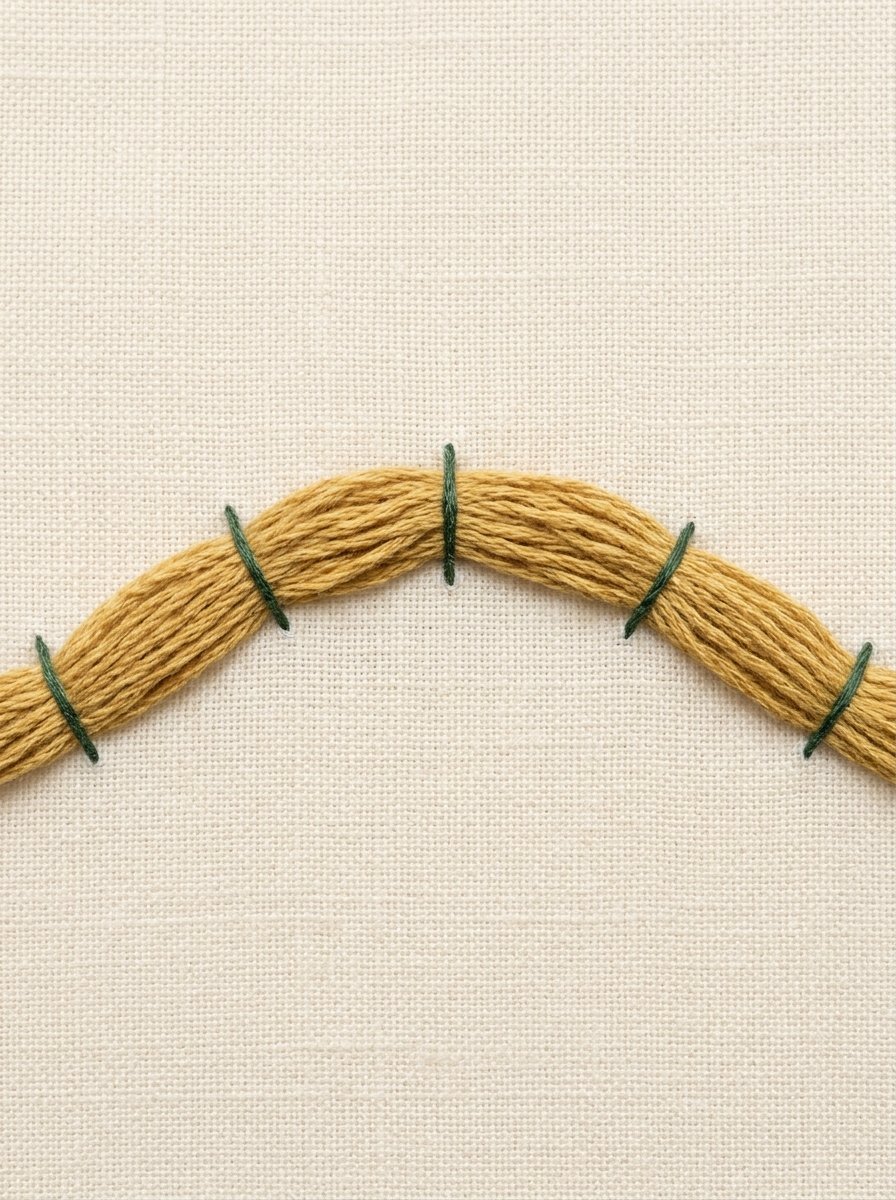
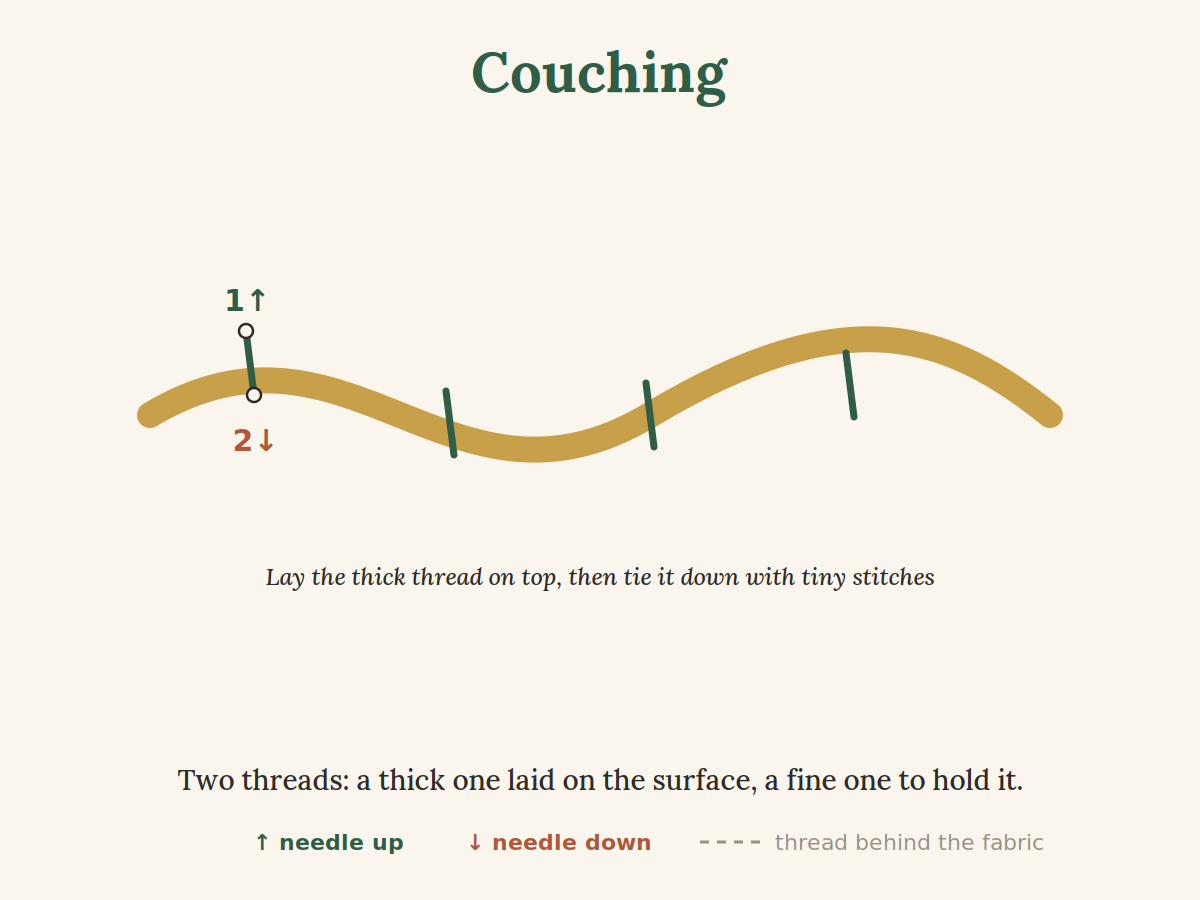
Couching uses two threads. Lay a thick thread, or a whole bundle of floss, on top of the fabric along your line. Then use a fine thread to make small stitches across it at regular intervals, tying it down. Take both ends of the thick thread to the back at the start and finish.
Best on clothes: the easiest way to add yarn, ribbon or metallic thread that is too thick to pull through the fabric. Lovely on chunky sweaters.
Ready to use these outline stitches on denim?
Jeans Embroidery Ideas: 12 Free Printable Patterns
Decorative and Edge Stitches
These stitches make lines with a pattern built in: combs, branches, zigzags. They are perfect along hems, cuffs, collars and pocket edges, where a plain line would look too quiet.
9. Blanket Stitch

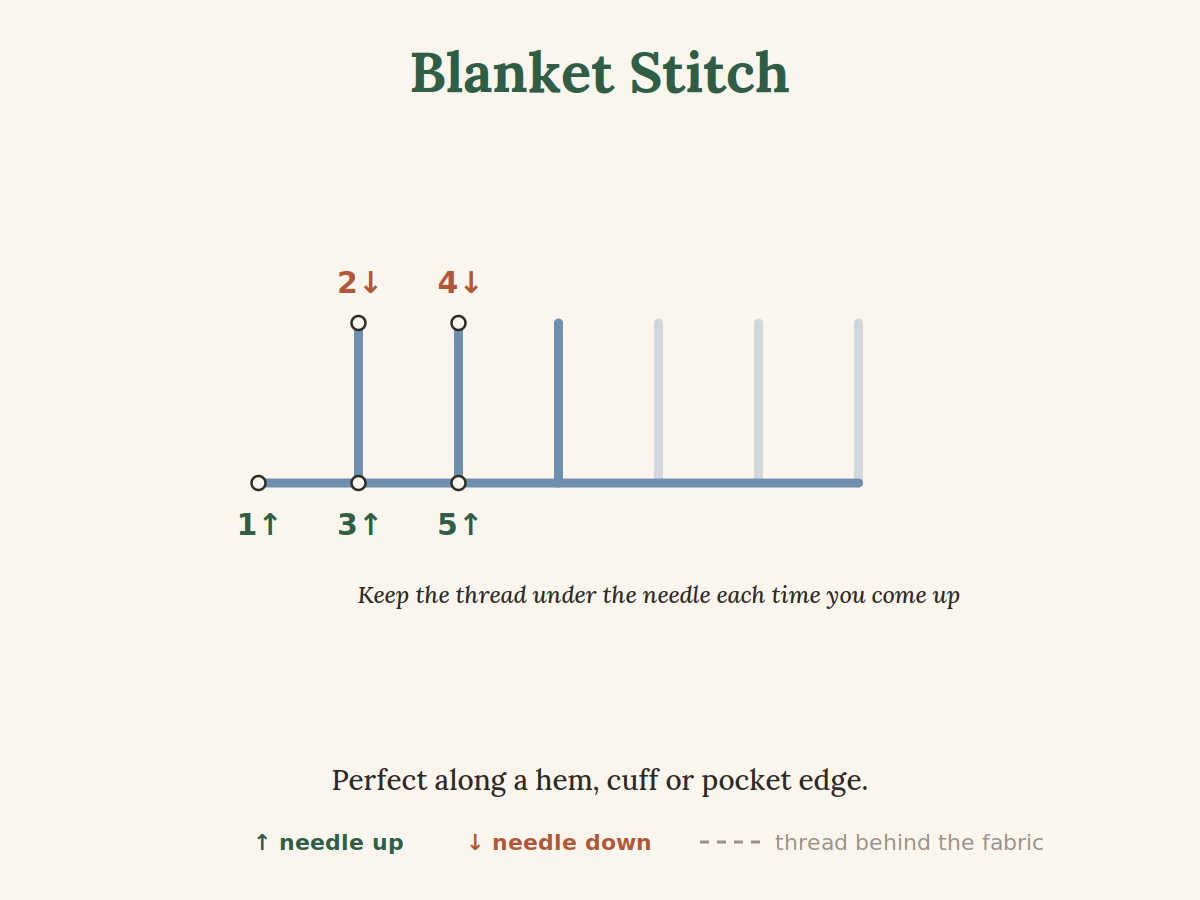
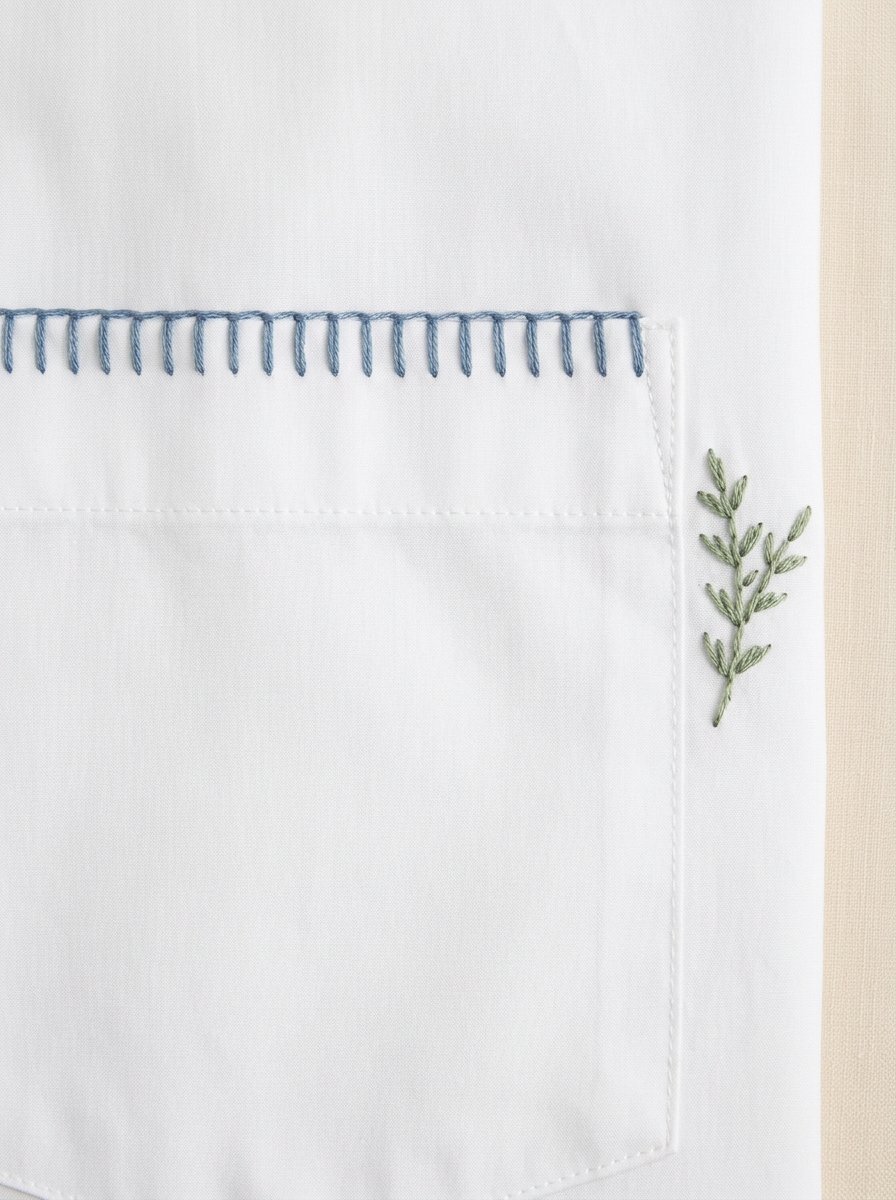
A straight line with evenly spaced legs, like a little comb. Come up on the baseline, go down at the top of the first leg, and come back up on the baseline directly below, with the thread under the needle. Pull through and the thread locks into an L. Repeat along the line.
Best on clothes: made for edges. Use it to finish a raw edge, outline a pocket, or stitch down a fabric patch on worn jeans.
10. Feather Stitch
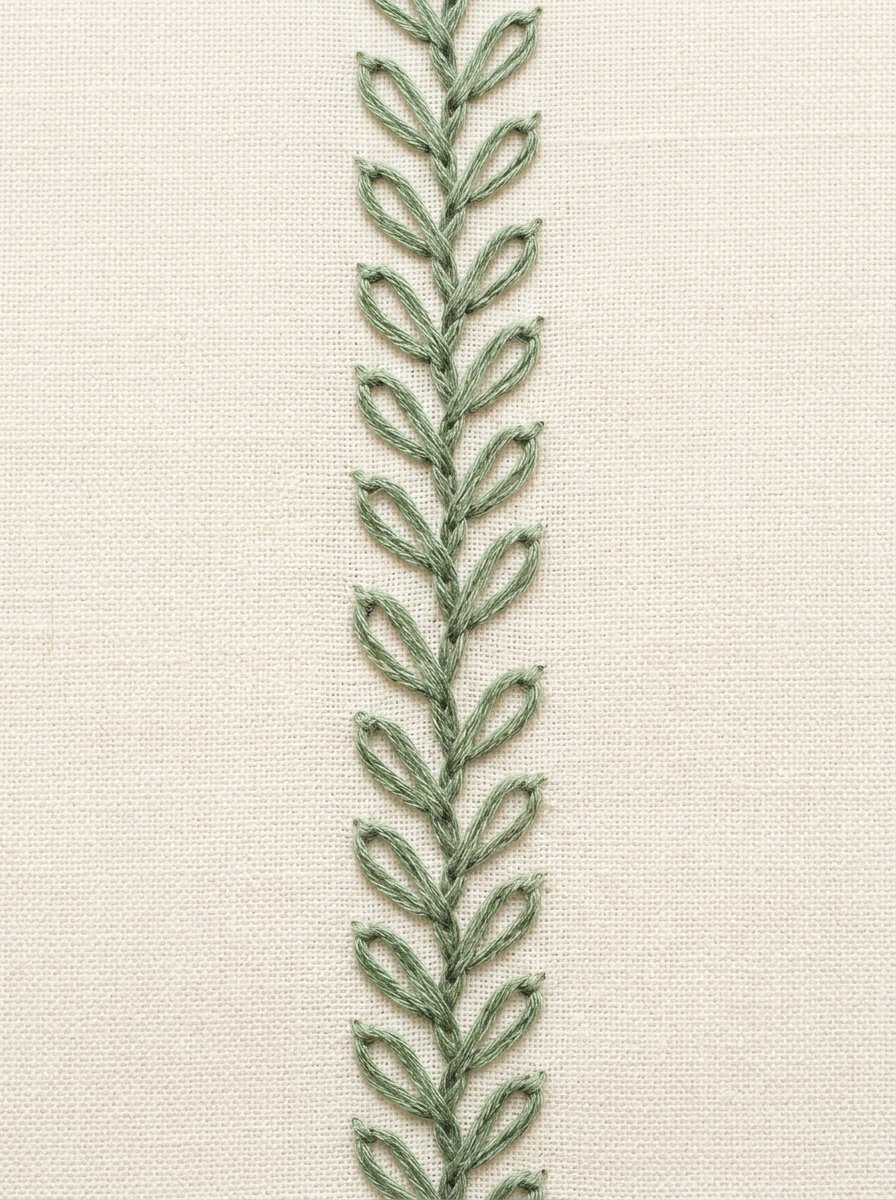
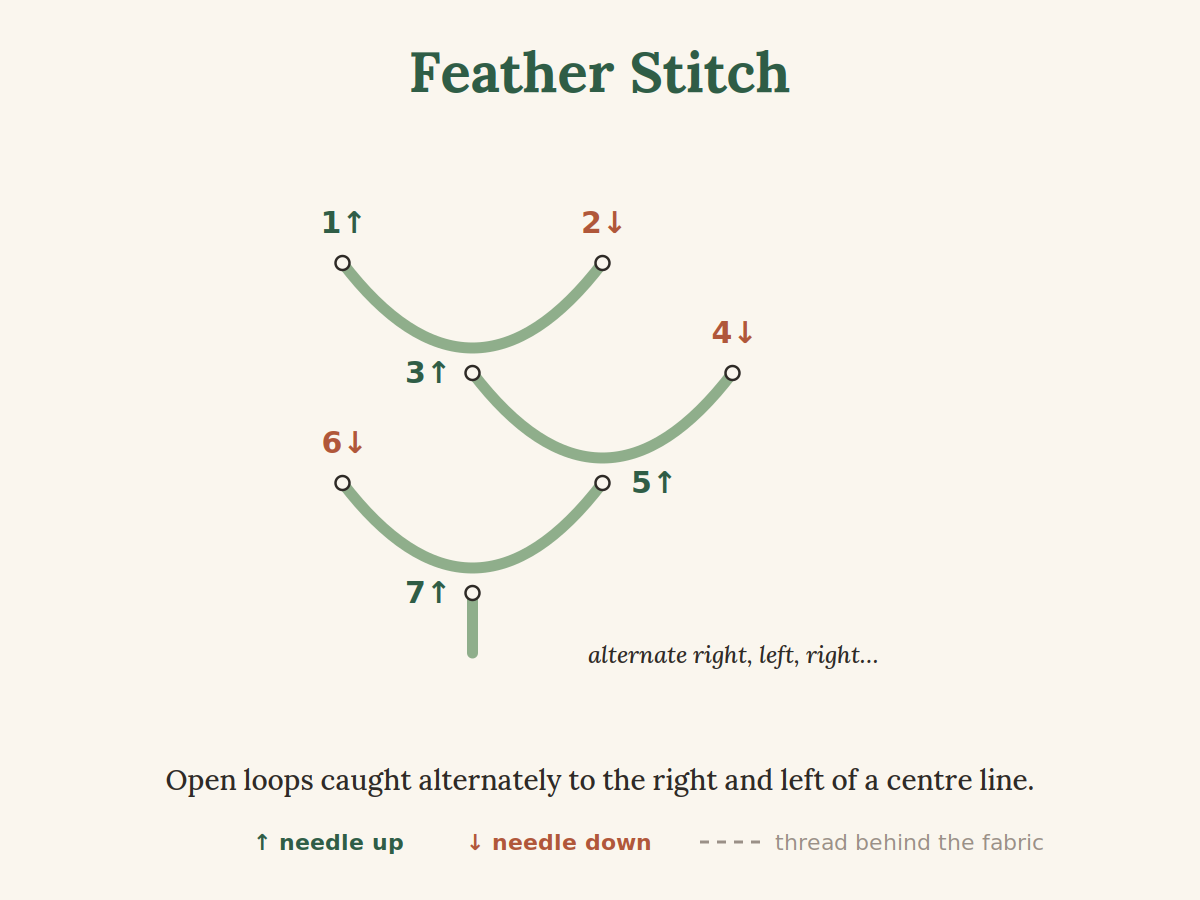
A branching line of open loops that looks like a fern or a twig. Come up at 1, go down at 2 level with it, and come up at 3 below the middle with the thread under the needle to catch the loop. From there, make the next loop to one side, then the next to the other, working down the line.
Best on clothes: airy and fast, so it is lovely for long botanical lines running down a sleeve or along a collar.
11. Fly Stitch
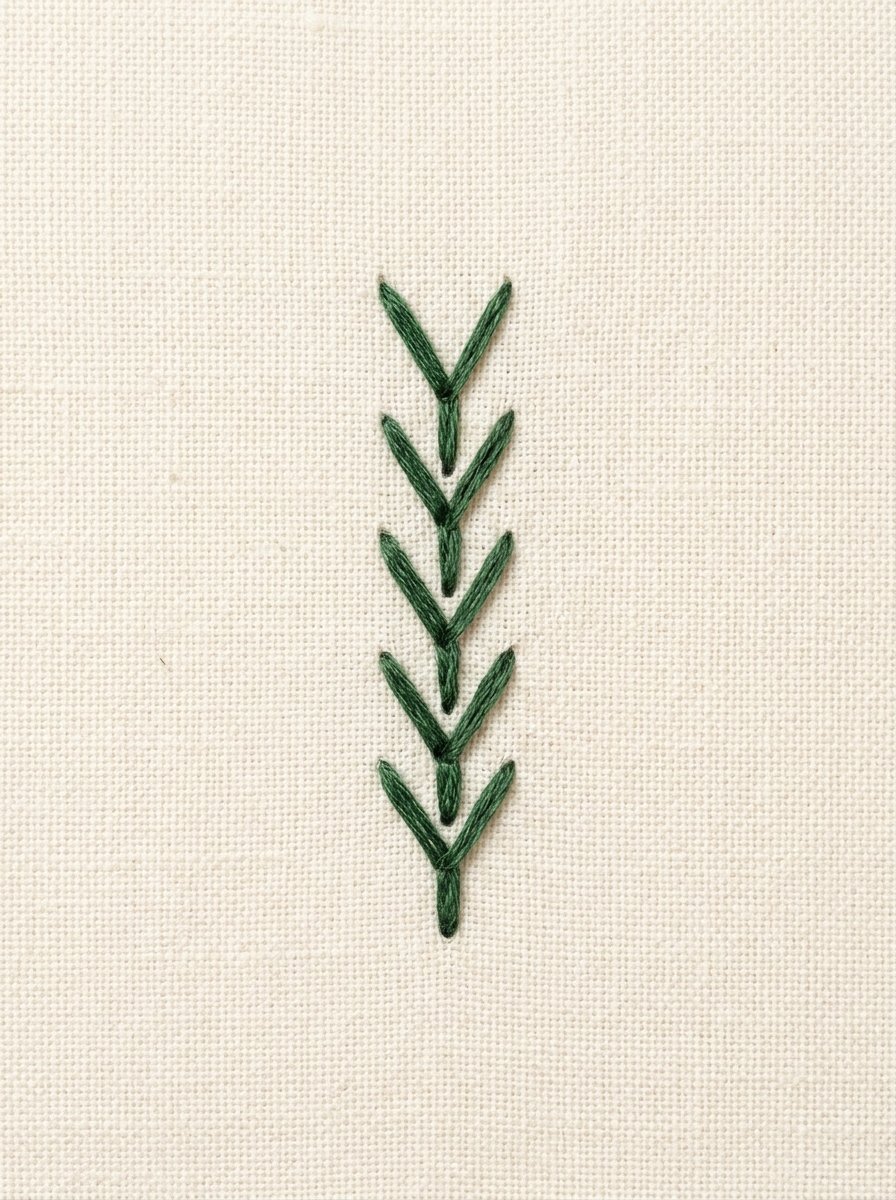
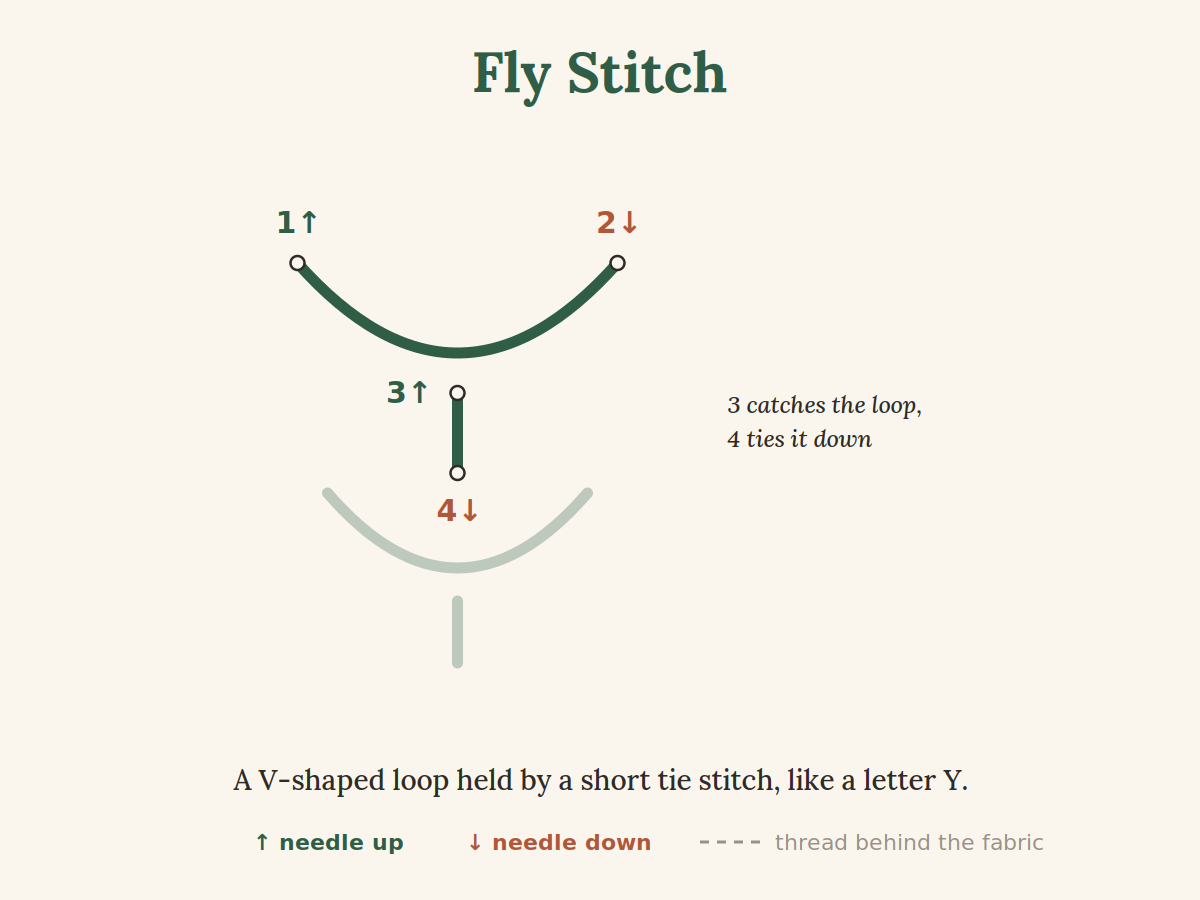
An open V held by a short tie, so each stitch looks like a letter Y. Come up at 1, go down at 2 without pulling tight, come up at 3 inside the loop, and go down at 4 to anchor it. Stack fly stitches one under another and you get a leafy sprig.
Best on clothes: the quickest way to stitch small leaves and wheat ears. Each one is anchored, so it stays put on a shirt that gets washed often.
12. Herringbone Stitch

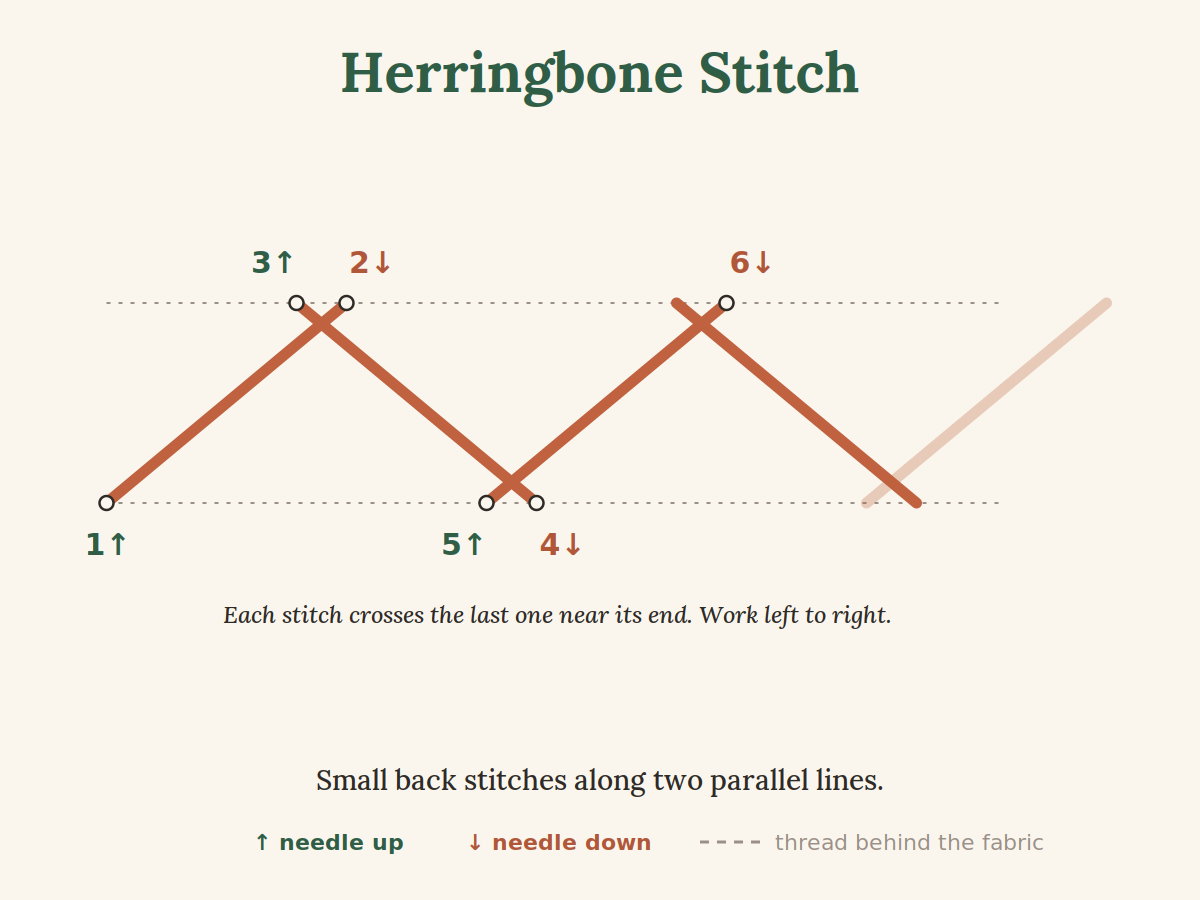
A band of crossing diagonals worked between two parallel guide lines, from left to right. Come up on the bottom line, go down on the top line further right, then take a small stitch backward along the top line. Cross down to the bottom line and take a small stitch backward again. Each stitch crosses the one before it near the ends.
Best on clothes: a neat decorative band for hems and waistbands. It also stretches a little, which makes it one of the friendlier border stitches for knits.
Filling Stitches
Filling stitches cover a shape with thread: a leaf, a petal, a heart. Some look glossy and smooth, some look textured. On clothes, keep filled shapes fairly small, because a large solid area stiffens the fabric.

13. Satin Stitch
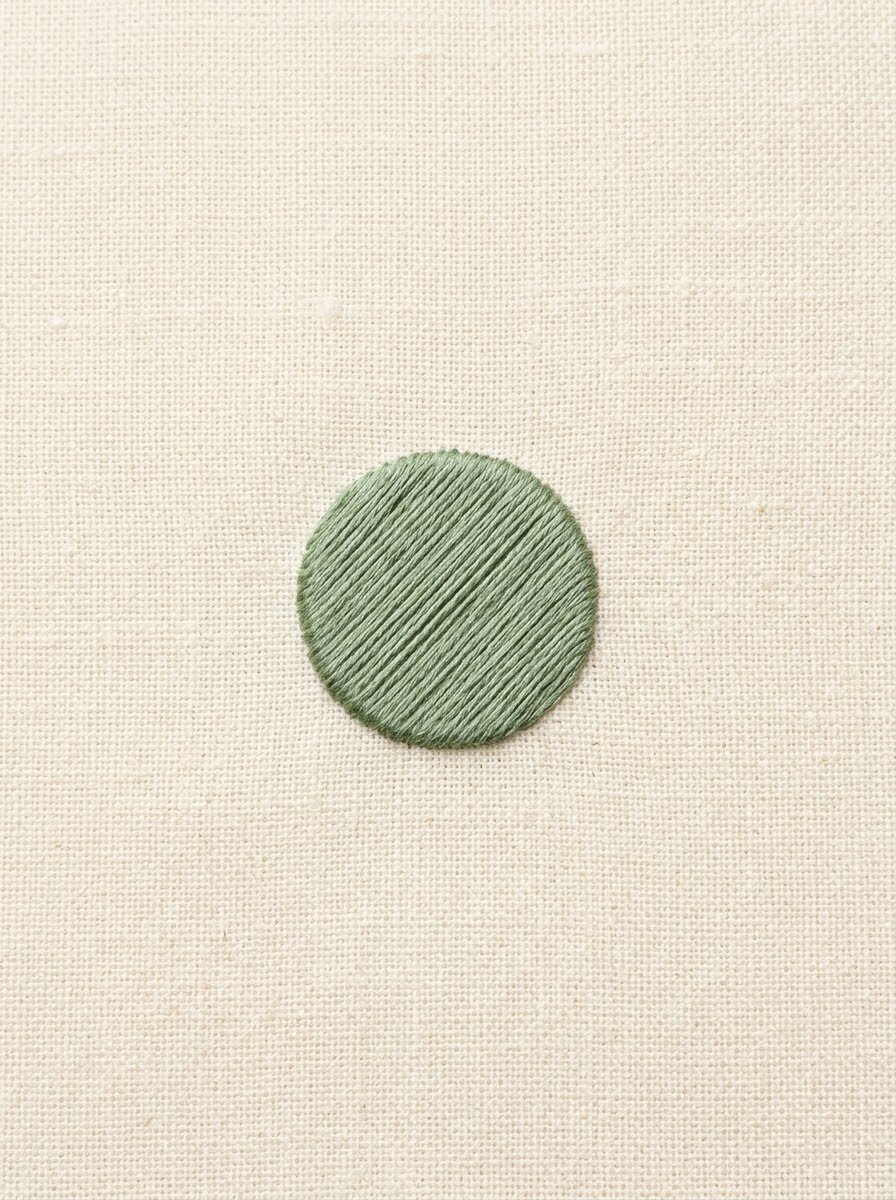
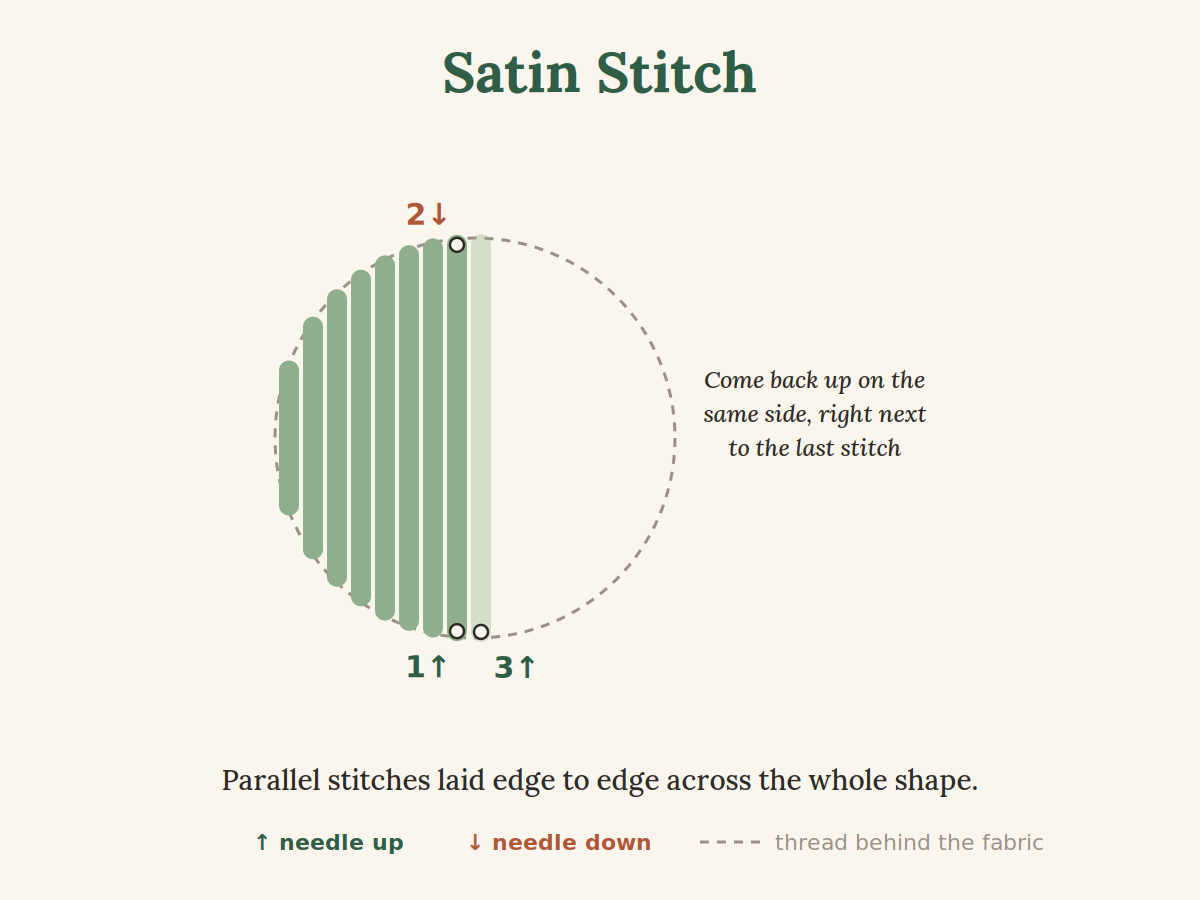
Straight stitches laid side by side across a whole shape, so close together that no fabric shows. Come up on one edge, go down on the opposite edge, and come back up on the first edge right next to where you started. Working from the middle of a shape out to each side helps keep the angle even.
Best on clothes: keep satin shapes small. Long stitches over a wide shape snag easily, and on stretchy knits they can pucker unless you use a stabilizer behind the fabric.
14. Long and Short Stitch
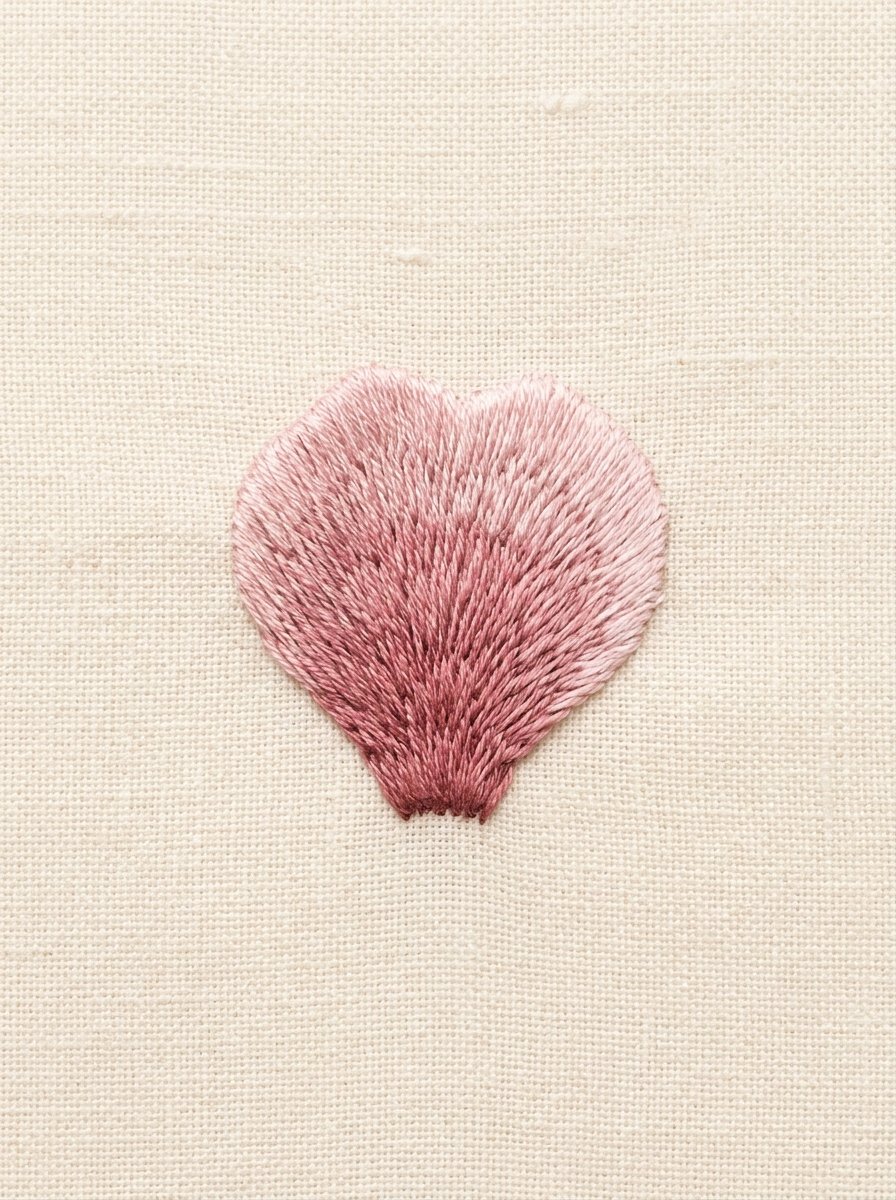
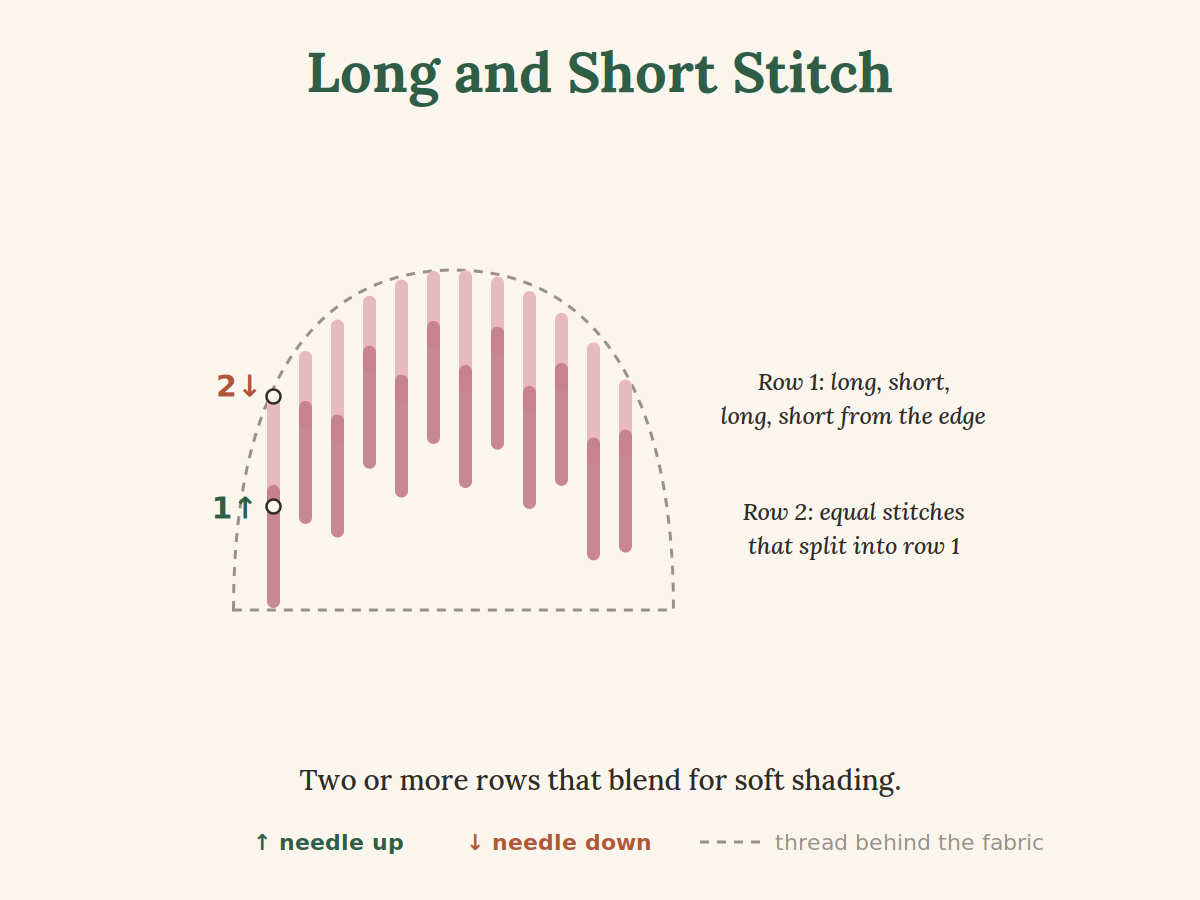
The stitch behind painterly, shaded flowers. Start at the outer edge with a row of alternating long and short stitches. For the next row, use a slightly different shade and make stitches of equal length that come up through the ends of the first row, filling the gaps. Each new row blends into the last one.
Best on clothes: because each stitch is short, it is more practical on garments than wide satin stitch. One shaded flower on a sweatshirt makes a real statement.
15. Seed Stitch

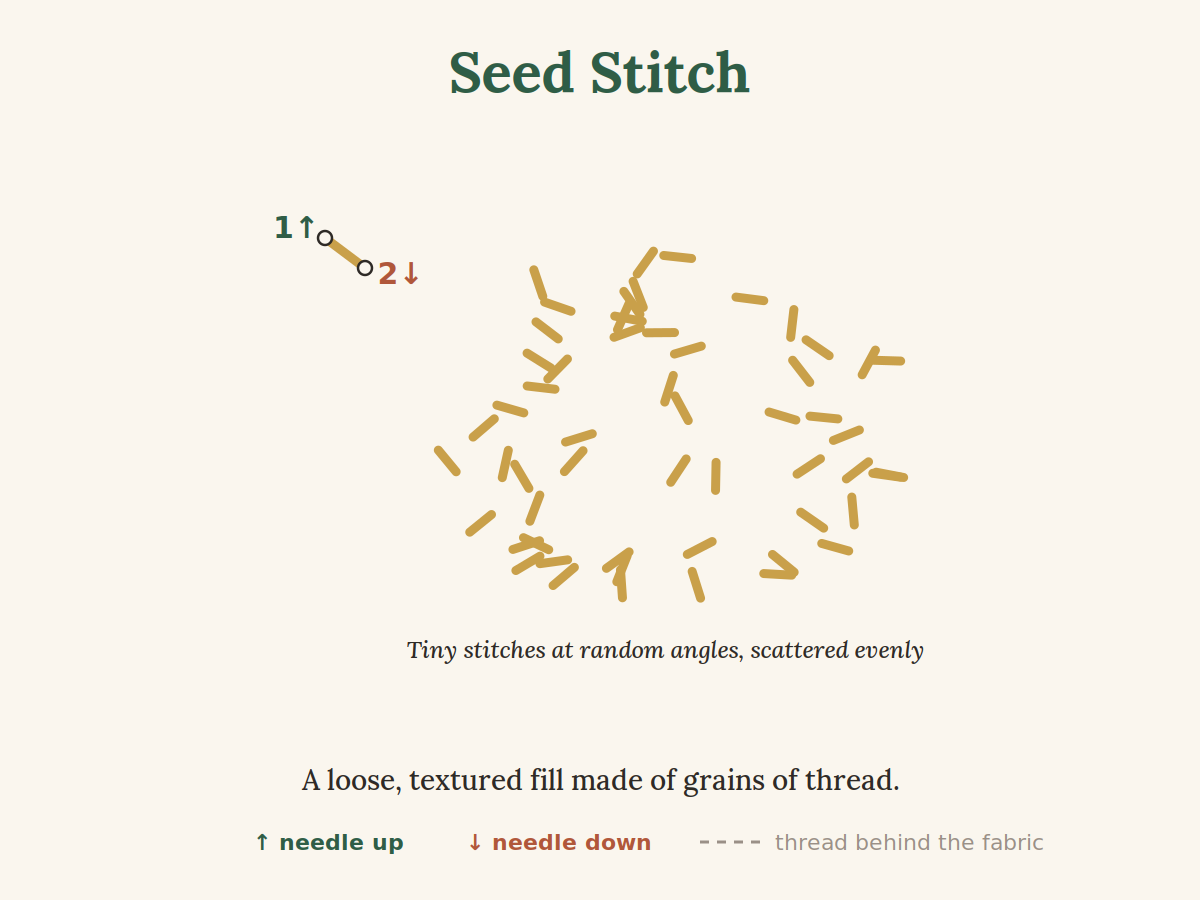
Tiny separate stitches, each about the size of a grain of rice, scattered at random angles across a shape. Keep the spacing roughly even and the angles truly mixed. Pack them closely for a solid texture, or space them out for a light, speckled look.
Best on clothes: a soft fill that keeps the fabric flexible, so it works well on T-shirts and kids’ clothes. Try it in a sunflower center.
Sunflower Embroidery on Clothes: 8 Ideas for Denim, Shirts and Sweatshirts
16. Fishbone Stitch
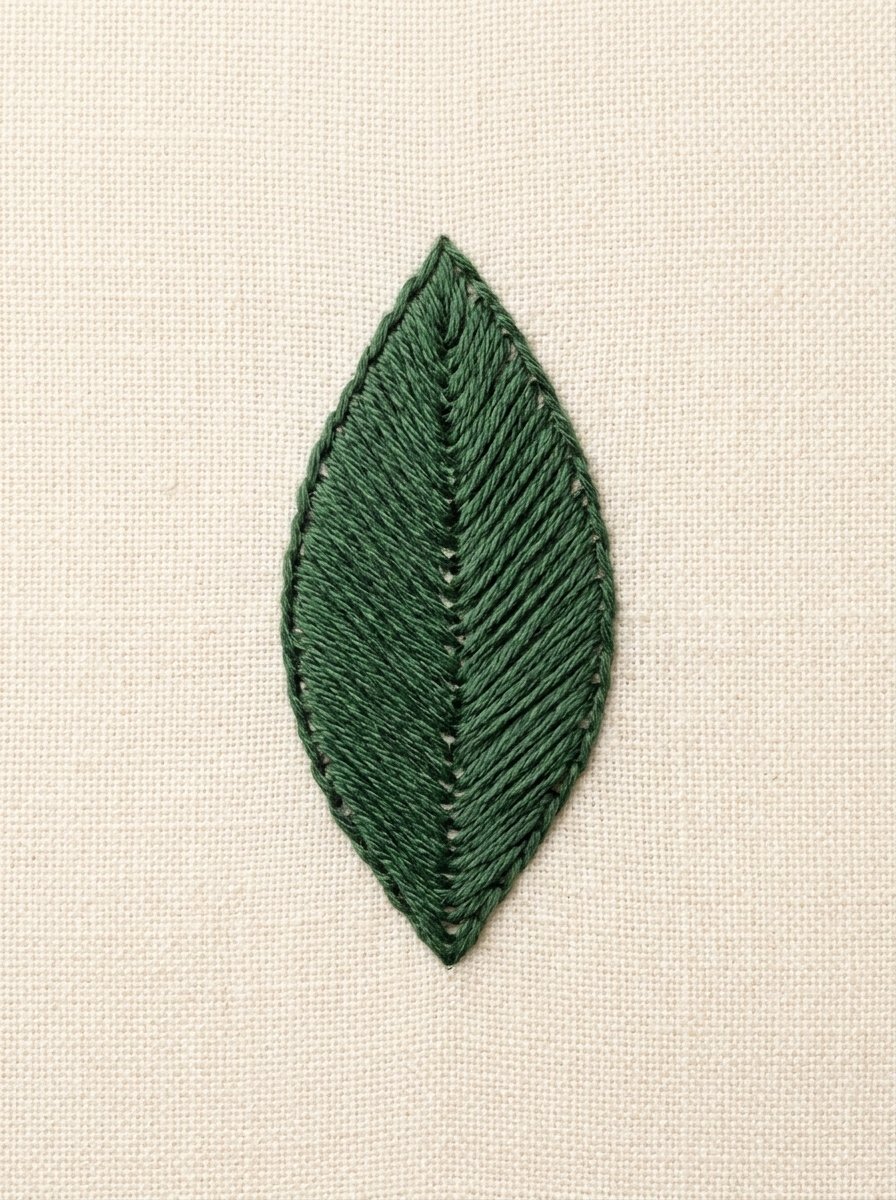
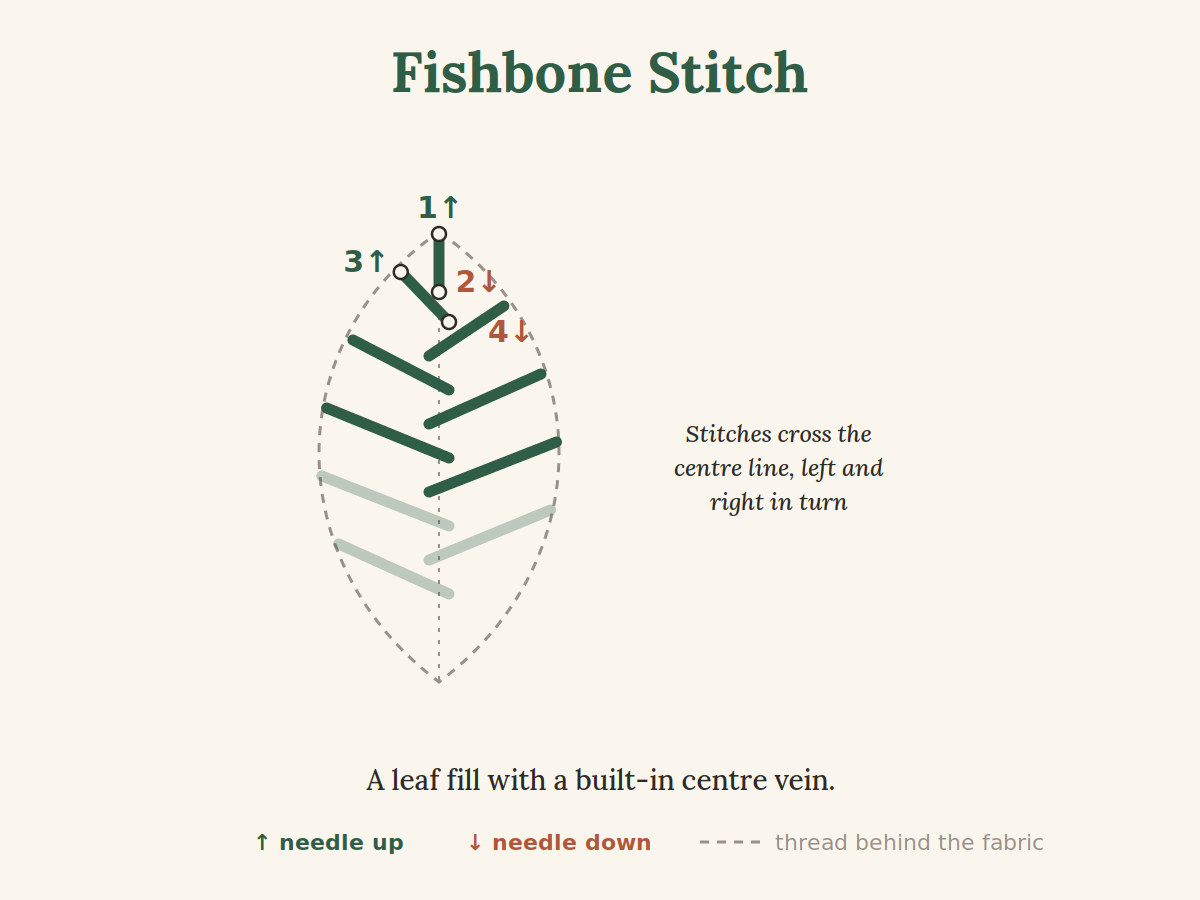
A leaf fill with a center vein built in. Start with one short straight stitch at the tip along the center line. Then work slanted stitches from the left edge and the right edge in turn, each one crossing just past the center line. The overlaps form the vein down the middle.
Best on clothes: the most natural-looking leaf you can stitch, and it holds together well, so it is a good choice for leaves on denim and canvas.
Put your leaves and fills to work in a full design:
20 Flower Embroidery Designs to Stitch on Your Clothes (Free Printable Patterns)
Knots and Flower Stitches
These stitches sit up off the fabric and add texture: dots, buds, petals and little roses. They take a few tries to get right, and then they become the most fun part of any design.

17. French Knot

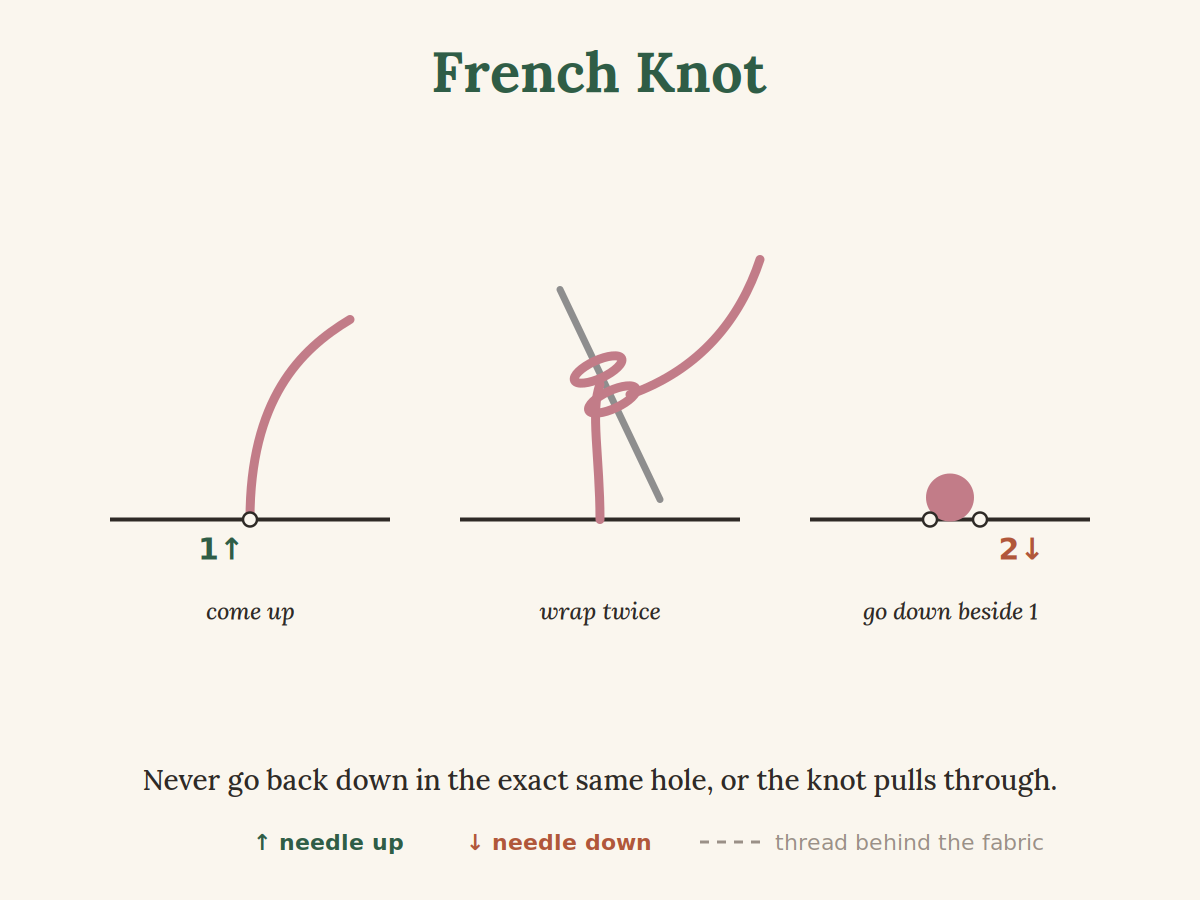
A small round knot that sits on top of the fabric. Come up where you want the knot, wrap the thread around the needle once or twice, and hold the wraps snug with your other hand. Take the needle down right beside where it came up, not in the same hole, and pull through slowly while still holding the thread.
Best on clothes: perfect for flower centers and polka dots. Make a bigger knot with more strands rather than more wraps, because loose extra wraps are what makes knots come undone.
18. Bullion Knot
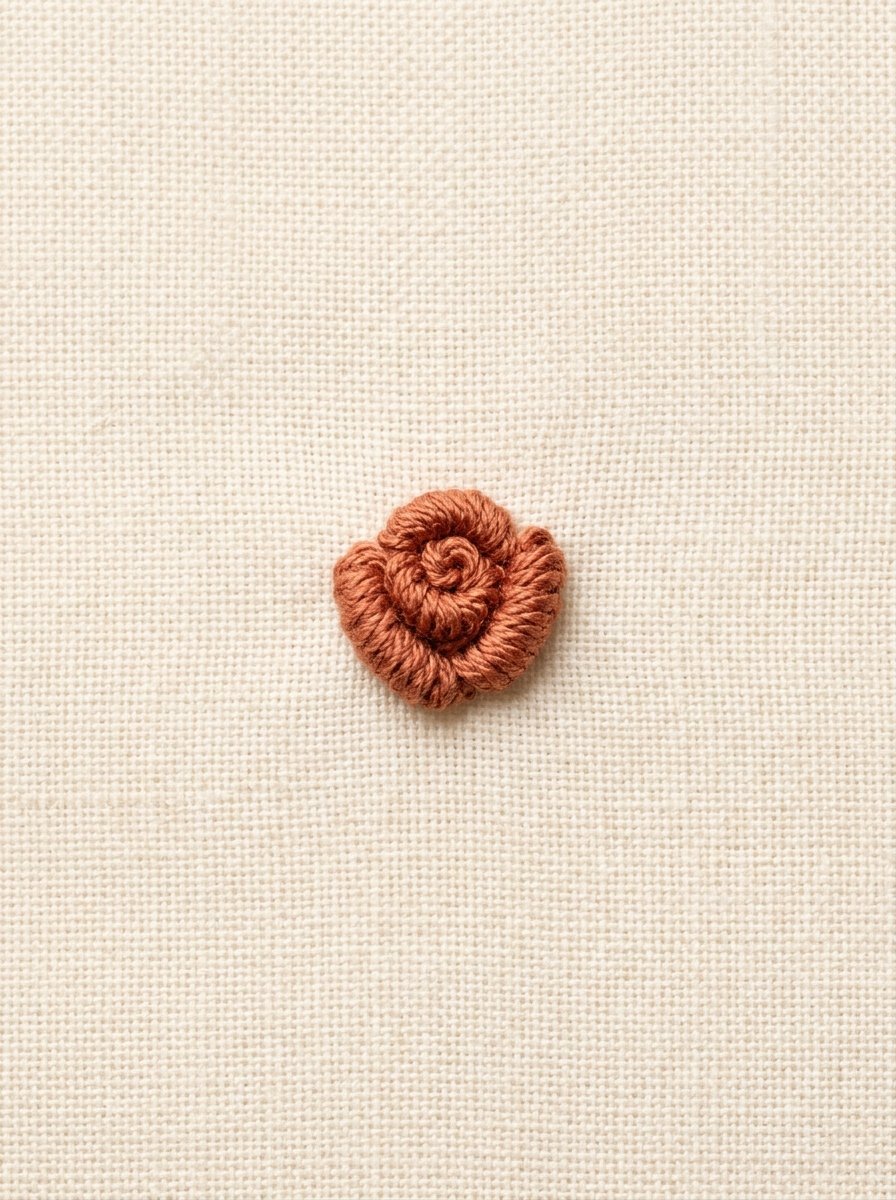

A long coil of thread that looks like a tiny caterpillar. Come up at 1, go down at 2 to set the length, and come back up at 1, leaving the needle halfway through the fabric. Wrap the thread around the needle until the wraps cover the distance between 1 and 2. Hold the wraps, pull the needle through, lay the coil flat and go down at 2.
Best on clothes: a needle with a narrow eye (a milliner or straw needle) makes the wraps slide off much more easily. Several curved bullions make a rose. Place them where they will not rub, such as a yoke or a chest pocket.
19. Lazy Daisy Stitch
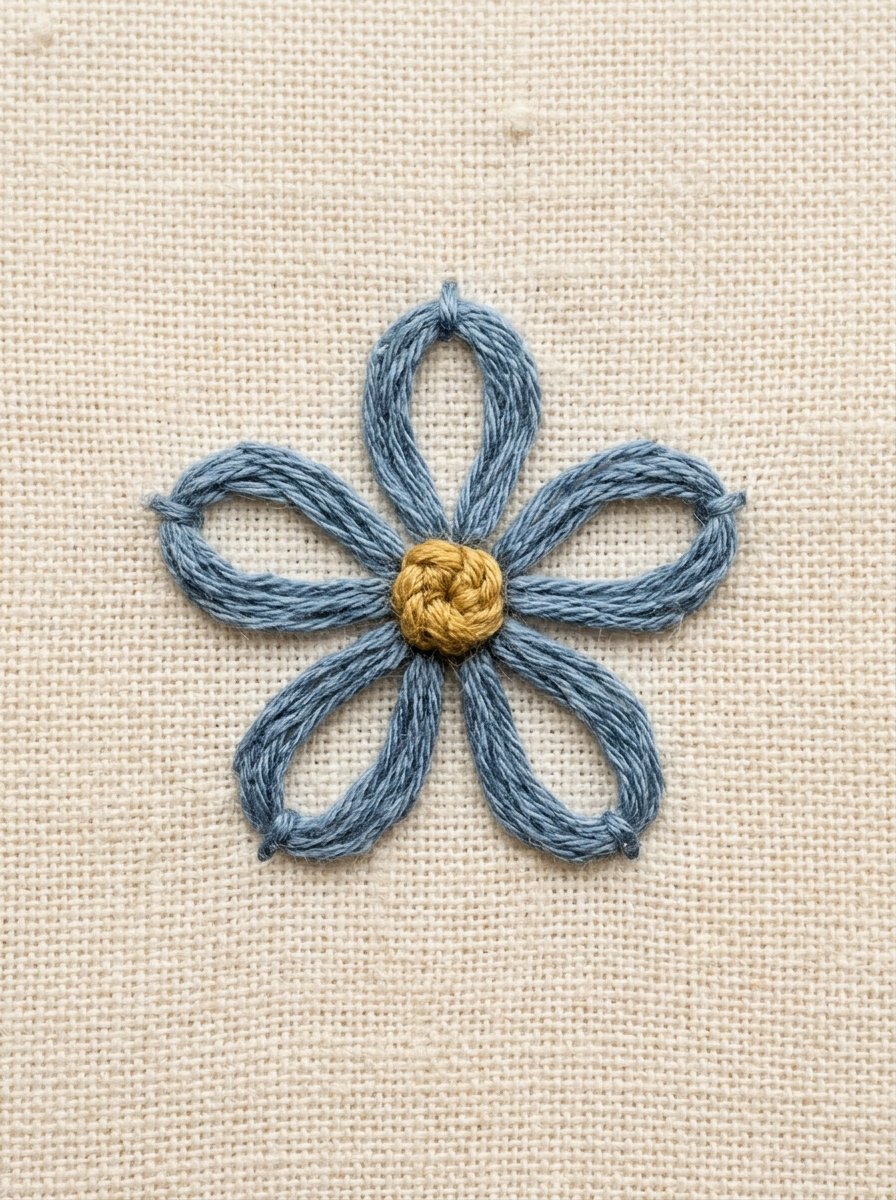
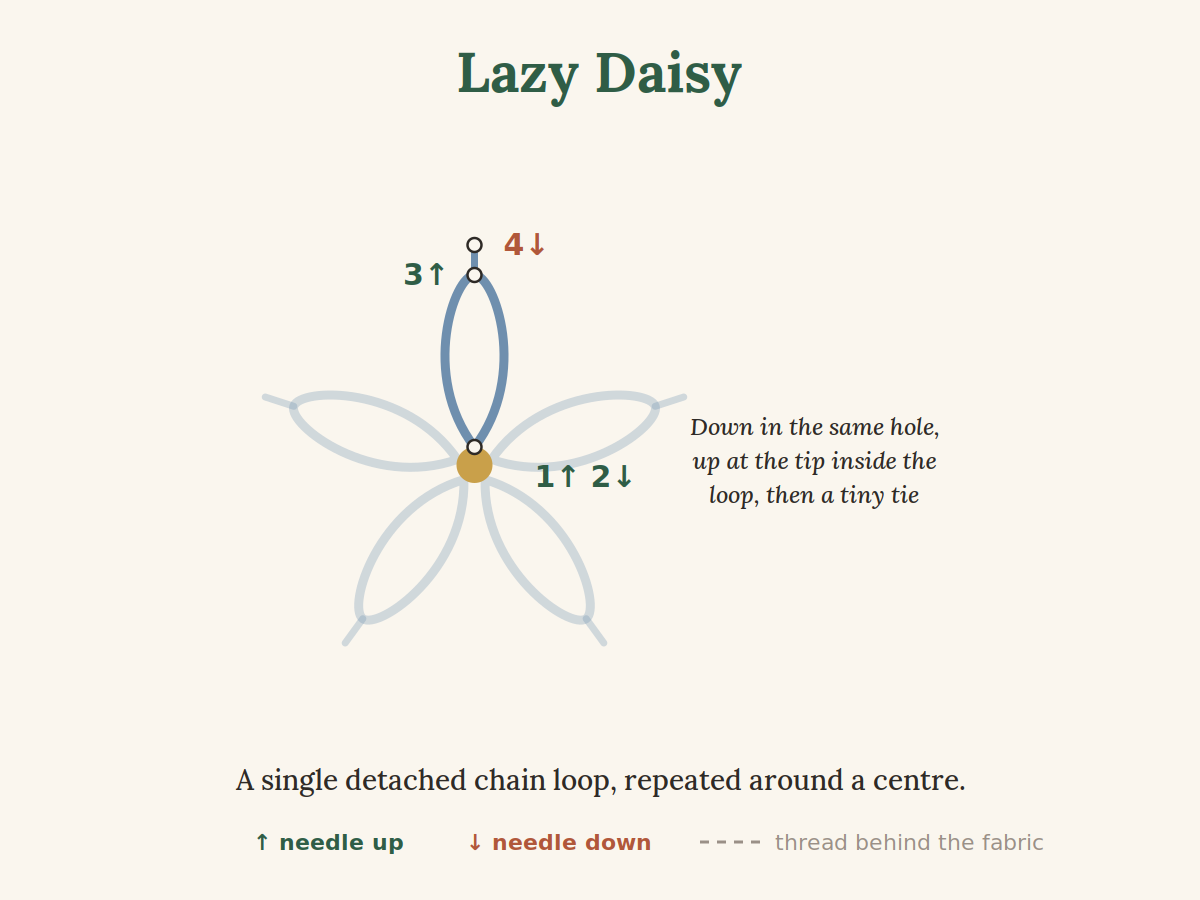
Also called detached chain: a single chain loop held at the tip by a tiny stitch. Come up at the flower center and go back down into the same hole, leaving a loop. Come up at the petal tip inside the loop, then go down just past it to tie the loop in place. Repeat around the center for a whole flower.
Best on clothes: the easiest flower to stitch and one of the cutest on cardigans, kids’ clothes and the corners of a collar.
20. Woven Wheel Stitch


Also called the spider web rose. Stitch five straight spokes from the center outward; the number must be odd so the weaving alternates on every round. Bring a new thread up near the center and weave over one spoke and under the next, round and round, without going through the fabric. Stop when the spokes are covered and the rose looks plump.
Best on clothes: big, raised and quick. Woven roses look wonderful on denim jacket backs, but keep them away from spots you sit or lean on.
Turn lazy daisies, knots and woven roses into easy motifs:
Simple Flower Embroidery Designs: 15 Easy Motifs with Free Printable Patterns
Free Printable Hand Embroidery Stitches Cheat Sheet
Keep all 20 stitches next to your hoop. The cheat sheet fits on one US Letter page and has every diagram from this guide, with the same numbering. Print it at actual size and tuck it into your embroidery kit.

Tips for Stitching on Clothes
- Wash first. Wash and dry a new garment before you stitch, so any shrinking happens before the embroidery is in.
- Stabilize knits. Sweatshirts, T-shirts and cardigans stretch while you stitch. A piece of stabilizer on the inside keeps stitches even and stops puckering.
- Do not drag the hoop. Move the hoop instead of stretching the fabric to reach a spot, and take it off when you stop for the day.
- Keep the back tidy. Weave thread ends under stitches on the back instead of tying big knots, and avoid long jumps between motifs, which catch on fingers and jewelry.
- Wash gently. Turn embroidered clothes inside out, wash cold on a gentle cycle and air dry.
Find a project for your favorite jacket:
Denim Jacket Embroidery Ideas: 12 Free Printable Patterns
FAQ
What are the basic hand embroidery stitches for beginners?
Start with running stitch, backstitch, stem stitch, satin stitch, French knot and lazy daisy. Those six cover lines, curves, fills, dots and flowers, which is enough to stitch most simple designs.
How many strands of floss should I use?
Two or three strands work for most stitches on clothes. Use one strand for tiny details and lettering, and four to six strands for bold lines, French knots with more presence, and woven wheels.
Which embroidery stitches hold up best on clothes?
Stitches made of short, anchored pieces of thread last longest: backstitch, split stitch, stem stitch, chain stitch, fly stitch and seed stitch. Long loose stitches, wide satin fills and big raised knots are more likely to snag, so save them for small motifs or low-wear areas.
Do I need a stabilizer to embroider on a sweatshirt?
It is strongly recommended for any stretchy fabric. Without it, the knit stretches as you pull the thread, and the stitches pucker once the hoop comes off. Woven fabrics like denim and cotton shirts usually do not need one.
How do I stop French knots from coming undone?
Go down beside the starting point, never in the same hole, keep the wraps snug against the needle, and hold the working thread until the knot has settled on the fabric. If you need a bigger knot, add strands instead of extra wraps.

