Border Embroidery Designs: 15 Easy Hand Embroidery Borders for Clothes (Free Printable Patterns)
A border is the easiest way to make a plain garment look finished. One line of stitches along a shirt placket, a cardigan edge or a jeans seam frames the whole piece, and because a border repeats the same small unit again and again, your hands learn the rhythm after the first inch.
Below are 15 border embroidery designs for clothes: seven stitch borders built from scallops, chains and zigzags, and eight floral borders with vines, buds and tiny blooms. Each one comes with the stitches, DMC colors and step-by-step instructions, so you can pick a border tonight and start on the edge of something you already own.
In This Post
- What You Will Need
- Before You Start: Stitching a Straight Border
- 15 Border Embroidery Designs
- 1. Scalloped Buttonhole Border
- 2. Double Crossed Chain Border
- 3. Braided Chain Border
- 4. Lazy Daisy Zigzag Border
- 5. Crossed Chain Lattice Border
- 6. Diamond Flower Border
- 7. Feather Stitch Fern Border
- 8. Daisy Vine Border
- 9. Forget-Me-Not Border
- 10. Lavender Sprig Border
- 11. Whipped Spiral Border
- 12. Rose Vine Border
- 13. Blue Daisy Vine Border
- 14. Wildflower Meadow Border
- 15. French Knot Bud Border
- Border Embroidery FAQ
What You Will Need
- A garment with a straight edge — a shirt placket, cuff, cardigan front, hem or side seam. Woven cotton, linen and denim are the easiest to stitch on.
- Six-strand embroidery floss — DMC numbers are listed for every design below.
- Embroidery needles, size 5–7 — a sharp crewel needle goes through denim and tight weaves cleanly.
- A 5–6 inch embroidery hoop — you move it along the border as you go.
- A water-soluble fabric pen for marking guide lines and motifs.
- A clear quilting ruler to keep the border parallel to the edge.
- Small embroidery scissors.
- Stick-and-stitch stabilizer (optional) — handy on knits like sweatshirts and cardigans.
Before You Start: Stitching a Straight Border
Mark two guide lines. Use a ruler and a water-soluble pen to draw two parallel lines along the edge — they set the width of the border and keep it from drifting. Most borders here sit between them; a center line helps for vines and chains.
Mark the repeat, not the whole border. Tick marks every half inch or inch show where each flower, scallop or diamond goes. Even spacing does more for a border than perfect individual stitches.
Start in the middle of a long edge. On a placket or hem, begin at the most visible point and work outward, so any small changes in tension end up near the seams.
Keep tension even. Chain and buttonhole borders pucker if pulled tight. Let each loop sit on the fabric rather than squeeze it.
Wash and dry the garment first. Pre-washing means the fabric shrinks before you stitch, not after.
New to any of the stitches below? The stitch guide walks through each one with diagrams:
Hand Embroidery Stitches: 20 Basic Stitches for Beginners (Free Printable Cheat Sheet)
From Maker Warmth
Looking for your next stitch project?
Every pattern on this blog is free to print, from tiny bows to full denim jacket designs. Save this one, then browse the whole collection.
See all free patterns →15 Border Embroidery Designs
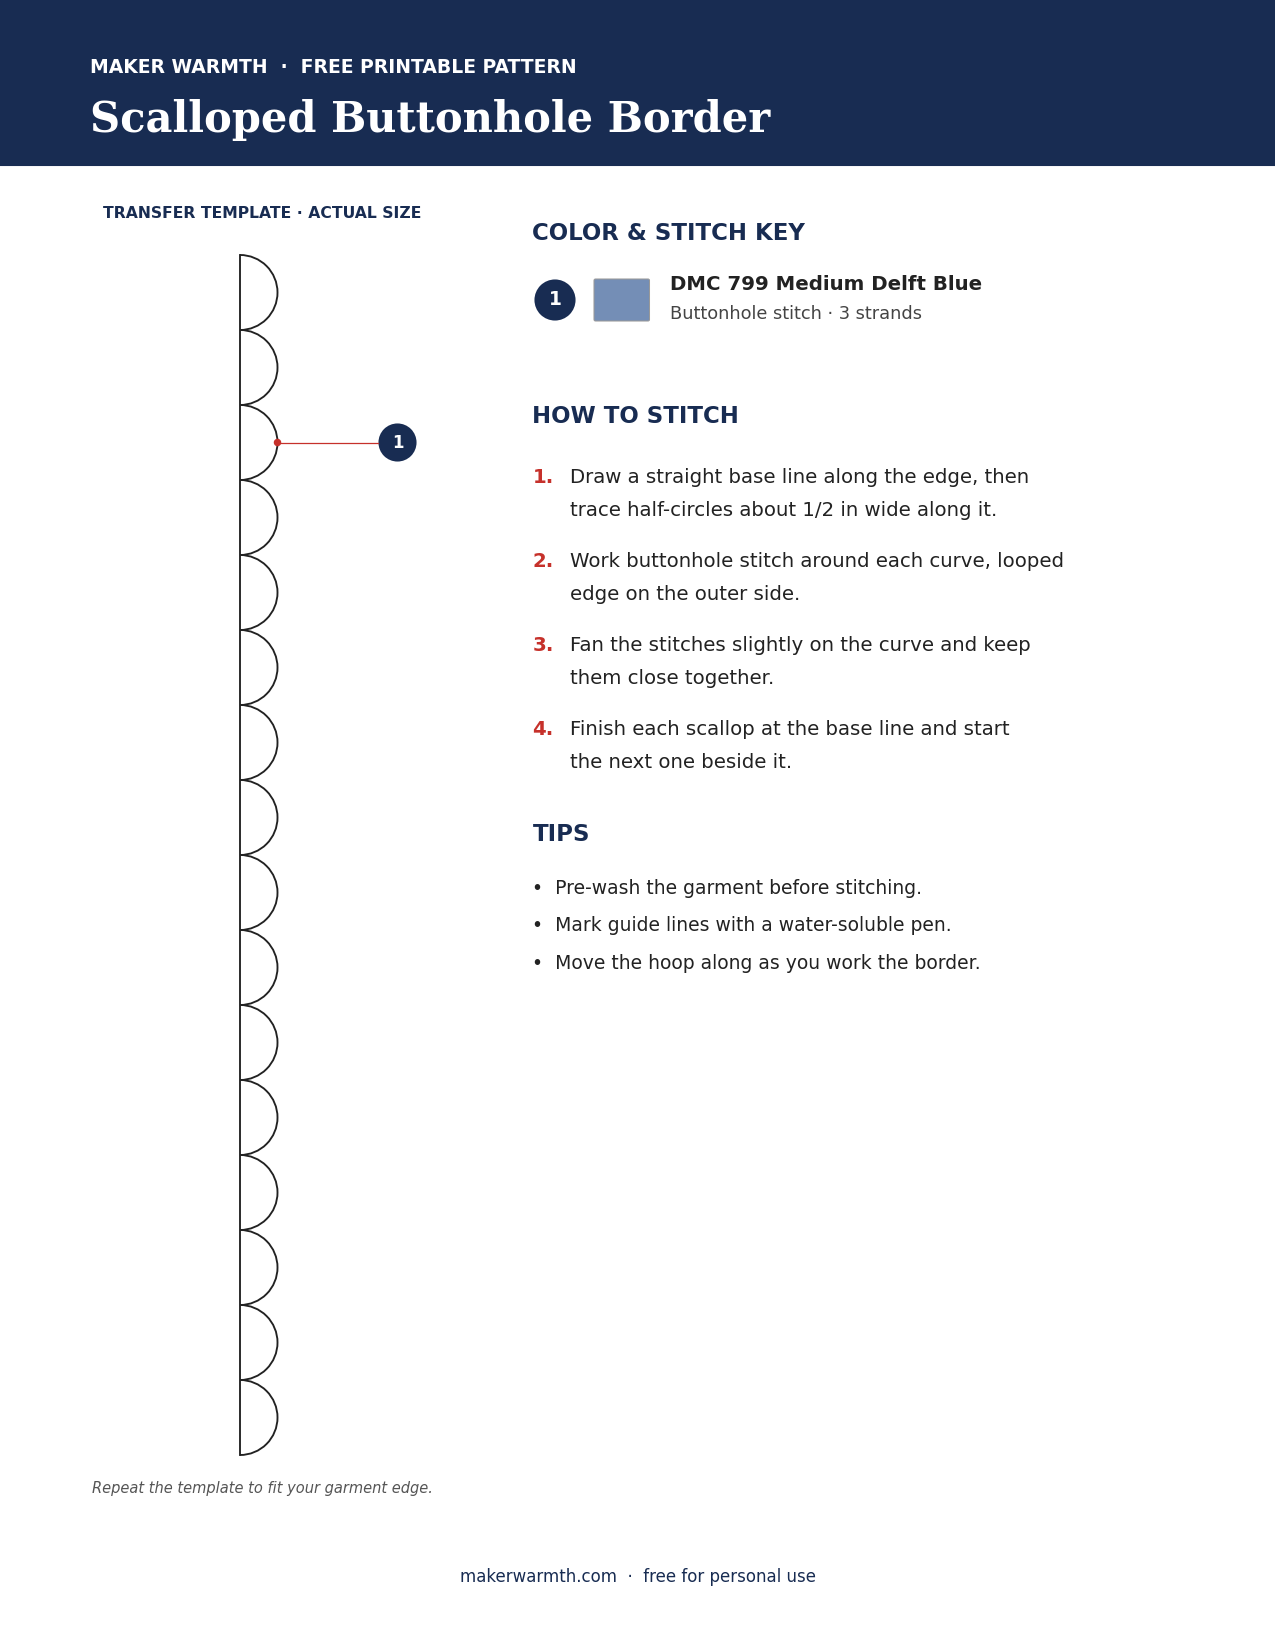
1. Scalloped Buttonhole Border

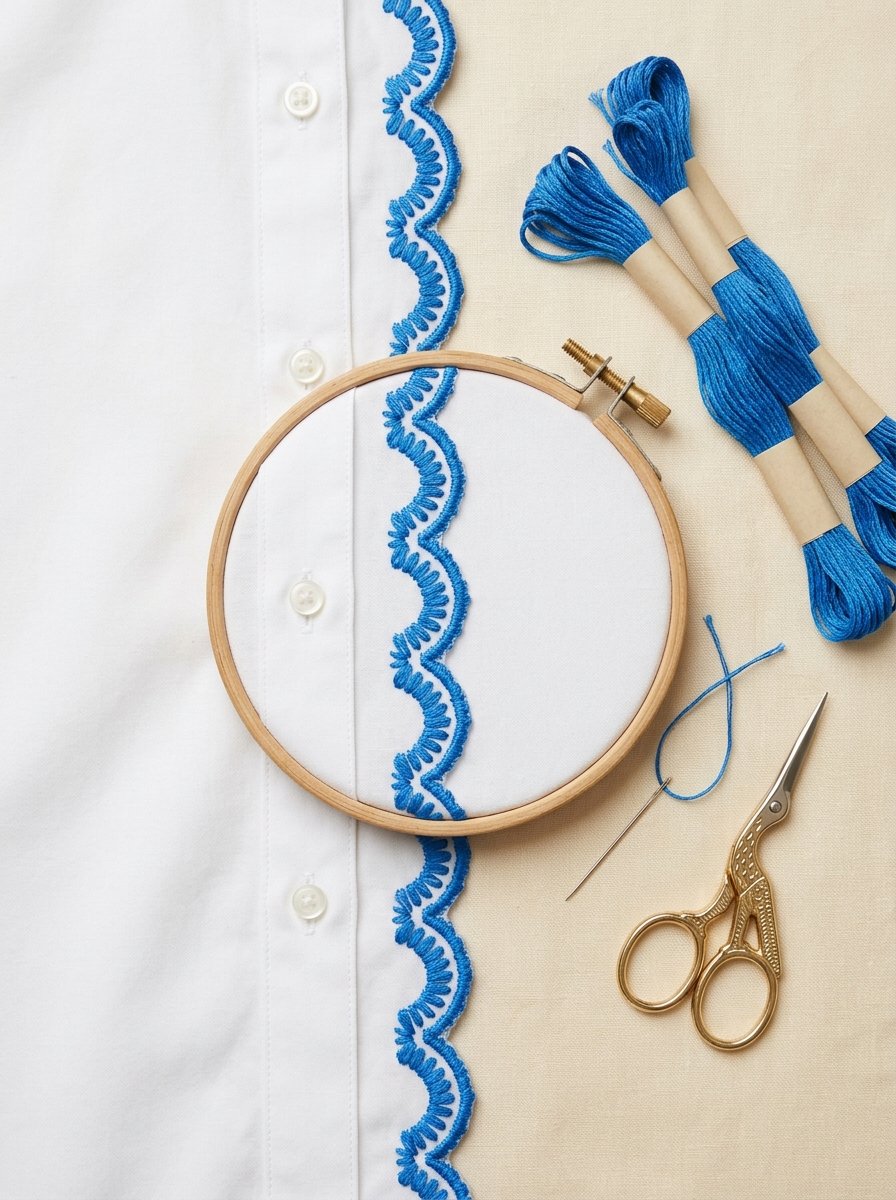
A row of rounded scallops along a white shirt placket looks like vintage trim, yet it is one stitch repeated. Bright blue on white keeps it crisp; navy or red work just as well.
Stitches: buttonhole stitch, back stitch (optional outline)
Colors: DMC 799 Medium Delft Blue
Strands: 3
- Draw a straight base line along the edge, then trace half-circles about 1/2 inch wide along it using a coin or bottle cap.
- Work buttonhole stitch around each curve, with the looped edge on the outer side of the scallop.
- Fan the stitches slightly on the curve and keep them close together so no fabric shows between them.
- Finish each scallop at the base line and start the next one right beside it.
Download the Free Printable PDF
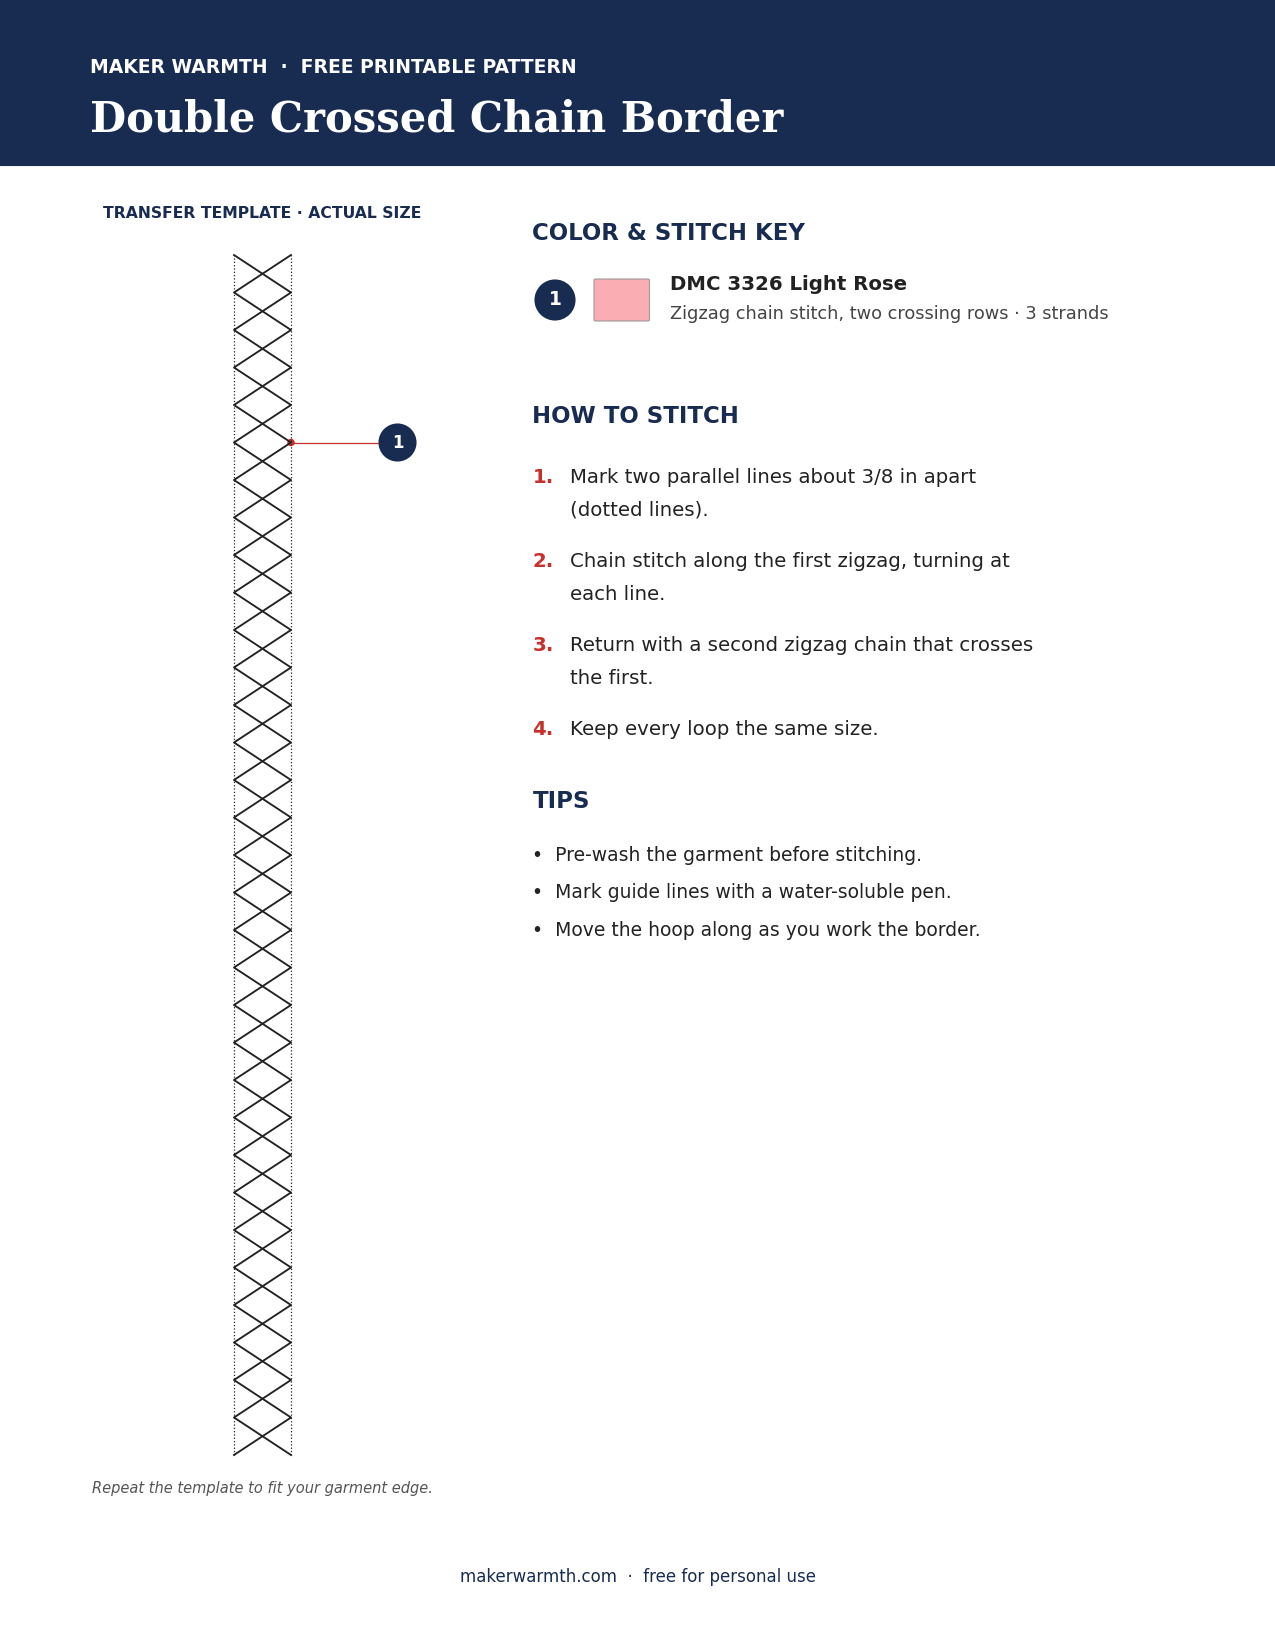
2. Double Crossed Chain Border

Two rows of chain loops that lean into each other and form a neat column of pink links. It reads as lace from a distance and looks lovely on ivory, cream or white cotton.
Stitches: open chain stitch, zigzag chain stitch
Colors: DMC 3326 Light Rose
Strands: 3
- Mark two parallel lines about 3/8 inch apart.
- Work a chain stitch that alternates from the left line to the right line, so each loop sits at an angle.
- Return along the same lines with a second zigzag chain, crossing the first so the loops interlock.
- Keep the loops the same size; mark the turning points every 1/4 inch if needed.
Download the Free Printable PDF
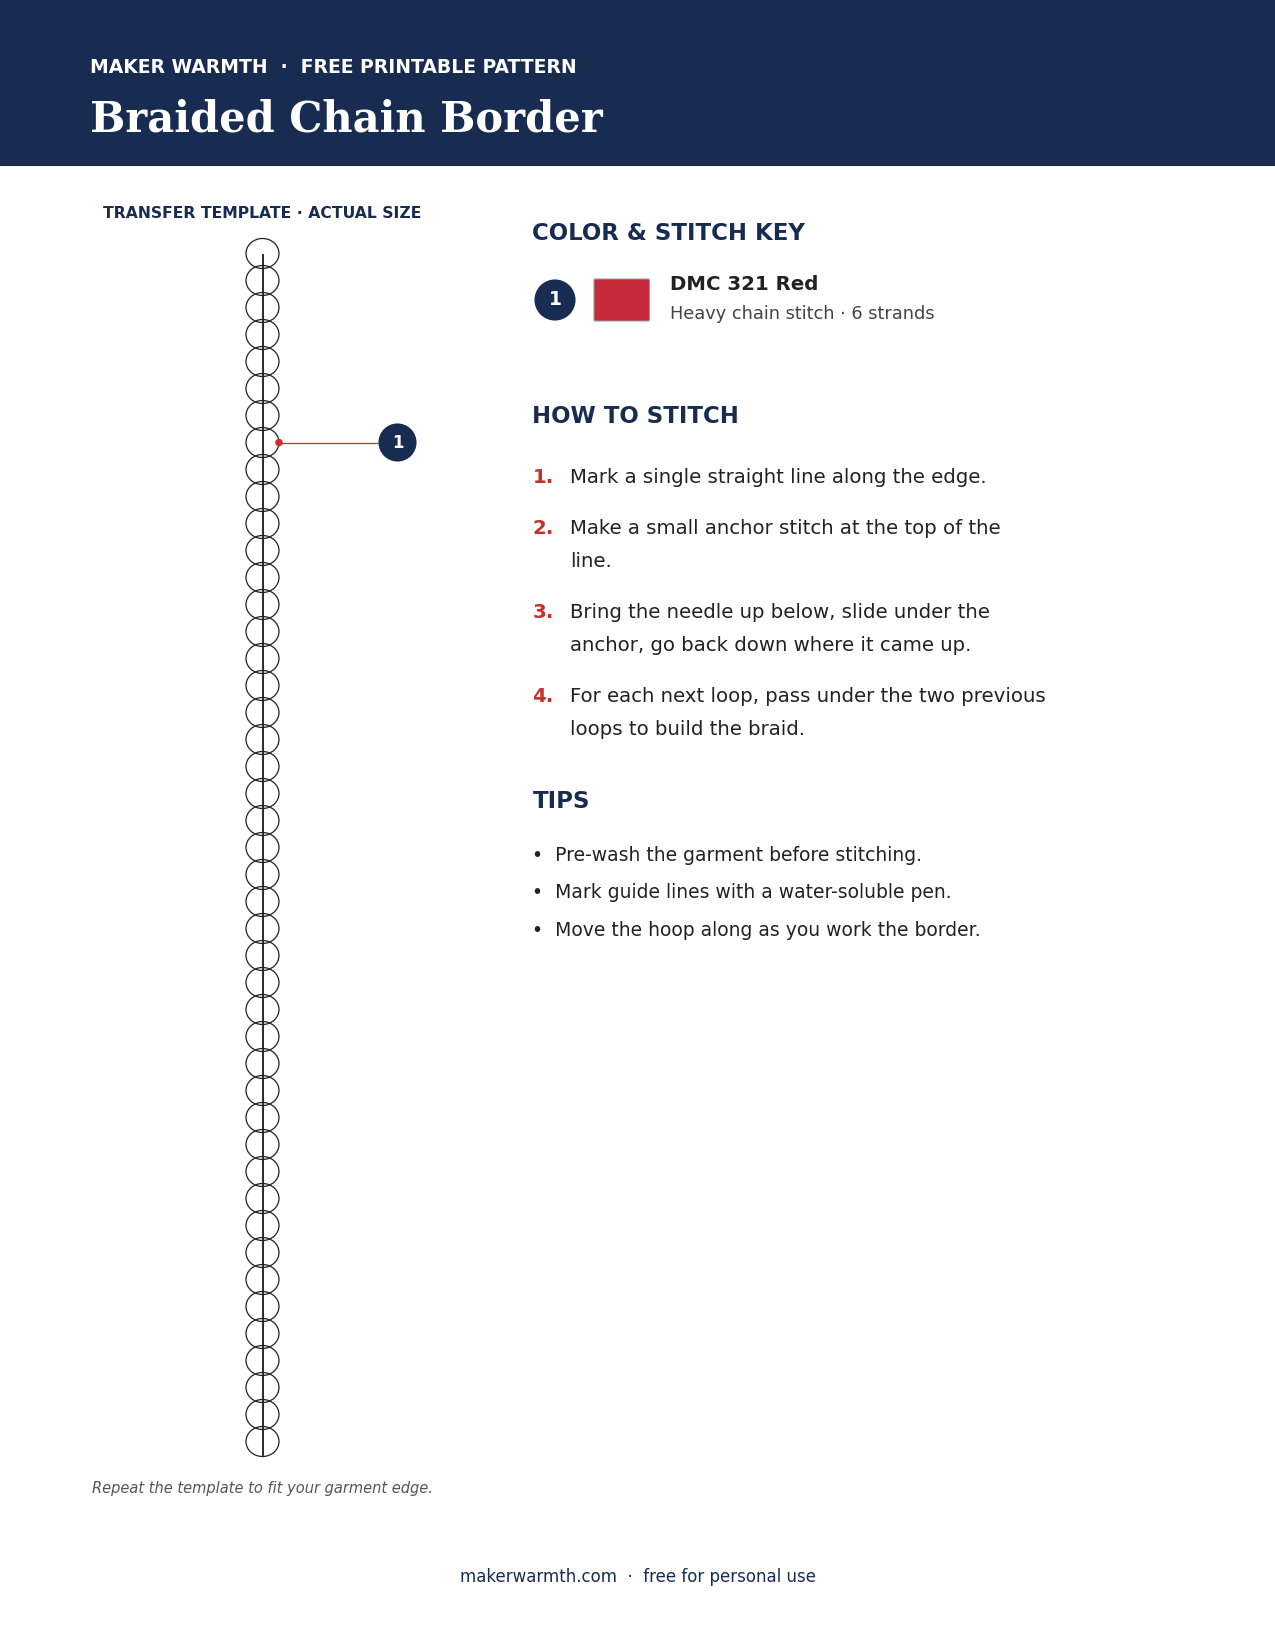
3. Braided Chain Border

A thick, raised braid that looks like cord sewn onto the garment. One bold color down a jacket front is enough to change the whole piece.
Stitches: heavy chain stitch
Colors: DMC 321 Red
Strands: 6
- Mark a single straight line along the edge.
- Make a small straight stitch at the top of the line as an anchor.
- Bring the needle up a short step down the line, slide it under the anchor stitch without piercing the fabric, and go back down where it came up — this is the first loop.
- For every next loop, pass the needle under the two previous loops. That double pass is what builds the braid.
Download the Free Printable PDF
4. Lazy Daisy Zigzag Border

Open loops joined point to point make a sunny zigzag along a skirt slit or hem. It is one of the quickest borders here and a nice first project.
Stitches: lazy daisy (detached chain) stitch
Colors: DMC 973 Bright Canary
Strands: 4
- Draw two parallel lines about 1/2 inch apart and mark a zigzag between them.
- Work one long lazy daisy loop along each diagonal of the zigzag.
- Start every new loop at the tip of the previous one so they connect.
- Keep the tie-down stitches small so the loops stay open and round.

Download the Free Printable PDF
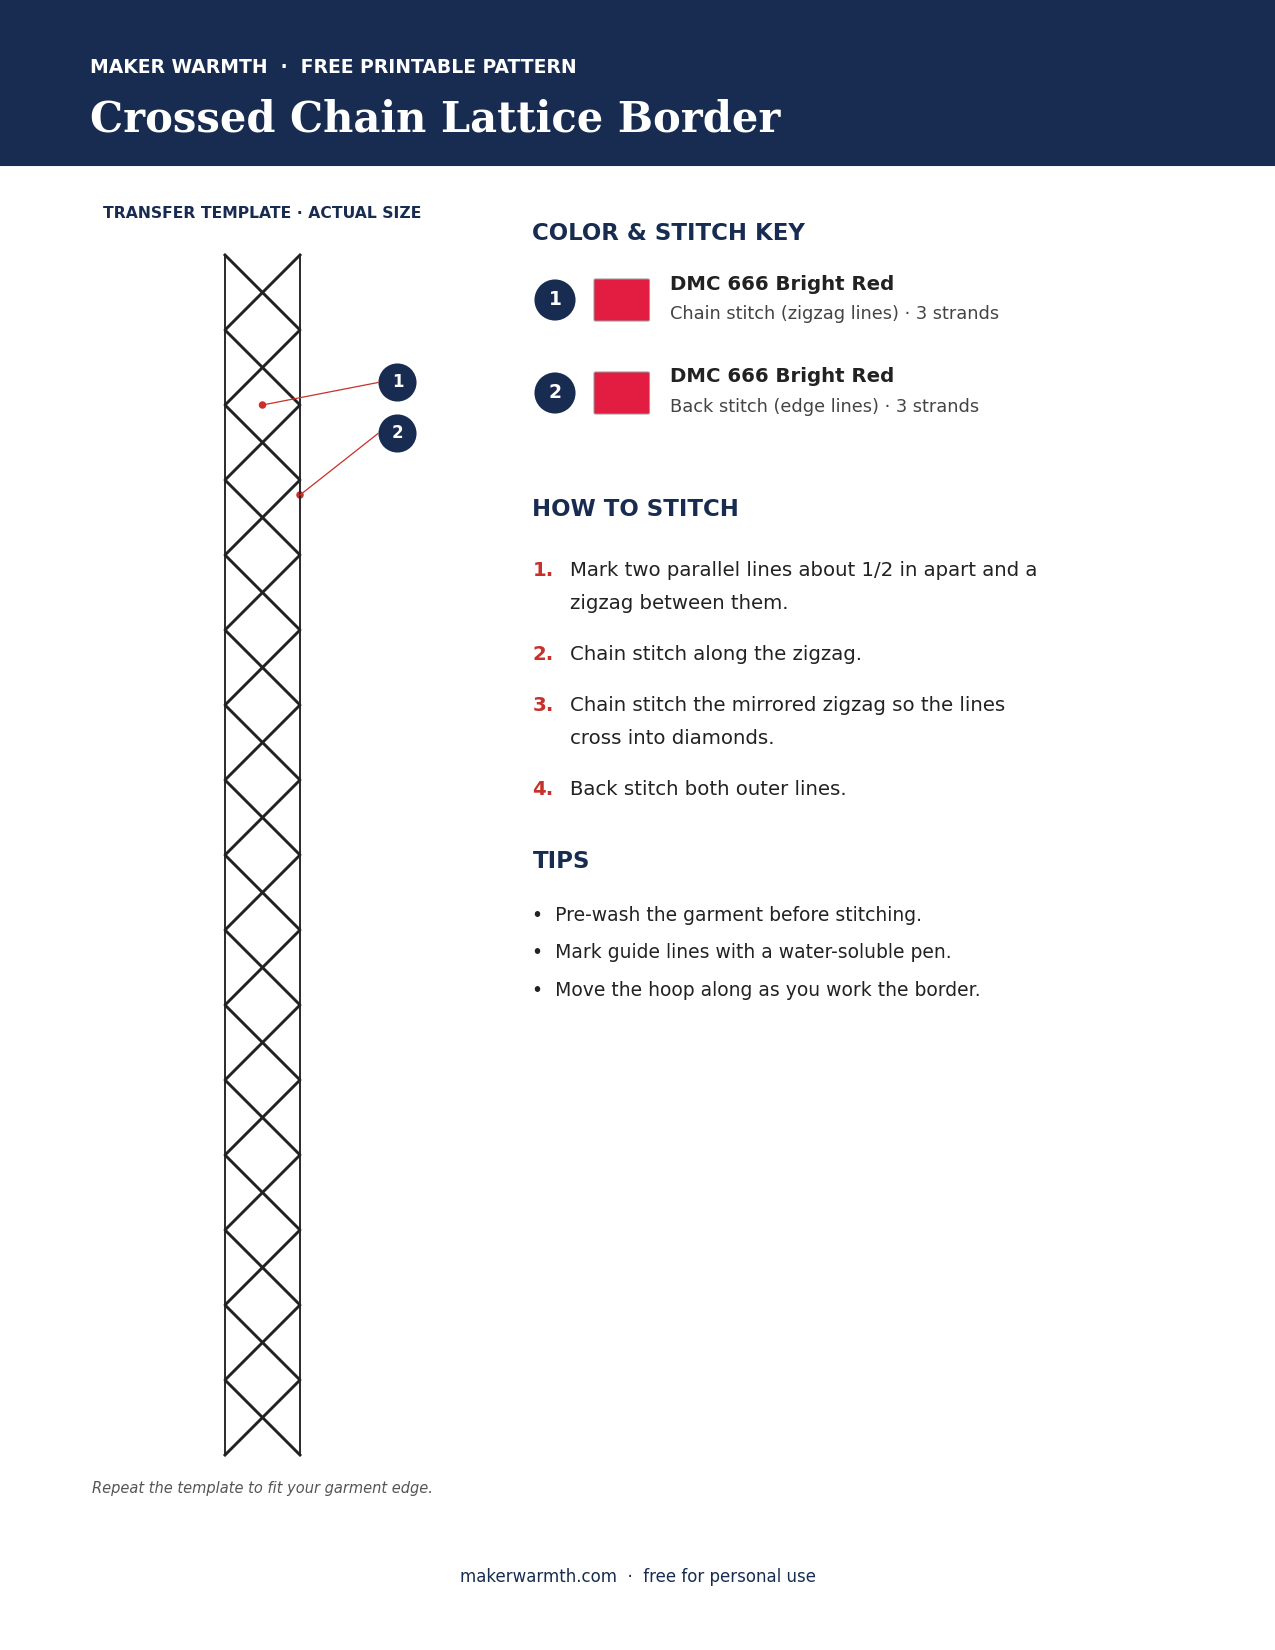
5. Crossed Chain Lattice Border

Red on navy gives this border a folk-shirt feel. The lattice is built from two zigzag lines of chain stitch that cross each other.
Stitches: chain stitch, back stitch (edge lines)
Colors: DMC 666 Bright Red
Strands: 3
- Mark two parallel lines about 1/2 inch apart and a zigzag between them.
- Chain stitch along the zigzag.
- Mark a mirrored zigzag and chain stitch it so the two lines cross and form diamonds.
- Back stitch both outer lines to frame the lattice.
Download the Free Printable PDF
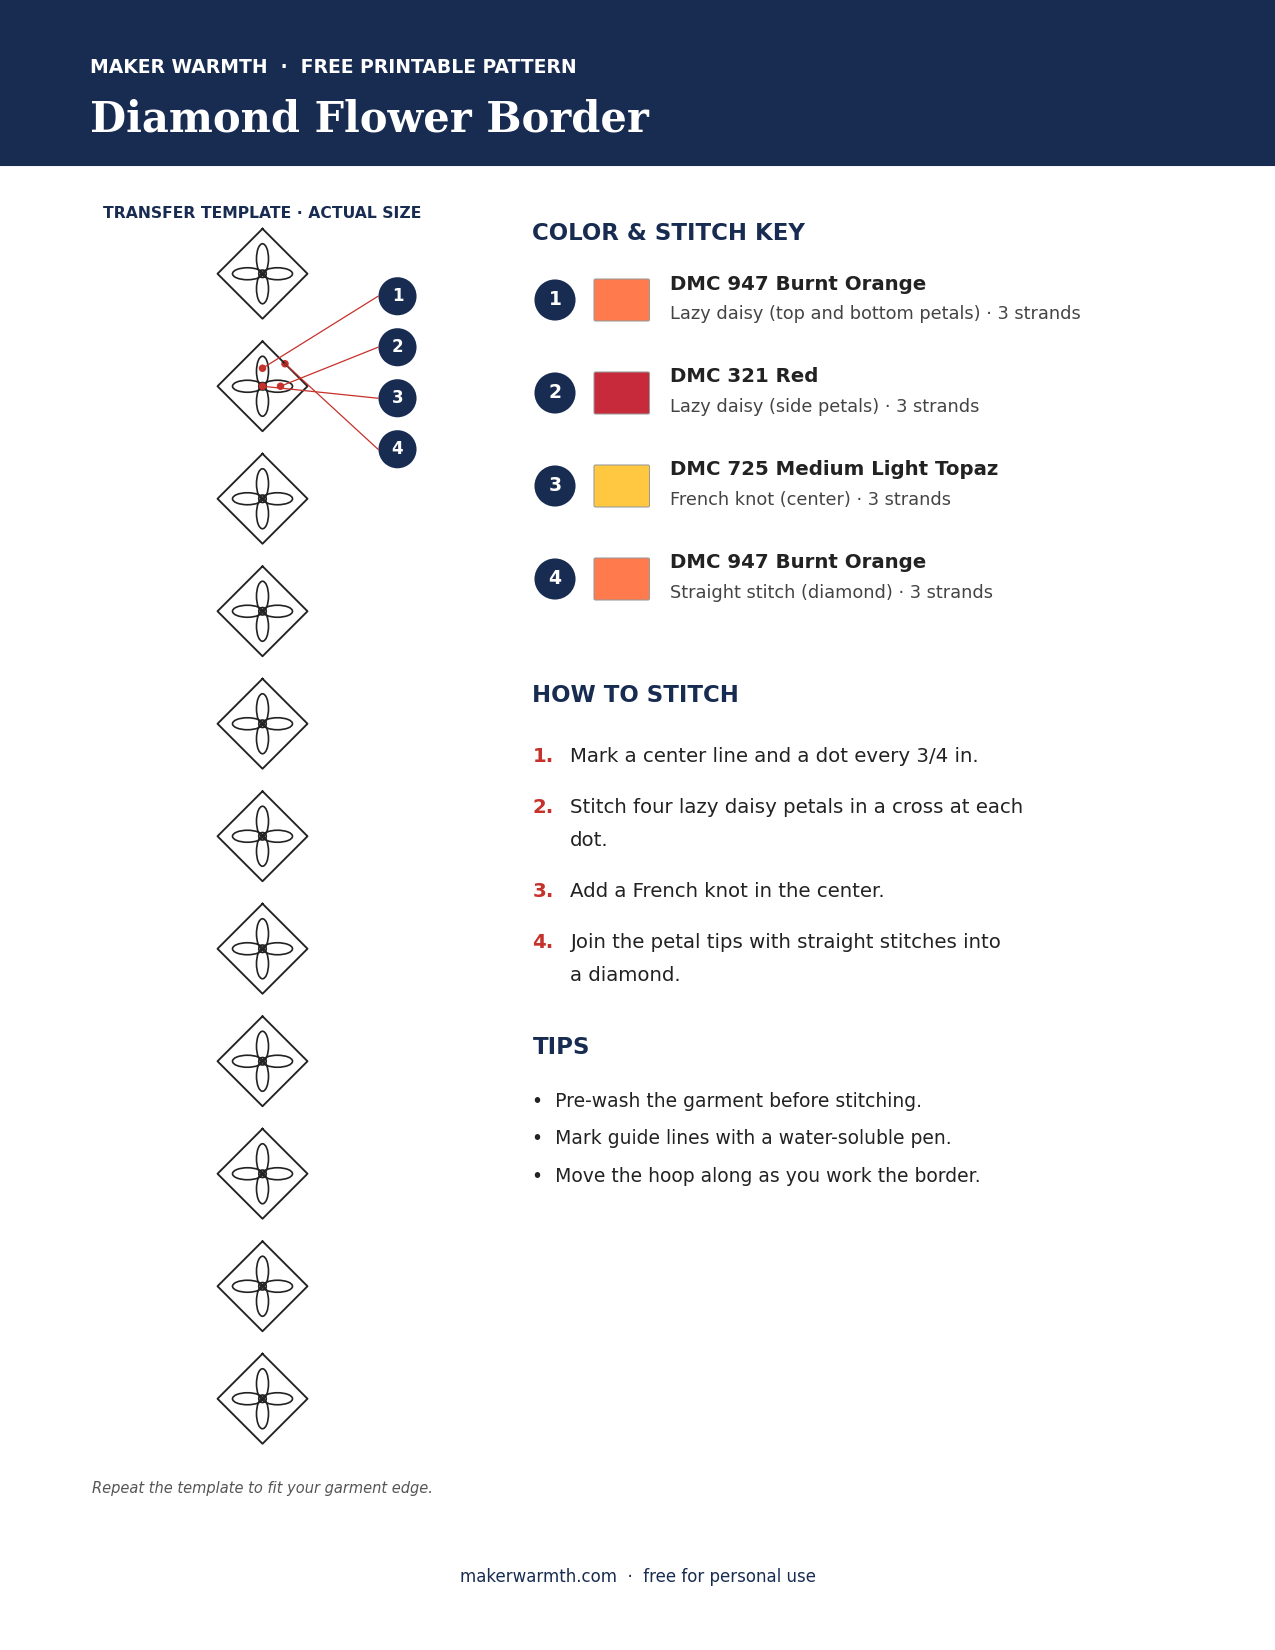
6. Diamond Flower Border

Tiny four-petal flowers set inside diamonds, stacked into a warm orange and red column. It suits natural linen and looks great on a shirt front or sleeve.
Stitches: lazy daisy stitch, straight stitch, French knot
Colors: DMC 947 Burnt Orange, DMC 321 Red, DMC 725 Medium Light Topaz
Strands: 3
- Mark a center line and dots every 3/4 inch along it.
- At each dot, stitch four lazy daisy petals in a cross: top and bottom in orange, sides in red.
- Add a topaz French knot in the center.
- Connect the petal tips with straight stitches in orange to form a diamond around each flower.
Download the Free Printable PDF
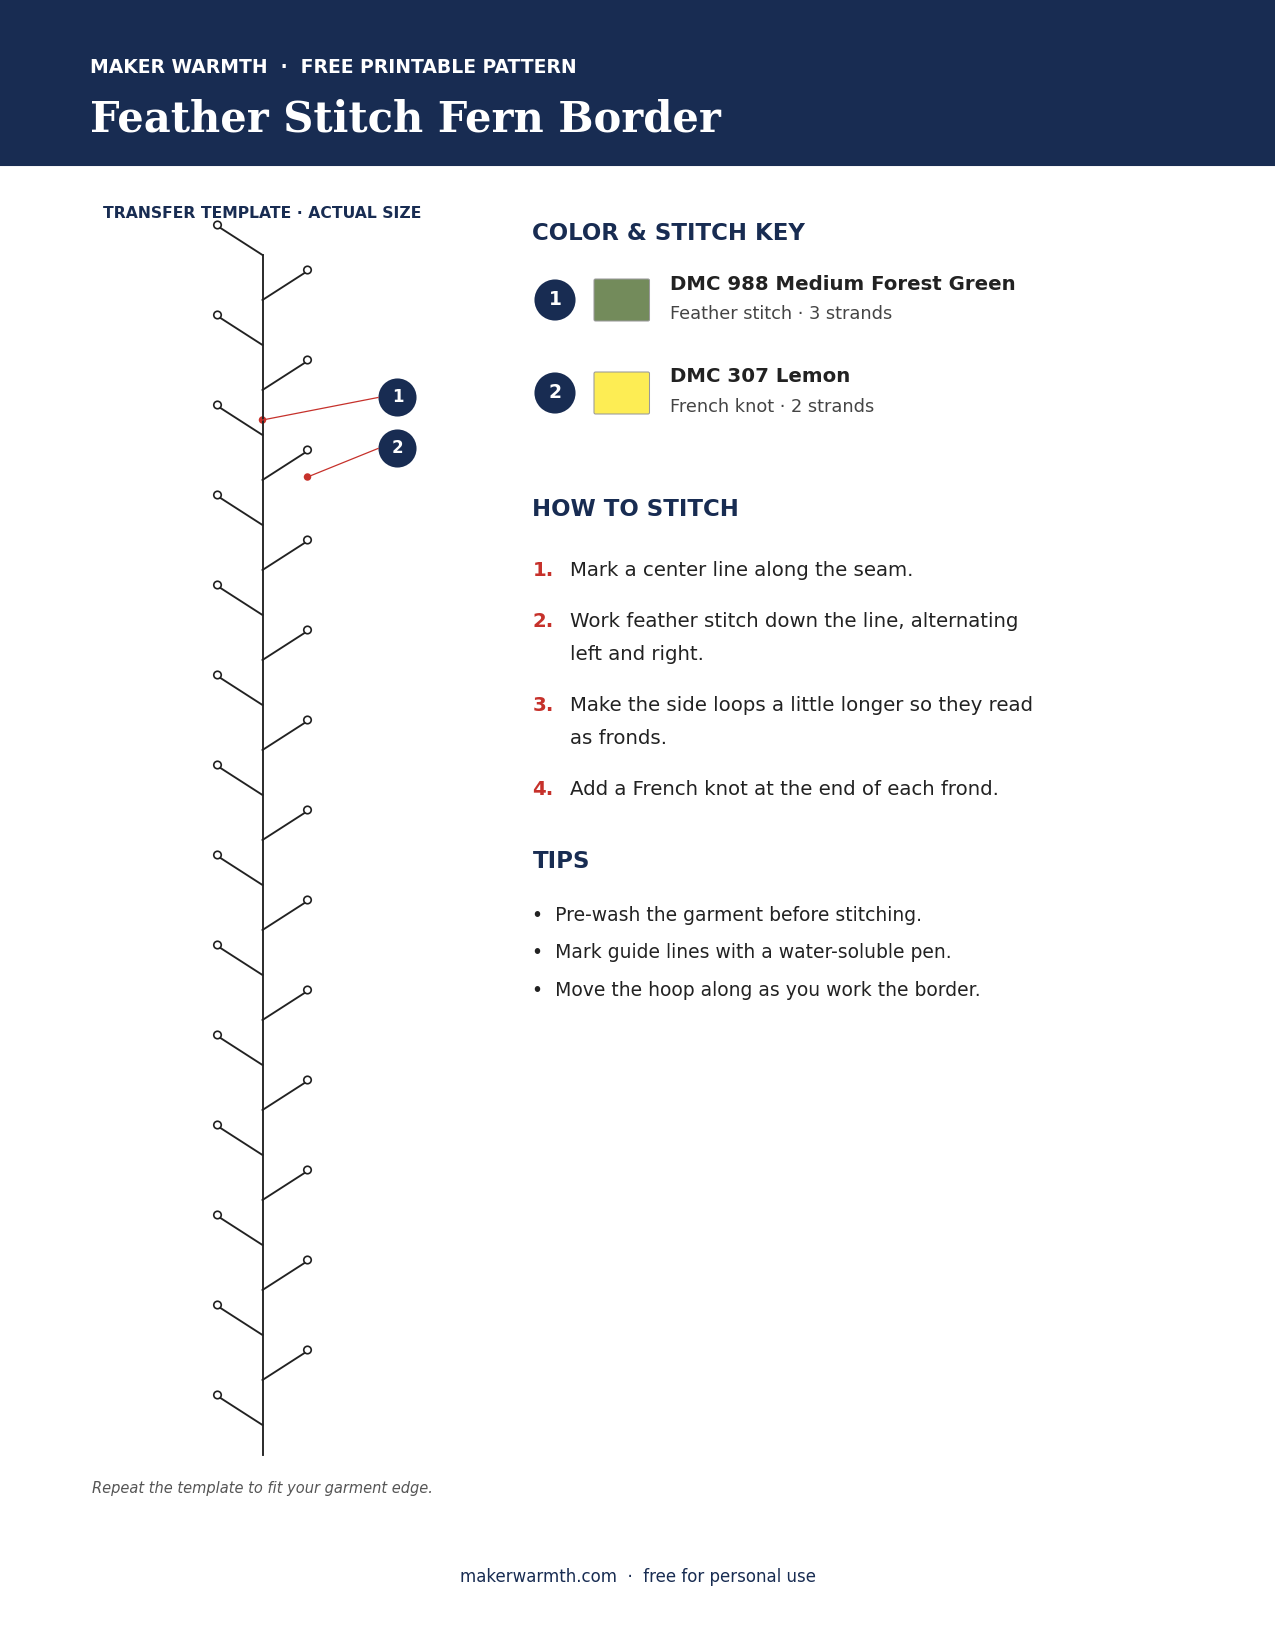
7. Feather Stitch Fern Border

Feather stitch branches out naturally, so a single line of it already looks like a fern. Yellow knots at the tips turn it into a spring sprig running down light denim.
Stitches: feather stitch, French knot
Colors: DMC 988 Medium Forest Green, DMC 307 Lemon
Strands: 3 for the fern, 2 for the knots
- Mark a center line along the seam.
- Work feather stitch down the line, alternating loops to the left and right.
- Make the side loops a little longer than usual so they read as fronds.
- Add a yellow French knot at the end of each frond.
Download the Free Printable PDF
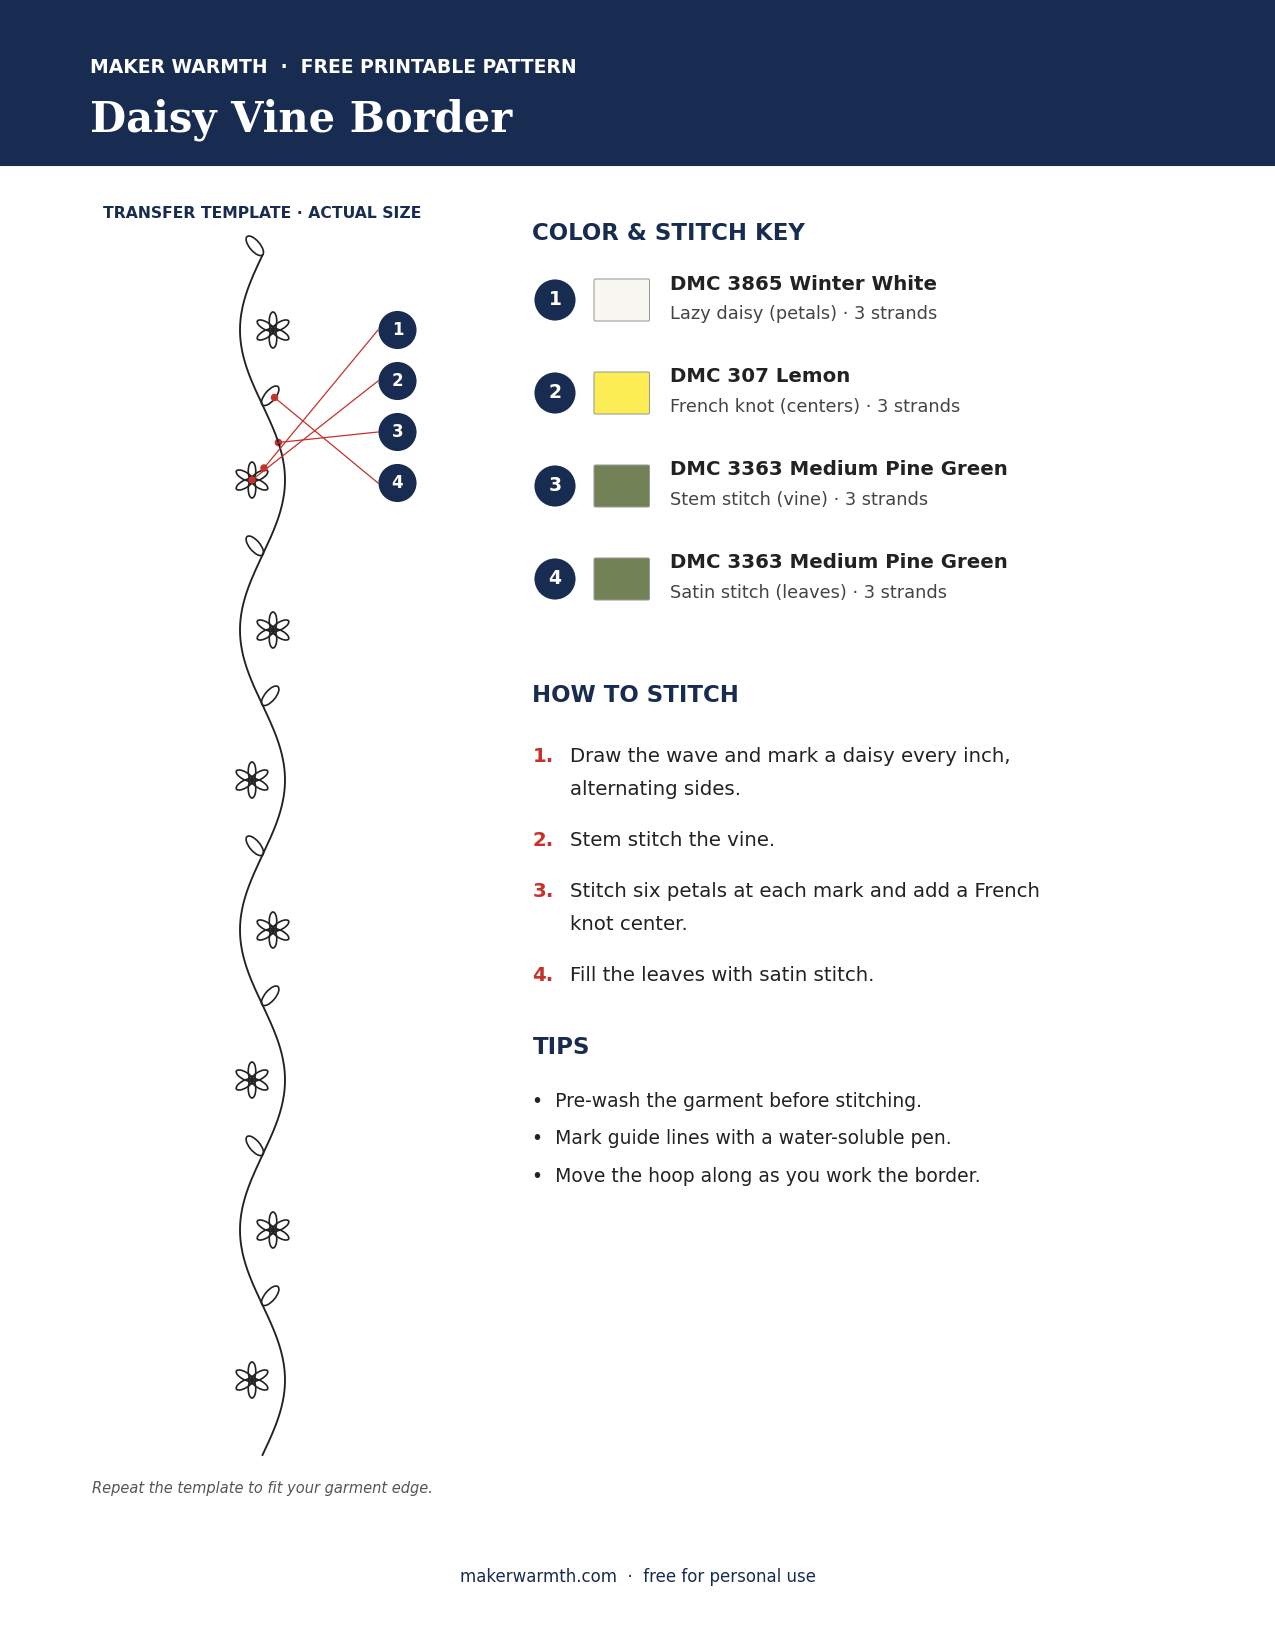
8. Daisy Vine Border
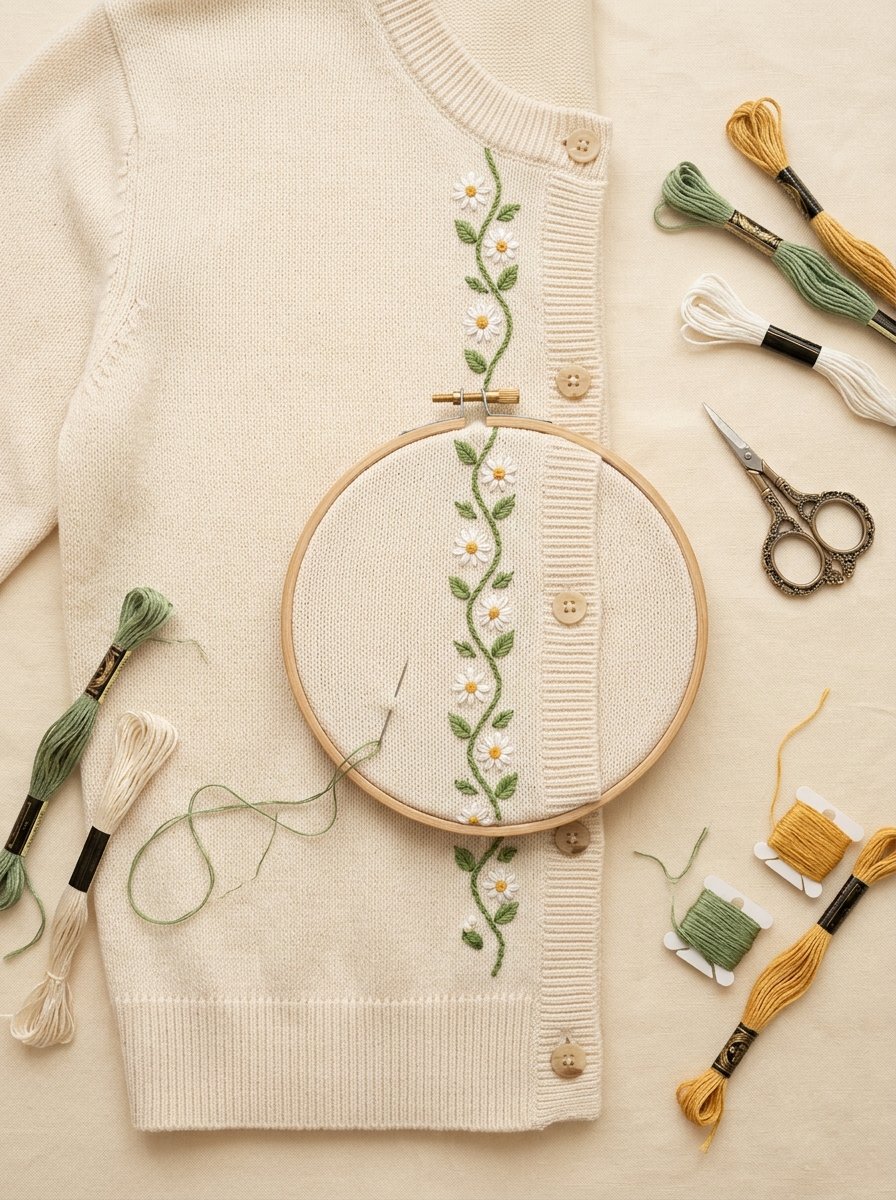
A soft wavy vine with little white daisies, made for the button edge of a cream cardigan. On knits, a layer of stick-and-stitch stabilizer keeps the vine smooth.
Stitches: stem stitch, lazy daisy stitch, French knot, satin stitch
Colors: DMC 3865 Winter White, DMC 307 Lemon, DMC 3363 Medium Pine Green
Strands: 3
- Draw a gentle wave along the edge and mark a daisy every 1 inch, alternating sides.
- Stem stitch the vine in green.
- Stitch five or six white lazy daisy petals at each mark and add a yellow French knot center.
- Fill small satin stitch leaves between the flowers.
Download the Free Printable PDF
9. Forget-Me-Not Border
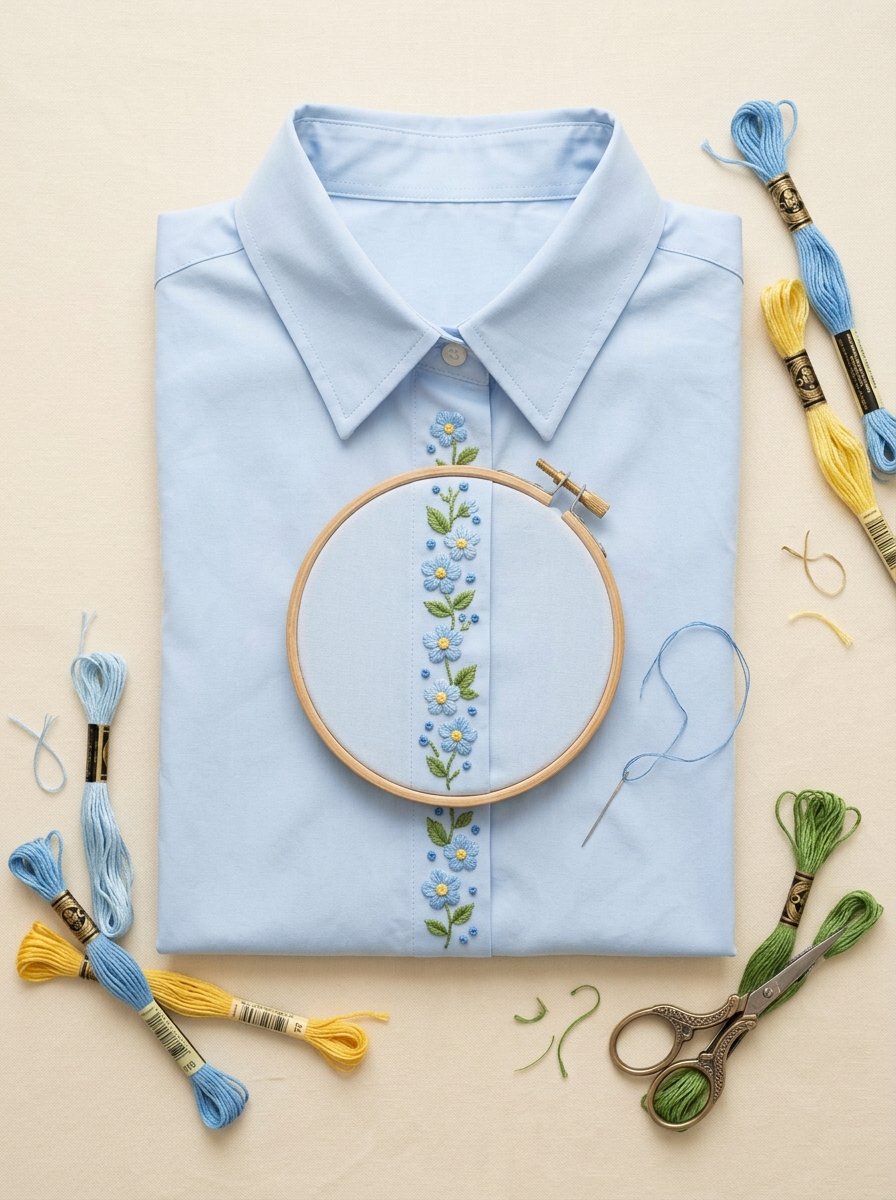
Clusters of tiny blue flowers with yellow centers, scattered along a pale blue placket. Keep the clusters a little uneven — forget-me-nots grow in loose bunches, not in neat rows.
Stitches: lazy daisy stitch, French knot, stem stitch
Colors: DMC 3755 Baby Blue, DMC 307 Lemon, DMC 469 Avocado Green
Strands: 3 for petals and leaves, 2 for knots
- Mark small circles in groups of two or three along the edge.
- Stitch five short lazy daisy petals in blue for each flower.
- Add a yellow French knot in the center.
- Add short green stems and leaves, then scatter blue French knot buds around the clusters.

Download the Free Printable PDF
10. Lavender Sprig Border
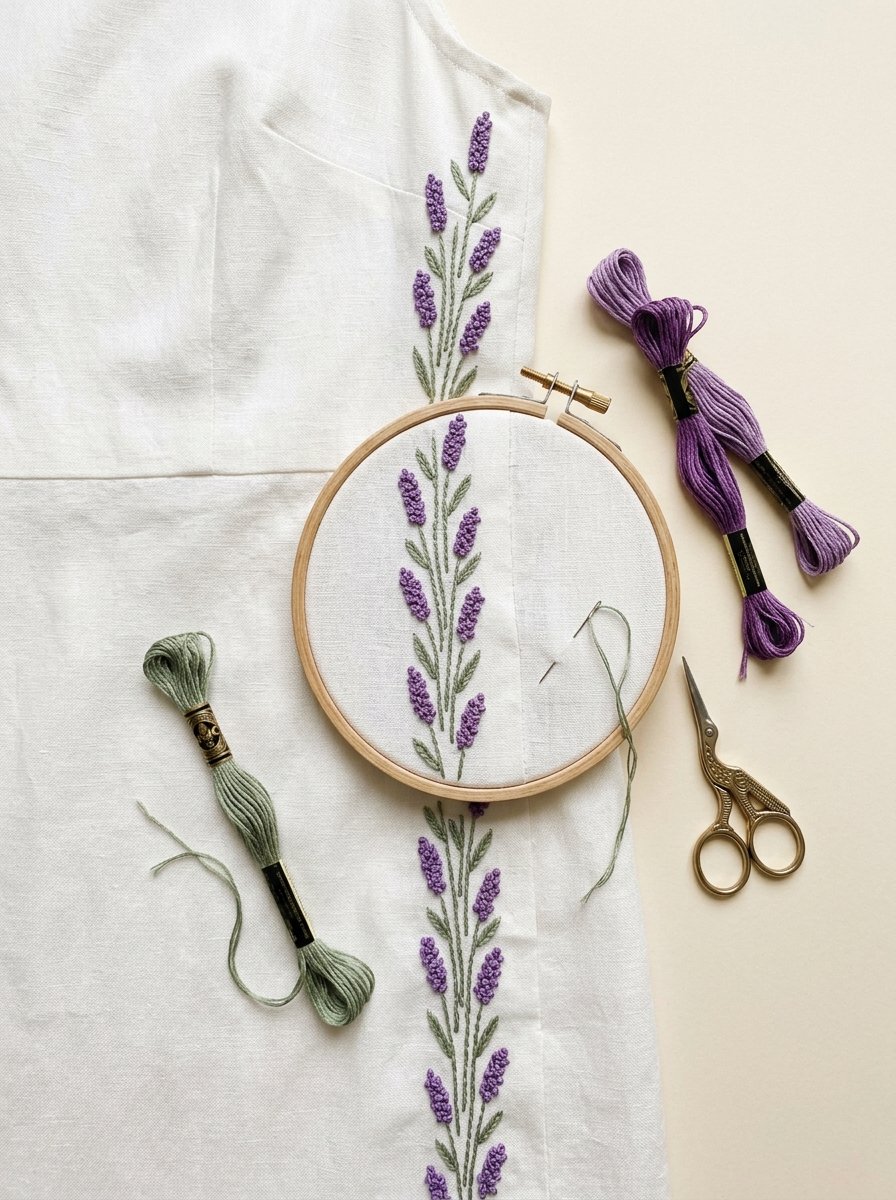
Slim lavender stems in a column along a white linen dress. Two shades of purple make the flower heads look full and alive.
Stitches: stem stitch, French knot, lazy daisy stitch
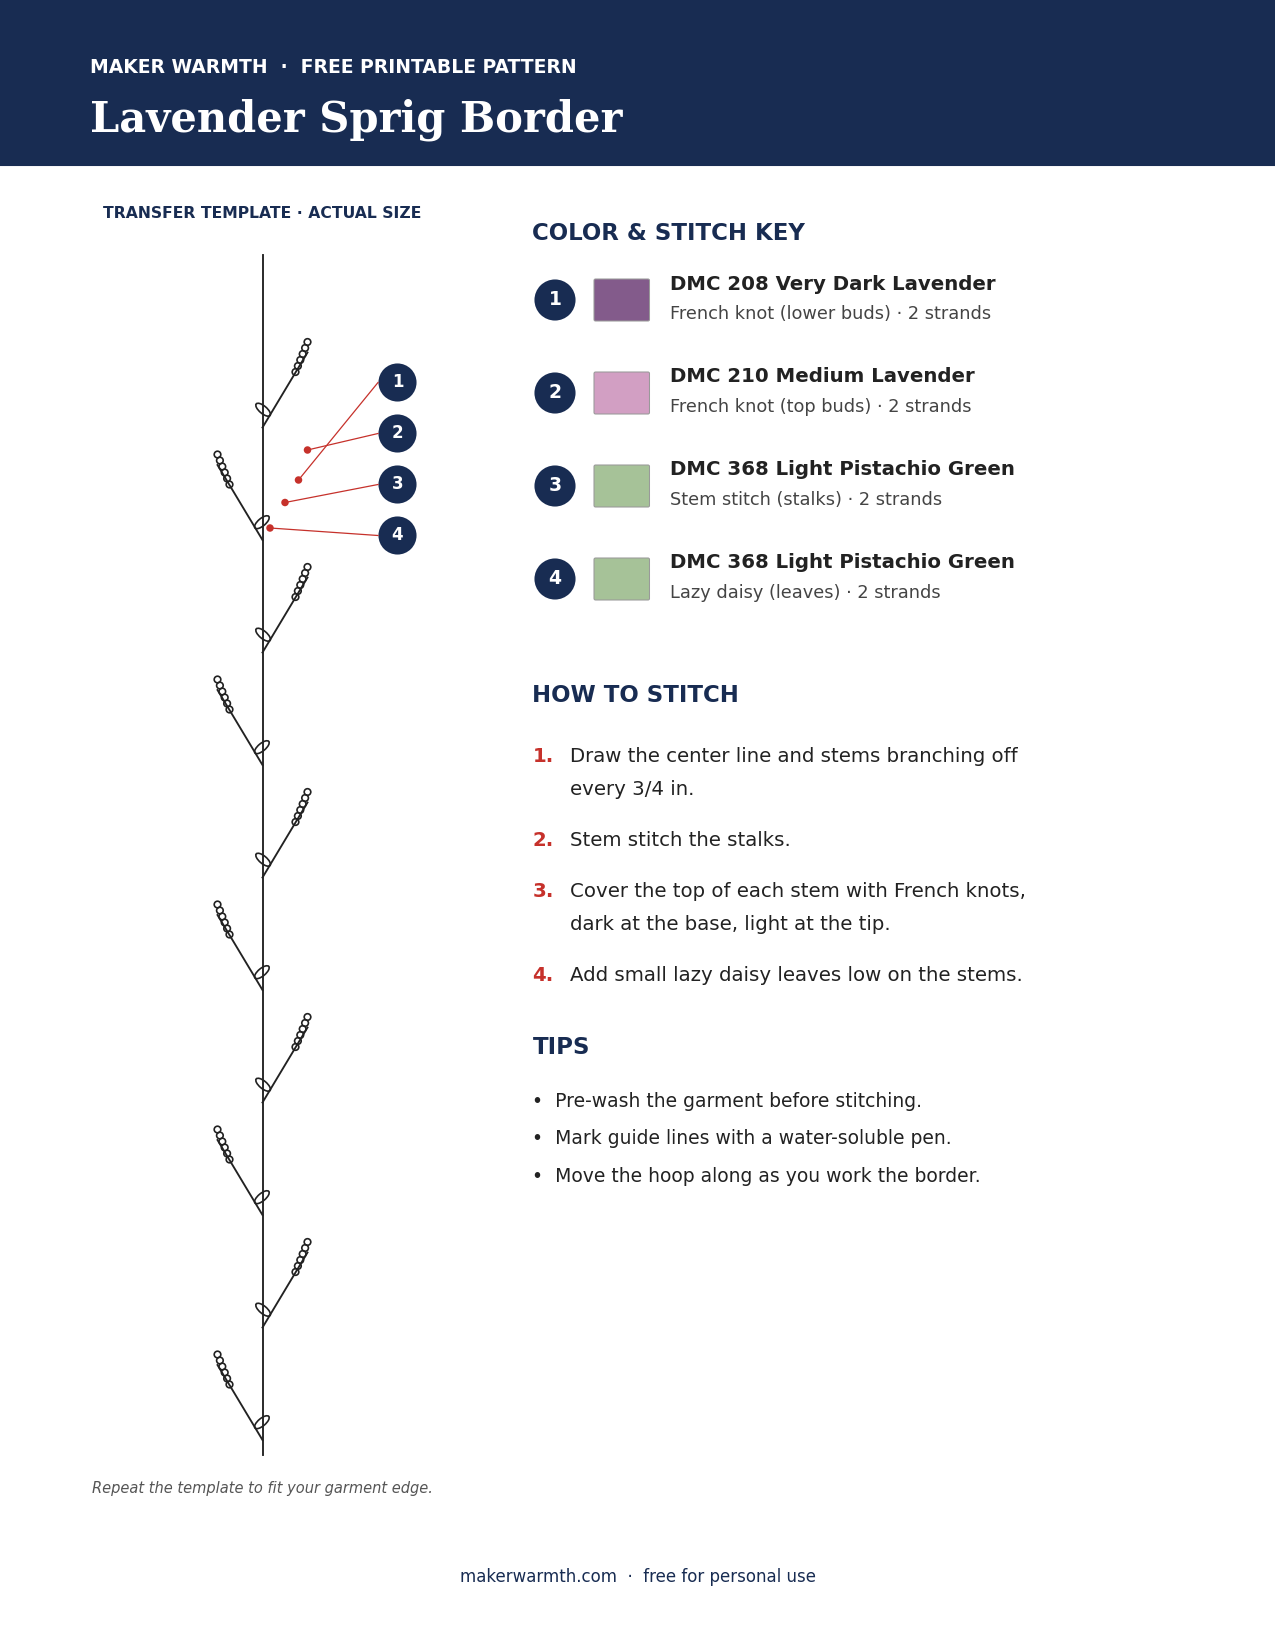
Colors: DMC 208 Very Dark Lavender, DMC 210 Medium Lavender, DMC 368 Light Pistachio Green
Strands: 2
- Draw a center line and short stems branching off it every 3/4 inch.
- Stem stitch the stalks in green.
- Cover the top third of each stem with French knots, darker purple at the base, lighter at the tip.
- Add a few tiny lazy daisy leaves low on the stems.
Download the Free Printable PDF
11. Whipped Spiral Border

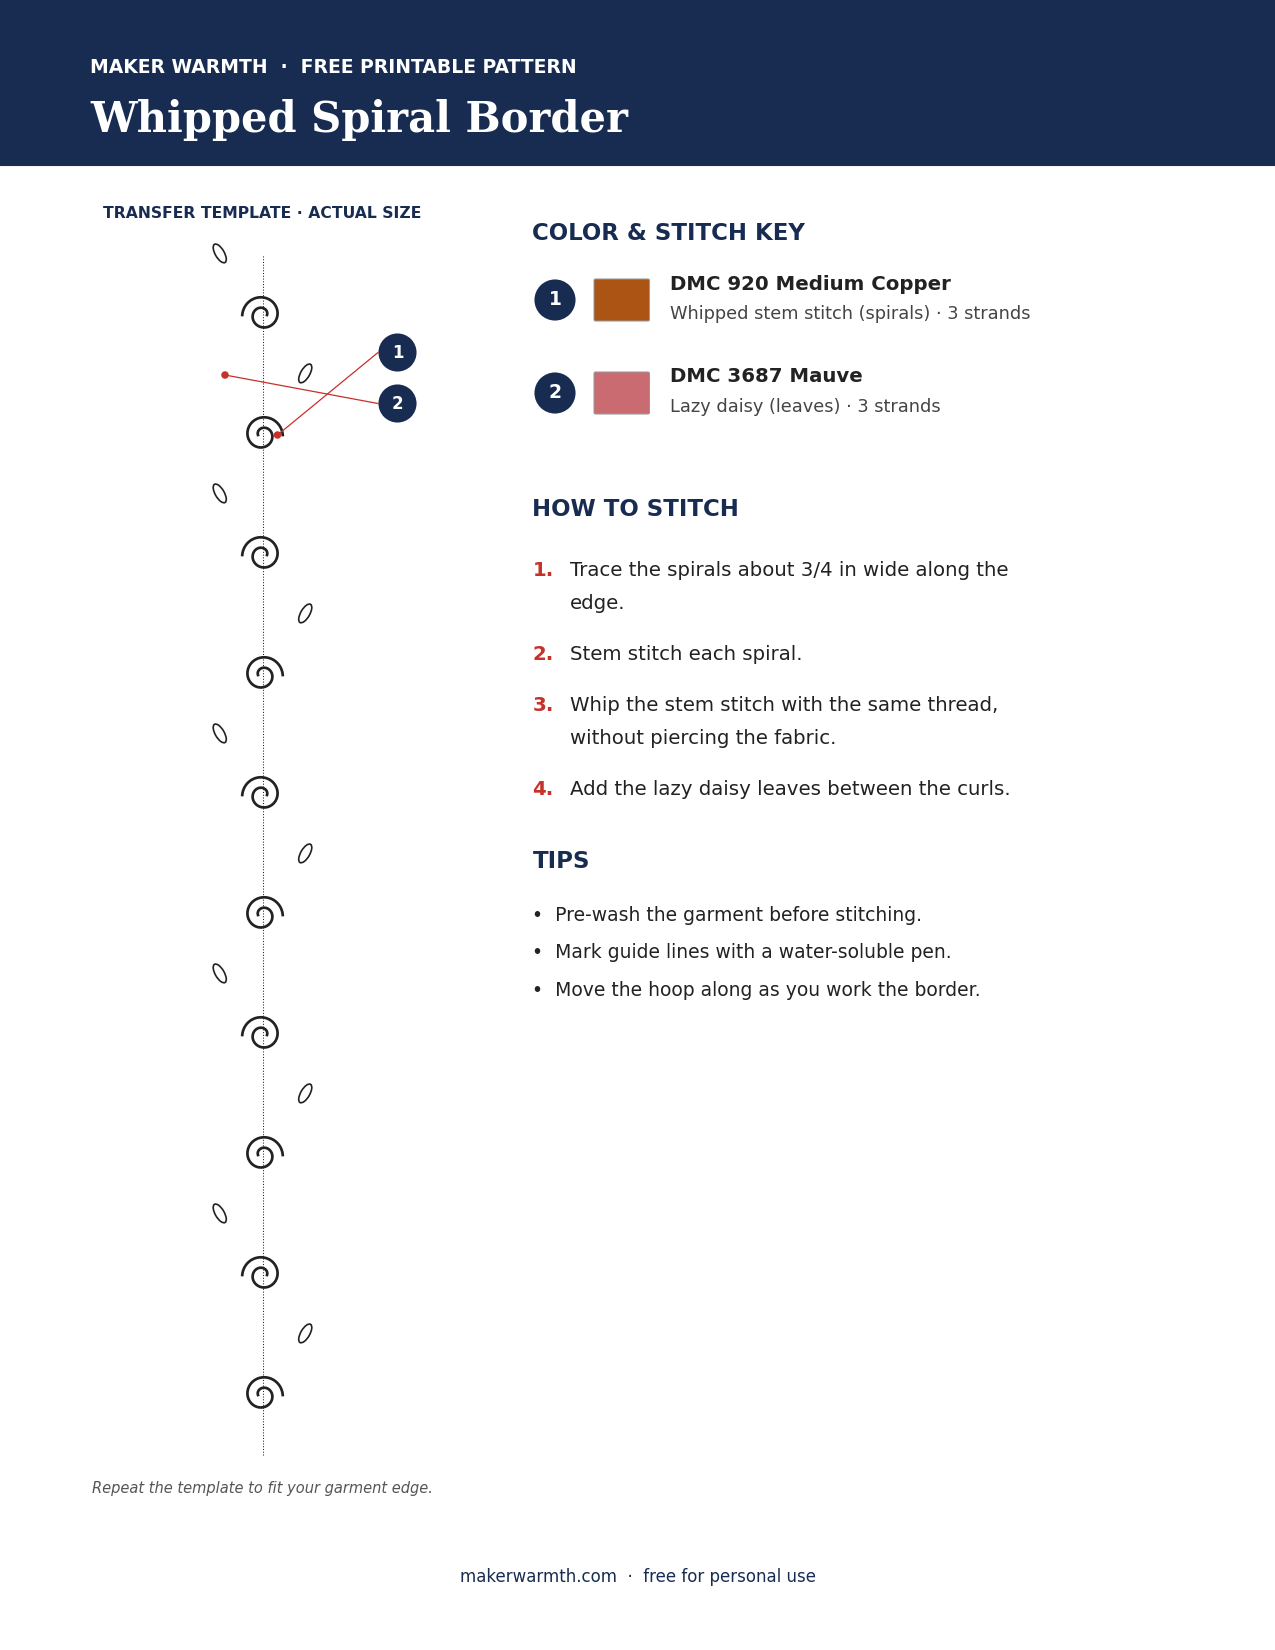
Rust spirals on lilac are an unexpected pairing that works. Whipping the stem stitch makes the line smooth and rope-like, so the curls look polished.
Stitches: whipped stem stitch, lazy daisy stitch
Colors: DMC 920 Medium Copper, DMC 3687 Mauve
Strands: 3
- Trace a chain of S-shaped spirals about 3/4 inch wide along the edge.
- Stem stitch the spirals in copper.
- Whip each stem stitch line with the same thread, passing under the stitches without piercing the fabric.
- Add mauve lazy daisy leaves in the spaces between the curls.
Download the Free Printable PDF
12. Rose Vine Border
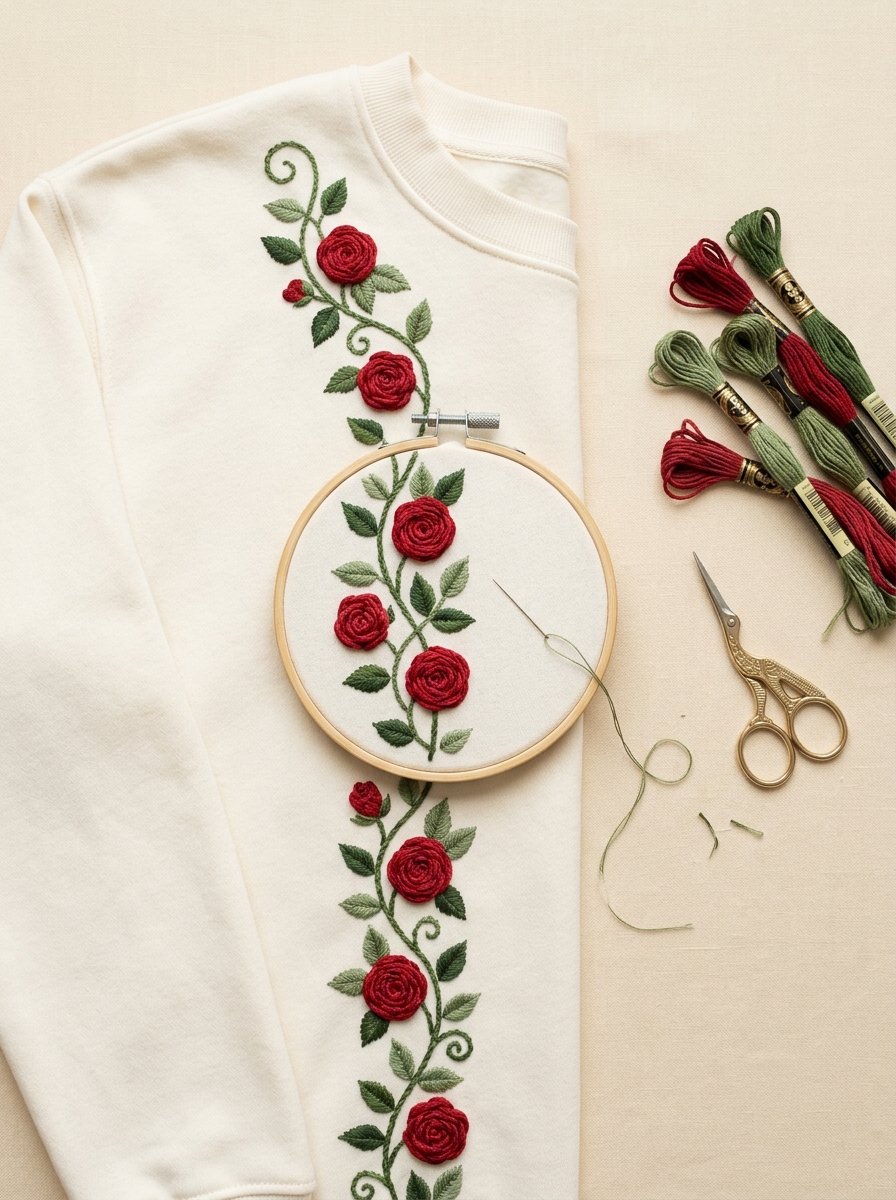
Woven wheel roses on a curving vine down the front of an ivory sweatshirt. The roses are raised and textured, so the border looks rich even in a single red.
Stitches: woven wheel rose, stem stitch, satin stitch
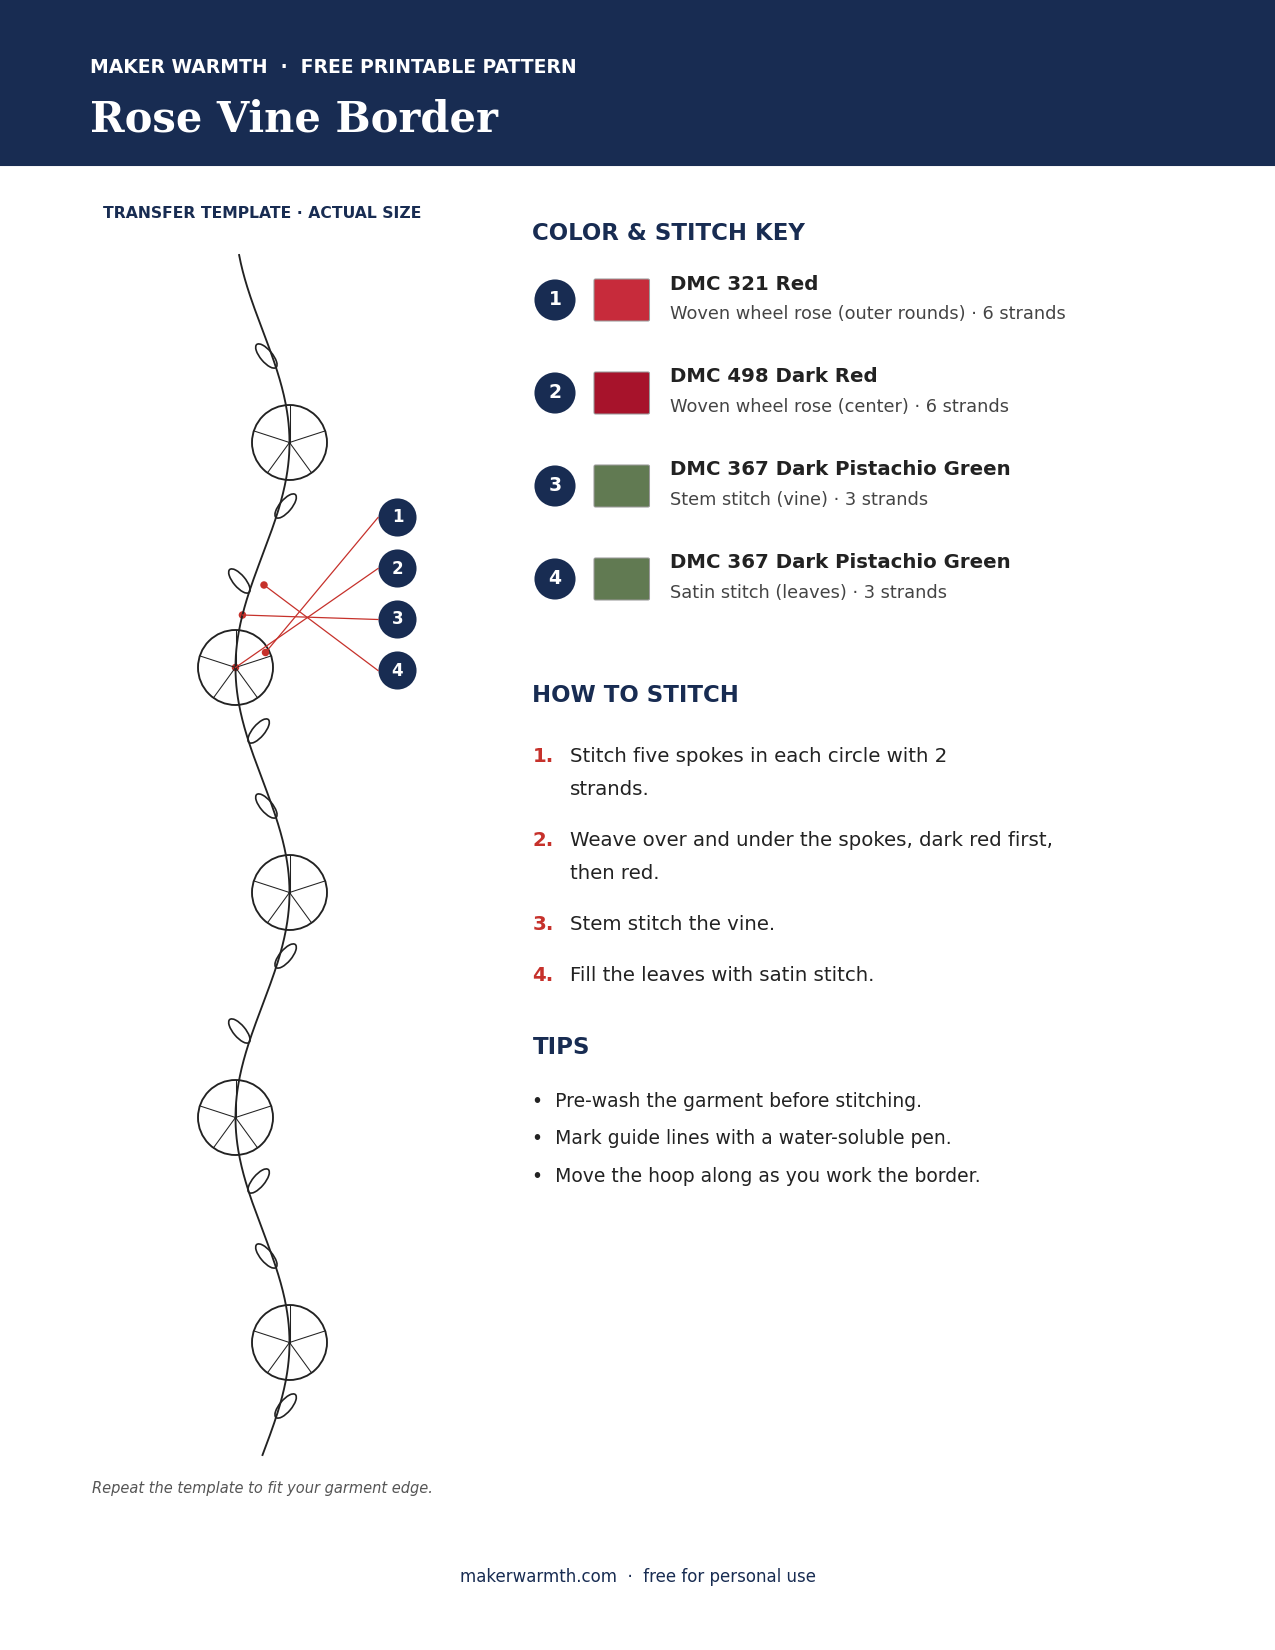
Colors: DMC 321 Red, DMC 498 Dark Red, DMC 367 Dark Pistachio Green
Strands: 2 for the spokes, 6 for weaving the roses, 3 for vine and leaves
- Draw a curving vine and mark rose circles about 1/2 inch wide every 1 1/2 inches.
- Stitch five spokes in each circle, then weave over and under them, starting dark red in the center and finishing with red.
- Stem stitch the vine in green.
- Add satin stitch leaves along the vine.
Download the Free Printable PDF
13. Blue Daisy Vine Border
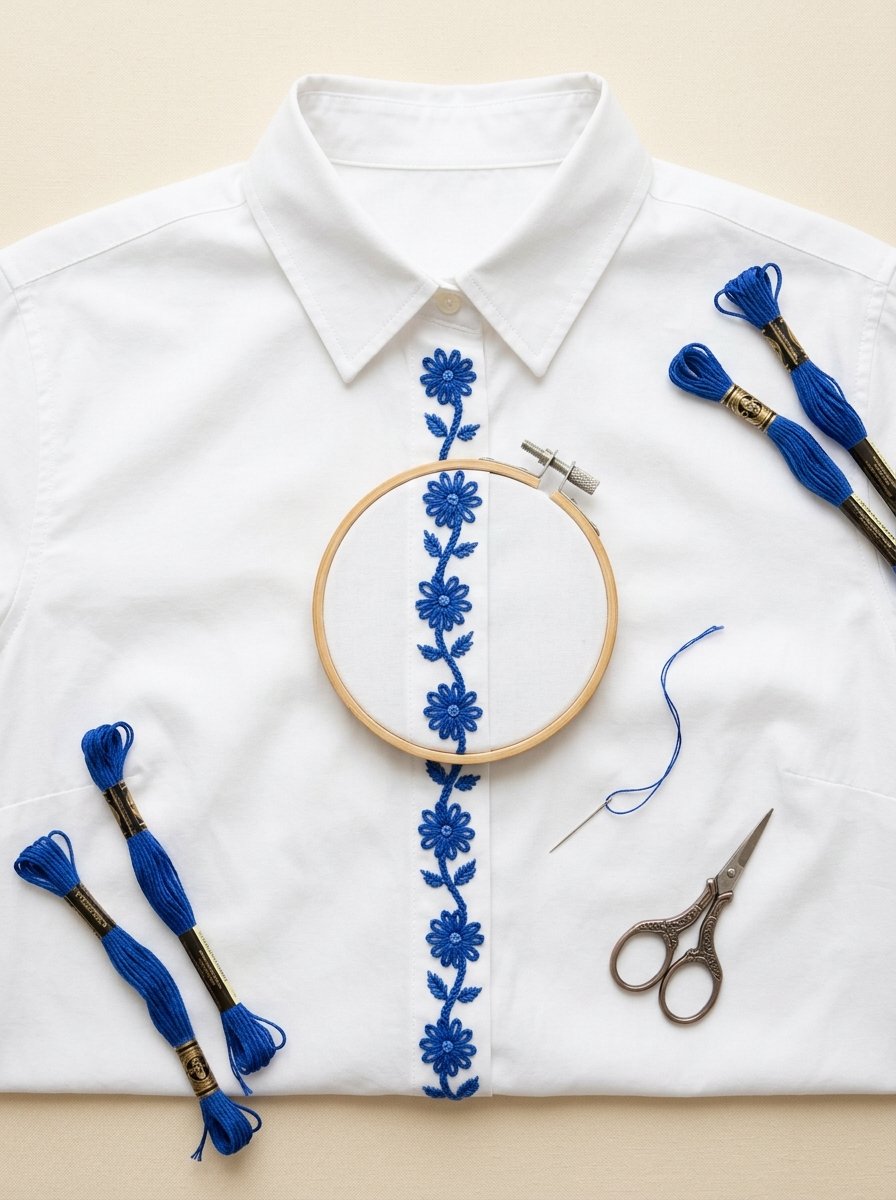
Flowers, stem and leaves all in one blue, like old blue-and-white china. A single color means one skein and no thread changes.
Stitches: lazy daisy stitch, stem stitch, fly stitch, French knot
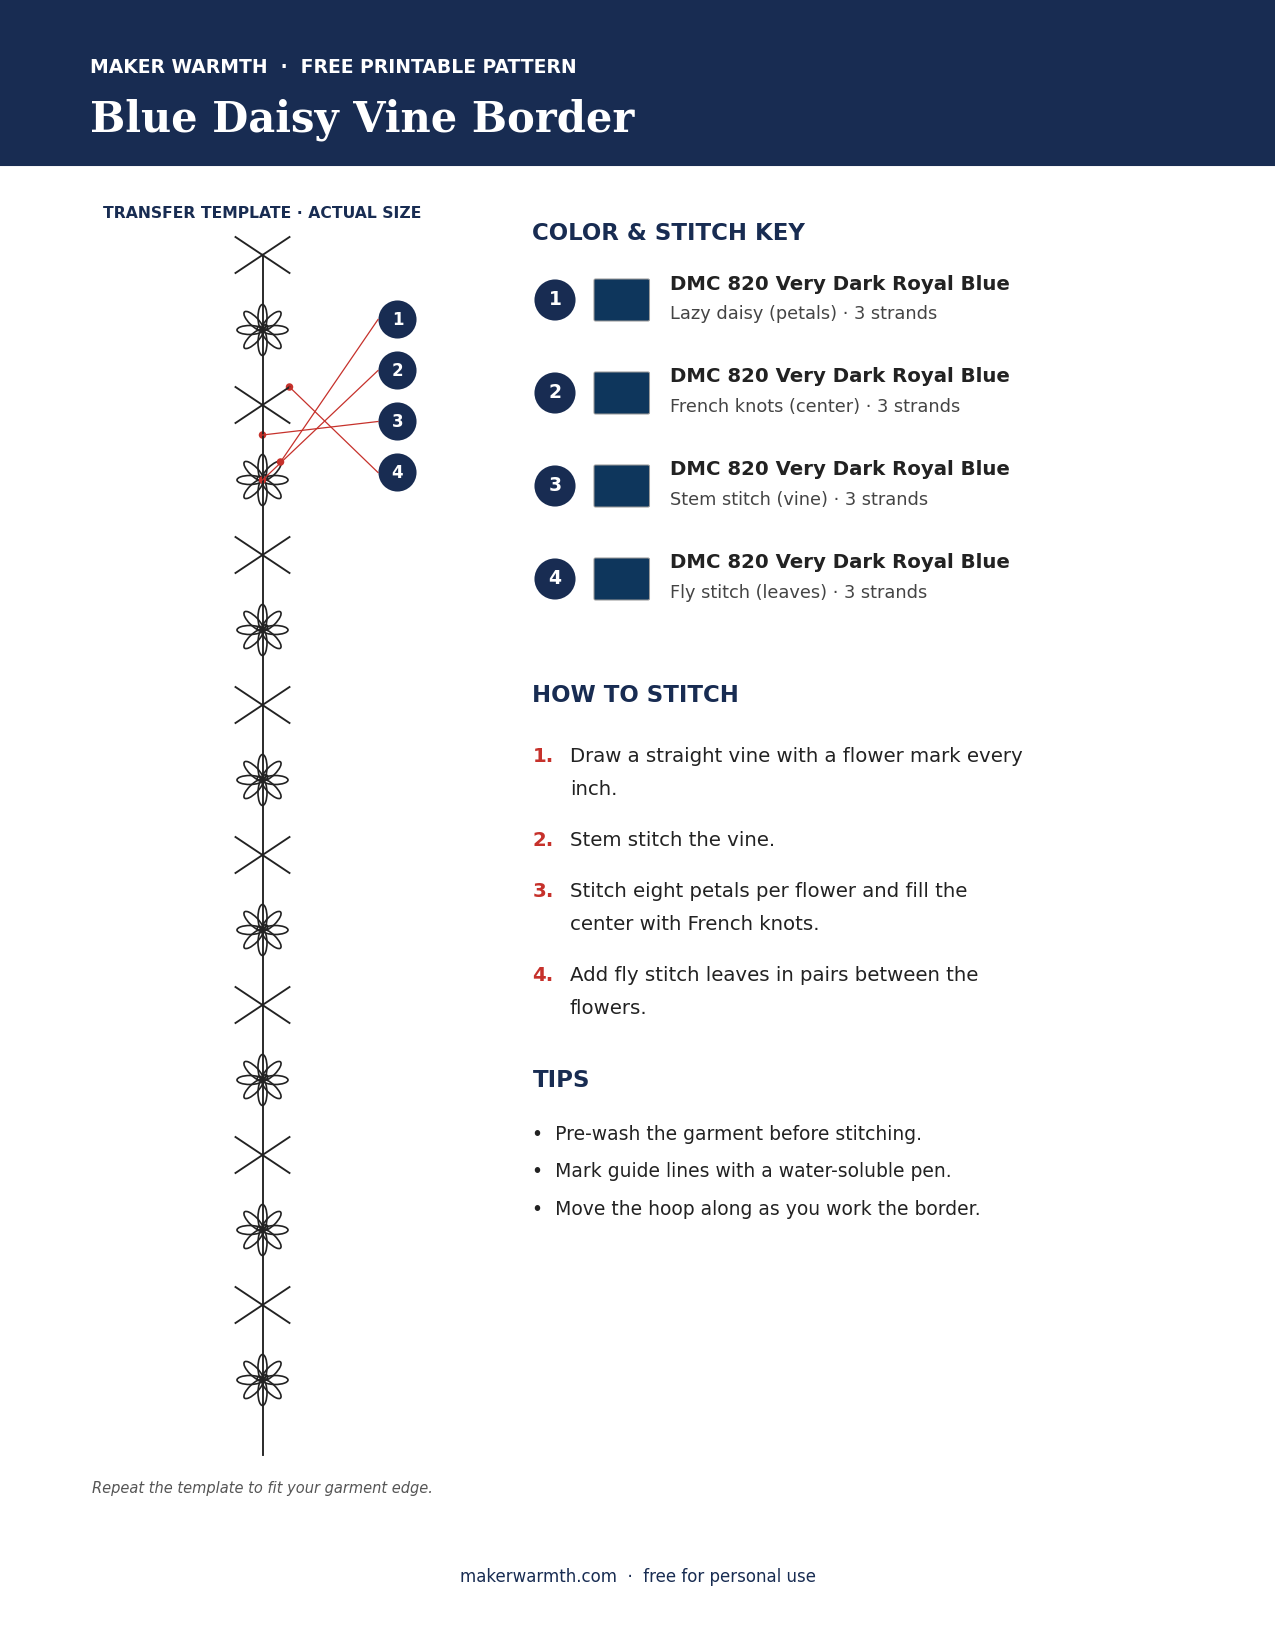
Colors: DMC 820 Very Dark Royal Blue
Strands: 3
- Draw a straight vine with flower marks every 1 inch.
- Stem stitch the vine.
- Stitch eight lazy daisy petals for each flower and fill the center with a cluster of French knots.
- Add fly stitch leaves in pairs between the flowers.
Download the Free Printable PDF
14. Wildflower Meadow Border
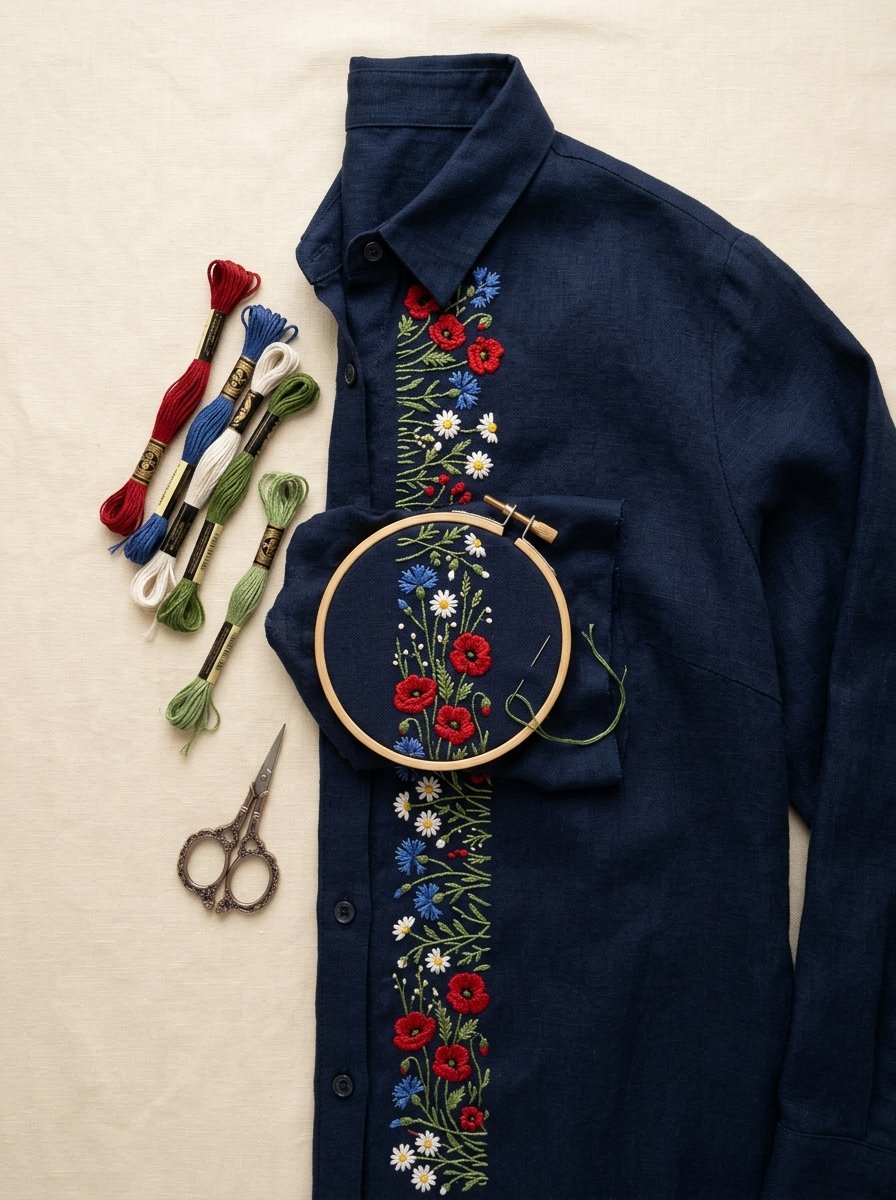
A narrow strip of poppies, cornflowers, daisies and grass down a navy shirt dress. Bright flowers pop against dark fabric, and the mixed shapes keep the eye moving.
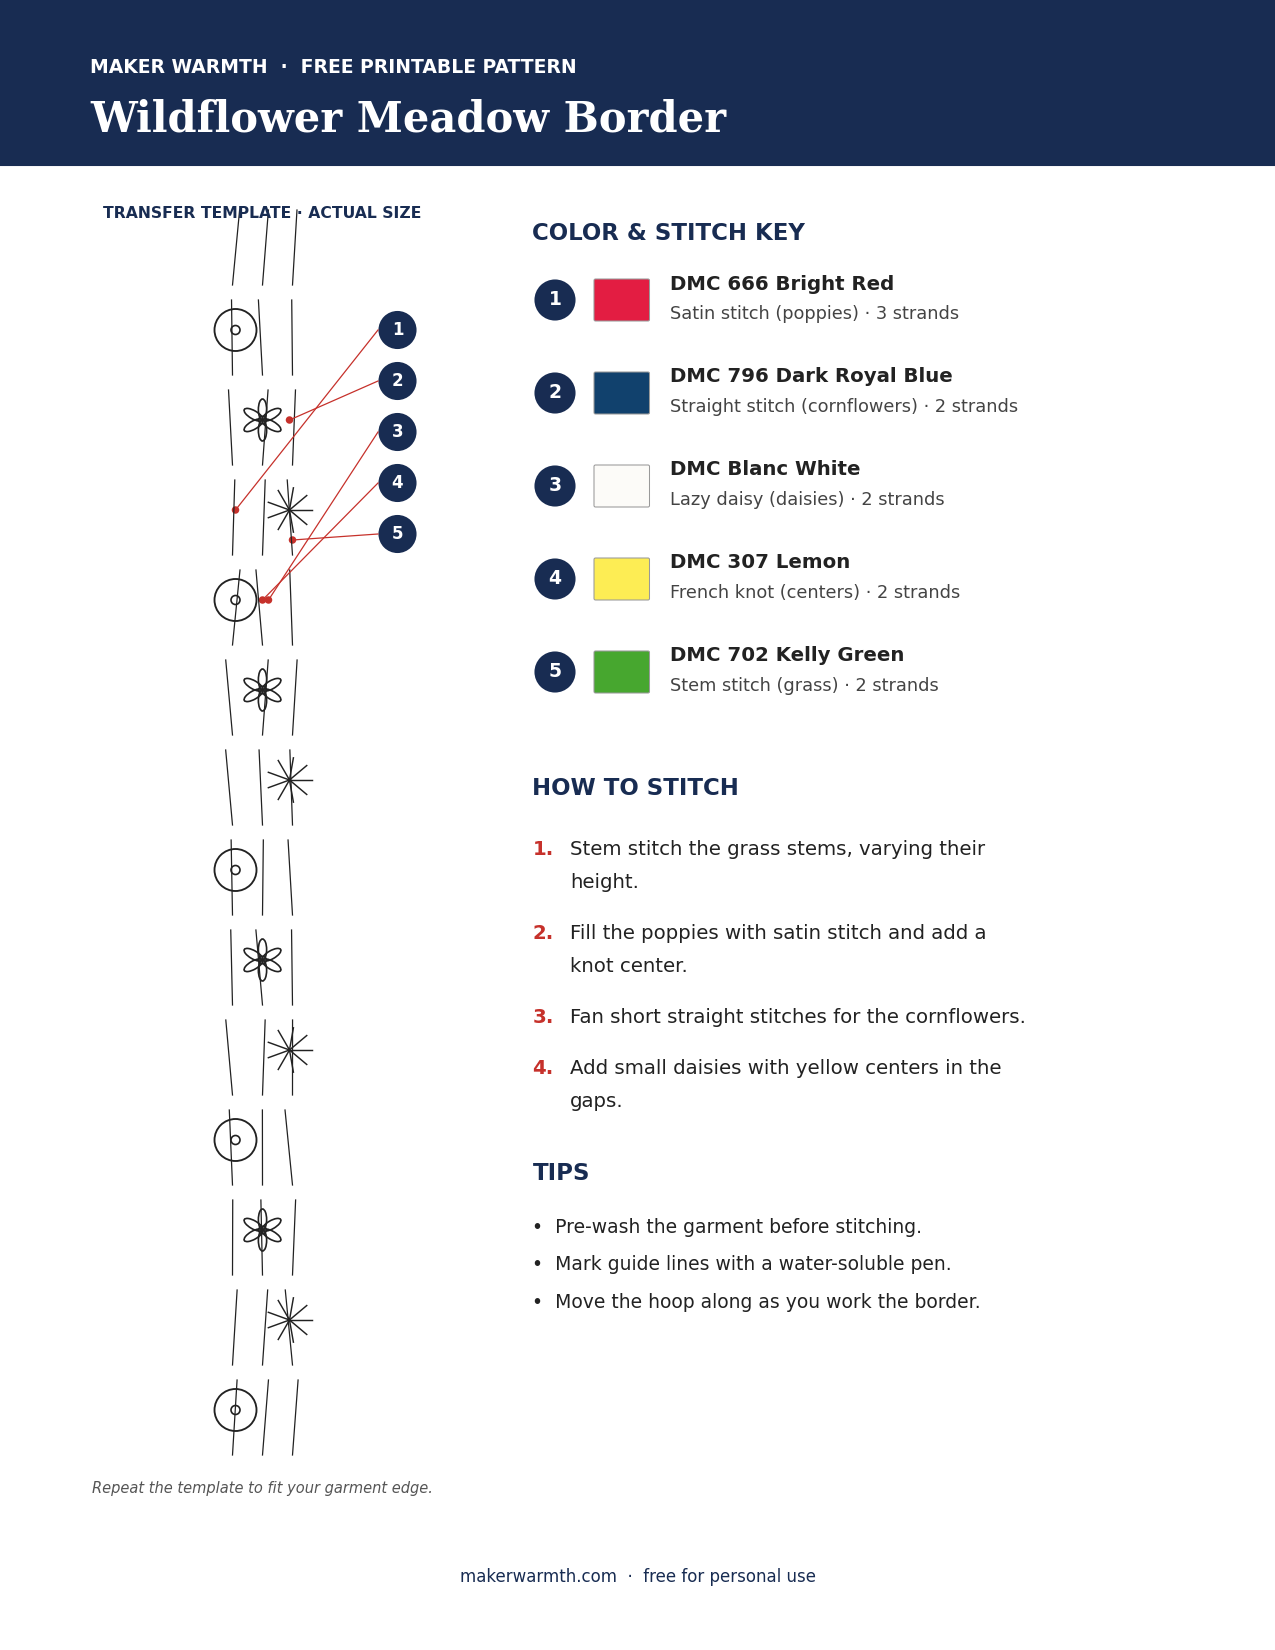
Stitches: satin stitch, straight stitch, lazy daisy stitch, French knot, stem stitch
Colors: DMC 666 Bright Red, DMC 796 Dark Royal Blue, DMC Blanc, DMC 307 Lemon, DMC 702 Kelly Green
Strands: 2–3
- Stem stitch tall grass stems in green along the edge, varying their height.
- Add red satin stitch poppies with a French knot center.
- Make cornflowers from short blue straight stitches fanned out from one point.
- Fill gaps with small white lazy daisy flowers with yellow centers.
Download the Free Printable PDF
15. French Knot Bud Border
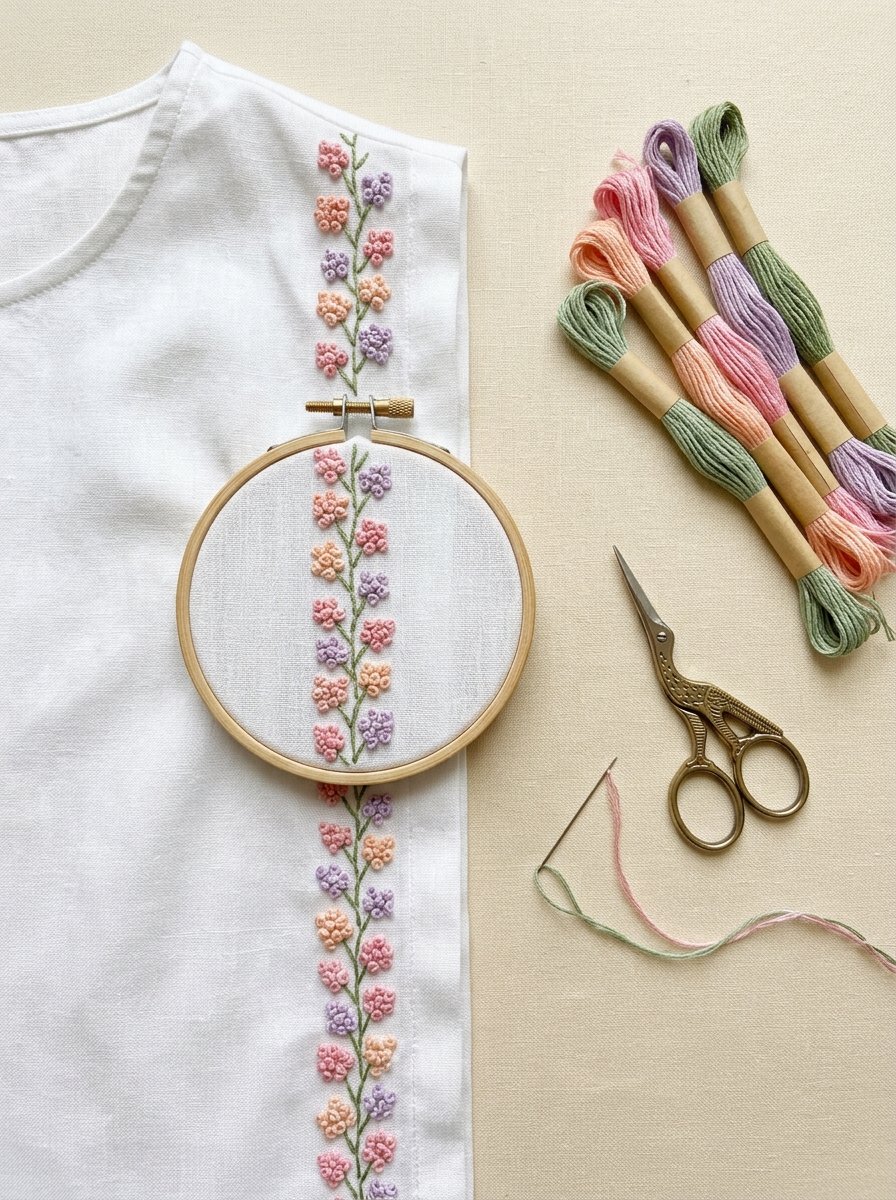
Clusters of tiny pastel buds on fine stems — the softest border on the list. It suits a white linen top, a baby dress or the neckline of a summer blouse.
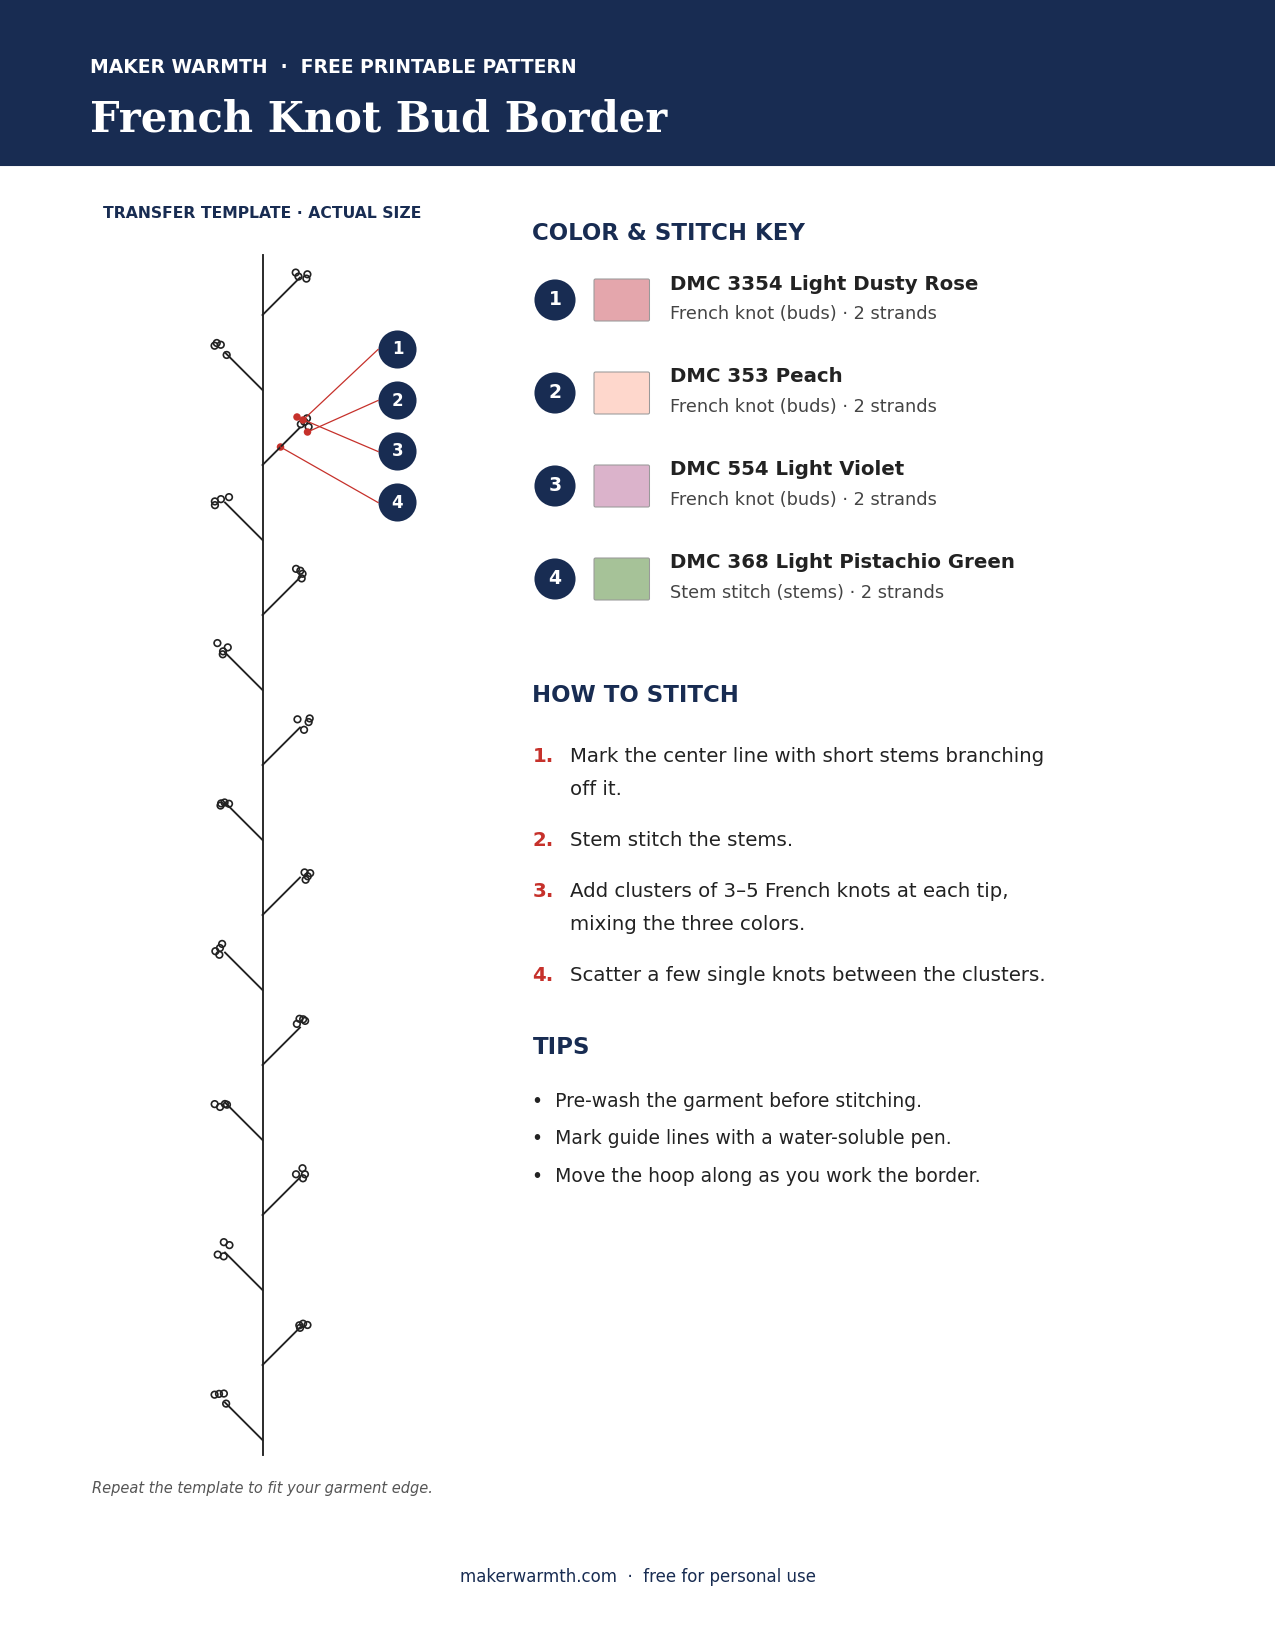
Stitches: French knot, stem stitch
Colors: DMC 3354 Light Dusty Rose, DMC 353 Peach, DMC 554 Light Violet, DMC 368 Light Pistachio Green
Strands: 2
- Mark a center line with short stems branching off it.
- Stem stitch the stems in green.
- Add clusters of three to five French knots at each stem tip, mixing the three pastel colors.
- Scatter a few single knots between the clusters to fill the line.
Download the Free Printable PDF
Border Embroidery FAQ
What is the easiest border embroidery stitch for beginners?
Lazy daisy and feather stitch. Both build a full border from one repeated movement, and small unevenness disappears in the pattern. The Lazy Daisy Zigzag and Feather Stitch Fern borders above are good first projects.
How do I keep a border straight on a garment?
Mark two parallel guide lines with a ruler and a water-soluble pen, measured from the edge or seam, not from the fabric pattern. Mark the repeat points too, then move the hoop along as you stitch.
How many strands of floss should I use for a border?
Three strands for most borders. Use two for fine details like French knot buds, and six for bold raised borders such as the braided chain.
Will a hand-embroidered border survive washing?
Yes, if you secure the thread ends on the back and wash the garment inside out on a gentle cycle in cool water. Pre-wash the garment before stitching so it does not shrink under the embroidery.
More ideas for denim and small spots on your clothes:
Jeans Embroidery Ideas: 12 Free Printable Patterns
Small Embroidery Ideas: 20 Tiny Designs for Collars, Cuffs and Pockets
Embroidered Clothes: 20 Hand Embroidery Ideas for Shirts, Sweaters, Tees and Jeans