
Sweatshirt Embroidery Ideas: 15 Hand Embroidery Designs (Free Printable Patterns)
A sweatshirt is the easiest garment to start embroidering. The fleece is thick and stable, there is plenty of flat space on the chest, and a small design goes a long way. Below are 15 sweatshirt embroidery ideas, from fabric appliqué letters and reverse embroidery to a rainbow neckline, pumpkins and a Christmas gingerbread man.
Every idea comes with a numbered thread and stitch guide, step-by-step notes and a page in one free printable PDF with all 15 patterns at actual size. The numbers in the PDF match the numbered guides below.
In This Post
- What You Will Need
- How to Embroider on a Sweatshirt
- 1. HELLO in Patchwork Letters
- 2. Gingham and Polka-Dot Initials
- 3. Reverse Embroidery Plaid Heart
- 4. Rainbow Bars Along the Neckline
- 5. Little Bow Under the Collar
- 6. Wildflower Postage Stamp
- 7. Mountains and Sun
- 8. Three Little Pumpkins
- 9. Cozy Words Along the Collar
- 10. One Word with a Lavender Sprig
- 11. Wildflower Meadow on Black
- 12. Daisy Scatter on Burgundy
- 13. Shooting Stars
- 14. A Pair of Cherries
- 15. Gingerbread Man and Snowflakes
- Sweatshirt Embroidery FAQ
What You Will Need
What You Will Need
- A cotton or cotton-blend sweatshirt – prewash it once before you start
- Six-strand embroidery floss in the colours of your design
- Size 7 embroidery needles, and a size 22 chenille needle for 4-6 strands
- Tear-away or cut-away embroidery stabilizer for the inside
- Printable, self-adhesive wash-away stabilizer sheets for transferring designs
- Embroidery hoops: 10-13 cm (4-5 in) and 15-18 cm (6-7 in)
- For the appliqué ideas: cotton print scraps and paper-backed fusible web
- Small sharp embroidery scissors and a white chalk pencil for dark sweatshirts
How to Embroider on a Sweatshirt
Stabilize the inside. Sweatshirt fleece is thicker than a T-shirt, but it still stretches. Place a piece of tear-away or cut-away stabilizer inside the sweatshirt, behind the design, and hoop both layers together.
Transfer through a wash-away sheet. Pencil lines disappear in fleece. Print or trace the template onto a self-adhesive wash-away stabilizer sheet, stick it on the front and stitch straight through it; it dissolves in lukewarm water when you finish.
Do not stretch the fleece in the hoop. Tighten the hoop just enough to hold the fabric flat. If you pull it tight, the stitches pucker once it relaxes.
Use 3-4 strands. Two strands sink into the fleece pile. Three or four strands sit on top and stay visible after washing.
Keep only one layer in the hoop. Before each stitch, check that you have not caught the back of the sweatshirt.
Read next: Hand Embroidery Stitches: 20 Basic Stitches for Beginners (Free Printable Cheat Sheet)
From Maker Warmth
Looking for your next stitch project?
Every pattern on this blog is free to print, from tiny bows to full denim jacket designs. Save this one, then browse the whole collection.
See all free patterns →1. HELLO in Patchwork Letters

The word HELLO spelled in five different cotton prints is the sweatshirt embroidery idea that keeps going round Pinterest, and it is quicker than it looks. Each letter is cut from fabric and fused down, then a simple white backstitch holds the edges, so there is hardly any filling to do.
Pattern details
- Difficulty: Confident beginner
- Design size: about 104 x 30 mm (4.1 x 1.2 in)
- Fabric: Medium-weight cotton or cotton-blend sweatshirt fleece. Tear-away or cut-away stabilizer inside, behind the design; wash-away stabilizer sheet on top for the transfer. Plus five scraps of light cotton prints and paper-backed fusible web.
- Needle: Size 7 embroidery needle (size 22 chenille needle for 4-6 strands)
- Hoop: 18-20 cm (7-8 in) hoop, or move a smaller hoop letter by letter
Colour key
- P: Pink gingham, pink floral and lilac check cotton scraps
- W: White; 2 strands
Thread and stitch guide (numbers match page 2 of the PDF)
- Fabric letters: fabric appliqué, colour P. Fuse one letter cut from each print in place along its outline; mix the prints however you like.
- Letter edges: backstitch, colour W, 2 strands. Short stitches 1.5-2 mm in from each cut edge, all the way round every letter, including the inside of the O.
Backstitch stitch guide
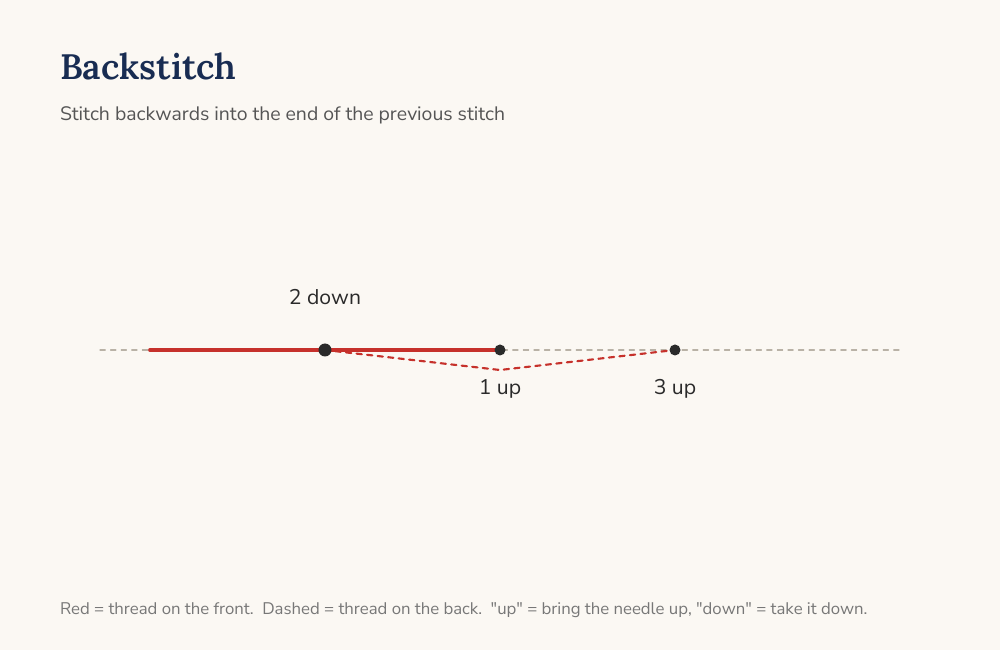
- Come up at 1, one stitch length along the line.
- Go down at 2, the end of the previous stitch (or the start of the line).
- Come up at 3, one stitch length ahead of 1, and repeat.
How to stitch this design
- Print the PDF at 100% and check the 50 mm scale line.
- Trace each letter in reverse onto the paper side of fusible web, iron the web onto the back of the cotton scraps and cut the letters out on the line.
- Mark the word position on the sweatshirt (centre chest, about 8 cm below the neckline seam), peel the paper and iron the letters in place under a pressing cloth.
- Put stabilizer inside the sweatshirt behind the word and hoop without stretching the fleece.
- Backstitch round each letter in white, 1.5-2 mm in from the edge, so the raw edges stay flat in the wash.
- Tear or trim the stabilizer away, then wash inside out on a gentle cycle; a little fraying at the edges is part of the look.
2. Gingham and Polka-Dot Initials
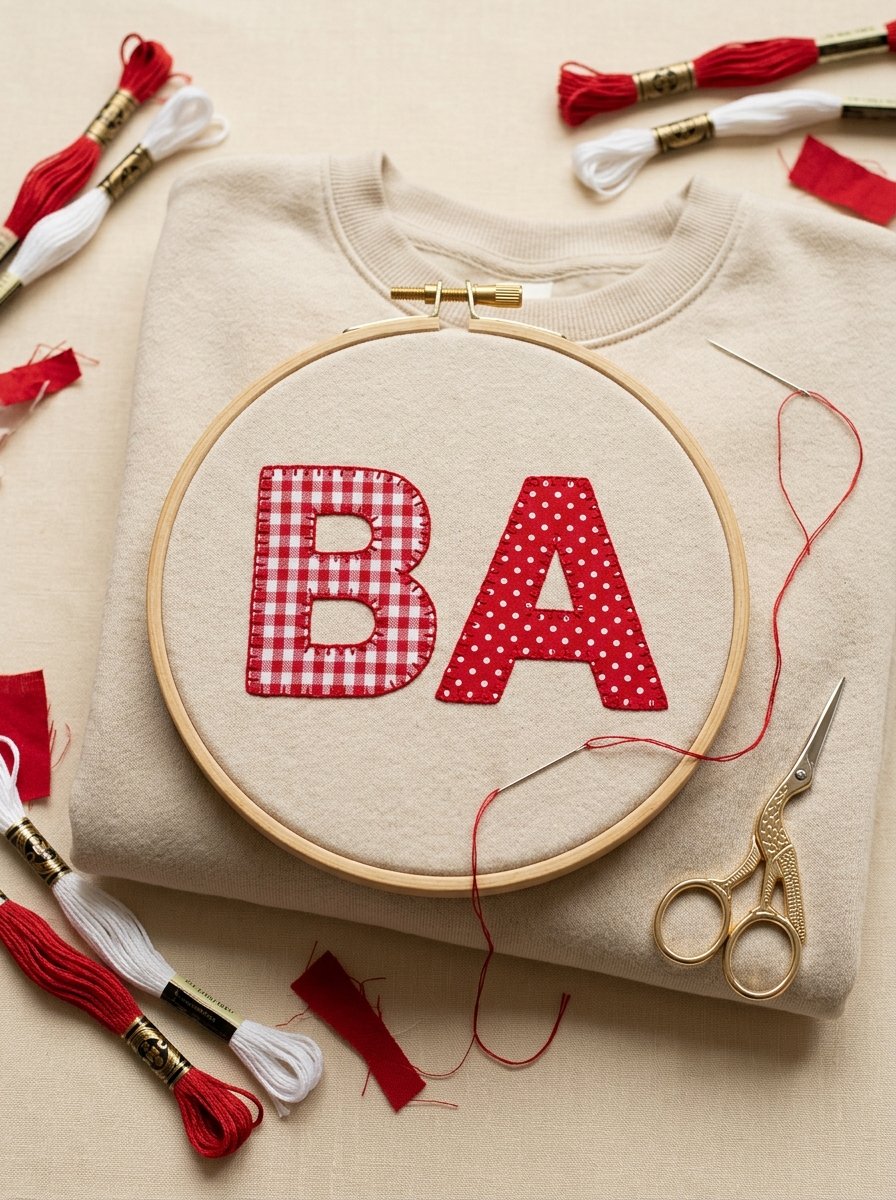
Two big initials in red gingham and polka dots turn a plain sweatshirt into a personal gift. Red blanket stitch round the edges is both the decoration and what keeps the fabric in place.
Pattern details
- Difficulty: Confident beginner
- Design size: about 70 x 40 mm (2.8 x 1.6 in)
- Fabric: Medium-weight cotton or cotton-blend sweatshirt fleece. Tear-away or cut-away stabilizer inside, behind the design; wash-away stabilizer sheet on top for the transfer. Plus red gingham and red polka-dot cotton scraps and fusible web.
- Needle: Size 7 embroidery needle (size 22 chenille needle for 4-6 strands)
- Hoop: 15-18 cm (6-7 in) hoop
Colour key
- R: Red gingham / red polka-dot fabric, red floss; 3 strands
Thread and stitch guide (numbers match page 3 of the PDF)
- First initial: fabric appliqué, colour R. Red gingham, fused in place.
- Second initial: fabric appliqué, colour R. Red polka dot, fused in place.
- Letter edges: blanket stitch, colour R, 3 strands. Stitches about 3 mm apart and 3 mm deep, with the straight edge of the stitch lying along the cut edge.
Blanket stitch guide

- Come up at 1 on the patch edge.
- Go down at 2, above and to the right, through the patch and sweater.
- Come up at 3 on the edge directly below 2, with the thread under the needle.
- Pull gently so the thread lies along the edge, and repeat.
How to stitch this design
- Print the PDF at 100% and check the scale line. Swap in your own initials at the same height (about 34 mm) if you like.
- Trace each letter in reverse onto fusible web, fuse to the gingham and polka-dot scraps and cut out.
- Iron the letters onto the chest, about 8 cm below the neckline, using a pressing cloth.
- Stabilize the back and hoop the fleece without stretching.
- Blanket-stitch round each letter in red. At inside corners, take one extra stitch into the same hole so the corner stays sharp.
- Trim the stabilizer and wash inside out on a gentle cycle.
3. Reverse Embroidery Plaid Heart
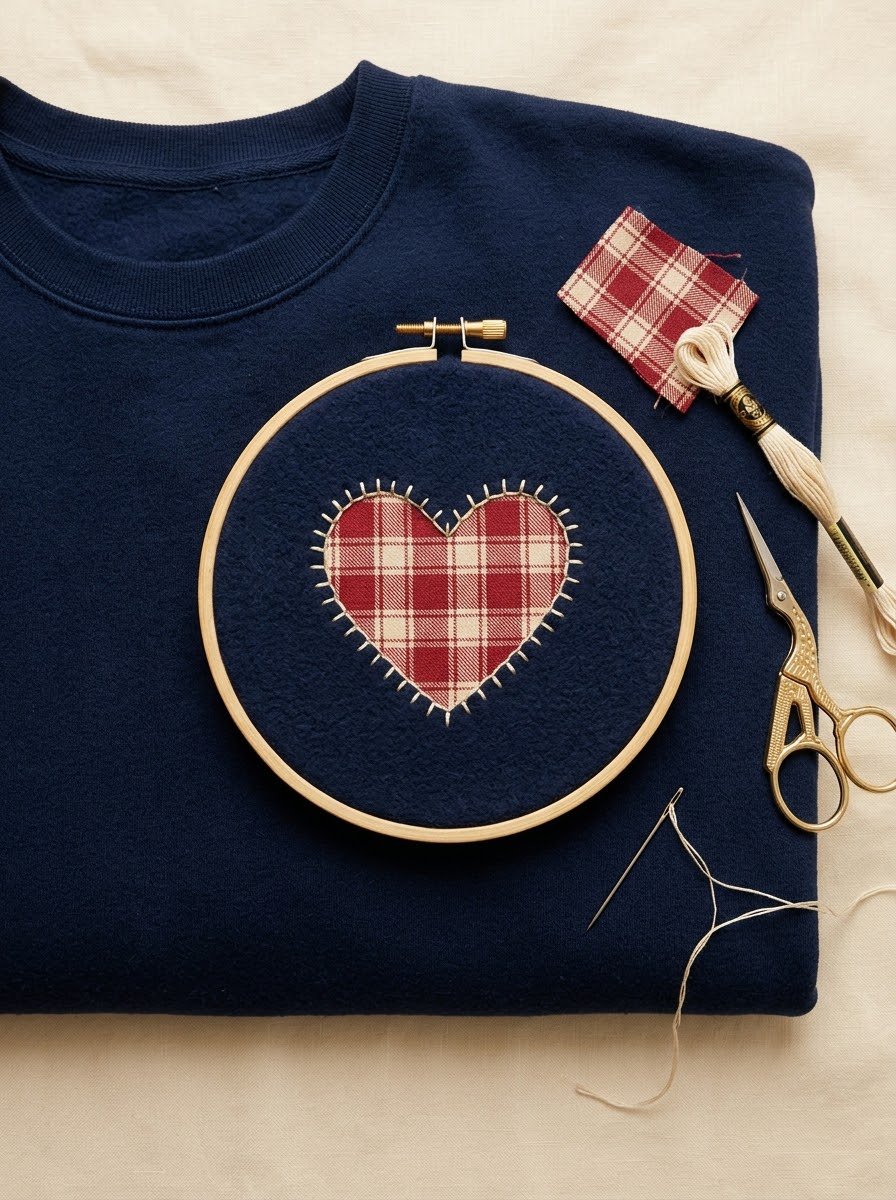
Reverse embroidery is the trend in the top pins right now: you stitch a shape through two layers, then cut away the top layer so the fabric underneath shows through. A plaid heart on navy is the simplest way to try it.
Pattern details
- Difficulty: Intermediate
- Design size: about 64 x 56 mm (2.5 x 2.2 in)
- Fabric: A cotton sweatshirt plus a piece of plaid cotton about 9 x 9 cm, placed INSIDE the sweatshirt behind the heart. No stabilizer needed – the plaid does the job.
- Needle: Size 7 embroidery needle (size 22 chenille needle for 4-6 strands)
- Hoop: 15-18 cm (6-7 in) hoop
Colour key
- F: Plaid cotton (inside the sweatshirt)
- C: Cream; 3 strands
Thread and stitch guide (numbers match page 4 of the PDF)
- Plaid layer: fabric under the sweatshirt, colour F. Pinned inside, right side facing out toward the front of the sweatshirt.
- Heart outline: backstitch, colour C, 3 strands. Short stitches through both layers along the heart line.
- Cut line: guide only – cut, do not stitch. After stitching, cut away the sweatshirt fabric only, about 3 mm inside the stitching.
Backstitch stitch guide
- Come up at 1, one stitch length along the line.
- Go down at 2, the end of the previous stitch (or the start of the line).
- Come up at 3, one stitch length ahead of 1, and repeat.
How to stitch this design
- Print the PDF at 100% and check the scale line. Transfer the heart onto the front of the sweatshirt.
- Turn the sweatshirt inside out and pin the plaid square behind the heart, print side facing the sweatshirt.
- Hoop both layers together without stretching.
- Backstitch the heart outline in cream through both layers with small, even stitches.
- Take the work out of the hoop. Pinch up the sweatshirt layer only, snip a small hole in the centre and cut along the dashed line, about 3 mm inside the stitches. Never cut the plaid.
- Trim the plaid on the inside to about 1 cm outside the stitching. Wash once and let the cut edge soften.
4. Rainbow Bars Along the Neckline

Six short bars of colour following the neckline – colour blocking in its simplest form. Each bar is a few minutes of satin stitch, which makes this one of the quickest designs in the list.
Pattern details
- Difficulty: Beginner
- Design size: about 112 x 40 mm (4.4 x 1.6 in)
- Fabric: Medium-weight cotton or cotton-blend sweatshirt fleece. Tear-away or cut-away stabilizer inside, behind the design; wash-away stabilizer sheet on top for the transfer.
- Needle: Size 7 embroidery needle (size 22 chenille needle for 4-6 strands)
- Hoop: 15 cm (6 in) hoop placed just below the collar
Colour key
- R: Red; 4 strands
- O: Orange; 4 strands
- Y: Yellow; 4 strands
- G: Green; 4 strands
- B: Blue; 4 strands
- V: Violet; 4 strands
Thread and stitch guide (numbers match page 5 of the PDF)
- Colour bars: satin stitch, colour R / O / Y / G / B / V, 4 strands. One bar per colour, worked across its short width so the stitches run parallel to the collar seam.
- Collar seam: guide only – do not stitch. The dashed curve shows where the ribbed collar meets the body.
Satin stitch guide
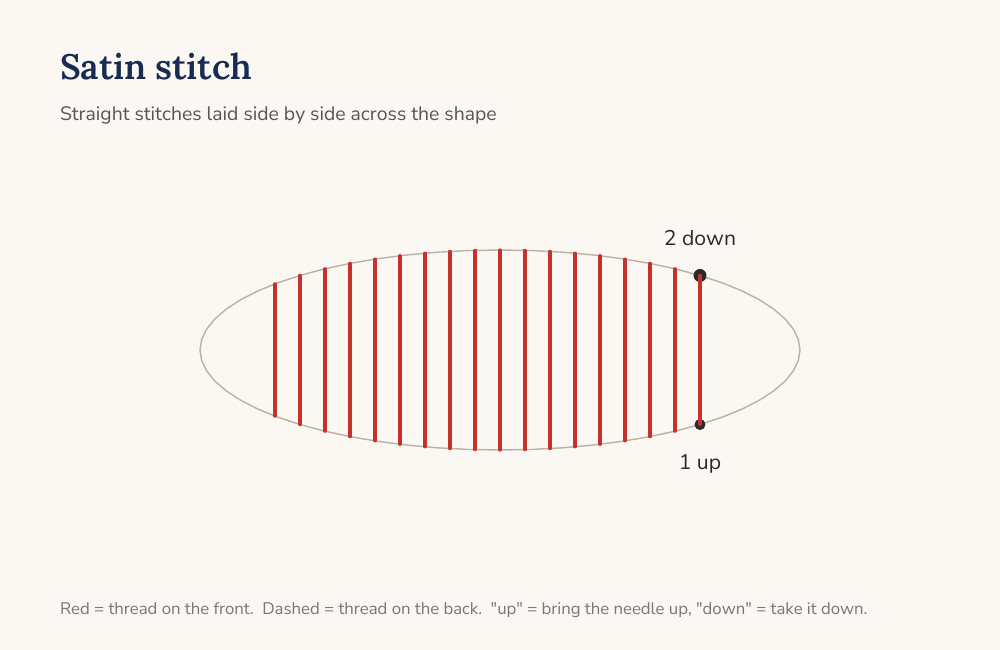
- Come up at 1 on one edge of the shape.
- Go down at 2 directly across on the opposite edge.
- Come up right beside 1 and repeat, laying each stitch snugly next to the last.
- Follow the lines on the pattern card for the stitch direction. Keep stitches no longer than about 8 mm; on wider shapes split the area in two.
How to stitch this design
- Print the PDF at 100%. Line the dashed curve up with the collar seam and transfer the six bars.
- Put stabilizer inside and hoop just below the collar without catching the ribbing.
- Satin-stitch each bar in its colour with 4 strands, keeping the edges straight.
- Start and end each colour separately on the back – do not carry thread between bars.
- Remove the stabilizer and wash inside out.
5. Little Bow Under the Collar
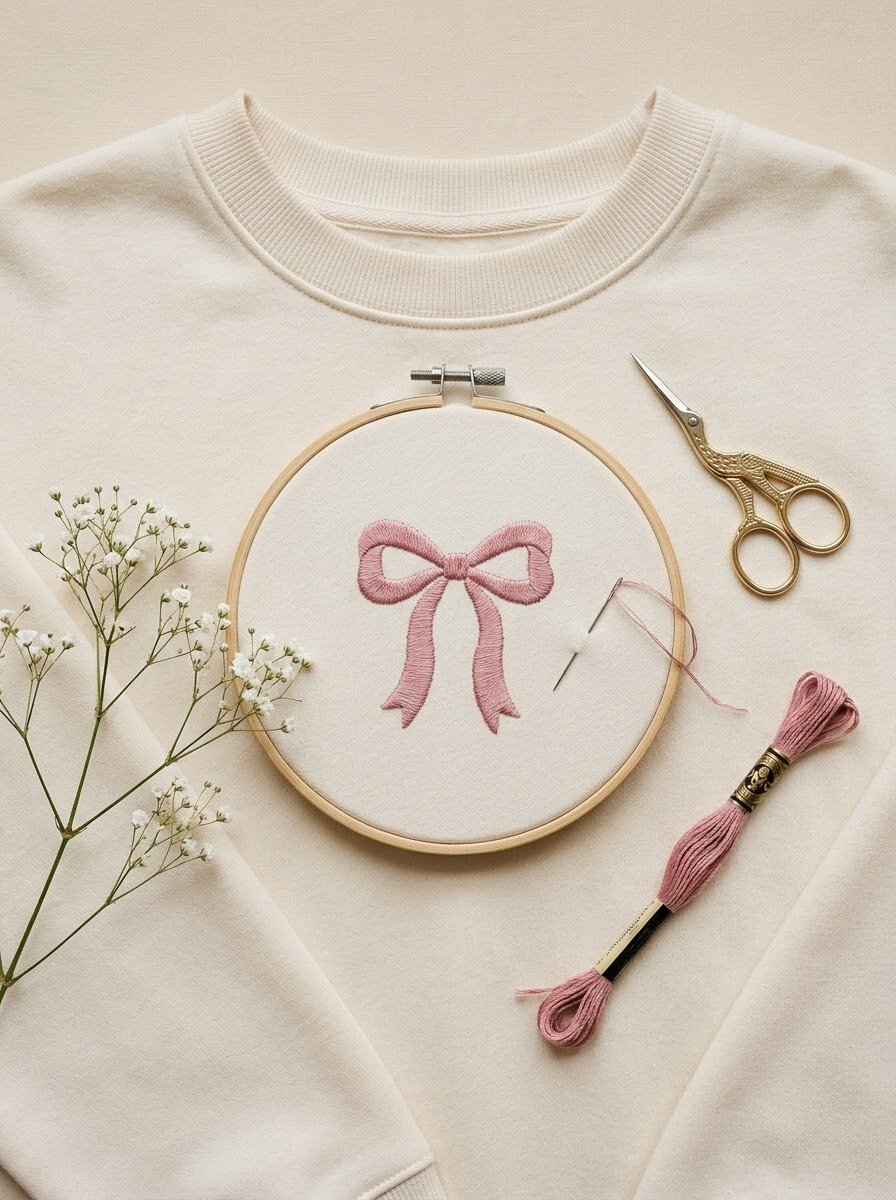
A small bow right under the neckline is a quiet, very wearable idea – it reads almost like a necklace. Dusty pink on cream is soft; red on white is more classic.
Pattern details
- Difficulty: Beginner
- Design size: about 46 x 40 mm (1.8 x 1.6 in)
- Fabric: Medium-weight cotton or cotton-blend sweatshirt fleece. Tear-away or cut-away stabilizer inside, behind the design; wash-away stabilizer sheet on top for the transfer.
- Needle: Size 7 embroidery needle (size 22 chenille needle for 4-6 strands)
- Hoop: 10-13 cm (4-5 in) hoop
Colour key
- R: Dusty pink; 4 strands
- D: Deeper rose; 3 strands
Thread and stitch guide (numbers match page 6 of the PDF)
- Bow loops: satin stitch, colour R, 4 strands. Stitches run from the knot outward along each loop.
- Tails: satin stitch, colour R, 4 strands. Slanted stitches following the angle of each tail.
- Knot: satin stitch, colour D, 3 strands. Fill the small centre last, over the inner ends of the loops and tails.
Satin stitch guide
- Come up at 1 on one edge of the shape.
- Go down at 2 directly across on the opposite edge.
- Come up right beside 1 and repeat, laying each stitch snugly next to the last.
- Follow the lines on the pattern card for the stitch direction. Keep stitches no longer than about 8 mm; on wider shapes split the area in two.
How to stitch this design
- Print at 100% and transfer the bow centred about 2 cm below the collar seam.
- Stabilize the back and hoop without stretching.
- Satin-stitch the two loops, then the two tails.
- Fill the knot in the deeper rose so the bow reads as tied.
- Remove the stabilizer and wash inside out.
Read next: Bow Embroidery: 15 Sweet Ideas for Jeans, Sweaters and Shirts (+ How to Stitch One)
6. Wildflower Postage Stamp

A wavy postage-stamp frame round a little bunch of flowers looks like something from a vintage letter. The frame is just backstitch, so it is more patient than difficult.
Pattern details
- Difficulty: Confident beginner
- Design size: about 56 x 68 mm (2.2 x 2.7 in)
- Fabric: Medium-weight cotton or cotton-blend sweatshirt fleece. Tear-away or cut-away stabilizer inside, behind the design; wash-away stabilizer sheet on top for the transfer.
- Needle: Size 7 embroidery needle (size 22 chenille needle for 4-6 strands)
- Hoop: 15 cm (6 in) hoop
Colour key
- B: Brown; 3 strands
- O: Olive; 3 strands
- M: Mustard; 3 strands
- R: Burnt orange; 3 strands
- K: Dark brown; 3 strands
Thread and stitch guide (numbers match page 7 of the PDF)
- Stamp frame: backstitch, colour B, 3 strands. Follow the wavy edge with short stitches, one stitch per curve at the tightest points.
- Stems: stem stitch, colour O, 3 strands. Main stem first, then the two side stems.
- Petals: lazy daisy, colour M / R, 3 strands. One loop per petal, mustard on the top flower and orange on the side flowers.
- Flower centres: French knot, colour K, 3 strands. One two-wrap knot in each centre.
- Leaves: lazy daisy, colour O, 3 strands. One loop per leaf.
Backstitch stitch guide
- Come up at 1, one stitch length along the line.
- Go down at 2, the end of the previous stitch (or the start of the line).
- Come up at 3, one stitch length ahead of 1, and repeat.
Stem stitch guide

- Come up at A and go down at B, one stitch length along the line.
- Come up at C, halfway back along A-B, right beside the stitch.
- Keep the working thread on the same side of the line every time.
- Shorten the stitches around tight curves.
Lazy daisy stitch guide
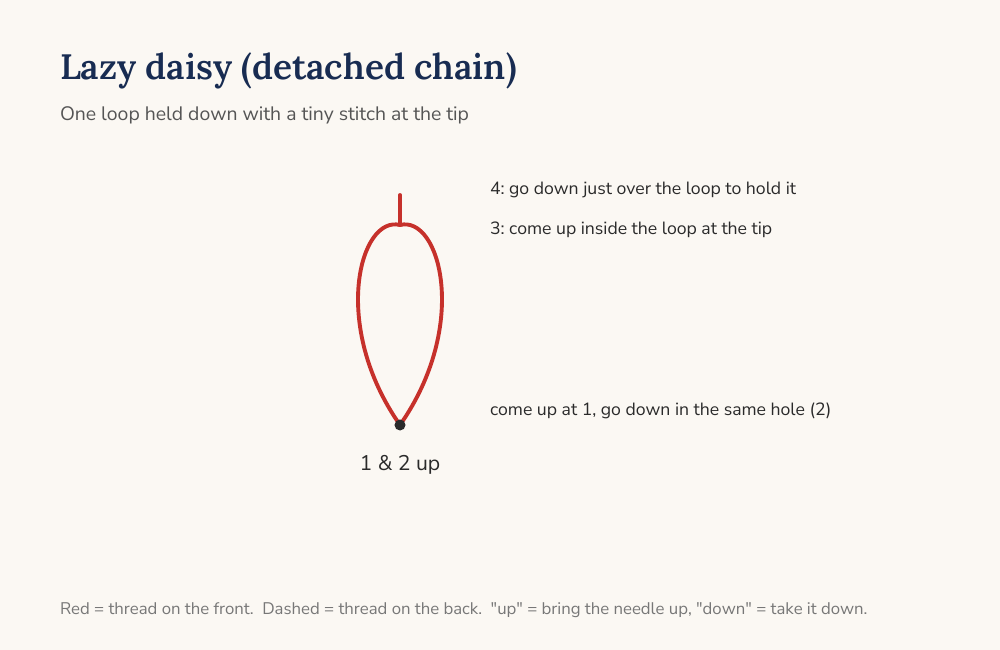
- Come up at 1 at the base of the petal or leaf.
- Go down in the same hole, leaving a small loop on the front.
- Come up at 3, at the tip, inside the loop.
- Go down at 4 just over the loop to tie it in place.
French knot stitch guide
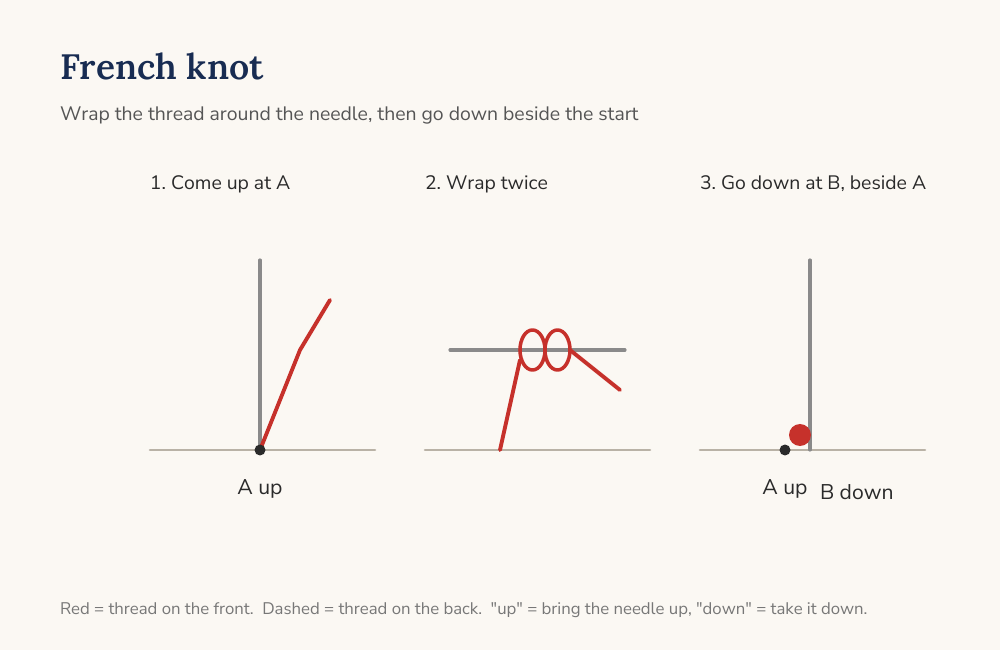
- Come up at A where the knot belongs.
- Hold the thread taut and wrap it once or twice around the needle.
- Go down at B, right beside A (not in the same hole), sliding the wraps down to the fabric.
- Keep holding the thread until the needle is through, then let the knot settle.
How to stitch this design
- Print at 100% and transfer the frame and flowers.
- Stabilize and hoop without stretching.
- Backstitch the wavy frame first so the design stays square.
- Stem-stitch the stems, then add the leaves.
- Work the lazy daisy petals and finish each flower with a French knot.
- Remove the stabilizer and wash inside out.
7. Mountains and Sun

A single white line of mountains and a gold sun is the most minimal design here, and it is also one of the few that works just as well on a man’s sweatshirt.
Pattern details
- Difficulty: Beginner
- Design size: about 82 x 54 mm (3.2 x 2.1 in)
- Fabric: Medium-weight cotton or cotton-blend sweatshirt fleece. Tear-away or cut-away stabilizer inside, behind the design; wash-away stabilizer sheet on top for the transfer.
- Needle: Size 7 embroidery needle (size 22 chenille needle for 4-6 strands)
- Hoop: 15 cm (6 in) hoop
Colour key
- W: White; 3 strands
- Y: Golden yellow; 3 strands
Thread and stitch guide (numbers match page 8 of the PDF)
- Mountain line: backstitch, colour W, 3 strands. One continuous line across all the peaks.
- Snow caps: straight stitch, colour W, 2 strands. Two short stitches under each peak.
- Sun: satin stitch, colour Y, 3 strands. Fill the circle with stitches across its width.
Backstitch stitch guide
- Come up at 1, one stitch length along the line.
- Go down at 2, the end of the previous stitch (or the start of the line).
- Come up at 3, one stitch length ahead of 1, and repeat.
Straight stitch guide
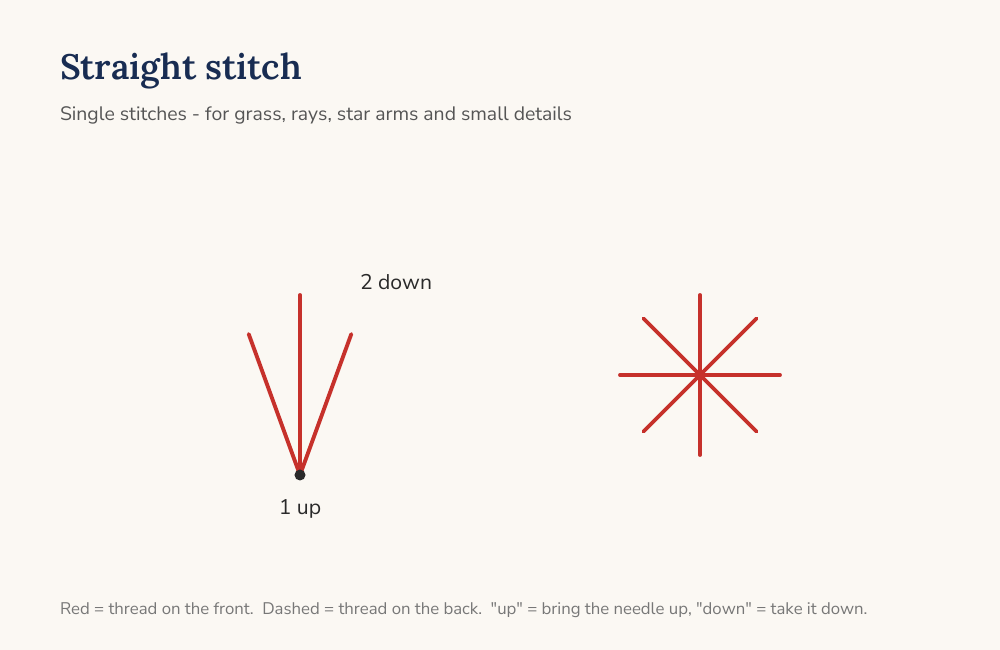
- Come up at 1 at one end of the line.
- Go down at 2 at the other end.
- Keep straight stitches short on knits (under 8 mm) so they do not snag.
Satin stitch guide
- Come up at 1 on one edge of the shape.
- Go down at 2 directly across on the opposite edge.
- Come up right beside 1 and repeat, laying each stitch snugly next to the last.
- Follow the lines on the pattern card for the stitch direction. Keep stitches no longer than about 8 mm; on wider shapes split the area in two.
How to stitch this design
- Print at 100% and transfer onto the chest.
- Stabilize and hoop without stretching.
- Backstitch the mountain line, shortening the stitches at each peak so the points stay sharp.
- Add the snow-cap straight stitches.
- Satin-stitch the sun last.
- Remove the stabilizer and wash inside out.
8. Three Little Pumpkins
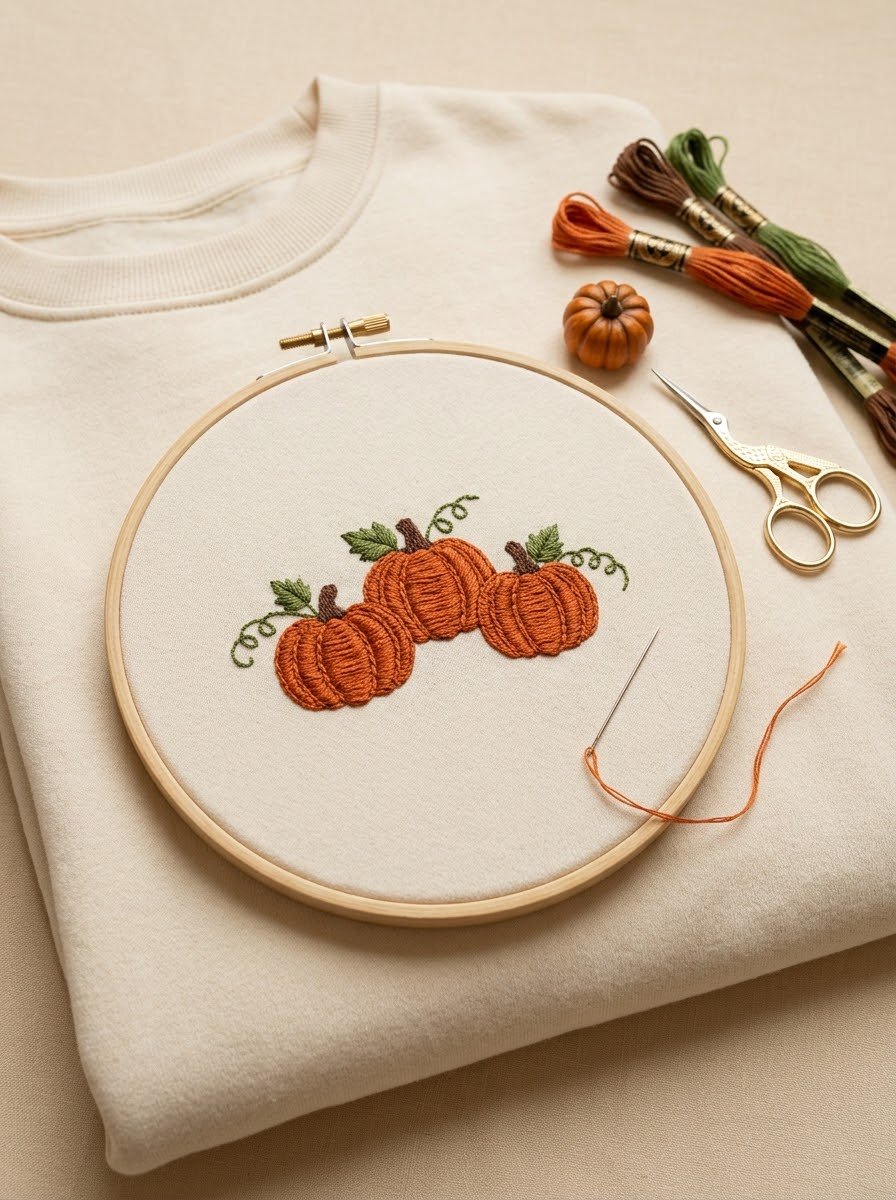
Three pumpkins outlined in stem stitch – no filling at all – give a fall sweatshirt in an evening. Stitch the ribs in a thick 4 strands so the outline reads clearly from a distance.
Pattern details
- Difficulty: Beginner
- Design size: about 78 x 24 mm (3.1 x 0.9 in)
- Fabric: Medium-weight cotton or cotton-blend sweatshirt fleece. Tear-away or cut-away stabilizer inside, behind the design; wash-away stabilizer sheet on top for the transfer.
- Needle: Size 7 embroidery needle (size 22 chenille needle for 4-6 strands)
- Hoop: 15 cm (6 in) hoop
Colour key
- O: Burnt orange; 4 strands
- B: Brown; 3 strands
- G: Leaf green; 3 strands
Thread and stitch guide (numbers match page 9 of the PDF)
- Pumpkin ribs: stem stitch, colour O, 4 strands. Work each of the three overlapping ovals as a separate outline, middle one last.
- Stems: satin stitch, colour B, 3 strands. Fill each small stem.
- Leaves: lazy daisy, colour G, 3 strands. One loop per leaf.
- Tendrils: stem stitch, colour G, 2 strands. Small curls beside each stem.
Stem stitch guide
- Come up at A and go down at B, one stitch length along the line.
- Come up at C, halfway back along A-B, right beside the stitch.
- Keep the working thread on the same side of the line every time.
- Shorten the stitches around tight curves.
Satin stitch guide
- Come up at 1 on one edge of the shape.
- Go down at 2 directly across on the opposite edge.
- Come up right beside 1 and repeat, laying each stitch snugly next to the last.
- Follow the lines on the pattern card for the stitch direction. Keep stitches no longer than about 8 mm; on wider shapes split the area in two.
Lazy daisy stitch guide
- Come up at 1 at the base of the petal or leaf.
- Go down in the same hole, leaving a small loop on the front.
- Come up at 3, at the tip, inside the loop.
- Go down at 4 just over the loop to tie it in place.
How to stitch this design
- Print at 100% and transfer the row centred on the chest.
- Stabilize and hoop without stretching.
- Stem-stitch the outer ribs of each pumpkin, then the centre rib.
- Fill the stems, then add the leaves and tendrils.
- Remove the stabilizer and wash inside out.
9. Cozy Words Along the Collar

A short phrase curving under the collar is a favourite for gift sweatshirts. Two strands of backstitch keep the letters fine; the pattern spells ‘slow down & stay cozy’, and you can swap in any short phrase.
Pattern details
- Difficulty: Confident beginner
- Design size: about 104 x 34 mm (4.1 x 1.3 in)
- Fabric: Medium-weight cotton or cotton-blend sweatshirt fleece. Tear-away or cut-away stabilizer inside, behind the design; wash-away stabilizer sheet on top for the transfer.
- Needle: Size 7 embroidery needle (size 22 chenille needle for 4-6 strands)
- Hoop: 15-18 cm (6-7 in) hoop placed below the collar
Colour key
- B: Chocolate brown; 2 strands
Thread and stitch guide (numbers match page 10 of the PDF)
- Lettering: backstitch, colour B, 2 strands. Very short stitches (about 2 mm) so the curves of the script stay smooth.
- Collar seam: guide only – do not stitch. Line this curve up with the collar seam.
Backstitch stitch guide
- Come up at 1, one stitch length along the line.
- Go down at 2, the end of the previous stitch (or the start of the line).
- Come up at 3, one stitch length ahead of 1, and repeat.
How to stitch this design
- Print at 100% and line the dashed curve up with the collar seam. Swap in your own short phrase if you like – keep it under about 25 letters.
- Transfer the words onto wash-away stabilizer and stick it below the collar.
- Hoop without catching the ribbing.
- Backstitch each word with 2 strands, ending the thread between words.
- Dissolve the stabilizer and dry flat.
10. One Word with a Lavender Sprig

One small word in script with a lavender sprig after it – ‘bloom’ here, but a name or any short word works the same way. On the chest it is subtle; on the forearm of a sleeve it is a little surprise.
Pattern details
- Difficulty: Beginner
- Design size: about 68 x 30 mm (2.7 x 1.2 in)
- Fabric: Medium-weight cotton or cotton-blend sweatshirt fleece. Tear-away or cut-away stabilizer inside, behind the design; wash-away stabilizer sheet on top for the transfer.
- Needle: Size 7 embroidery needle (size 22 chenille needle for 4-6 strands)
- Hoop: 12-15 cm (5-6 in) hoop
Colour key
- B: Brown; 3 strands
- G: Sage green; 2 strands
- L: Lavender; 3 strands
Thread and stitch guide (numbers match page 11 of the PDF)
- Word: backstitch, colour B, 3 strands. Short stitches along the middle of each letter stroke.
- Sprig stem: stem stitch, colour G, 2 strands. Work from the bottom up.
- Lavender buds: French knot, colour L, 3 strands. Two-wrap knots up the stem.
Backstitch stitch guide
- Come up at 1, one stitch length along the line.
- Go down at 2, the end of the previous stitch (or the start of the line).
- Come up at 3, one stitch length ahead of 1, and repeat.
Stem stitch guide
- Come up at A and go down at B, one stitch length along the line.
- Come up at C, halfway back along A-B, right beside the stitch.
- Keep the working thread on the same side of the line every time.
- Shorten the stitches around tight curves.
French knot stitch guide
- Come up at A where the knot belongs.
- Hold the thread taut and wrap it once or twice around the needle.
- Go down at B, right beside A (not in the same hole), sliding the wraps down to the fabric.
- Keep holding the thread until the needle is through, then let the knot settle.
How to stitch this design
- Print at 100%. Type your own word in a script font at about the same size if you want something other than ‘bloom’.
- Transfer onto the chest or the forearm of a sleeve.
- Stabilize and hoop (on a sleeve, stitch in hand with one hand inside).
- Backstitch the word, then add the sprig and knots.
- Remove the stabilizer and wash inside out.
Read next: Sweater Embroidery Ideas: 15 Cozy Designs for Knit Sweaters (Free Printable Patterns)
11. Wildflower Meadow on Black
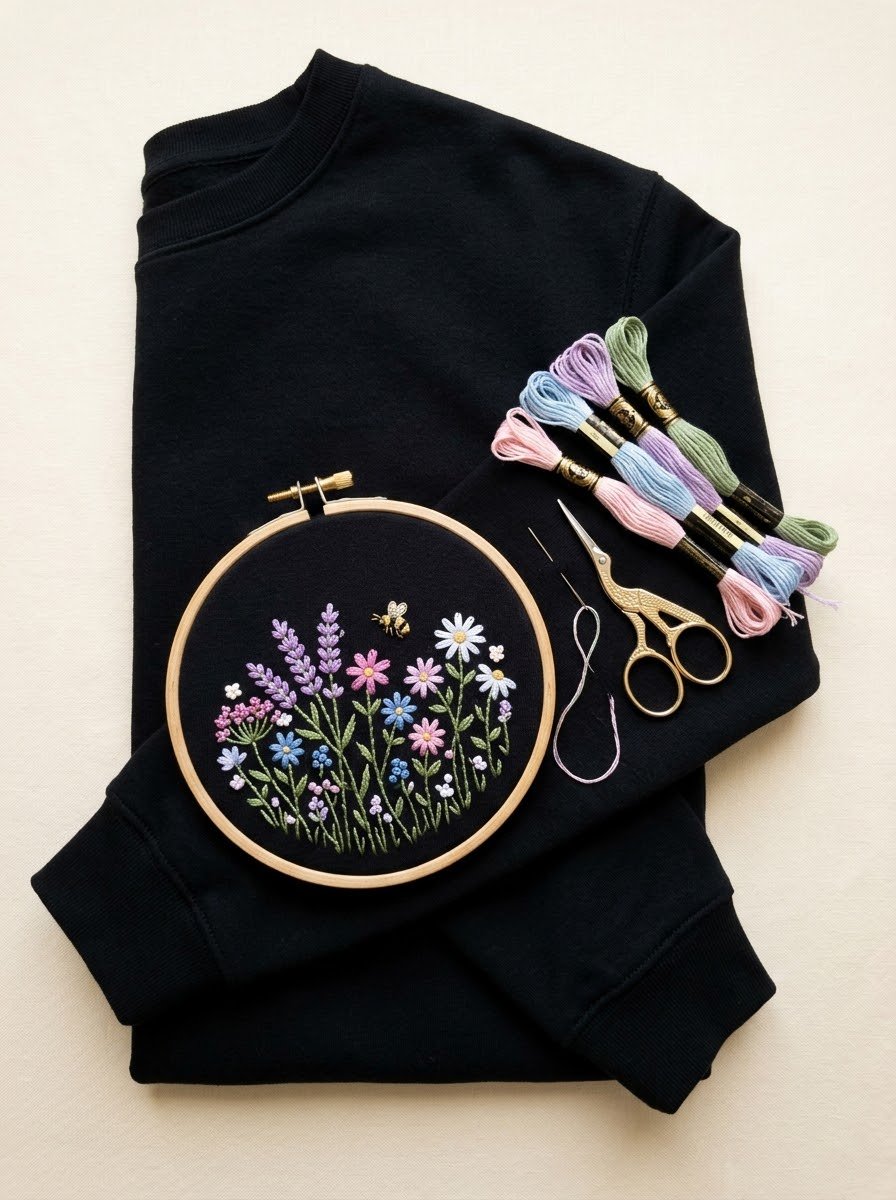
Pastel wildflowers glow on a black sweatshirt – this meadow was one of the most-saved designs in the top pins. It is all stem stitch, lazy daisies and French knots, so it is calmer to stitch than it looks.
Pattern details
- Difficulty: Confident beginner
- Design size: about 80 x 60 mm (3.1 x 2.4 in)
- Fabric: Medium-weight cotton or cotton-blend sweatshirt fleece. Tear-away or cut-away stabilizer inside, behind the design; wash-away stabilizer sheet on top for the transfer. On black, use a white chalk pencil or a printed wash-away sheet for the transfer.
- Needle: Size 7 embroidery needle (size 22 chenille needle for 4-6 strands)
- Hoop: 15-18 cm (6-7 in) hoop
Colour key
- G: Leaf green; 2 strands
- P: Pink; 3 strands
- B: Light blue; 3 strands
- W: White; 3 strands
- L: Lavender; 3 strands
- Y: Yellow; 3 strands
Thread and stitch guide (numbers match page 12 of the PDF)
- Stems: stem stitch, colour G, 2 strands. Work every stem from the bottom up.
- Flowers: lazy daisy, colour P / B / W, 3 strands. Five loops per flower.
- Lavender spikes: French knot, colour L, 3 strands. Two-wrap knots up each lavender stem.
- Flower centres: French knot, colour Y, 3 strands. One knot per flower.
- Bee: satin stitch, colour Y / W, 3 strands. Yellow body in satin stitch, one white lazy daisy wing.
Stem stitch guide
- Come up at A and go down at B, one stitch length along the line.
- Come up at C, halfway back along A-B, right beside the stitch.
- Keep the working thread on the same side of the line every time.
- Shorten the stitches around tight curves.
Lazy daisy stitch guide
- Come up at 1 at the base of the petal or leaf.
- Go down in the same hole, leaving a small loop on the front.
- Come up at 3, at the tip, inside the loop.
- Go down at 4 just over the loop to tie it in place.
French knot stitch guide
- Come up at A where the knot belongs.
- Hold the thread taut and wrap it once or twice around the needle.
- Go down at B, right beside A (not in the same hole), sliding the wraps down to the fabric.
- Keep holding the thread until the needle is through, then let the knot settle.
Satin stitch guide
- Come up at 1 on one edge of the shape.
- Go down at 2 directly across on the opposite edge.
- Come up right beside 1 and repeat, laying each stitch snugly next to the last.
- Follow the lines on the pattern card for the stitch direction. Keep stitches no longer than about 8 mm; on wider shapes split the area in two.
How to stitch this design
- Print at 100% and transfer onto wash-away stabilizer – pencil lines are hard to see on black.
- Stabilize the back and hoop without stretching.
- Stem-stitch all the stems first.
- Add the lazy daisy flowers and lavender knots, then the yellow centres.
- Stitch the little bee last.
- Dissolve the stabilizer and dry flat.
12. Daisy Scatter on Burgundy
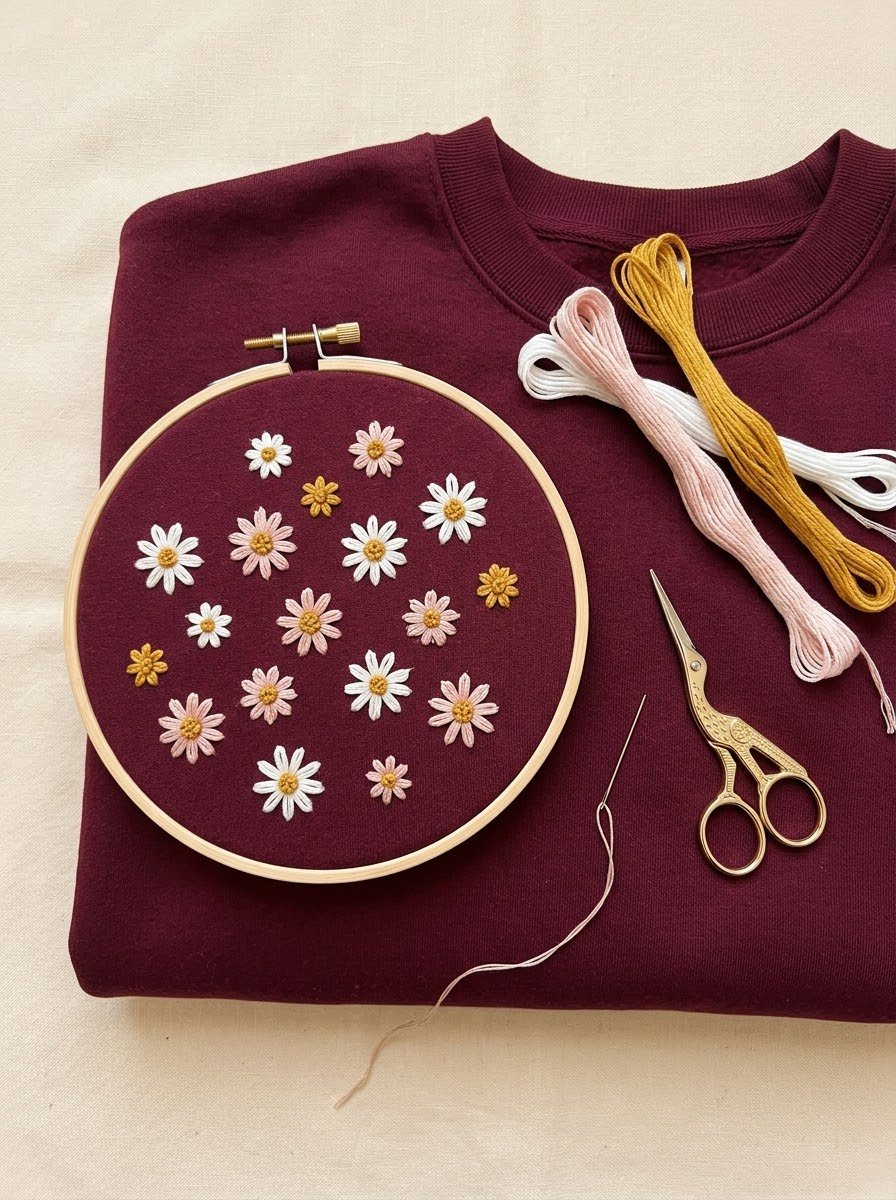
White and blush daisies scattered over burgundy – only one stitch for the petals and one for the centres, so this is a perfect first sweatshirt project.
Pattern details
- Difficulty: Beginner
- Design size: about 90 x 80 mm (3.5 x 3.1 in)
- Fabric: Medium-weight cotton or cotton-blend sweatshirt fleece. Tear-away or cut-away stabilizer inside, behind the design; wash-away stabilizer sheet on top for the transfer.
- Needle: Size 7 embroidery needle (size 22 chenille needle for 4-6 strands)
- Hoop: 15-18 cm (6-7 in) hoop
Colour key
- W: White; 3 strands
- P: Blush; 3 strands
- Y: Mustard; 3 strands
Thread and stitch guide (numbers match page 13 of the PDF)
- White daisies: lazy daisy, colour W, 3 strands. Six loops per flower.
- Blush daisies: lazy daisy, colour P, 3 strands. Six loops per flower.
- Centres: French knot, colour Y, 3 strands. One two-wrap knot in each centre.
Lazy daisy stitch guide
- Come up at 1 at the base of the petal or leaf.
- Go down in the same hole, leaving a small loop on the front.
- Come up at 3, at the tip, inside the loop.
- Go down at 4 just over the loop to tie it in place.
French knot stitch guide
- Come up at A where the knot belongs.
- Hold the thread taut and wrap it once or twice around the needle.
- Go down at B, right beside A (not in the same hole), sliding the wraps down to the fabric.
- Keep holding the thread until the needle is through, then let the knot settle.
How to stitch this design
- Print at 100% and transfer the scatter, or repeat it to cover more of the front.
- Stabilize and hoop without stretching.
- Work the petals of each daisy, then its centre, finishing each flower before moving on so you never carry thread across the back.
- Remove the stabilizer and wash inside out.
13. Shooting Stars

Three gold shooting stars on forest green – one colour, two easy stitches. It works across the chest or running down a sleeve.
Pattern details
- Difficulty: Beginner
- Design size: about 82 x 52 mm (3.2 x 2.0 in)
- Fabric: Medium-weight cotton or cotton-blend sweatshirt fleece. Tear-away or cut-away stabilizer inside, behind the design; wash-away stabilizer sheet on top for the transfer.
- Needle: Size 7 embroidery needle (size 22 chenille needle for 4-6 strands)
- Hoop: 15 cm (6 in) hoop, or stitch in hand on a sleeve
Colour key
- Y: Golden yellow; 3 strands
Thread and stitch guide (numbers match page 14 of the PDF)
- Stars: straight stitch, colour Y, 3 strands. Five straight stitches from the centre outward.
- Trails: stem stitch, colour Y, 2 strands. Three curved lines behind each star.
Straight stitch guide
- Come up at 1 at one end of the line.
- Go down at 2 at the other end.
- Keep straight stitches short on knits (under 8 mm) so they do not snag.
Stem stitch guide
- Come up at A and go down at B, one stitch length along the line.
- Come up at C, halfway back along A-B, right beside the stitch.
- Keep the working thread on the same side of the line every time.
- Shorten the stitches around tight curves.
How to stitch this design
- Print at 100% and transfer onto the chest or sleeve.
- Stabilize and hoop without stretching (or stitch a sleeve in hand).
- Stitch the three stars, then the trails, keeping them slightly apart.
- Remove the stabilizer and wash inside out.
14. A Pair of Cherries

Two red cherries on the left chest – small, bright and very easy. A good one for practising smooth satin stitch.
Pattern details
- Difficulty: Beginner
- Design size: about 44 x 44 mm (1.7 x 1.7 in)
- Fabric: Medium-weight cotton or cotton-blend sweatshirt fleece. Tear-away or cut-away stabilizer inside, behind the design; wash-away stabilizer sheet on top for the transfer.
- Needle: Size 7 embroidery needle (size 22 chenille needle for 4-6 strands)
- Hoop: 10-13 cm (4-5 in) hoop
Colour key
- R: Cherry red; 4 strands
- B: Brown; 3 strands
- G: Leaf green; 3 strands
Thread and stitch guide (numbers match page 15 of the PDF)
- Cherries: satin stitch, colour R, 4 strands. Fill each circle with stitches at a slight slant; a padding layer of split stitch underneath makes them rounder.
- Stems: stem stitch, colour B, 3 strands. From each cherry up to the meeting point.
- Leaf: satin stitch, colour G, 3 strands. Fill each half of the leaf separately, slanting toward the vein.
Satin stitch guide
- Come up at 1 on one edge of the shape.
- Go down at 2 directly across on the opposite edge.
- Come up right beside 1 and repeat, laying each stitch snugly next to the last.
- Follow the lines on the pattern card for the stitch direction. Keep stitches no longer than about 8 mm; on wider shapes split the area in two.
Stem stitch guide
- Come up at A and go down at B, one stitch length along the line.
- Come up at C, halfway back along A-B, right beside the stitch.
- Keep the working thread on the same side of the line every time.
- Shorten the stitches around tight curves.
How to stitch this design
- Print at 100% and transfer onto the left chest or centre.
- Stabilize and hoop without stretching.
- Satin-stitch the two cherries.
- Stem-stitch the stems, then fill the leaf.
- Remove the stabilizer and wash inside out.
15. Gingerbread Man and Snowflakes

A little gingerbread man among snowflakes on a red sweatshirt – the Christmas idea in this list, and a good one to start now so it is ready for December.
Pattern details
- Difficulty: Confident beginner
- Design size: about 60 x 52 mm (2.4 x 2.0 in)
- Fabric: Medium-weight cotton or cotton-blend sweatshirt fleece. Tear-away or cut-away stabilizer inside, behind the design; wash-away stabilizer sheet on top for the transfer. On red, transfer with a printed wash-away sheet.
- Needle: Size 7 embroidery needle (size 22 chenille needle for 4-6 strands)
- Hoop: 15 cm (6 in) hoop
Colour key
- T: Tan; 4 strands
- W: White; 3 strands
- R: Red; 3 strands
- K: Dark brown; 2 strands
Thread and stitch guide (numbers match page 16 of the PDF)
- Gingerbread body: satin stitch, colour T, 4 strands. Fill the head, body, arms and legs in sections, stitches running across the narrow width of each part.
- Icing: straight stitch / stem stitch, colour W, 3 strands. Zigzag on arms and legs, and the smile.
- Buttons: French knot, colour R, 3 strands. Three two-wrap knots down the middle.
- Eyes: French knot, colour K, 2 strands. One knot for each eye.
- Snowflakes: straight stitch, colour W, 2 strands. Six straight stitches from the centre.
Satin stitch guide
- Come up at 1 on one edge of the shape.
- Go down at 2 directly across on the opposite edge.
- Come up right beside 1 and repeat, laying each stitch snugly next to the last.
- Follow the lines on the pattern card for the stitch direction. Keep stitches no longer than about 8 mm; on wider shapes split the area in two.
Stem stitch guide
- Come up at A and go down at B, one stitch length along the line.
- Come up at C, halfway back along A-B, right beside the stitch.
- Keep the working thread on the same side of the line every time.
- Shorten the stitches around tight curves.
Straight stitch guide
- Come up at 1 at one end of the line.
- Go down at 2 at the other end.
- Keep straight stitches short on knits (under 8 mm) so they do not snag.
French knot stitch guide
- Come up at A where the knot belongs.
- Hold the thread taut and wrap it once or twice around the needle.
- Go down at B, right beside A (not in the same hole), sliding the wraps down to the fabric.
- Keep holding the thread until the needle is through, then let the knot settle.
How to stitch this design
- Print at 100% and transfer onto wash-away stabilizer.
- Stabilize the back and hoop without stretching.
- Satin-stitch the gingerbread man section by section.
- Add the white icing, red buttons and brown eyes on top.
- Stitch the snowflakes around him.
- Dissolve the stabilizer and dry flat.
Read next: Embroidered Clothes: 20 Hand Embroidery Ideas for Shirts, Sweaters, Tees and Jeans
Sweatshirt Embroidery FAQ
Can you hand embroider a sweatshirt?
Yes. Put stabilizer inside behind the design, transfer the pattern with a wash-away sheet, hoop the fleece without stretching it and use three or four strands of floss so the stitches sit on top of the pile.
What stabilizer is best for sweatshirt embroidery?
A tear-away or cut-away stabilizer inside the sweatshirt supports the stitches. Cut-away stays in and is the better choice for dense designs; tear-away is fine for light outlines. Add a wash-away sheet on top for the transfer.
How do I transfer a design onto a dark sweatshirt?
Print the template onto a self-adhesive wash-away stabilizer sheet and stick it on, or trace it with a white chalk pencil over a light box. The wash-away sheet is the most accurate on black, navy or red.
Will hand embroidery survive washing?
Yes, if the thread ends are woven in on the back rather than left loose. Wash the sweatshirt inside out on a gentle cycle and dry it flat or on low heat.
What is reverse embroidery?
You place a second fabric behind the sweatshirt, stitch a shape through both layers, then cut away the sweatshirt layer inside the stitching so the fabric underneath shows through. Idea 3 walks through it step by step.
Read next: Browse all free embroidery patterns