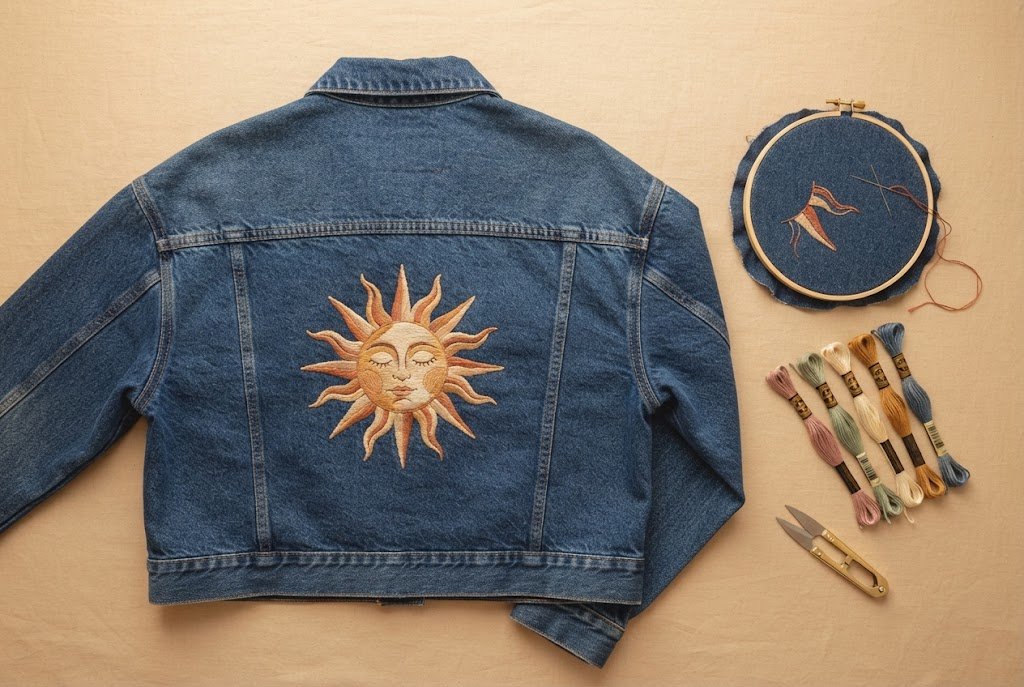
Denim Jacket Embroidery Ideas: 12 Free Printable Patterns
A denim jacket gives you more places to stitch than almost any other piece in your closet. The back panel takes a big scene, the yoke takes a long band, and the collar points, pocket flaps and cuffs each hold a small motif that shows up every time you move.
These 12 denim jacket embroidery ideas are arranged by where they sit on the jacket, from the back down to the button placket. Every idea has its own printable pattern with a thread key, and all 12 patterns are collected in one PDF at the end of the post.
In This Post
- What You Will Need
- Transferring the Patterns onto Denim
- 1. Mountain Range at Dusk
- 2. Wheat and Wild Grass Band
- 3. Crescent Moon and Scattered Stars
- 4. Blackberry Sprig Collar Points
- 5. Running Stitch Wave Collar Border
- 6. Bee Over the Pocket Flap
- 7. Tiny Lemon Branch
- 8. Swallow in Flight
- 9. Climbing Grapevine Sleeve
- 10. Checkerboard Cuff Band
- 11. Initials Under the Top Button
- 12. Sun and Rays Medallion
- Download All 12 Patterns
- The Stitches Behind These Designs
- FAQ
What You Will Need
- A denim jacket in light or medium wash. Dark and black denim work too, but use lighter floss so the design reads.
- DMC six-strand embroidery floss in the colors listed for each pattern.
- Size 7 crewel needles. The sharp point and long eye get through denim twill without tearing the floss.
- Stick-and-stitch stabilizer. You print the pattern on it, press it onto the denim and wash it away when the stitching is done.
- A 6-inch wooden embroidery hoop for the back and sleeves. Small areas such as collar points are stitched in hand without a hoop.
- Embroidery scissors with a fine tip for trimming close to the fabric.
- A heat-erasable fabric pen for touching up lines or marking a center point.
- Thread conditioner (optional). It keeps six strands from twisting on long rows across the yoke.
Transferring the Patterns onto Denim

Denim is too dark and too textured for a lightbox, so every pattern here is made for stick-and-stitch stabilizer.
- Print the pattern at 100% or Actual Size. Measure the scale line on the page; it should read exactly 2 in (5 cm).
- Print or trace the design onto the stabilizer sheet, cut around it with a small margin and peel off the backing.
- Press it onto the jacket where the pattern’s placement note shows. Hoop the area if it is large enough.
- Stitch straight through the stabilizer. When you finish, soak the area in lukewarm water until the sheet dissolves, then let the jacket dry flat.
Long band patterns (ideas 2, 5, 9 and 10) show one repeat. Stick down the first repeat, stitch it, then place the next one so the ends meet.
From Maker Warmth
Looking for your next stitch project?
Every pattern on this blog is free to print, from tiny bows to full denim jacket designs. Save this one, then browse the whole collection.
See all free patterns →1. Mountain Range at Dusk
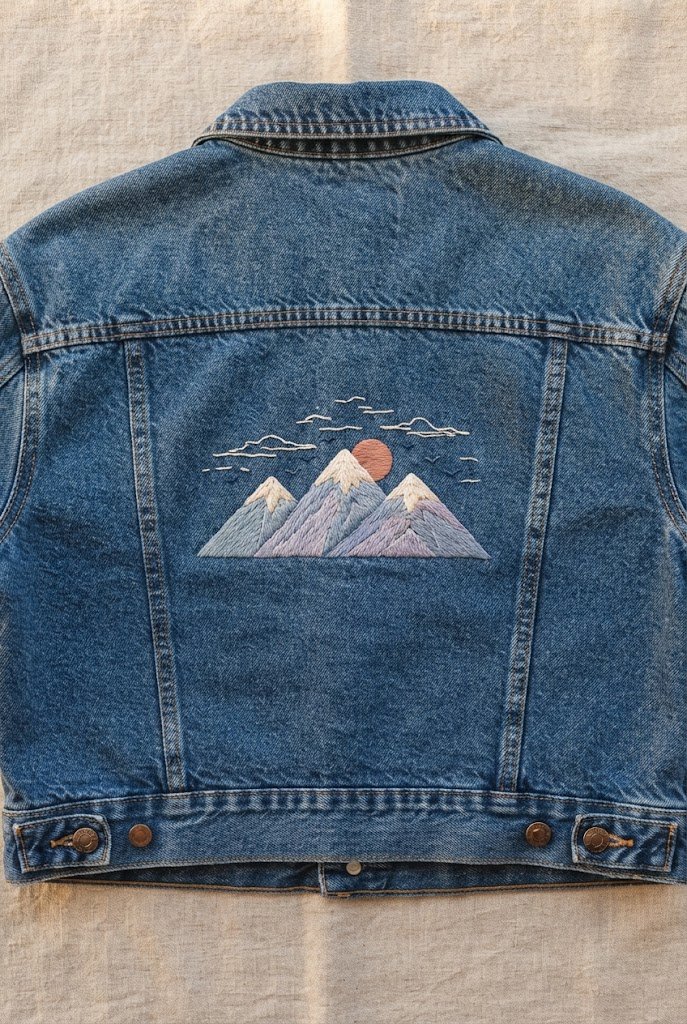
Three peaks, a band of setting sun and a few drifting cloud lines fill the center of the back panel without crowding it. The snow caps are left as a single pale fill, which keeps the shapes bold enough to read from across a room.
Placement: back panel, centered 2 in below the yoke seam
Stitches: split stitch fill, satin stitch, backstitch
Floss: slate blue, dusty lilac, warm cream, burnt orange, soft peach
Level: Intermediate
Time: about 8–10 hours
Size: 6 x 4 in
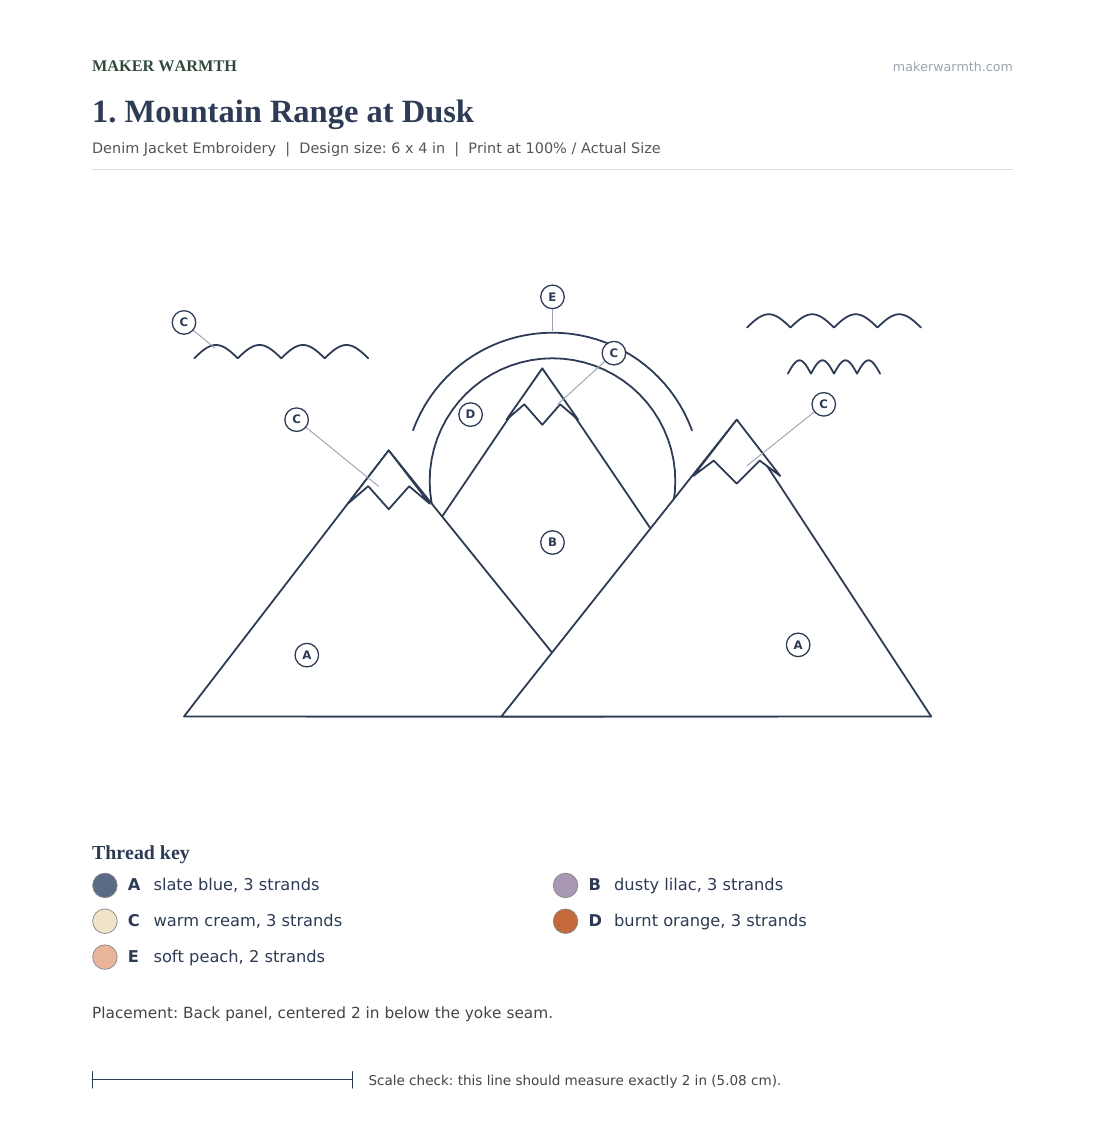
Thread key: A slate blue, 3 strands · B dusty lilac, 3 strands · C warm cream, 3 strands · D burnt orange, 3 strands · E soft peach, 2 strands
How to stitch it
- Fill the sun band (D) with horizontal satin stitches, then the soft glow line above it (E).
- Fill the back peak (B) and the two front peaks (A) with split stitch rows that follow the slope of each side.
- Fill the snow caps (C) last so they sit slightly raised over the blue.
- Backstitch the cloud lines (C) with 2 strands, keeping each line separate.
2. Wheat and Wild Grass Band
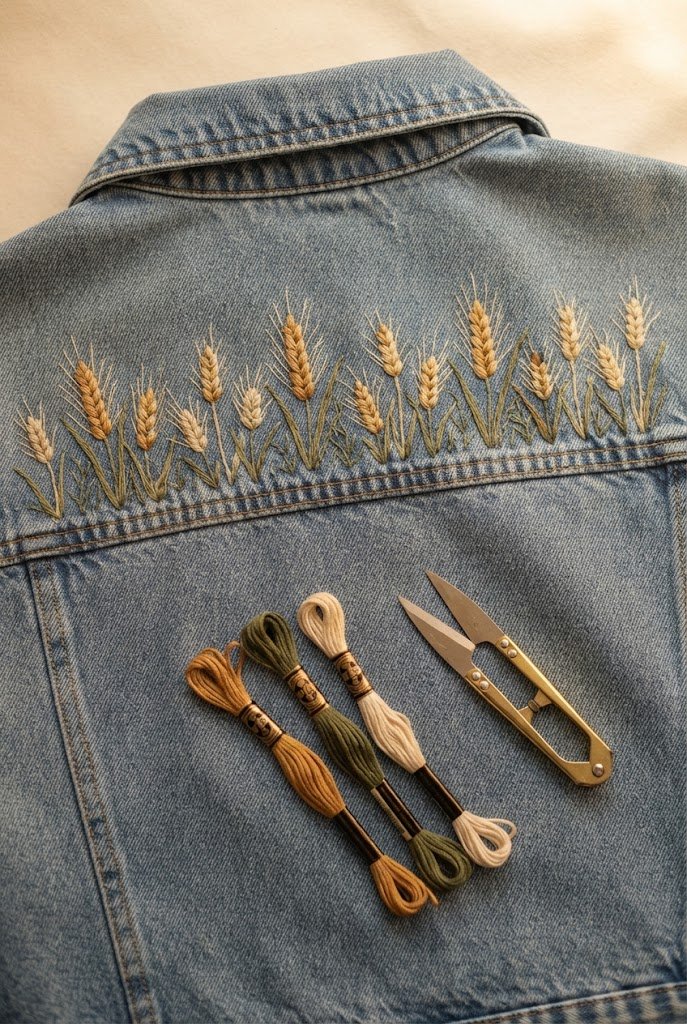
The yoke is a ready-made frame: a straight strip with seams above and below. A row of wheat ears and grass blades runs the full width, alternating tall and short so the band never looks like a ruler.
Placement: back yoke, between the two seams
Stitches: fishbone stitch, stem stitch, straight stitch
Floss: golden ochre, wheat beige, olive green
Level: Confident beginner
Time: about 5–7 hours for a full yoke
Size: one repeat 4 x 1.5 in
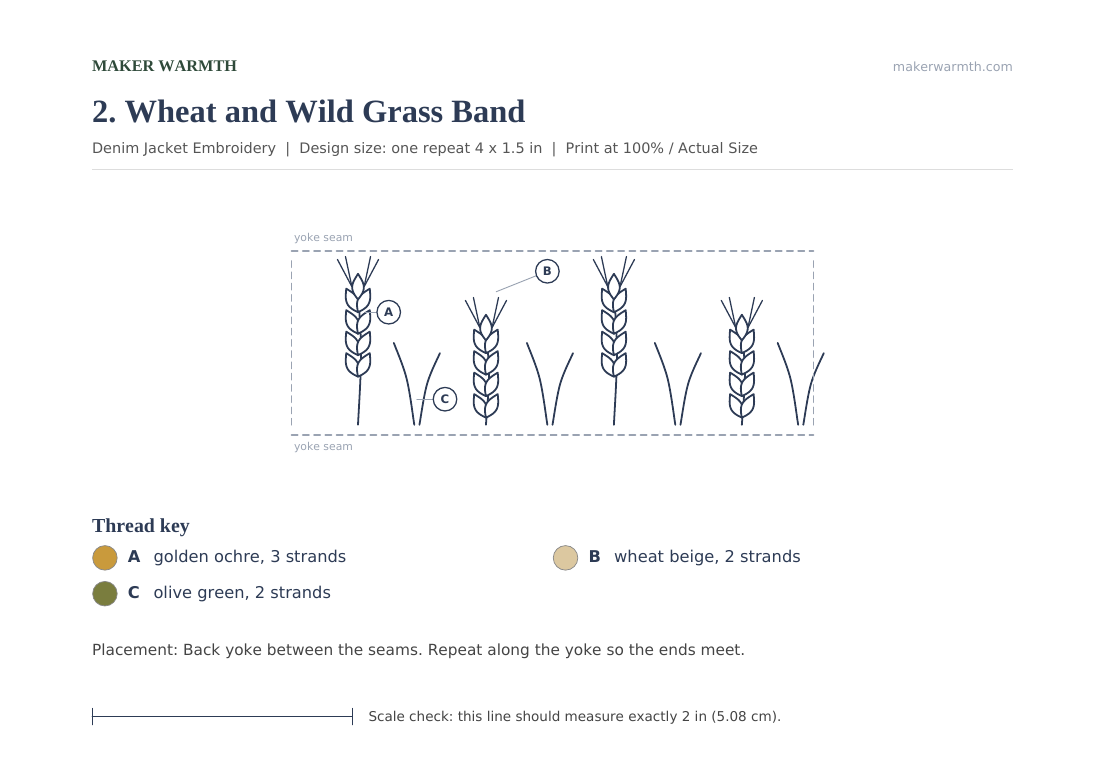
Thread key: A golden ochre, 3 strands · B wheat beige, 2 strands · C olive green, 2 strands
How to stitch it
- Stem stitch every stalk (C) from the bottom seam upward.
- Work each wheat ear (A) in fishbone stitch from the tip down to the stalk.
- Add the whiskers (B) as single straight stitches fanning out from the top of each ear.
- Stitch the grass blades (C) as long straight stitches between the ears, then place the next repeat.
3. Crescent Moon and Scattered Stars

A satin-stitched crescent sits low on the back with a scatter of stars climbing toward the shoulder. It is the quickest design on this list and a good first project on a jacket.
Placement: lower back panel, off center to the left
Stitches: satin stitch, straight stitch, French knots
Floss: pale gold, warm cream
Level: Beginner
Time: about 2–3 hours
Size: 4 x 5 in

Thread key: A pale gold, 3 strands · B warm cream, 2 strands
How to stitch it
- Split stitch the outline of the crescent (A), then cover it with satin stitches that run across the curve.
- Make each large star (A) from four straight stitches crossing at the center.
- Make the small stars (B) from two crossing straight stitches.
- Add a French knot (B) at every dot on the pattern.
4. Blackberry Sprig Collar Points

A short bramble with two ripe berries and one unripe one fits into each collar point. The pattern includes a mirrored version, so both sides lean toward the neckline.
Placement: both collar points, 0.5 in from the edges
Stitches: French knots, fishbone stitch, stem stitch
Floss: deep plum, dusty pink, sage green
Level: Confident beginner
Time: about 2 hours for both points
Size: 1.5 x 1.5 in each

Thread key: A deep plum, 3 strands · B dusty pink, 3 strands · C sage green, 2 strands
How to stitch it
- Stitch the collar without a hoop. Stem stitch the stem (C) first.
- Work the leaves (C) in fishbone stitch from tip to base.
- Fill the ripe berries (A) with tightly packed two-wrap French knots, then the unripe berry (B).
- Repeat with the mirrored pattern on the other point.
5. Running Stitch Wave Collar Border

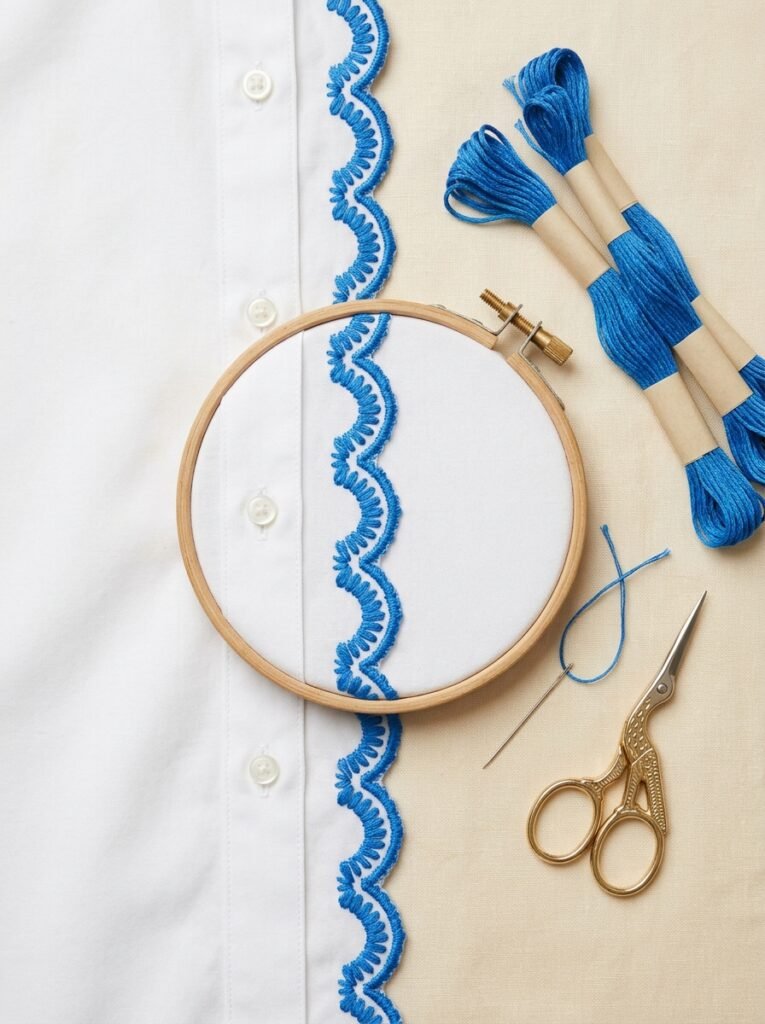
A soft wave follows the outer edge of the collar, with a dot tucked into each dip. Whipping the running stitch turns a dashed line into a smooth rope, and it is the easiest way to make a jacket look finished.
Placement: along the collar edge, 0.25 in inside the topstitching
Stitches: running stitch, whipped running stitch, French knots
Floss: warm cream, rust
Level: Beginner
Time: about 2–3 hours
Size: one repeat 3 x 0.5 in
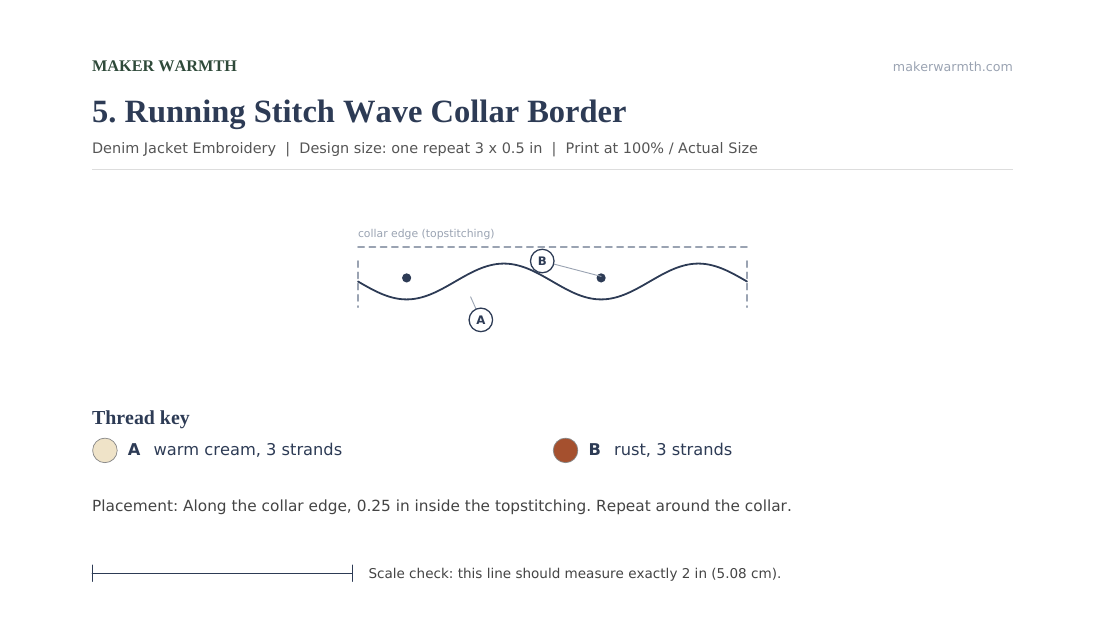
Thread key: A warm cream, 3 strands · B rust, 3 strands
How to stitch it
- Running stitch the wave (A) along the whole collar, keeping each stitch about 0.15 in long.
- Come back with B and whip each stitch: slide the needle under it from the same side every time, without piercing the denim.
- Add one French knot (B) in each dip of the wave.
6. Bee Over the Pocket Flap

One small bee hovers above the chest pocket with a dotted flight path looping down to the flap. It takes up little space and draws the eye straight to the front of the jacket.
Placement: left chest, bee 1 in above the pocket flap
Stitches: satin stitch, backstitch, running stitch
Floss: mustard yellow, soft black, white
Level: Beginner
Time: about 1.5 hours
Size: 2 x 2.5 in with flight path
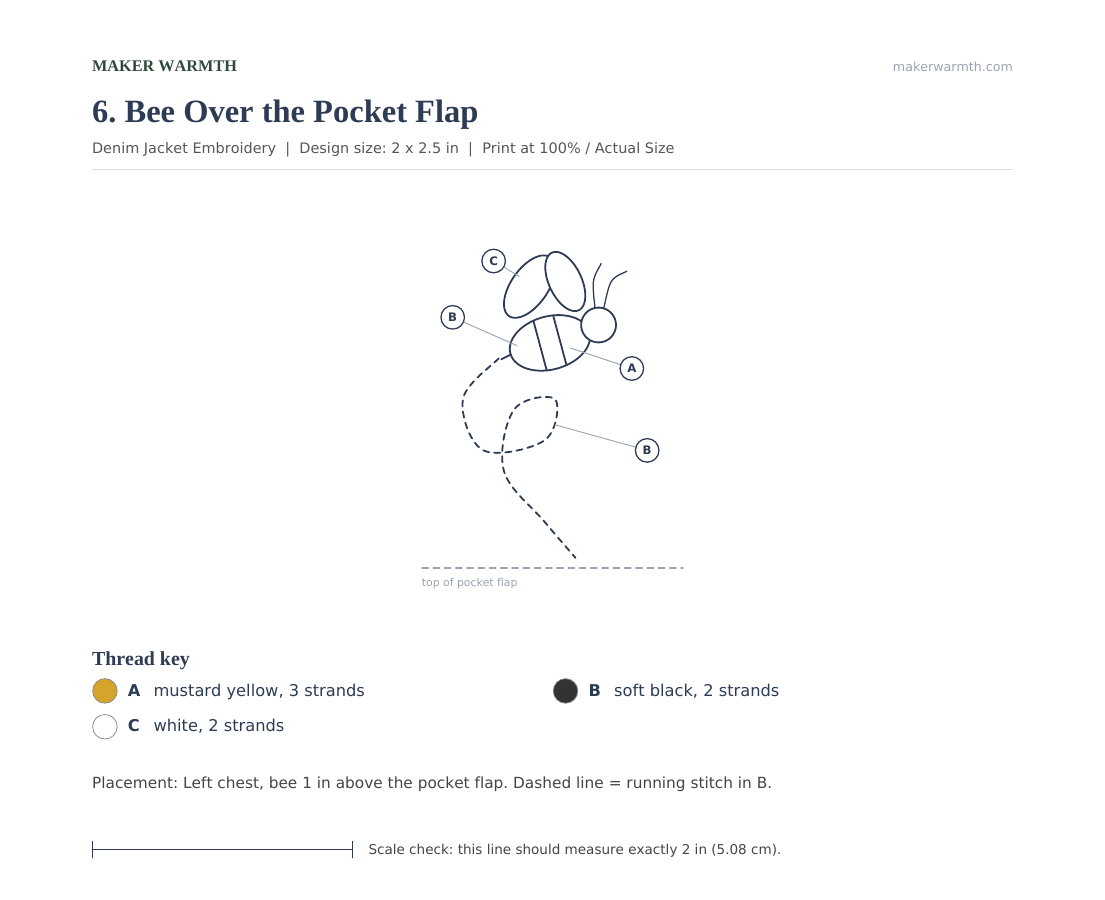
Thread key: A mustard yellow, 3 strands · B soft black, 2 strands · C white, 2 strands
How to stitch it
- Satin stitch the yellow body stripes (A), then the black stripes (B) between them.
- Fill the wings (C) with satin stitches angled away from the body.
- Backstitch the wing outlines and antennae (B) with 1 strand.
- Running stitch the flight path (B) with 2 strands and short gaps.
7. Tiny Lemon Branch
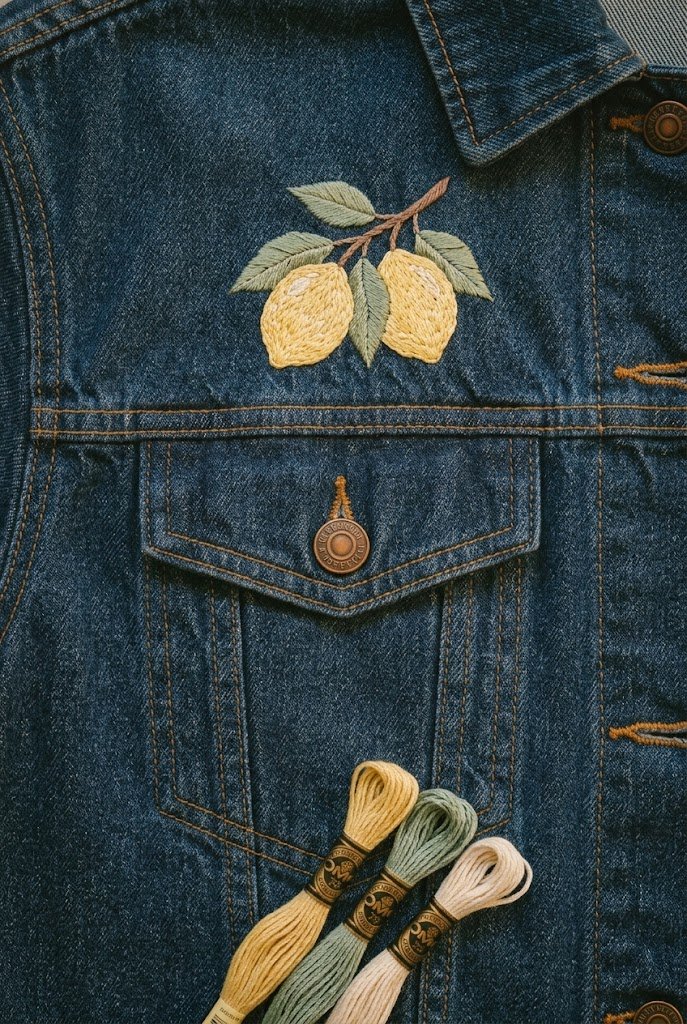
Two lemons hang from a short branch on the opposite side of the chest. Bright yellow against blue denim stands out even in a small size, so it works well on light and dark washes alike.
Placement: right chest, above the pocket
Stitches: split stitch fill, fishbone stitch, stem stitch
Floss: lemon yellow, pale yellow, leaf green, brown
Level: Confident beginner
Time: about 2–3 hours
Size: 2.5 x 2 in
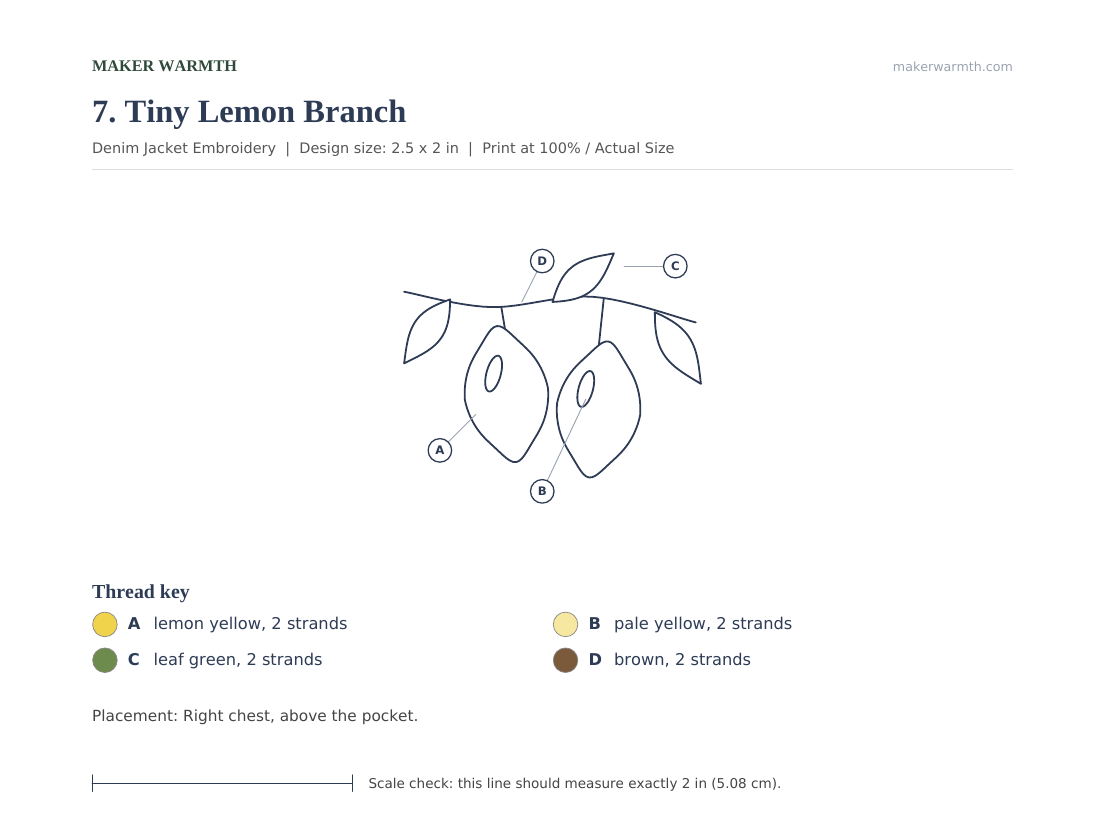
Thread key: A lemon yellow, 2 strands · B pale yellow, 2 strands · C leaf green, 2 strands · D brown, 2 strands
How to stitch it
- Stem stitch the branch (D).
- Fill each lemon (A) with split stitch rows that follow its oval shape, leaving the highlight area open.
- Fill the highlight (B) so it blends into the yellow.
- Work the leaves (C) in fishbone stitch from tip to stem.
8. Swallow in Flight

A swallow with a forked tail sweeps across the top of the sleeve. The navy body and rust throat give it a little vintage tattoo feel without heavy black outlines.
Placement: upper sleeve, 3 in below the shoulder seam
Stitches: split stitch fill, backstitch
Floss: navy, rust, warm cream
Level: Intermediate
Time: about 3–4 hours
Size: 3.5 x 2 in
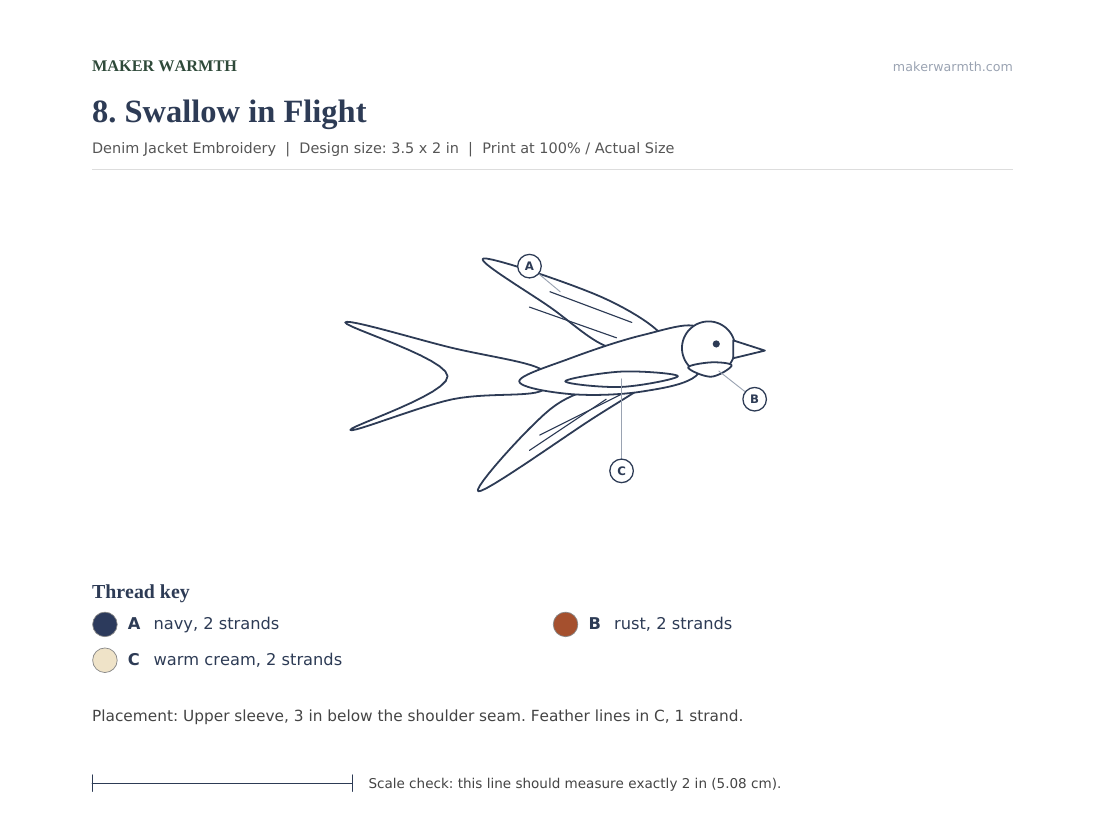
Thread key: A navy, 2 strands · B rust, 2 strands · C warm cream, 2 strands
How to stitch it
- Hoop the sleeve with only one layer of denim inside; keep the back of the sleeve out of the way.
- Fill the wings and tail (A) with split stitch rows running from the body to the tips.
- Fill the throat (B) and the belly (C).
- Backstitch the feather lines (C) over the navy with 1 strand.
9. Climbing Grapevine Sleeve
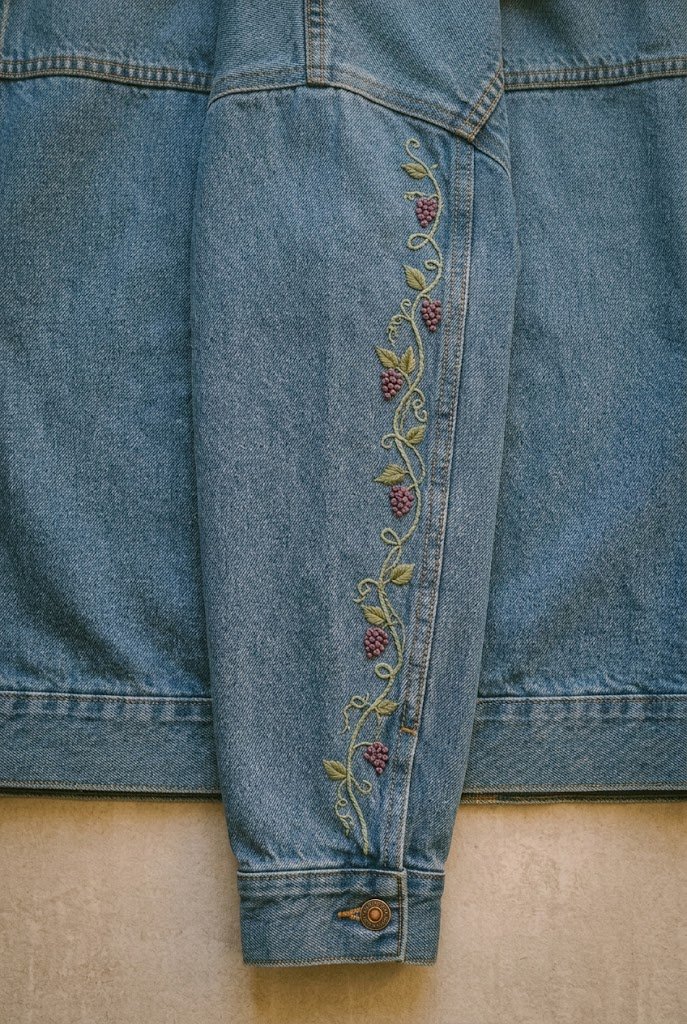
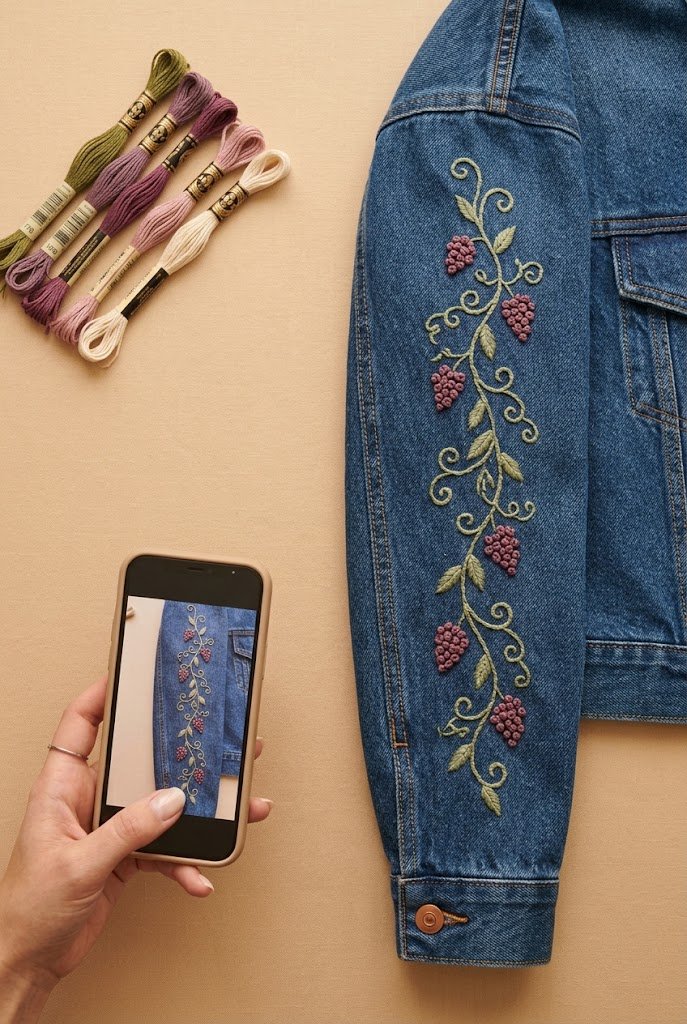
A vine follows the outer sleeve seam from shoulder to elbow, with curling tendrils and small bunches of grapes. Running it along the seam makes the design look planned rather than placed.
Placement: along the outer sleeve seam, shoulder to elbow
Stitches: stem stitch, French knots, lazy daisy
Floss: olive green, muted purple, light green
Level: Confident beginner
Time: about 4–5 hours
Size: one repeat 1.5 x 4 in
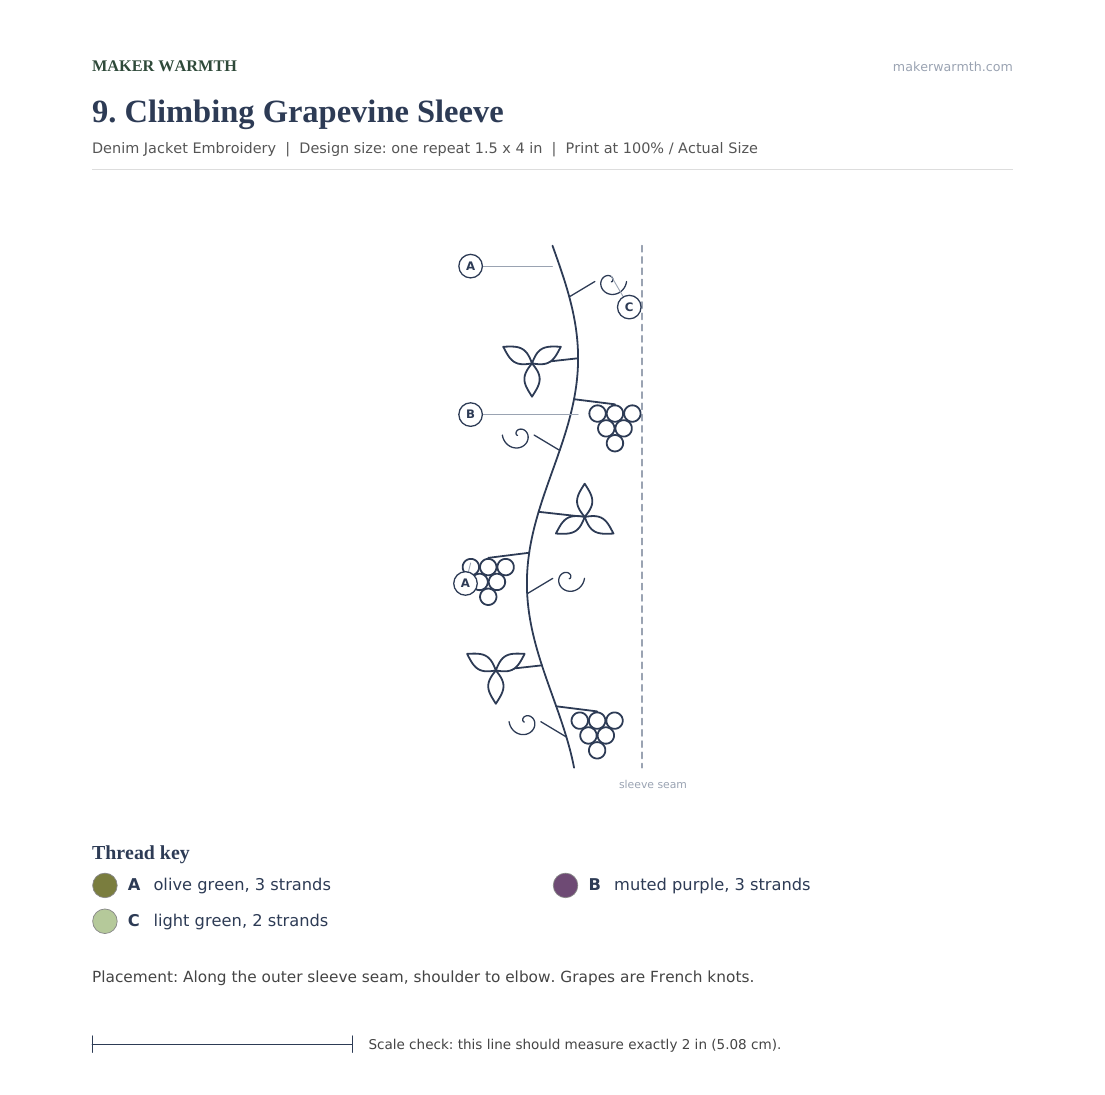
Thread key: A olive green, 3 strands · B muted purple, 3 strands · C light green, 2 strands
How to stitch it
- Stem stitch the main vine (A) next to the seam, then the tendrils (C) with tight curls.
- Make each leaf (A) from three lazy daisy stitches fanned from one point.
- Build each grape bunch (B) from French knots in a triangle, widest at the top.
- Place the next repeat so the vine connects.
10. Checkerboard Cuff Band

A two-color checkerboard wraps around each cuff. It is pure satin stitch, so it is a good way to practice keeping stitches straight and even before trying a larger fill.
Placement: around each cuff, centered between the cuff seams
Stitches: satin stitch
Floss: warm cream, terracotta
Level: Beginner
Time: about 3 hours per cuff
Size: one repeat 2 x 0.5 in, squares 0.25 in

Thread key: A warm cream, 3 strands · B terracotta, 3 strands
How to stitch it
- Stitch the cuffs in hand, without a hoop. Stick the pattern repeats around the cuff first.
- Fill every A square with vertical satin stitches.
- Fill every B square the same way, so all stitches run in one direction.
- Leave the denim squares unstitched if you prefer a lighter band.
11. Initials Under the Top Button

Two script initials sit just under the top button, where they show when the jacket is worn open. The pattern uses the letters M and R as a sample; trace your own initials in the same size and style.
Placement: button placket, 1 in below the top button
Stitches: backstitch, stem stitch
Floss: warm cream or pale gold
Level: Beginner
Time: about 1 hour
Size: 1.5 x 0.75 in
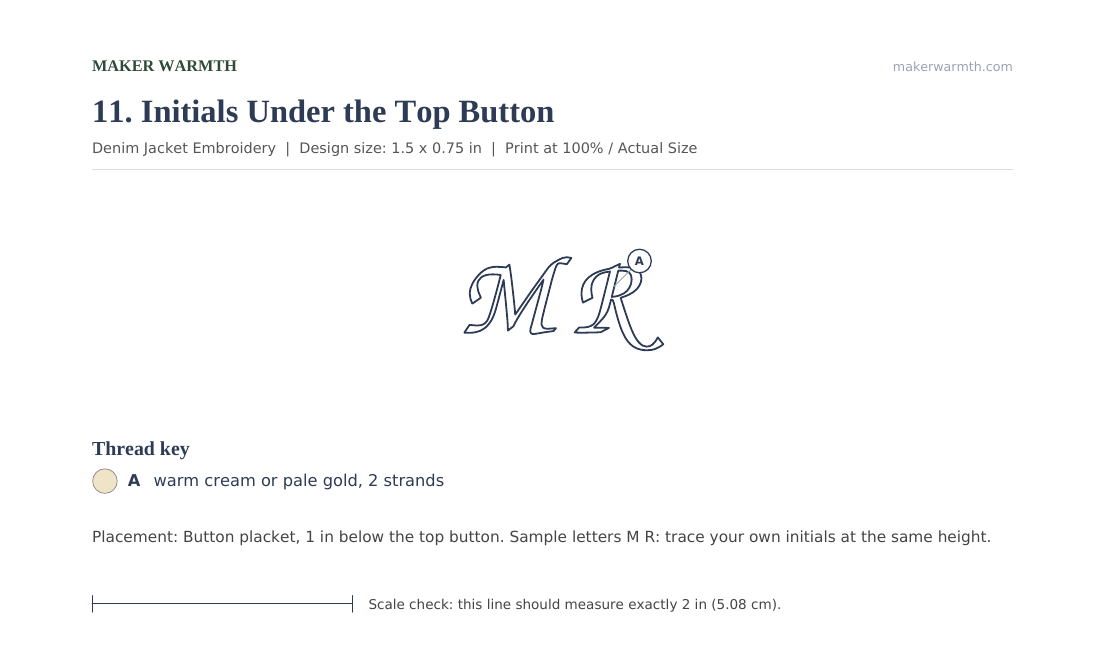
Thread key: A warm cream or pale gold, 2 strands
How to stitch it
- Stem stitch the thick downstrokes of each letter so they look heavier.
- Backstitch the thin connecting strokes with short, even stitches.
- Go around tight curves with stitches no longer than 0.1 in.
12. Sun and Rays Medallion

A big sun with a calm sleeping face and alternating long and short rays fills the whole back panel. It is the largest design here and the one people will ask about.
Placement: back panel, centered
Stitches: satin stitch, split stitch fill, straight stitch
Floss: marigold, golden ochre, rust, soft brown
Level: Intermediate
Time: about 10–12 hours
Size: 7 x 7 in
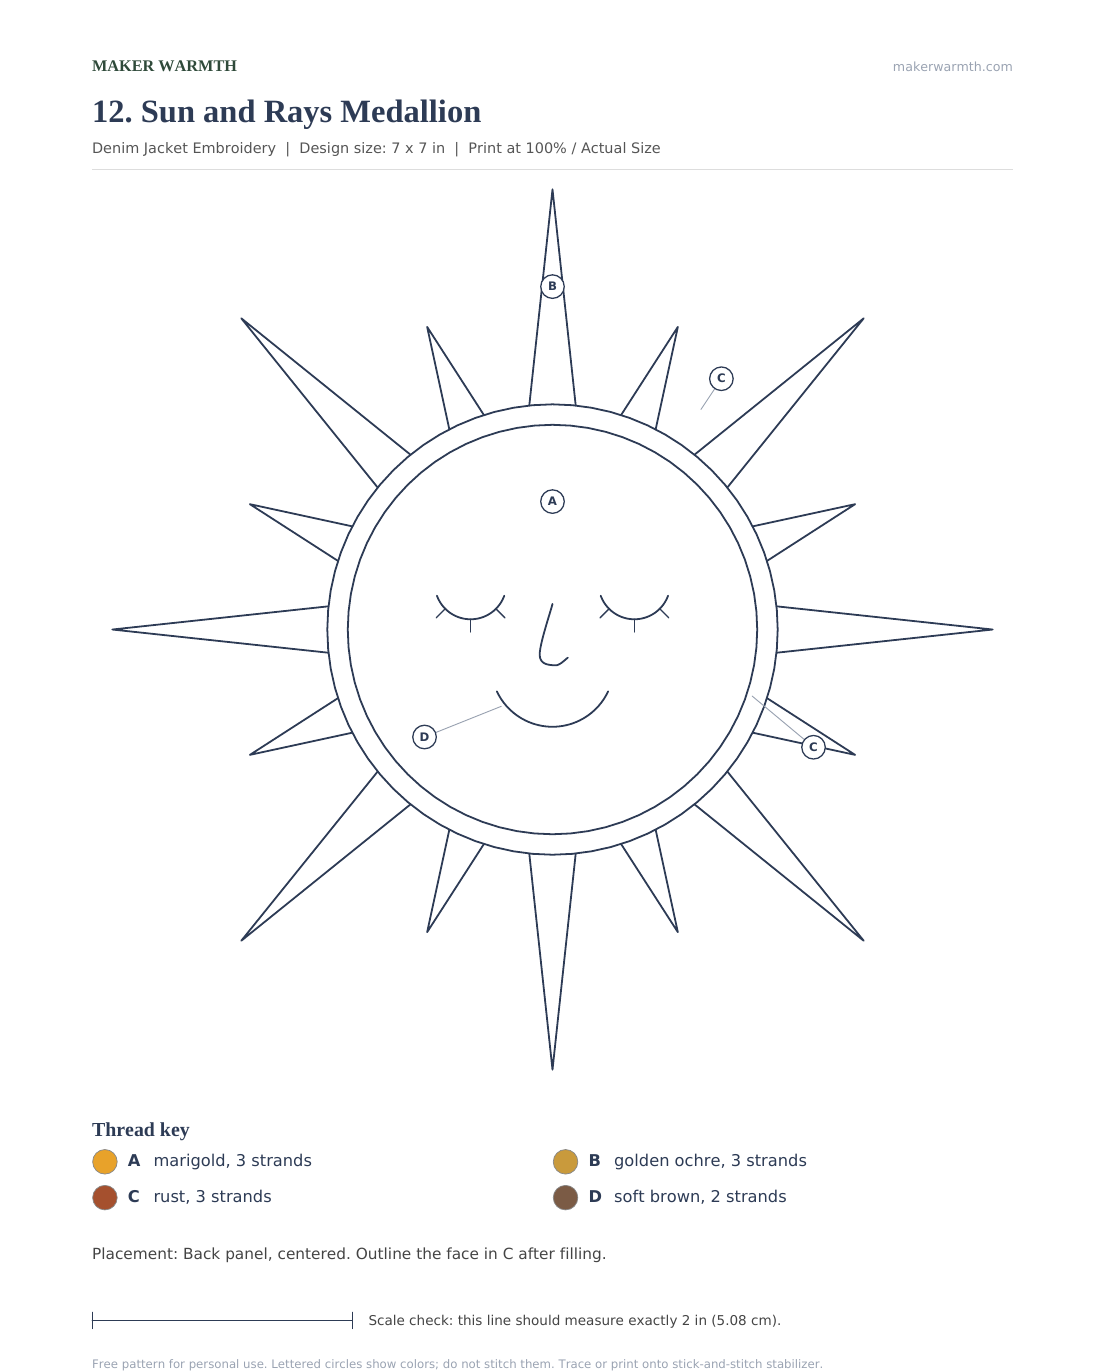
Thread key: A marigold, 3 strands · B golden ochre, 3 strands · C rust, 3 strands · D soft brown, 2 strands
How to stitch it
- Fill the sun face (A) with split stitch rows in a spiral from the edge to the center.
- Satin stitch the long rays (B) and the short rays (C), each in one direction from the face outward.
- Backstitch the closed eyes, nose and mouth (D) over the fill.
- Split stitch the outline of the face (C) to cover where the rays meet it.
Download All 12 Patterns
All 12 patterns are in one printable PDF, each at actual size with its thread key and a scale line to check your print.
The Stitches Behind These Designs
Split stitch fills most of the larger shapes. Each new stitch comes up through the middle of the one before, which builds a smooth surface that lies flat on denim.
Satin stitch covers small shapes with straight, side-by-side stitches. Keep each one under 0.4 in on a jacket so it does not snag.
Fishbone stitch makes leaves and wheat ears with a natural center vein.
Stem stitch gives a slightly twisted line for stems, vines and letter downstrokes.
French knots make berries, grapes and dots. Two wraps give a good size with three strands.
Whipped running stitch turns a dashed line into a smooth cord, ideal for borders.
FAQ
Can you hand embroider on a denim jacket?
Yes. Medium-weight denim holds stitches well. Use a size 7 crewel needle, keep to three strands or fewer and stitch through one layer at a time.
What stabilizer works best on denim?
A stick-and-stitch stabilizer. It carries the pattern, keeps the denim from shifting and washes away in water when you are done.
Will the embroidery survive the washing machine?
Turn the jacket inside out, wash it cold on a gentle cycle and let it air dry. Secure every thread end under nearby stitches on the back rather than with large knots.

Where should a beginner start?
The Crescent Moon (idea 3), the Bee (idea 6) and the Initials (idea 11) are small, use few colors and take an afternoon.
Do I need a hoop for the collar and cuffs?
No. These areas are too small or too thick to hoop. Hold the fabric in your hand and keep the tension relaxed.
Which part of your jacket would you stitch first: the back, the collar or the cuffs? Tell me in the comments.