
Christmas Embroidery Patterns: 15 Free Printable Designs for Trees, Wreaths, Snowflakes and Lettering
Christmas embroidery patterns are the fastest way to get from “I want to stitch something festive” to actually threading a needle. Below you will find 15 free printable designs: two very different Christmas trees, three wreaths, a bold red snowflake with pearls, four lettering pieces, candy canes, a snow-capped bauble, a dachshund in a Christmas sweater and a sampler of twelve tiny holiday icons.
Every pattern comes with a numbered color and stitch key with DMC thread numbers, step-by-step notes, and an actual-size transfer template in one free PDF. Stitch them in a hoop, or transfer them onto a sweater, a sweatshirt or a tote.
Looking for designs made specifically for clothes, or framed hoops to hang? Those live in their own collections:
Christmas Embroidery: 15 Festive Designs for Sweaters, Sweatshirts and Kids’ Clothes
Christmas Embroidery Hoop Art: 15 Festive Designs to Stitch This Season
In This Post
- What You Will Need
- How to Use These Christmas Embroidery Patterns
- Stitches Used in These Patterns
- 15 Free Christmas Embroidery Patterns
- 1. Red Snowflake with Pearl Beads
- 2. Wavy Chain Stitch Christmas Tree
- 3. Fishbone Pine Tree with French Knot Lights
- 4. Lazy Daisy Wreath with Red Sequin Berries
- 5. Open Pine Wreath with a Big Red Bow
- 6. Joy, Hope, Peace Word Tree
- 7. “Merry Christmas” in a Leafy Wreath
- 8. “Ho Ho Ho” Lettering with Pine Sprigs
- 9. Candy-Stripe Monogram in a Berry Wreath
- 10. Scattered Candy Canes
- 11. Snow-Capped Christmas Bauble
- 12. Six-Snowflake Sampler
- 13. Dachshund in a Christmas Sweater
- 14. Star Filled with Pine Sprigs
- 15. Mini Christmas Icon Sampler
- Finishing Your Christmas Embroidery
- Christmas Embroidery Patterns FAQ
What You Will Need
- Fabric – cream, white or pale grey cotton-linen for hoop pieces, navy linen for the snowflake sampler, or the garment you want to decorate.
- Stranded cotton embroidery floss – Christmas red, pine green, olive, gold, white and a few accent colors. Every pattern lists its exact DMC numbers.
- Embroidery hoop – 5 to 6 inch for most designs, 7 inch for the wreaths if you want room around them.
- Embroidery needles – size 7 for 2 to 3 strands, size 5 for the 6-strand chain stitch tree.
- Small embroidery scissors – sharp points make trimming between French knots much easier.
- Water-soluble transfer pen or wash-away stabilizer – for getting the template onto fabric or clothing.
- Beads and sequins – 4 mm cream pearls for the red snowflake, 4 mm red cup sequins and white seed beads for the lazy daisy wreath, and a beading needle.
- A printer – to print the free PDF at actual size.
How to Use These Christmas Embroidery Patterns
Each design below has a photo of the finished piece and a numbered pattern card. The numbers on the card match the color and stitch key underneath it, so you always know which thread and which stitch go where.
- Print the PDF at 100% / Actual Size. Each design has a template page with a 50 mm scale line. Measure it before you trace: if it is not exactly 50 mm, your printer has scaled the page.
- Transfer onto light fabric by taping the template to a window or a light box and tracing it with a water-soluble pen.
- Transfer onto dark fabric or knits (the navy snowflake sampler, a sweater) by printing or tracing the template onto wash-away stabilizer, sticking it on and stitching straight through.
- Stitch in number order. Fills come before outlines, and French knots, beads and sequins always go on last so your thread does not catch on them.
Stitches Used in These Patterns
All 15 patterns use a small set of basic stitches: backstitch, split stitch, stem stitch, whipped backstitch, chain stitch, satin stitch, padded satin stitch, fishbone stitch, fly stitch, lazy daisy stitch, straight stitch and French knots. If any of them is new to you, the beginner guide walks through each one step by step:
Hand Embroidery Stitches: 20 Basic Stitches for Beginners (Free Printable Cheat Sheet)
From Maker Warmth
Looking for your next stitch project?
Every pattern on this blog is free to print, from tiny bows to full denim jacket designs. Save this one, then browse the whole collection.
See all free patterns →15 Free Christmas Embroidery Patterns
1. Red Snowflake with Pearl Beads
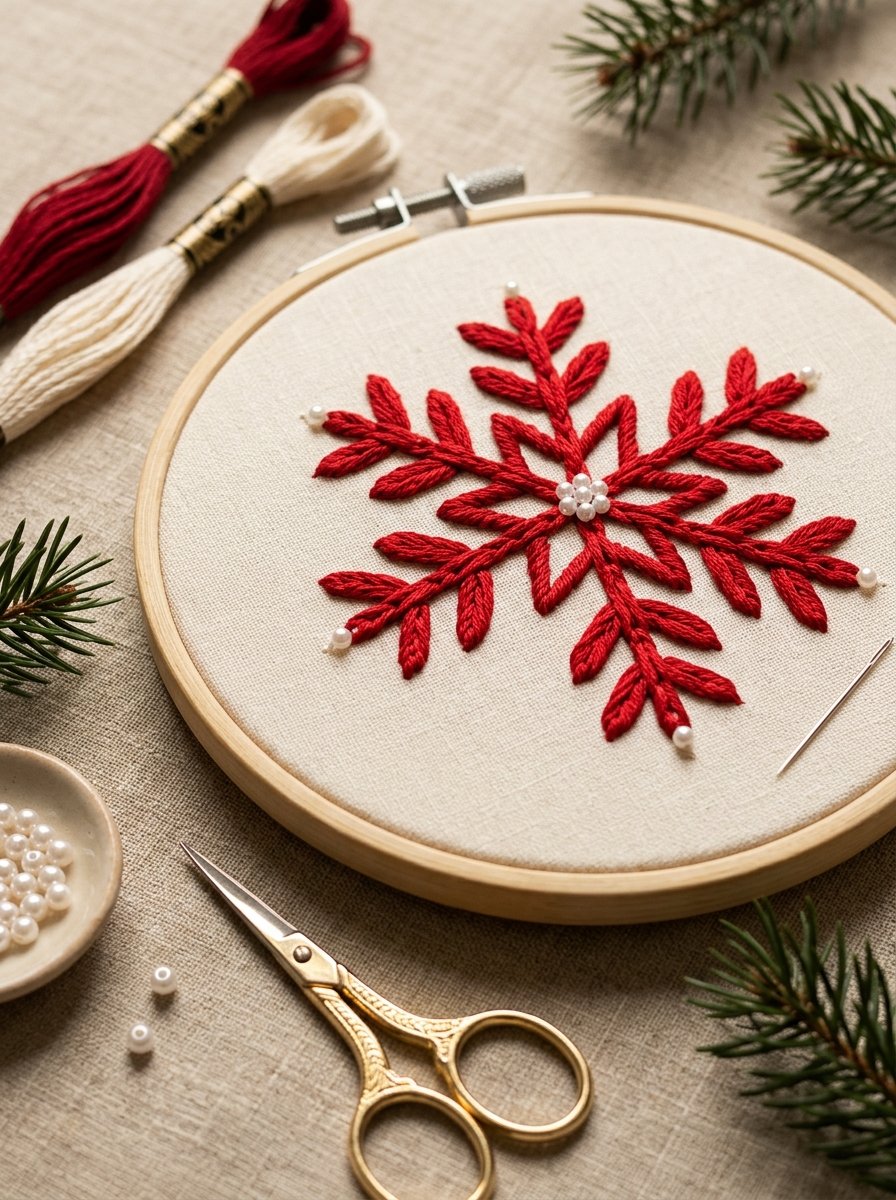
One bold red snowflake, six thick arms and a pearl at every tip. It is the simplest pattern in this collection to read from across a room, and it looks just as good on a sweater front as it does framed in a hoop. Padding the center and doubling the stem stitch on the arms is what gives it that raised, glossy look.

Pattern details
- Design size: 90 x 90 mm
- Skill level: Beginner
- Fabric: cream, white or pale grey cotton-linen
- Colors: DMC 321 Christmas red, 4 mm cream pearl beads
How to stitch it
- 1. Padded satin stitch (DMC 321 Christmas red, 3 strands). Center hexagon: outline in split stitch, then fill with satin stitch across.
- 2. Stem stitch, 2 rows side by side (DMC 321 Christmas red, 3 strands). Main arms: work two touching rows of stem stitch so each arm looks thick.
- 3. Straight stitch (DMC 321 Christmas red, 3 strands). V-shaped branches: one long straight stitch per line.
- 4. Beads, stitched down twice (4 mm cream pearl beads, 2 strands white). One 4 mm pearl at each arm tip and one in the center.
Download the Free Printable PDF
2. Wavy Chain Stitch Christmas Tree

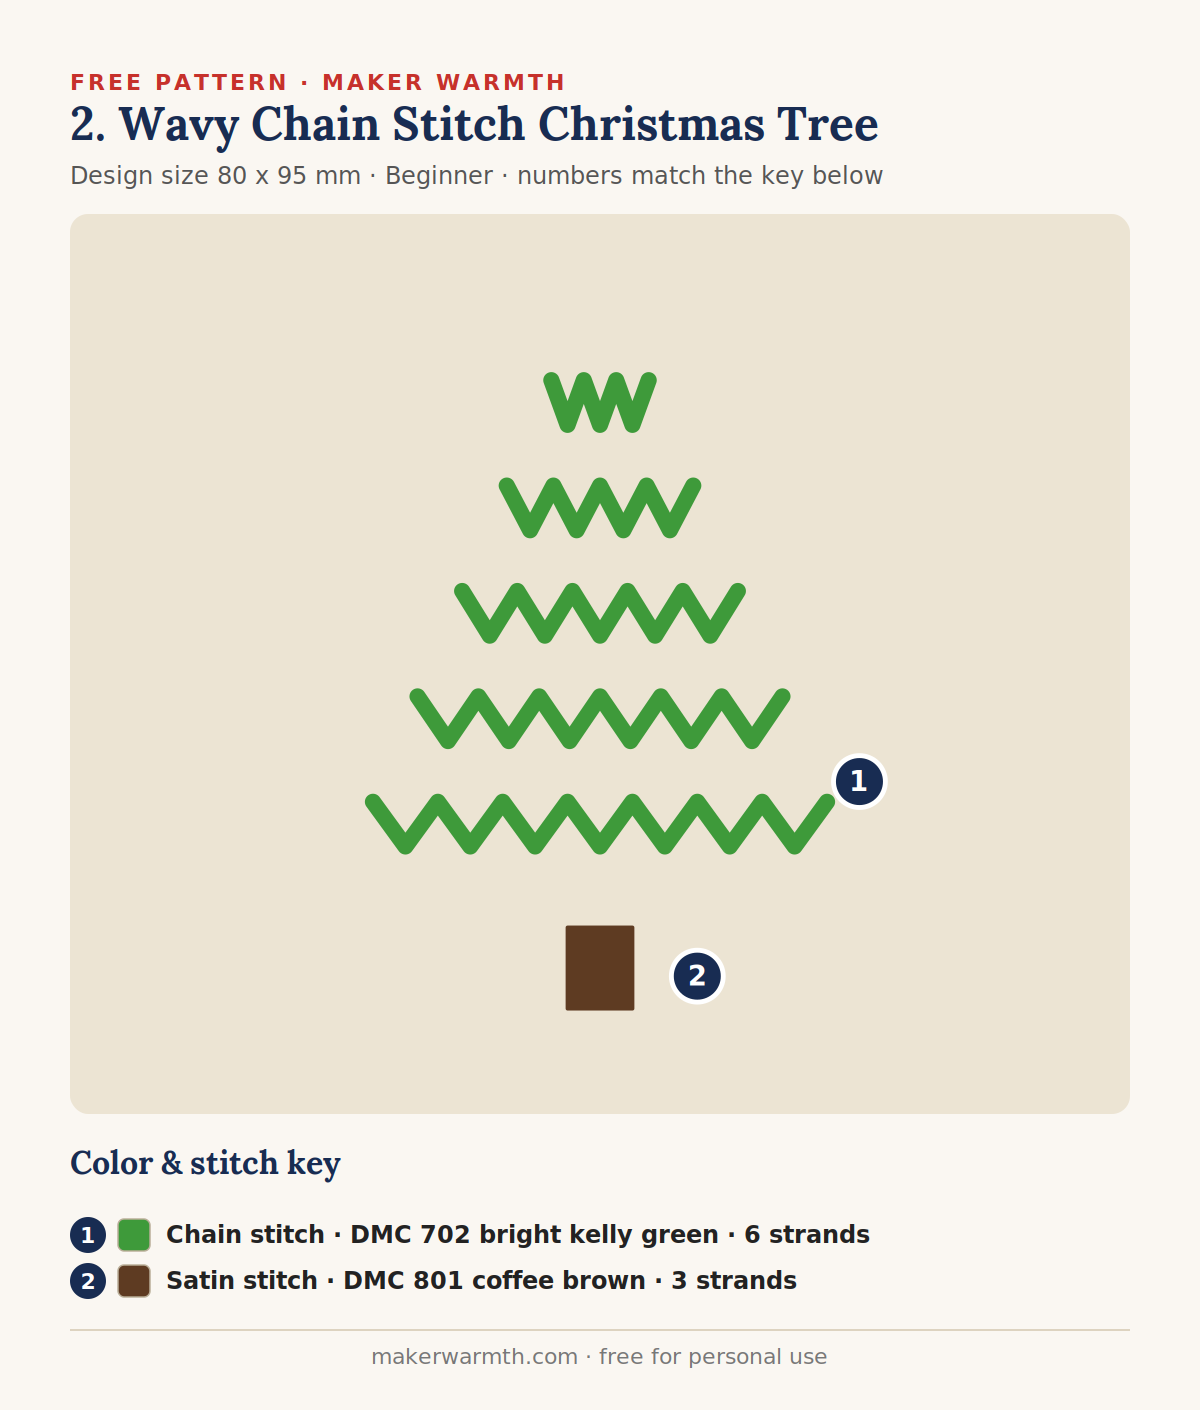
Five zigzag rows of chunky chain stitch, each one a little wider than the last, and you have a tree. Nothing to fill, nothing to shade. If you have never stitched a Christmas pattern before, start here: one stitch, two colors, and it is finished in an evening.
Pattern details
- Design size: 80 x 95 mm
- Skill level: Beginner
- Fabric: cream, white or pale grey cotton-linen
- Colors: DMC 702 bright kelly green, DMC 801 coffee brown
How to stitch it
- 1. Chain stitch (DMC 702 bright kelly green, 6 strands). Five zigzag rows, shortest at the top. Keep chain loops 3 to 4 mm long and pivot neatly at each point.
- 2. Satin stitch (DMC 801 coffee brown, 3 strands). Trunk: vertical satin stitches over the small rectangle.
Download the Free Printable PDF
3. Fishbone Pine Tree with French Knot Lights
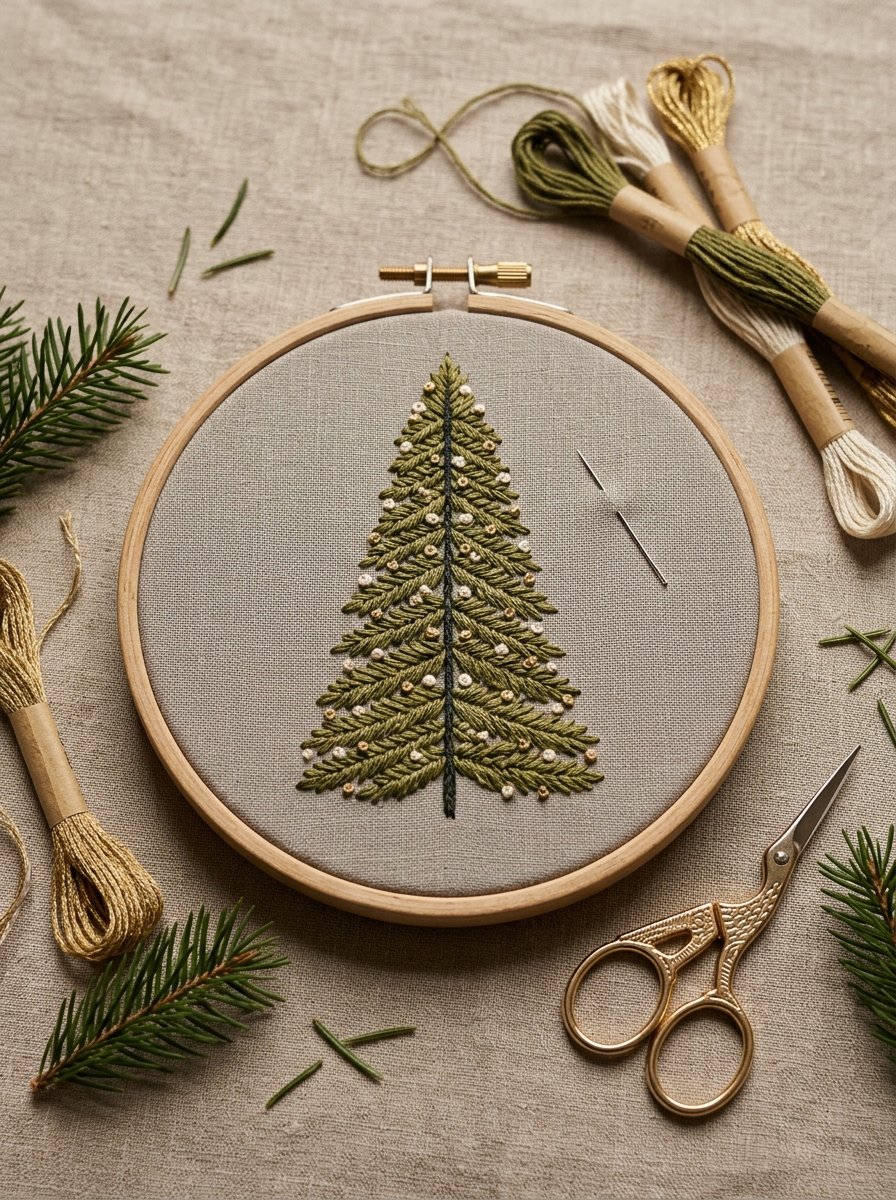
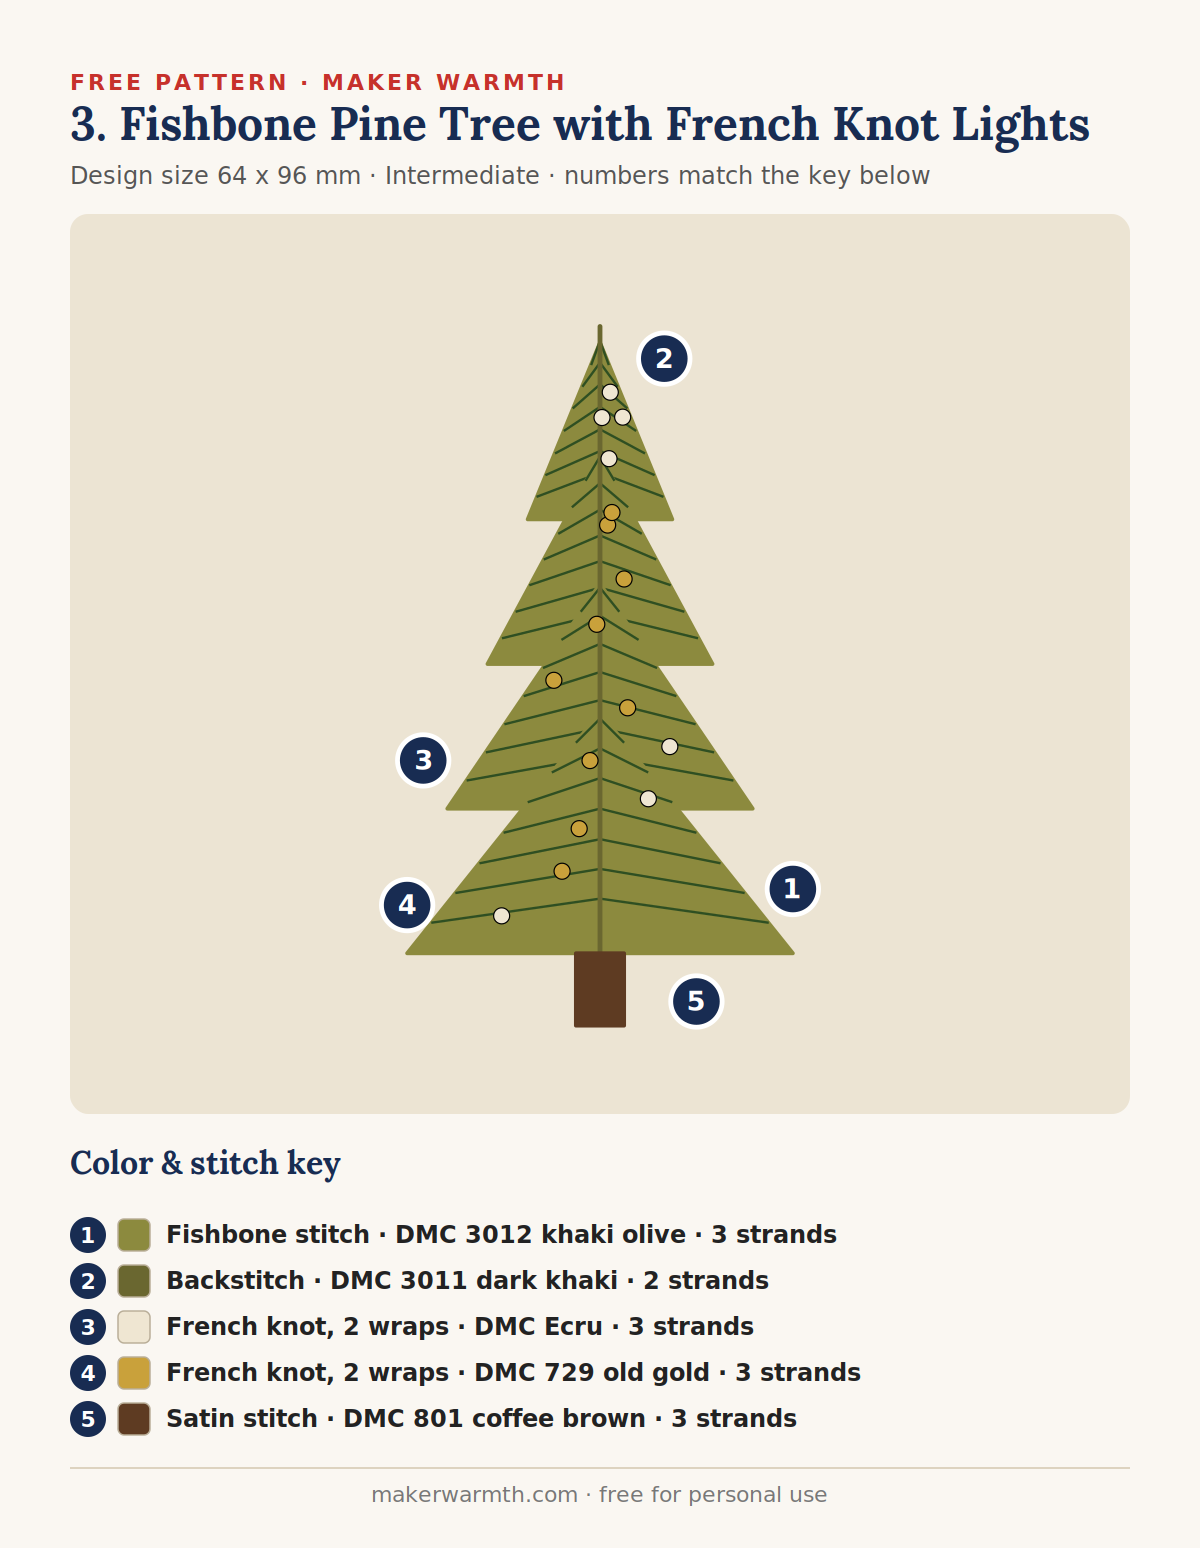
A slim, olive pine built from four tiers of fishbone stitch, with cream and gold French knots scattered over it like fairy lights. The angled fishbone stitches give the branches their direction, so the tree looks layered even though it is all one color.
Pattern details
- Design size: 64 x 96 mm
- Skill level: Intermediate
- Fabric: cream, white or pale grey cotton-linen
- Colors: DMC 3012 khaki olive, DMC 3011 dark khaki, DMC Ecru, DMC 729 old gold, DMC 801 coffee brown
How to stitch it
- 1. Fishbone stitch (DMC 3012 khaki olive, 3 strands). Four triangular tiers. Start each tier at its top point and angle every stitch down toward the center line.
- 2. Backstitch (DMC 3011 dark khaki, 2 strands). Center spine, worked last over the fishbone so it sits on top.
- 3. French knot, 2 wraps (DMC Ecru, 3 strands). Cream lights scattered over the tiers.
- 4. French knot, 2 wraps (DMC 729 old gold, 3 strands). Gold lights between the cream ones.
- 5. Satin stitch (DMC 801 coffee brown, 3 strands). Trunk.
Download the Free Printable PDF
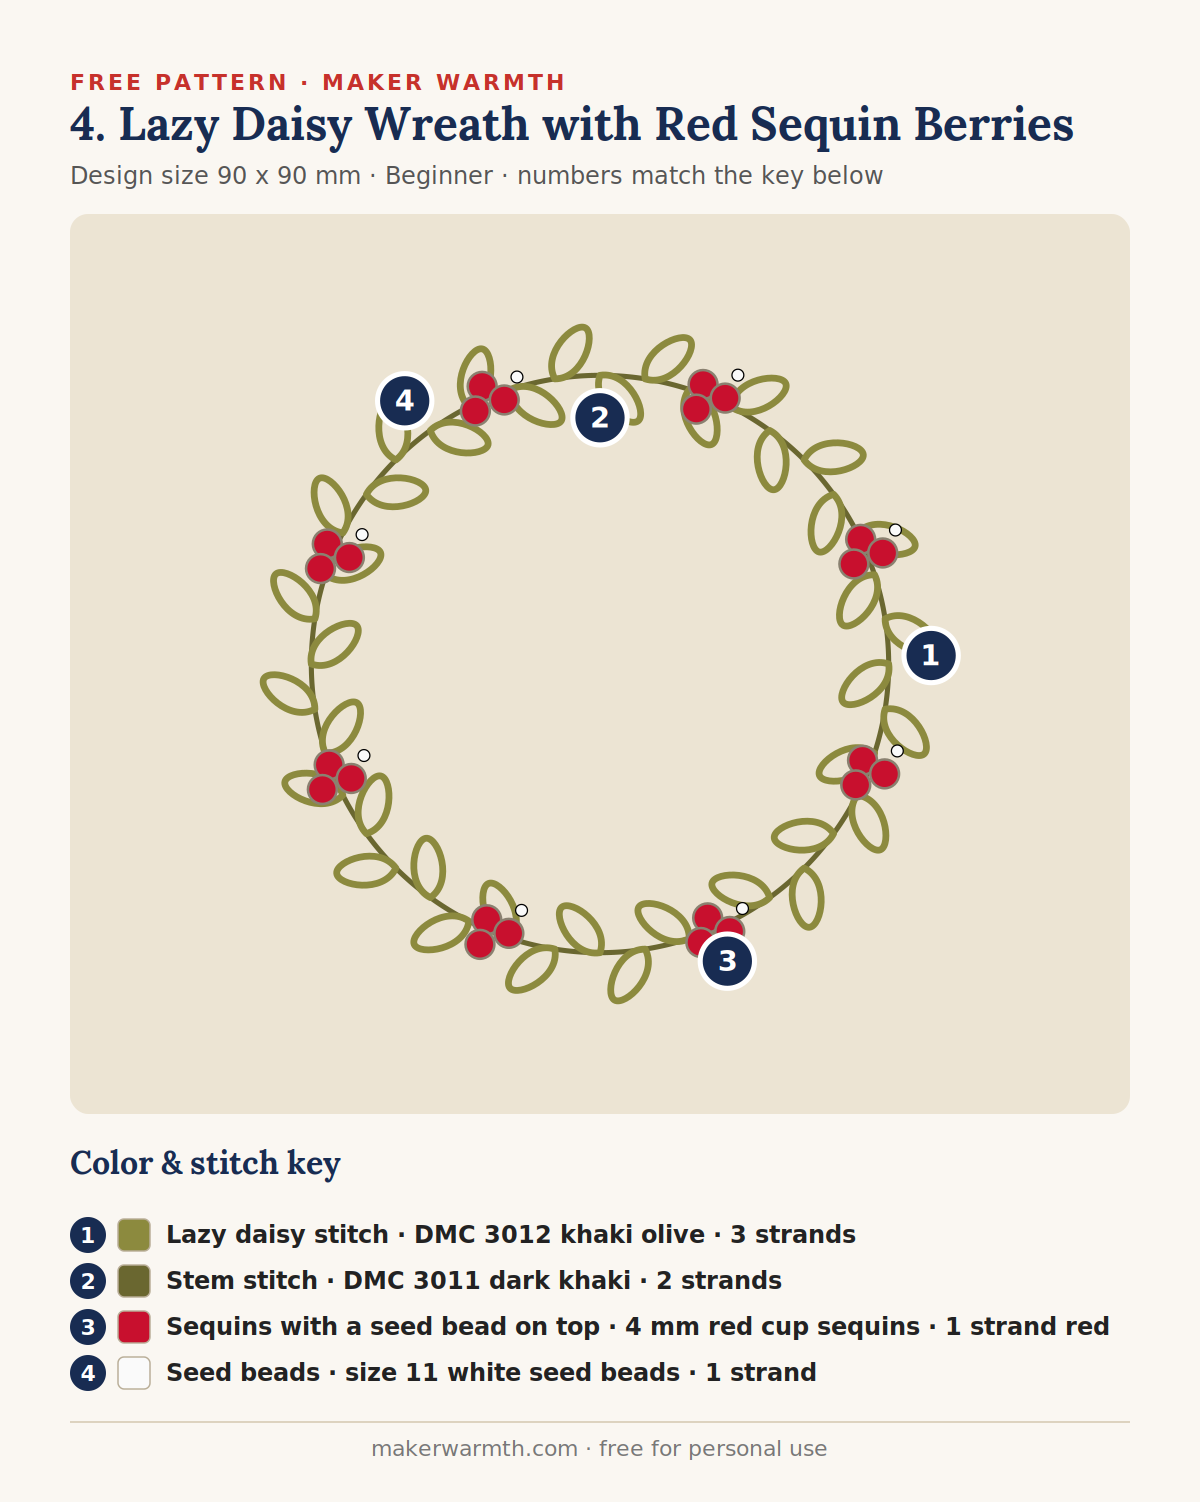
4. Lazy Daisy Wreath with Red Sequin Berries
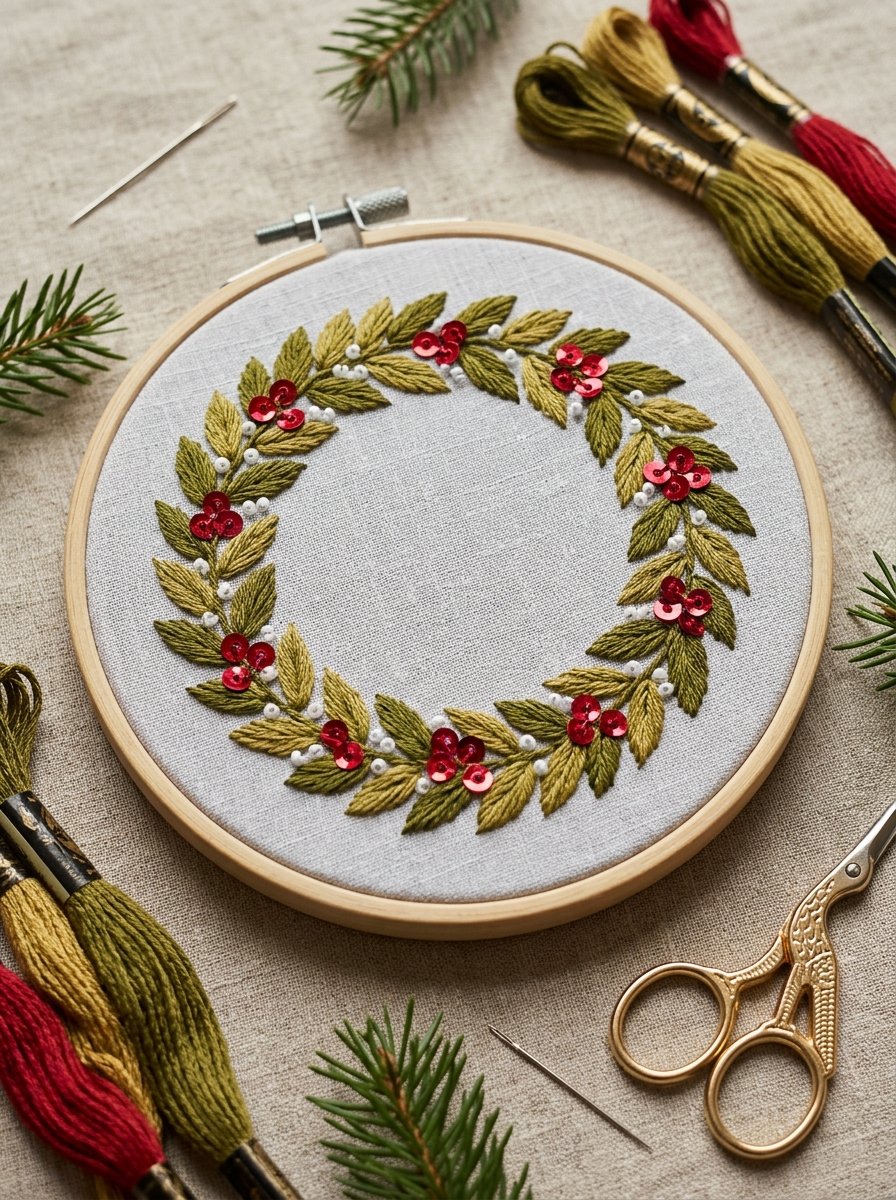
An olive-and-gold wreath of tiny lazy daisy leaves, with clusters of red sequins standing in for berries. The sequins catch the light under a tree or on a mantel, and the pattern is just as pretty stitched on a pale grey linen as on cream.
Pattern details
- Design size: 90 x 90 mm
- Skill level: Beginner
- Fabric: cream, white or pale grey cotton-linen
- Colors: DMC 3012 khaki olive, DMC 3011 dark khaki, 4 mm red cup sequins, size 11 white seed beads
How to stitch it
- 1. Lazy daisy stitch (DMC 3012 khaki olive, 3 strands). Two leaves at every mark around the ring, one pointing out, one pointing in.
- 2. Stem stitch (DMC 3011 dark khaki, 2 strands). The ring line. Stitch it first; the leaves hide most of it.
- 3. Sequins with a seed bead on top (4 mm red cup sequins, 1 strand red). Clusters of three red sequins in eight places.
- 4. Seed beads (size 11 white seed beads, 1 strand). One white seed bead beside each sequin cluster.
Download the Free Printable PDF
5. Open Pine Wreath with a Big Red Bow
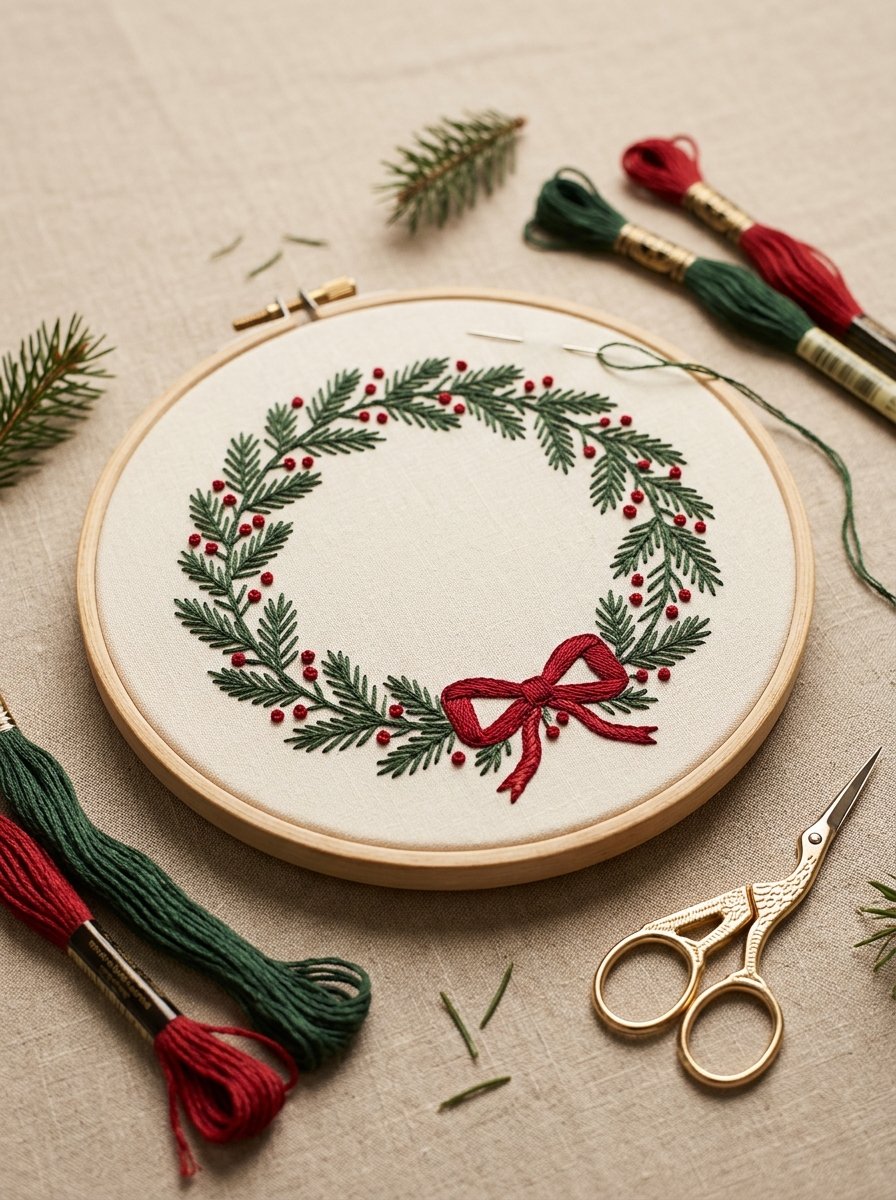
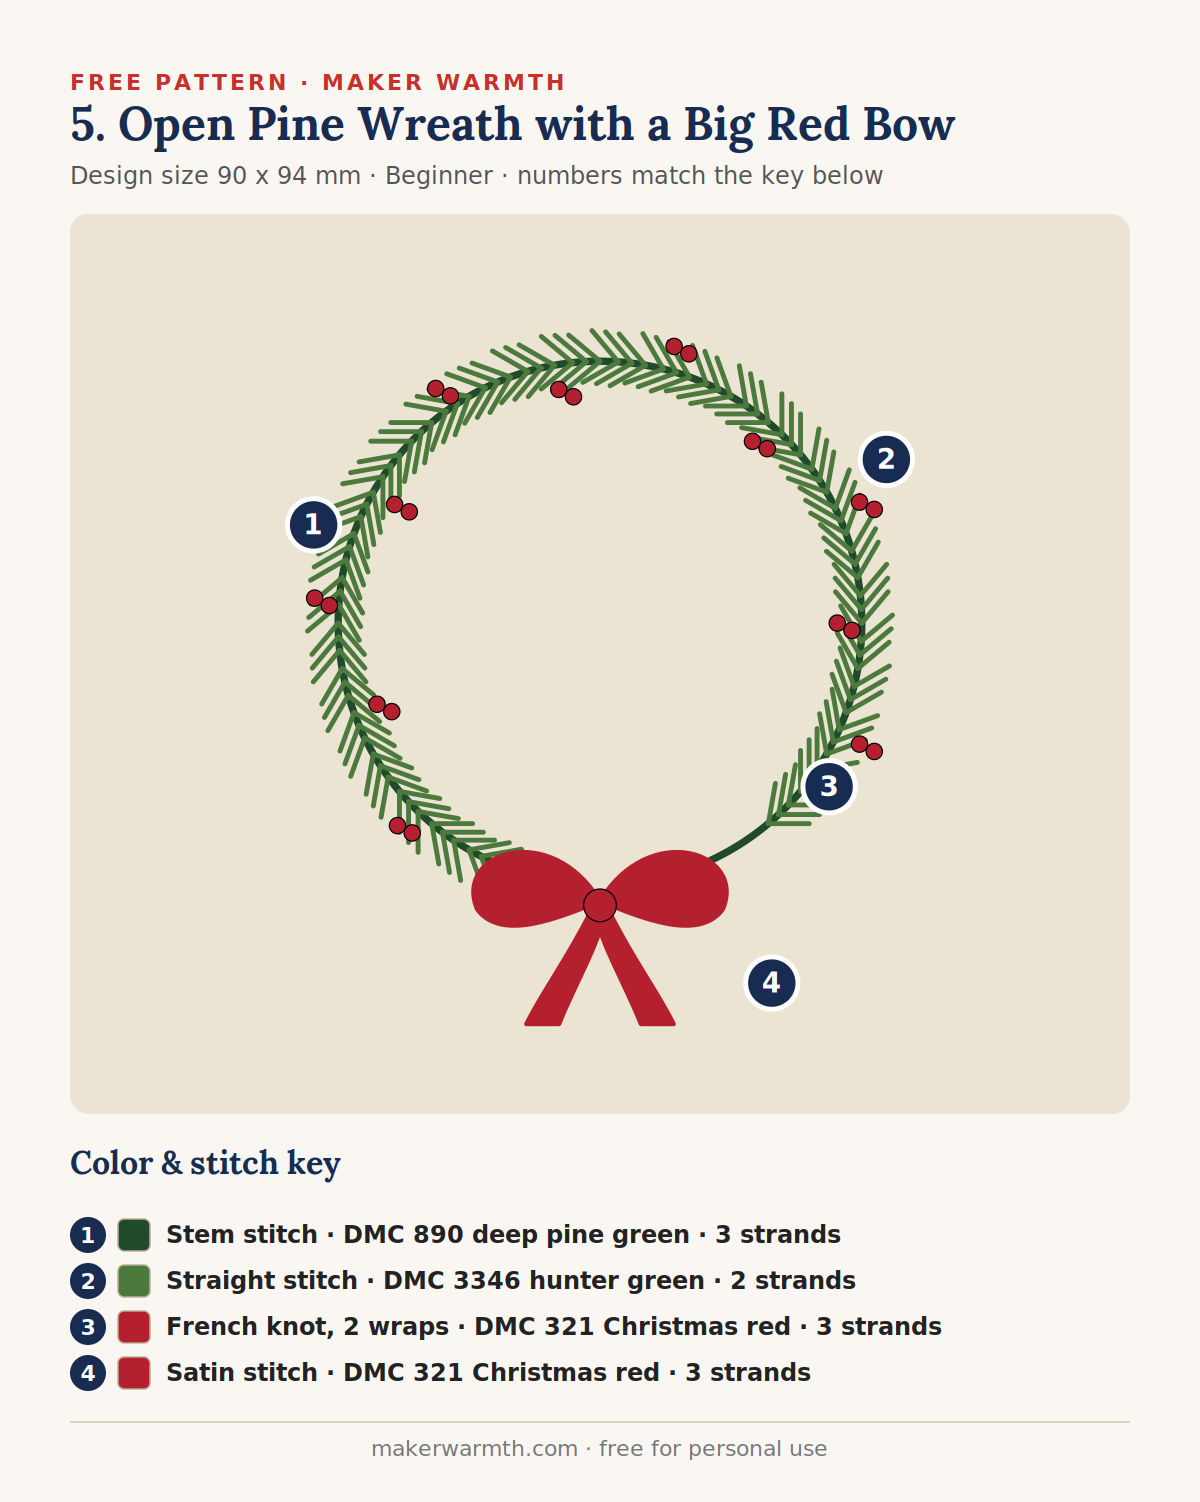
A loose, airy pine wreath that stays open at the bottom so the big red satin stitch bow has room to sit. Each branch is a stem stitch line with short straight-stitch needles on both sides, so it is quick, relaxing work.
Pattern details
- Design size: 90 x 94 mm
- Skill level: Beginner
- Fabric: cream, white or pale grey cotton-linen
- Colors: DMC 890 deep pine green, DMC 3346 hunter green, DMC 321 Christmas red
How to stitch it
- 1. Stem stitch (DMC 890 deep pine green, 3 strands). The wreath branch: one curved line, open at the bottom for the bow.
- 2. Straight stitch (DMC 3346 hunter green, 2 strands). Pine needles: short angled stitches on both sides of the branch, 4 to 5 mm long.
- 3. French knot, 2 wraps (DMC 321 Christmas red, 3 strands). Berries in pairs around the wreath.
- 4. Satin stitch (DMC 321 Christmas red, 3 strands). Bow loops and tails. Stitch each loop across its width; work the knot last as one big French knot.
Download the Free Printable PDF
6. Joy, Hope, Peace Word Tree
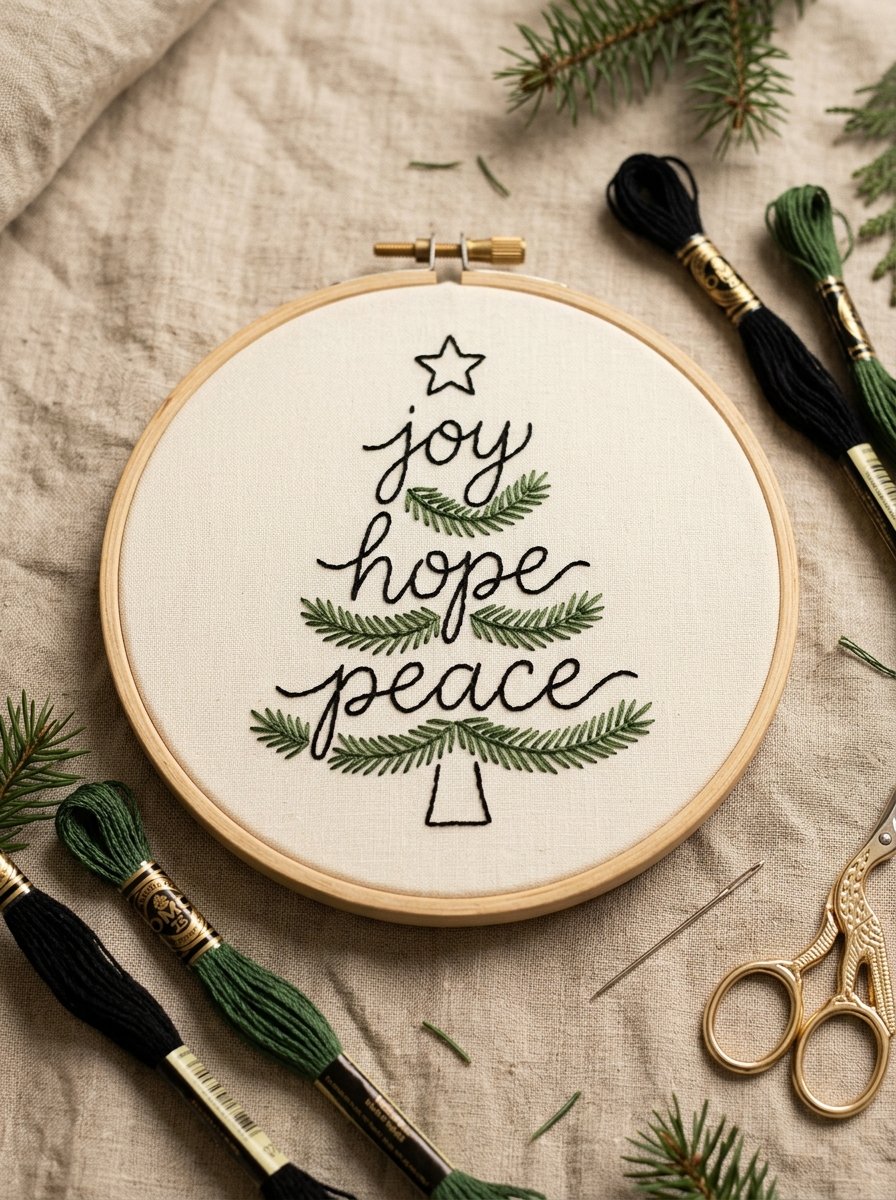
Three words stacked into the shape of a tree: joy, hope and peace, each one sitting on a little garland of pine needles. It is mostly black backstitch, so it suits anyone who prefers lettering to filling, and it looks wonderful as a printed-pattern gift tucked into a card.

Pattern details
- Design size: 64 x 98 mm
- Skill level: Beginner
- Fabric: cream, white or pale grey cotton-linen
- Colors: DMC 310 black, DMC 890 deep pine green
How to stitch it
- 1. Backstitch, 2 mm stitches (DMC 310 black, 2 strands). The three words. Keep stitches short on the curves so the script stays smooth.
- 2. Stem stitch + straight stitch (DMC 890 deep pine green, 2 strands). Garland under each word: a stem stitch line with tiny V-shaped needles.
- 3. Backstitch (DMC 310 black, 2 strands). Star outline on top.
- 4. Backstitch (DMC 310 black, 2 strands). Trunk outline.
Download the Free Printable PDF
7. “Merry Christmas” in a Leafy Wreath
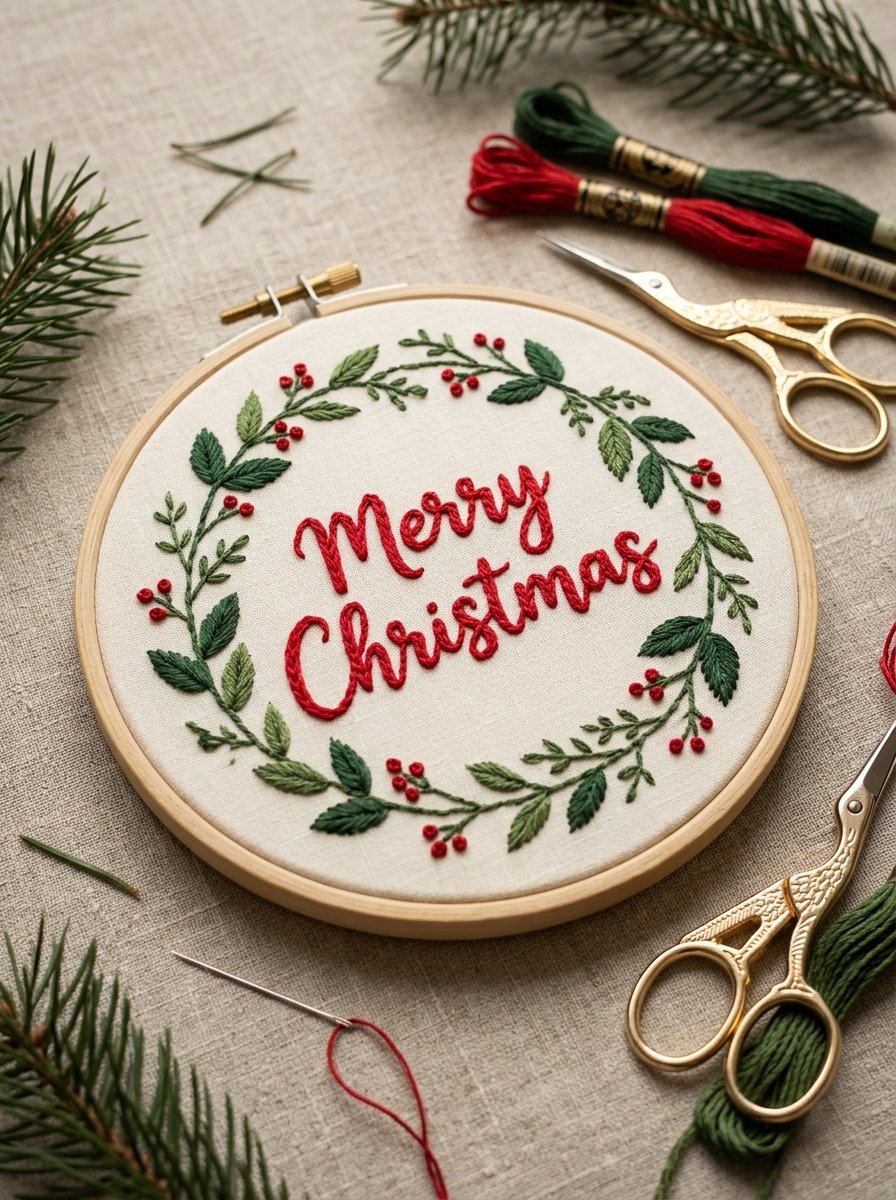
Classic red script inside a ring of hunter green leaves and berry pairs. Split stitch keeps the lettering smooth and slightly raised; if you want thicker downstrokes, add a second row beside the first on the heavier parts of each letter.
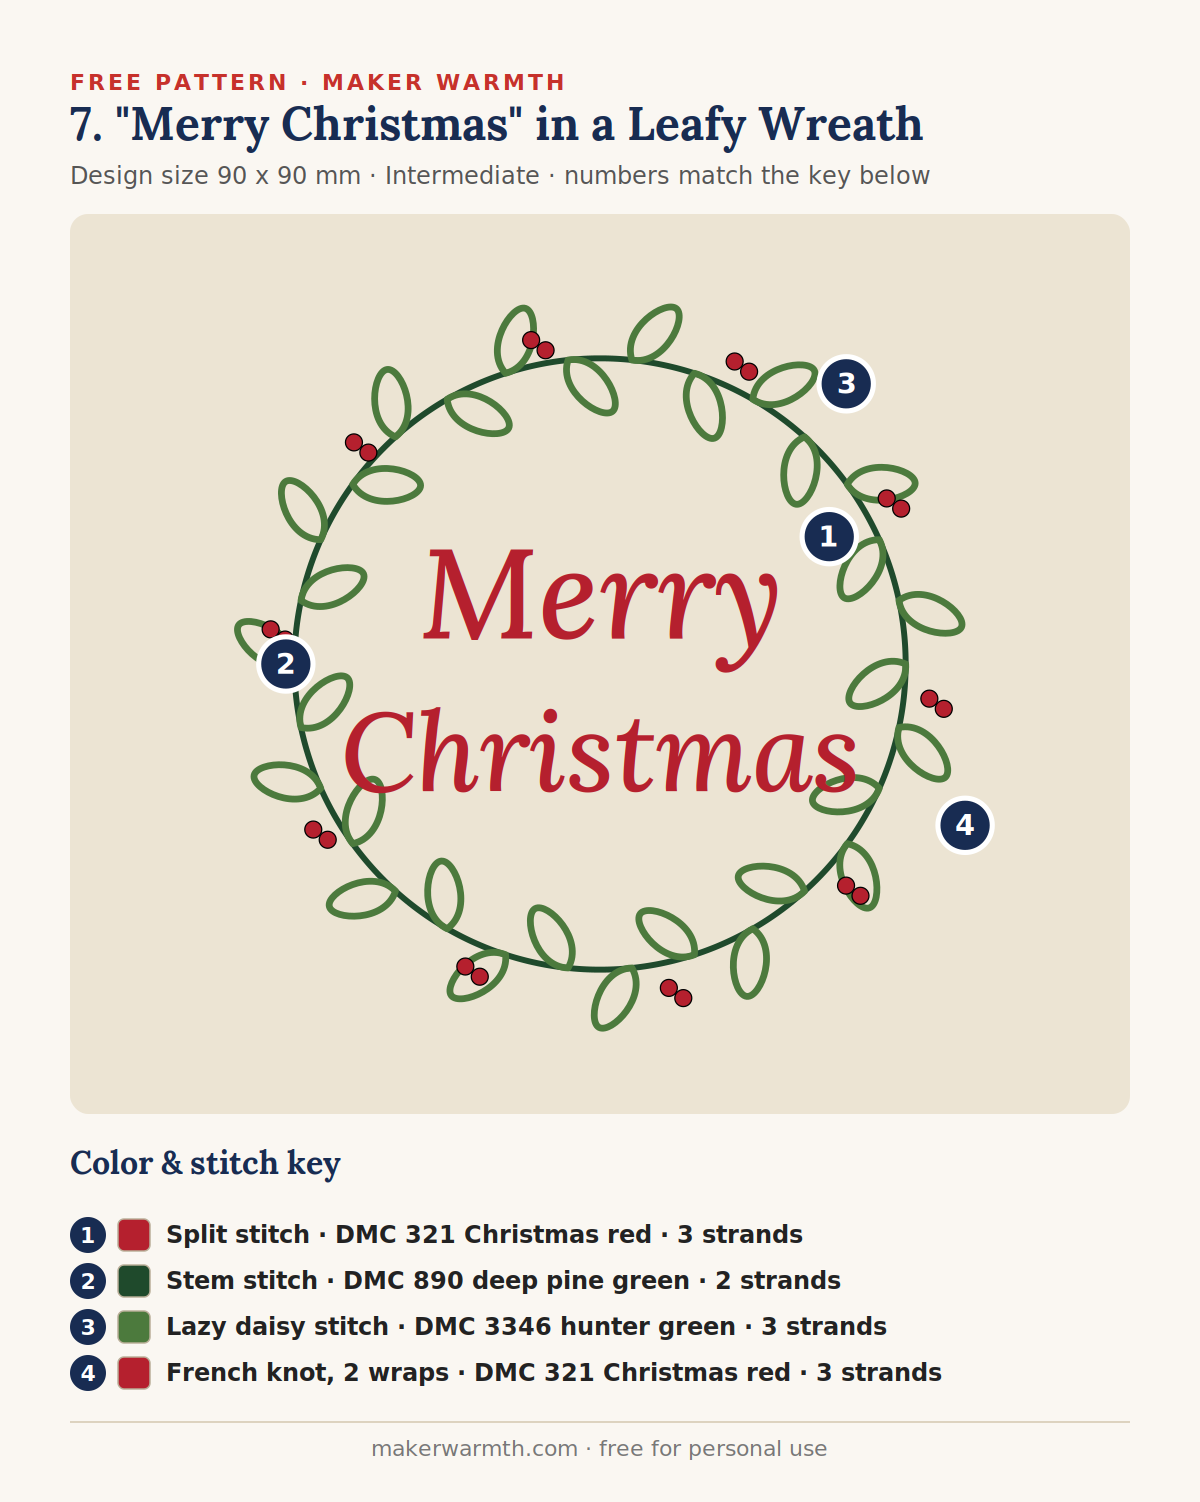
Pattern details
- Design size: 90 x 90 mm
- Skill level: Intermediate
- Fabric: cream, white or pale grey cotton-linen
- Colors: DMC 321 Christmas red, DMC 890 deep pine green, DMC 3346 hunter green
How to stitch it
- 1. Split stitch (DMC 321 Christmas red, 3 strands). The lettering. For thicker downstrokes, add a second row of split stitch beside the first.
- 2. Stem stitch (DMC 890 deep pine green, 2 strands). Wreath ring.
- 3. Lazy daisy stitch (DMC 3346 hunter green, 3 strands). Leaves, alternating in and out along the ring.
- 4. French knot, 2 wraps (DMC 321 Christmas red, 3 strands). Berries in pairs outside the ring.
Download the Free Printable PDF
8. “Ho Ho Ho” Lettering with Pine Sprigs
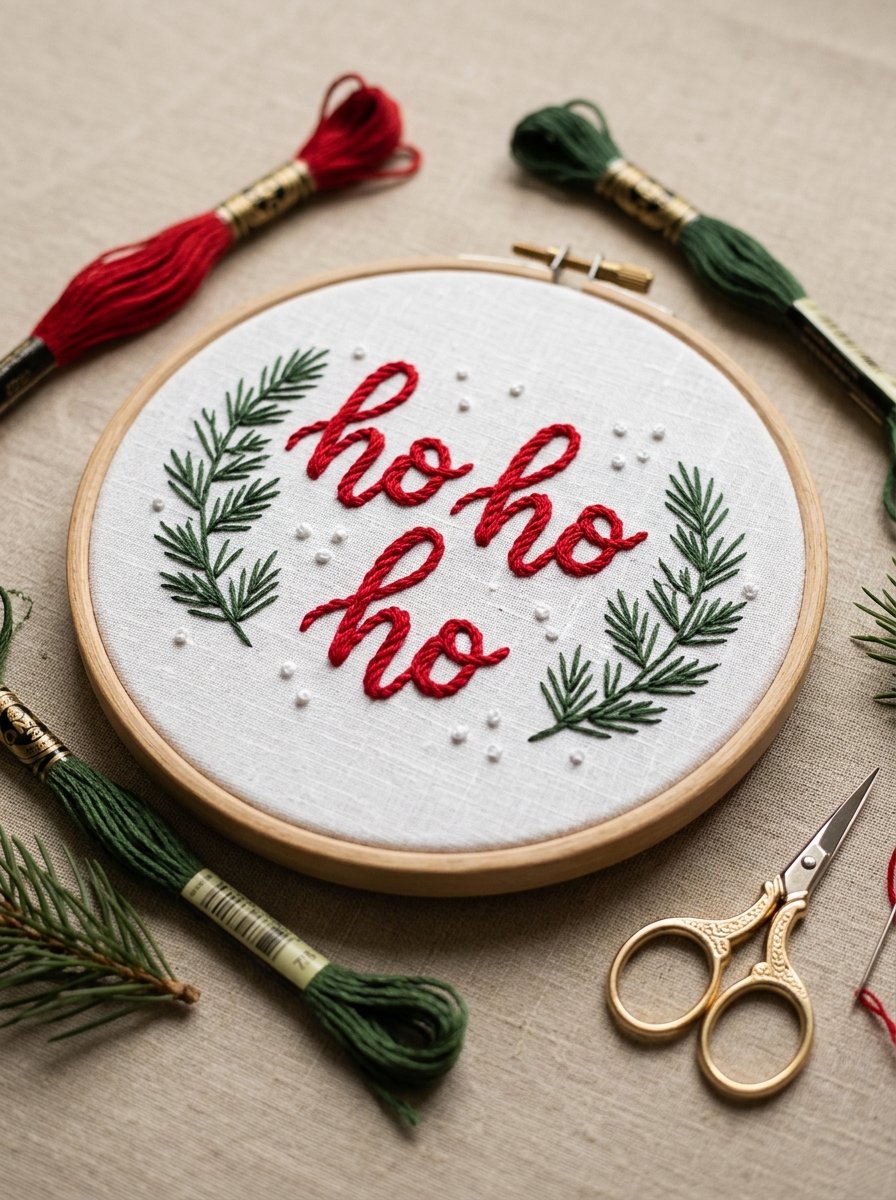
Santa’s laugh in bold red cursive, with pine sprigs on both sides and a scatter of snow dots. Whipping the backstitch turns each line into a smooth cord, which is the secret to lettering that looks neat instead of dotted.
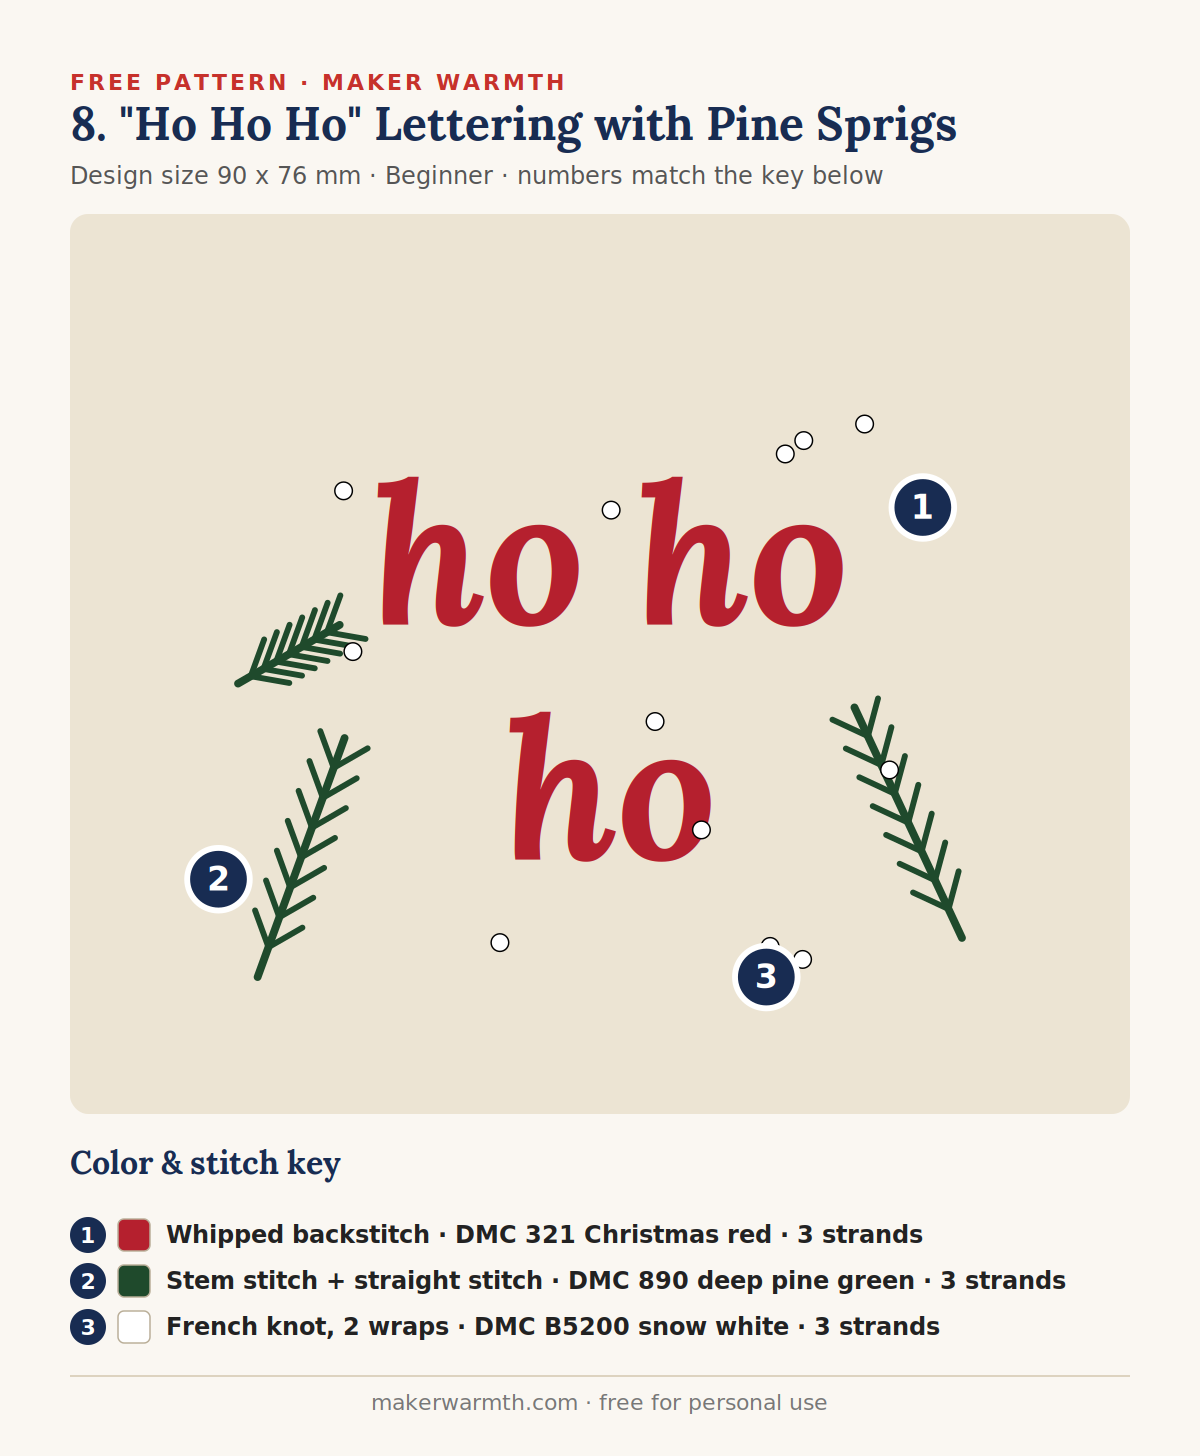
Pattern details
- Design size: 90 x 76 mm
- Skill level: Beginner
- Fabric: cream, white or pale grey cotton-linen
- Colors: DMC 321 Christmas red, DMC 890 deep pine green, DMC B5200 snow white
How to stitch it
- 1. Whipped backstitch (DMC 321 Christmas red, 3 strands). Backstitch the letters with 2 to 3 mm stitches, then whip each line with the same red for a smooth, raised cord.
- 2. Stem stitch + straight stitch (DMC 890 deep pine green, 3 strands). Pine sprigs: stem stitch the stems, then angled straight-stitch needles.
- 3. French knot, 2 wraps (DMC B5200 snow white, 3 strands). Snow dots around the words. On white fabric they read as soft texture.
Download the Free Printable PDF
9. Candy-Stripe Monogram in a Berry Wreath
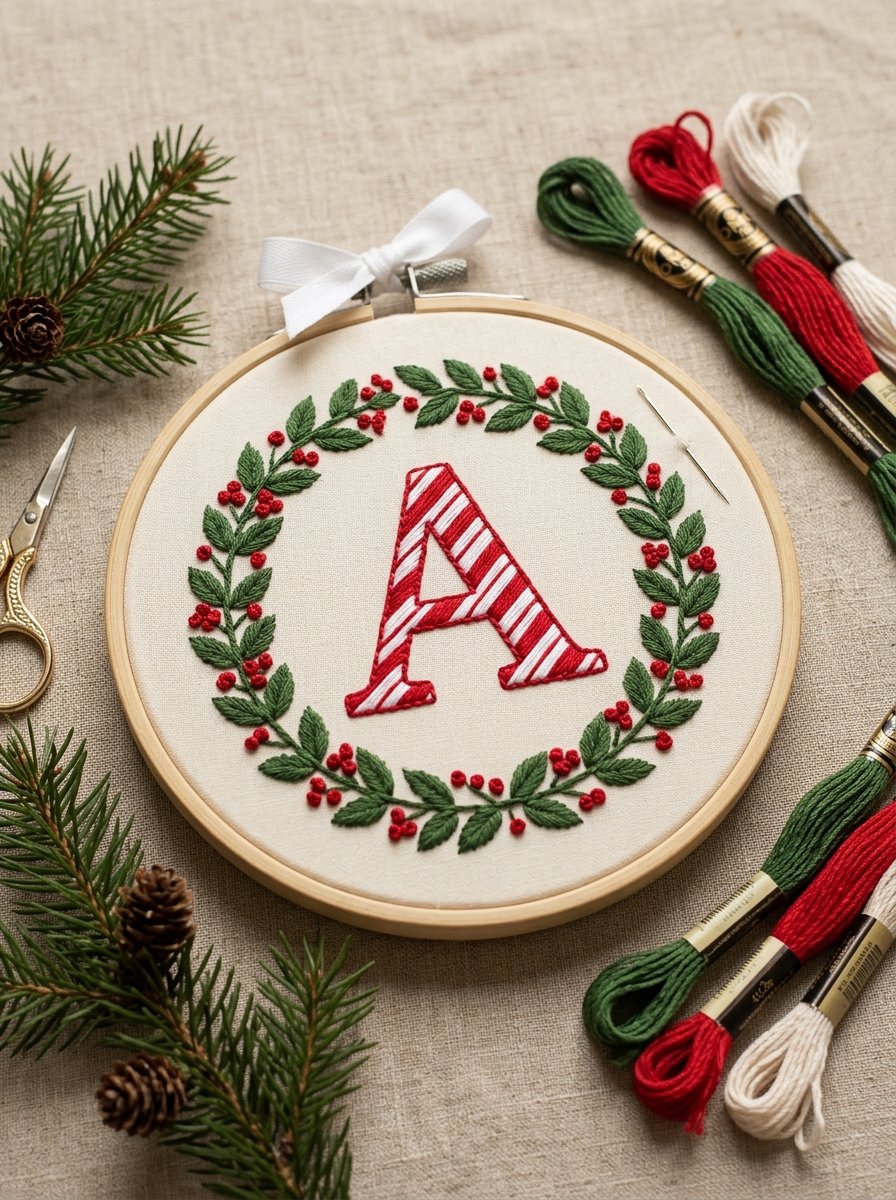
A candy-cane striped letter inside a berry wreath: personalize it with any initial for a stocking, a gift bag or a child’s sweater. The template shows the stripe angle, so every stripe on your letter runs the same way.
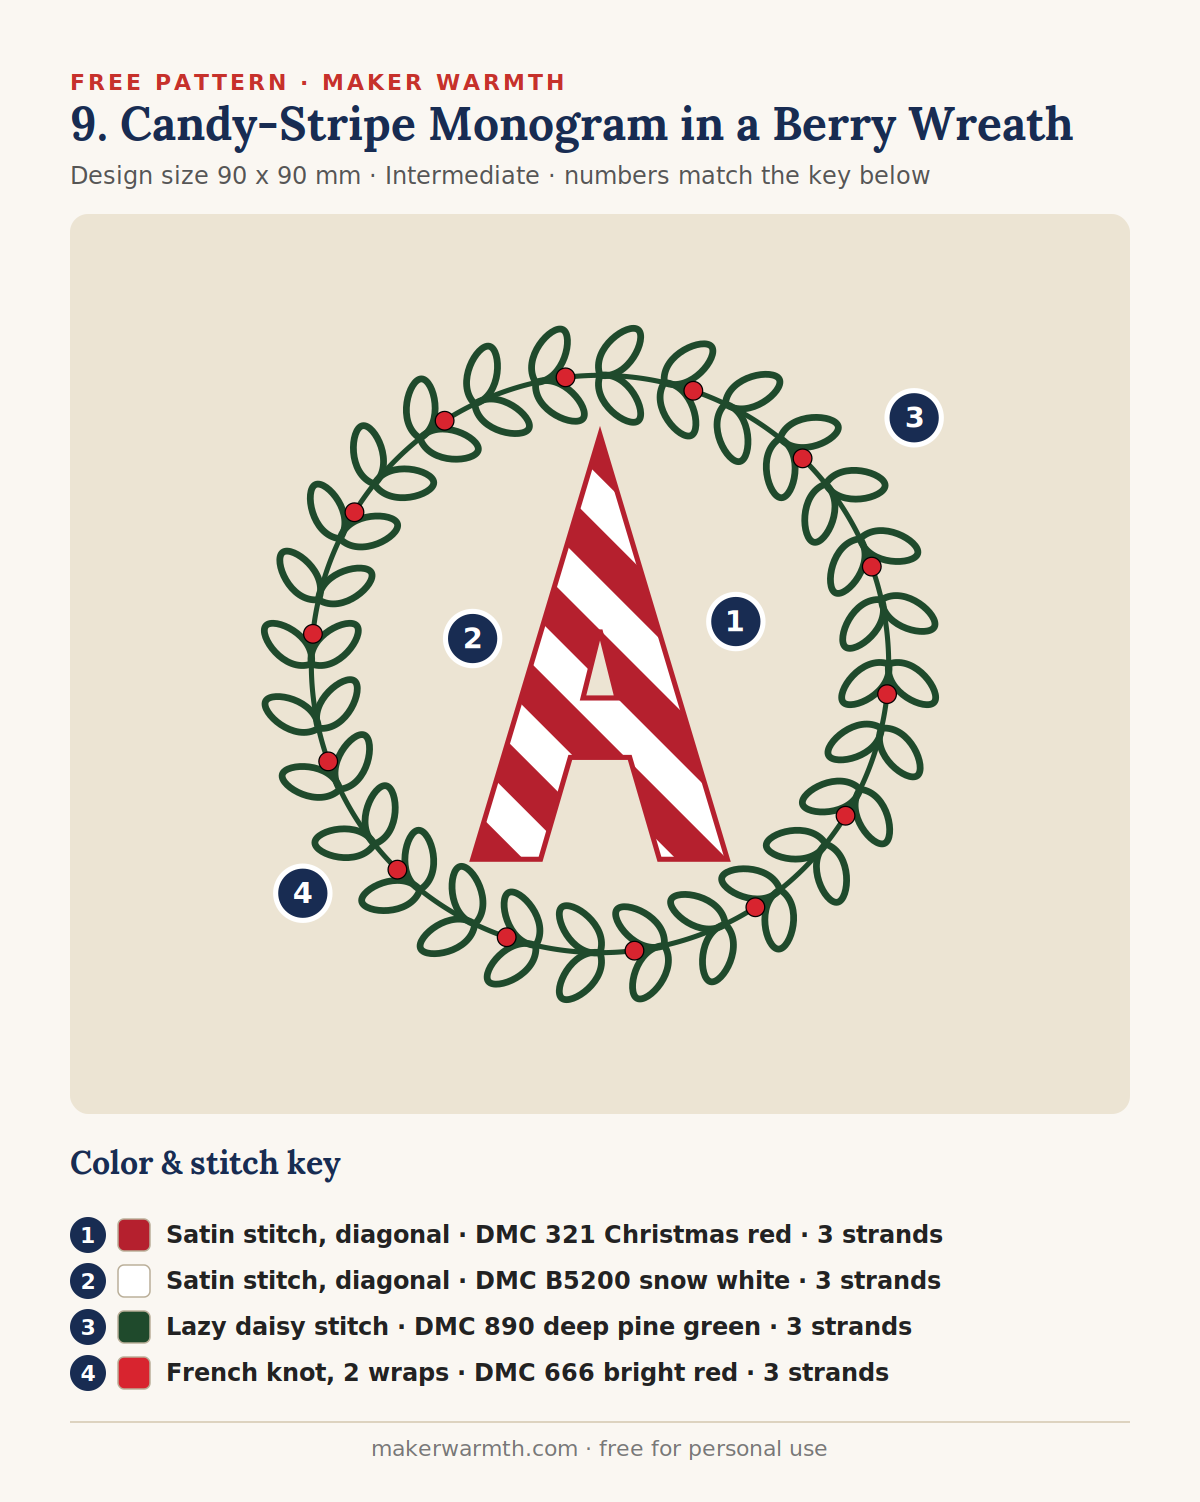
Pattern details
- Design size: 90 x 90 mm
- Skill level: Intermediate
- Fabric: cream, white or pale grey cotton-linen
- Colors: DMC 321 Christmas red, DMC B5200 snow white, DMC 890 deep pine green, DMC 666 bright red
How to stitch it
- 1. Satin stitch, diagonal (DMC 321 Christmas red, 3 strands). Red stripes inside the letter. Outline the letter in split stitch first, then fill each stripe on the diagonal.
- 2. Satin stitch, diagonal (DMC B5200 snow white, 3 strands). White stripes between the red ones, same angle.
- 3. Lazy daisy stitch (DMC 890 deep pine green, 3 strands). Leaves in pairs all around the ring.
- 4. French knot, 2 wraps (DMC 666 bright red, 3 strands). Bright red berries on the ring.
Download the Free Printable PDF
10. Scattered Candy Canes

About a dozen tiny candy canes scattered across the fabric at different angles. It is the most forgiving pattern here, because there is no exact layout to match, and it makes a sweet all-over design on a pajama top or a tea towel.
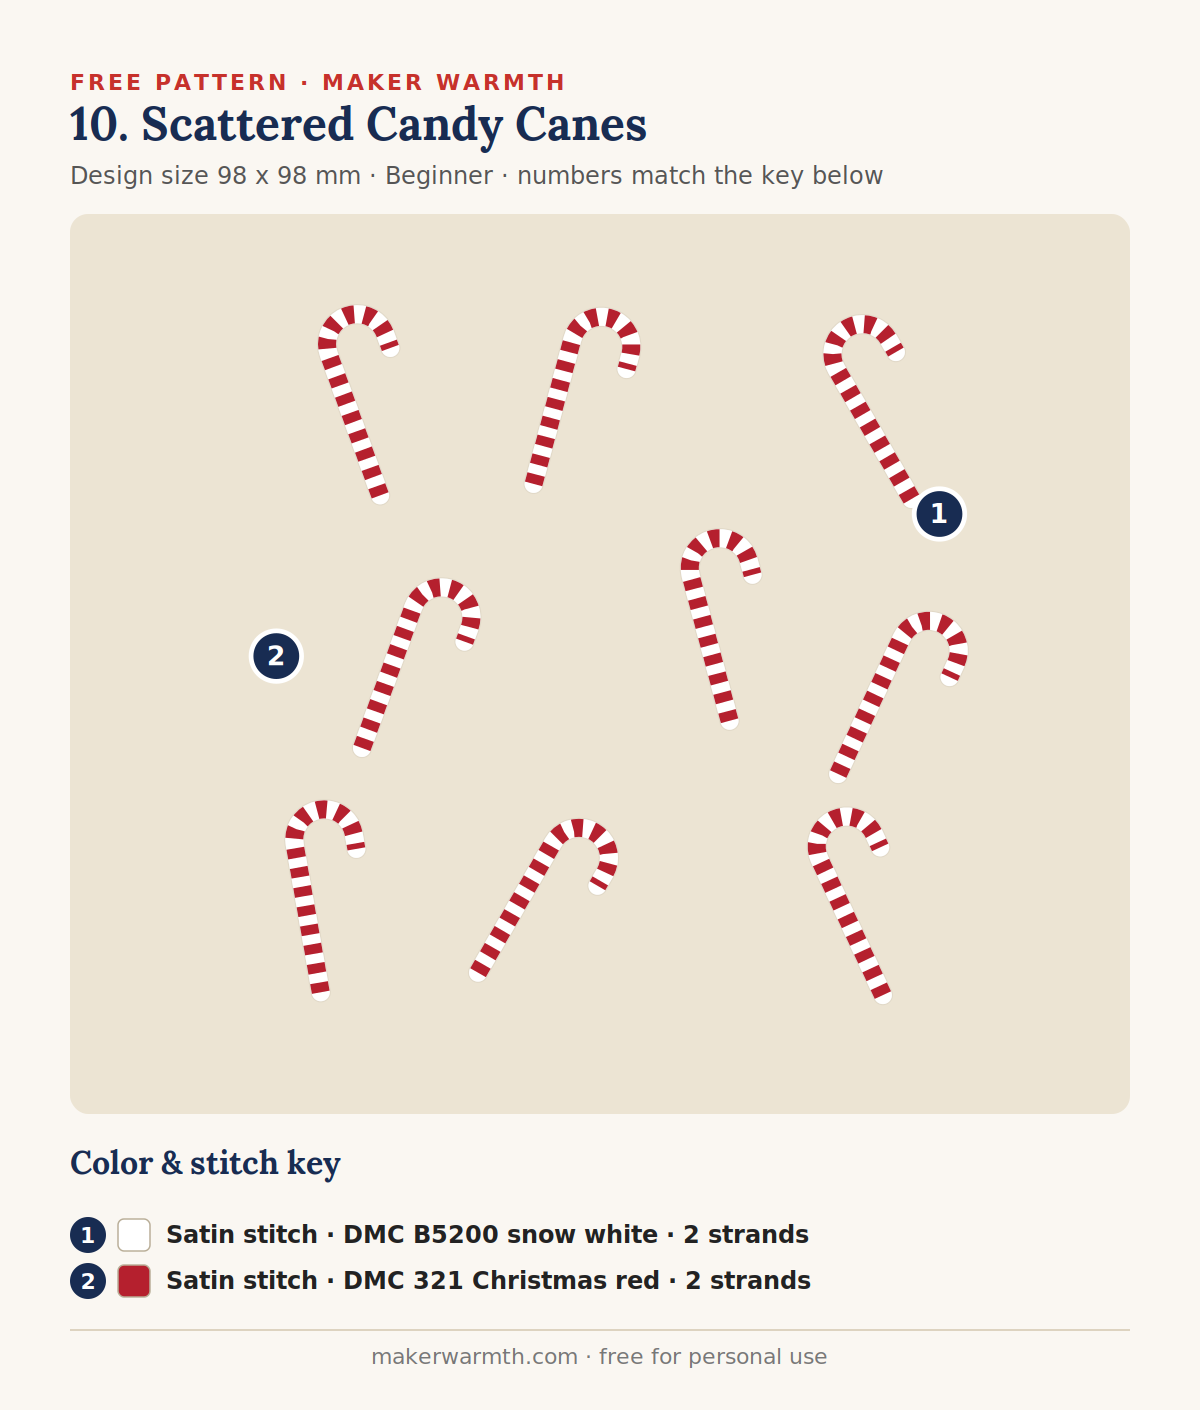
Pattern details
- Design size: 98 x 98 mm
- Skill level: Beginner
- Fabric: cream, white or pale grey cotton-linen
- Colors: DMC B5200 snow white, DMC 321 Christmas red
How to stitch it
- 1. Satin stitch (DMC B5200 snow white, 2 strands). Fill each cane across its width in white first, leaving gaps for the red bands.
- 2. Satin stitch (DMC 321 Christmas red, 2 strands). Red bands on the diagonal, about 1 mm wide, evenly spaced.
Download the Free Printable PDF
11. Snow-Capped Christmas Bauble
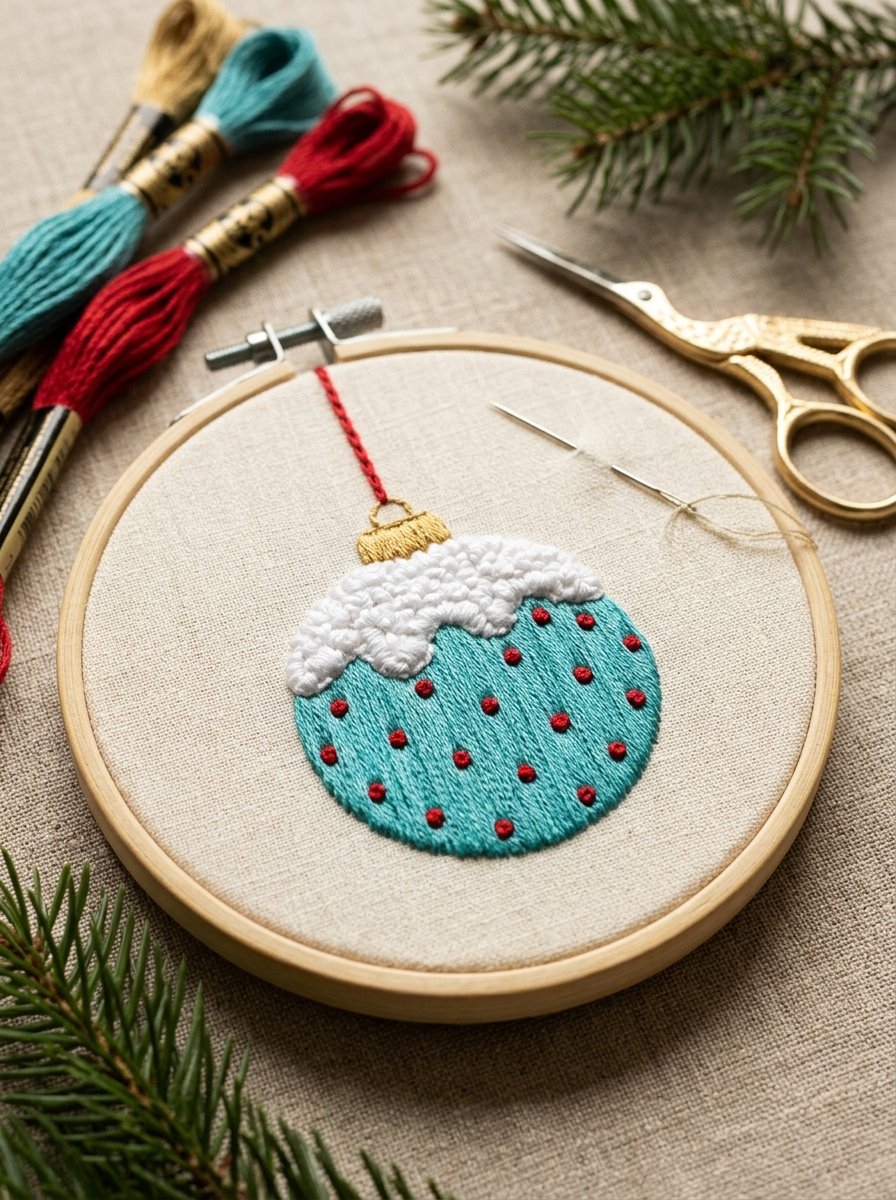
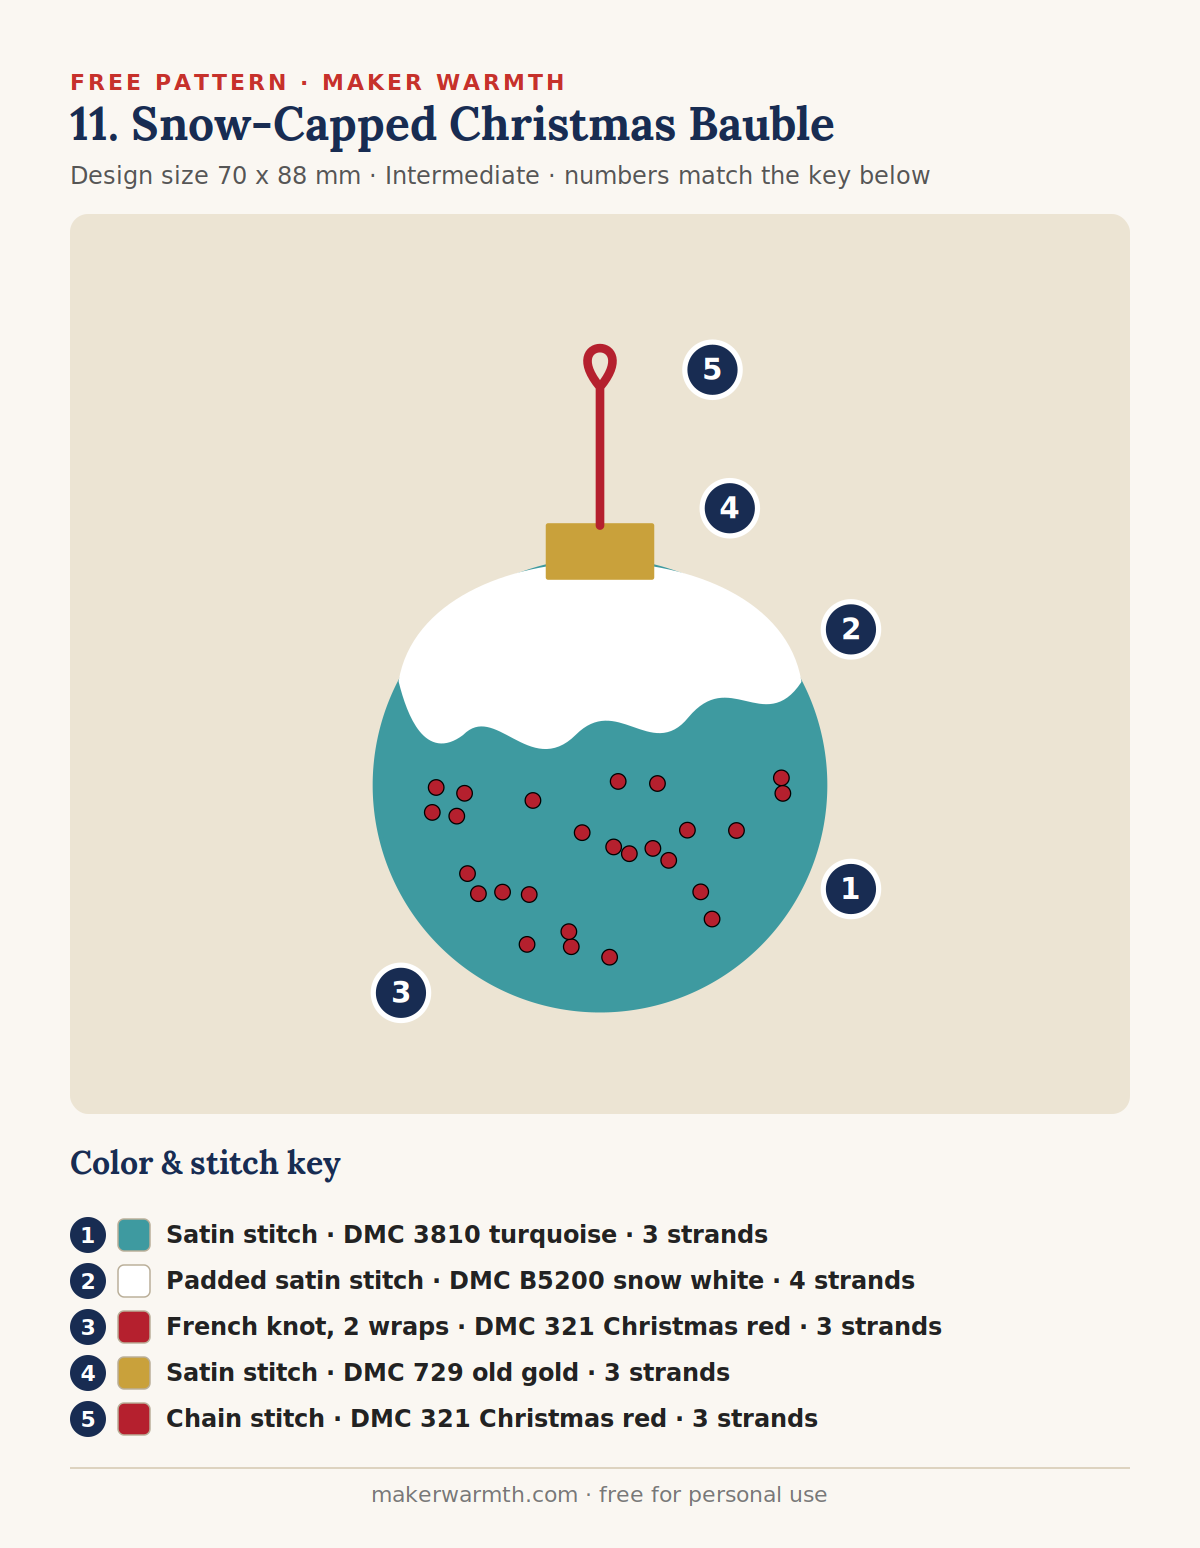
A round turquoise bauble with a fluffy snow cap and tiny red dots. The padded satin stitch on the snow is what makes this one pop: a layer of seed stitches underneath lifts the white so it looks like real snow sitting on top.
Pattern details
- Design size: 70 x 88 mm
- Skill level: Intermediate
- Fabric: cream, white or pale grey cotton-linen
- Colors: DMC 3810 turquoise, DMC B5200 snow white, DMC 321 Christmas red, DMC 729 old gold
How to stitch it
- 1. Satin stitch (DMC 3810 turquoise, 3 strands). Fill the ball in horizontal satin stitch, working in short sections so the stitches stay flat.
- 2. Padded satin stitch (DMC B5200 snow white, 4 strands). Snow cap: a layer of seed stitches as padding, then satin stitch on top, following the wavy edge.
- 3. French knot, 2 wraps (DMC 321 Christmas red, 3 strands). Red dots on the turquoise.
- 4. Satin stitch (DMC 729 old gold, 3 strands). Metal cap.
- 5. Chain stitch (DMC 321 Christmas red, 3 strands). Hanging cord and loop.
Download the Free Printable PDF
12. Six-Snowflake Sampler
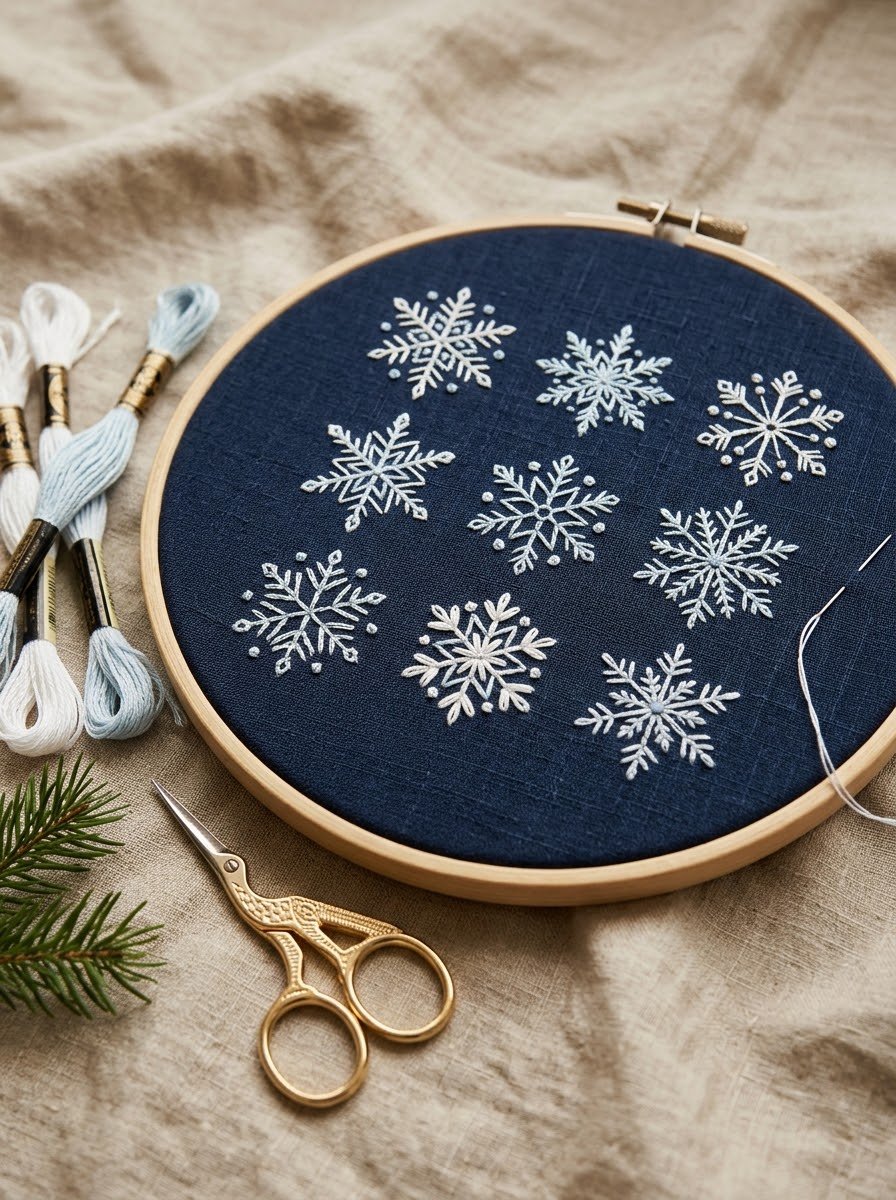
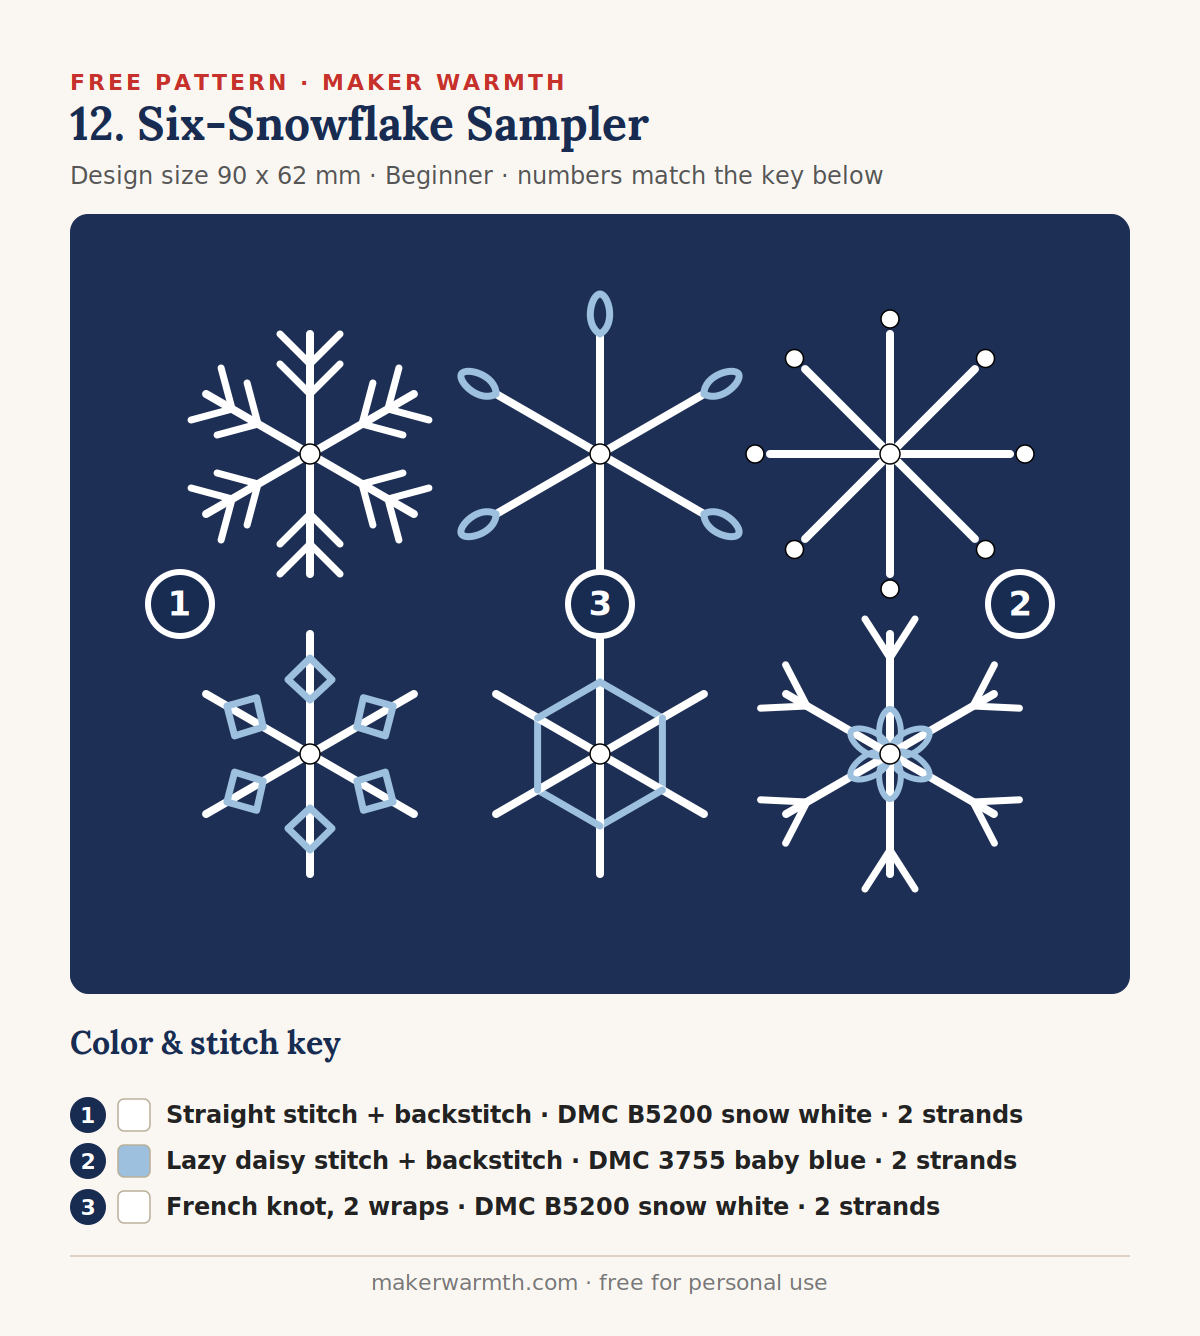
Six different snowflakes in white and pale blue on navy linen, each one using a different combination of straight stitch, lazy daisy and French knots. Stitch all six as a sampler, or pick one or two for a cuff or a pocket.
Pattern details
- Design size: 90 x 62 mm
- Skill level: Beginner
- Fabric: navy cotton-linen
- Colors: DMC B5200 snow white, DMC 3755 baby blue
How to stitch it
- 1. Straight stitch + backstitch (DMC B5200 snow white, 2 strands). Arms and forks of every snowflake.
- 2. Lazy daisy stitch + backstitch (DMC 3755 baby blue, 2 strands). Petal tips, inner diamonds and the connecting lines.
- 3. French knot, 2 wraps (DMC B5200 snow white, 2 strands). Centers and tip dots.
Download the Free Printable PDF
13. Dachshund in a Christmas Sweater
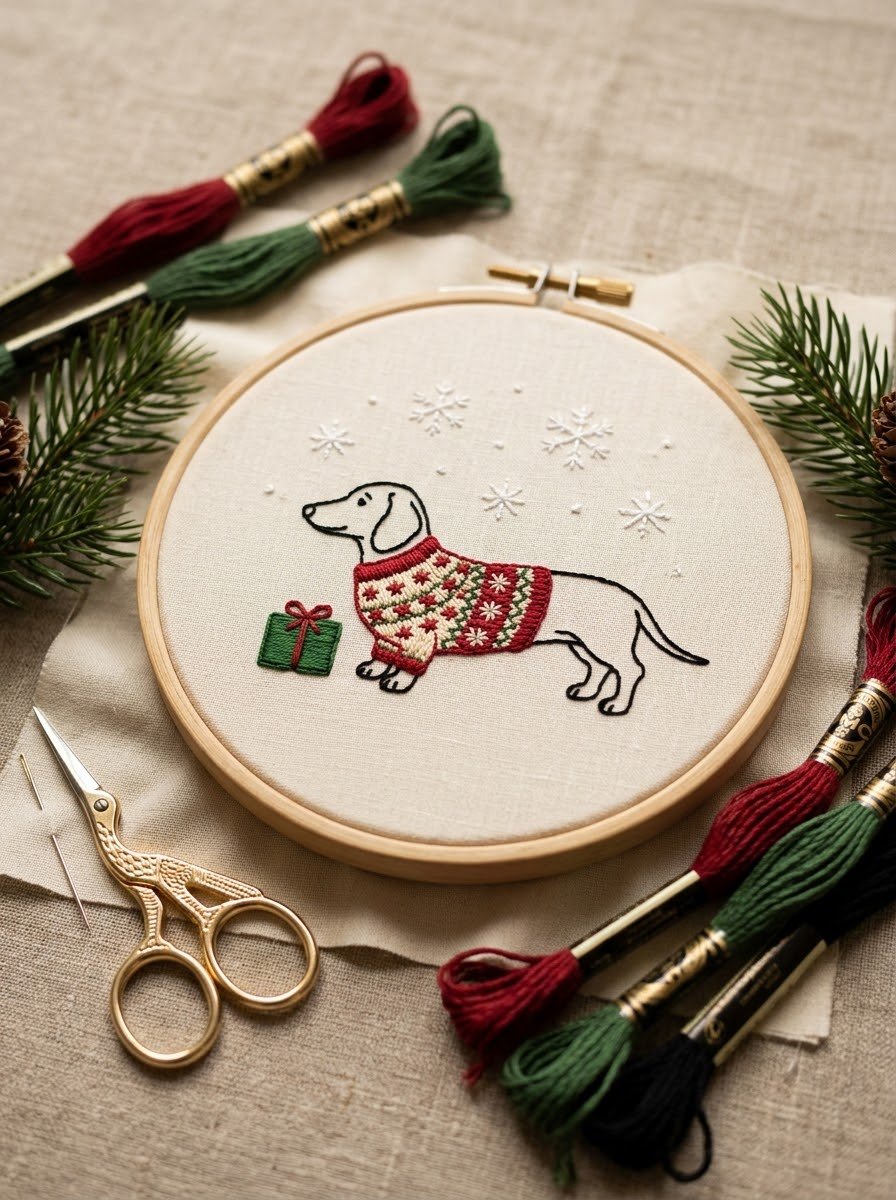
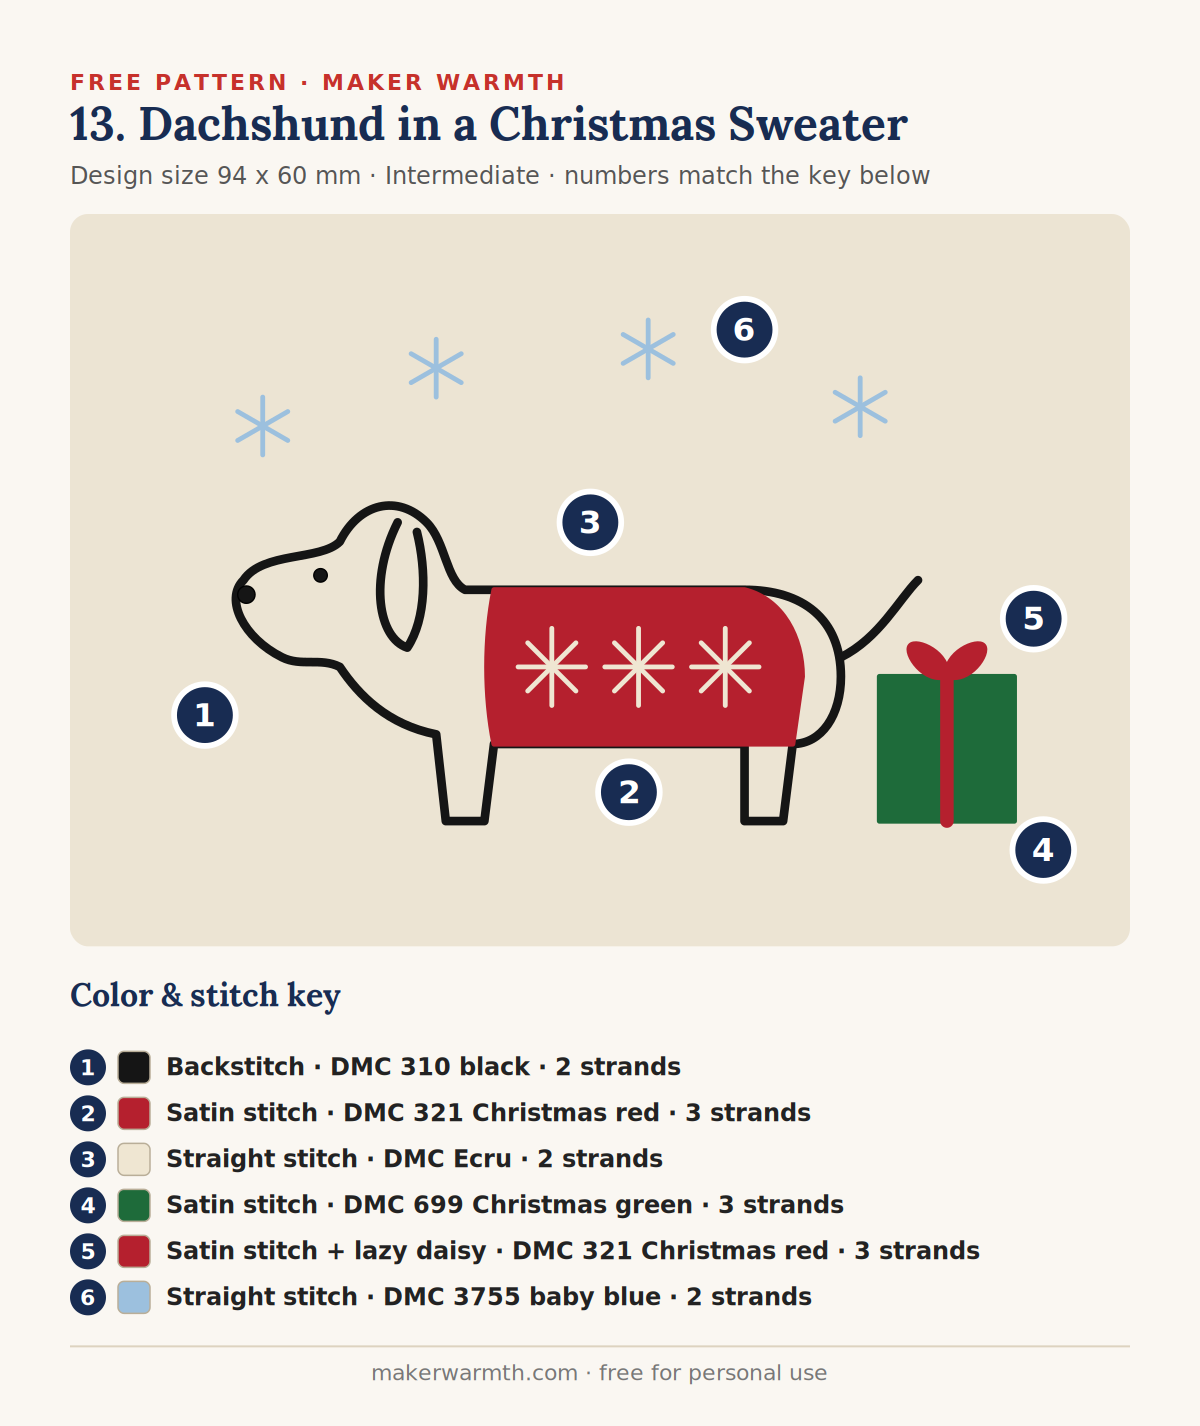
A dachshund in a cozy red Christmas sweater, standing next to a little wrapped gift. The outline is simple backstitch, and the sweater is a single satin stitch fill with cream snowflakes on top. Swap the gift color to match your own wrapping paper.
Pattern details
- Design size: 94 x 60 mm
- Skill level: Intermediate
- Fabric: cream, white or pale grey cotton-linen
- Colors: DMC 310 black, DMC 321 Christmas red, DMC Ecru, DMC 699 Christmas green, DMC 3755 baby blue
How to stitch it
- 1. Backstitch (DMC 310 black, 2 strands). Dog outline, ear, tail, legs. French knots for the eye and nose.
- 2. Satin stitch (DMC 321 Christmas red, 3 strands). Sweater body, stitched vertically.
- 3. Straight stitch (DMC Ecru, 2 strands). Snowflake motifs on top of the red satin.
- 4. Satin stitch (DMC 699 Christmas green, 3 strands). Gift box.
- 5. Satin stitch + lazy daisy (DMC 321 Christmas red, 3 strands). Ribbon and bow on the gift.
- 6. Straight stitch (DMC 3755 baby blue, 2 strands). Small snowflakes in the sky.
Download the Free Printable PDF
14. Star Filled with Pine Sprigs
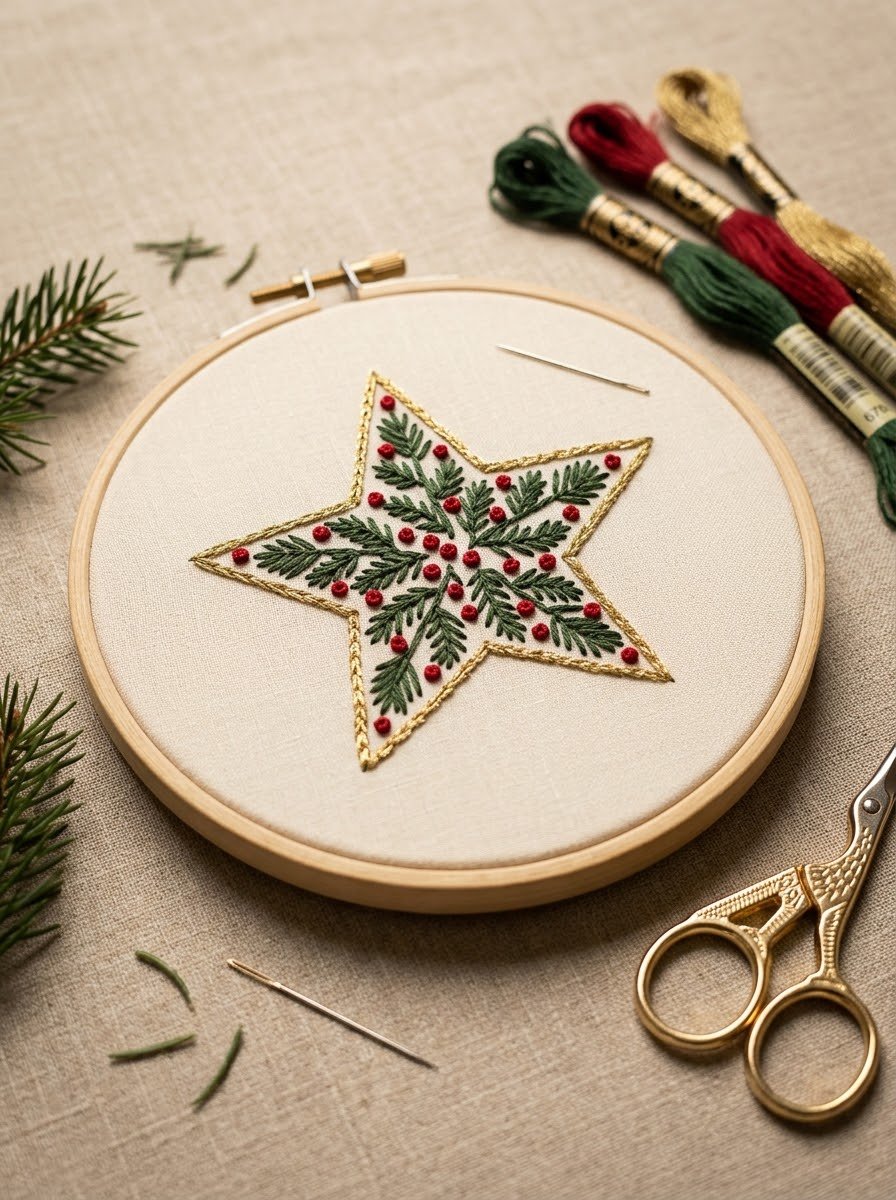
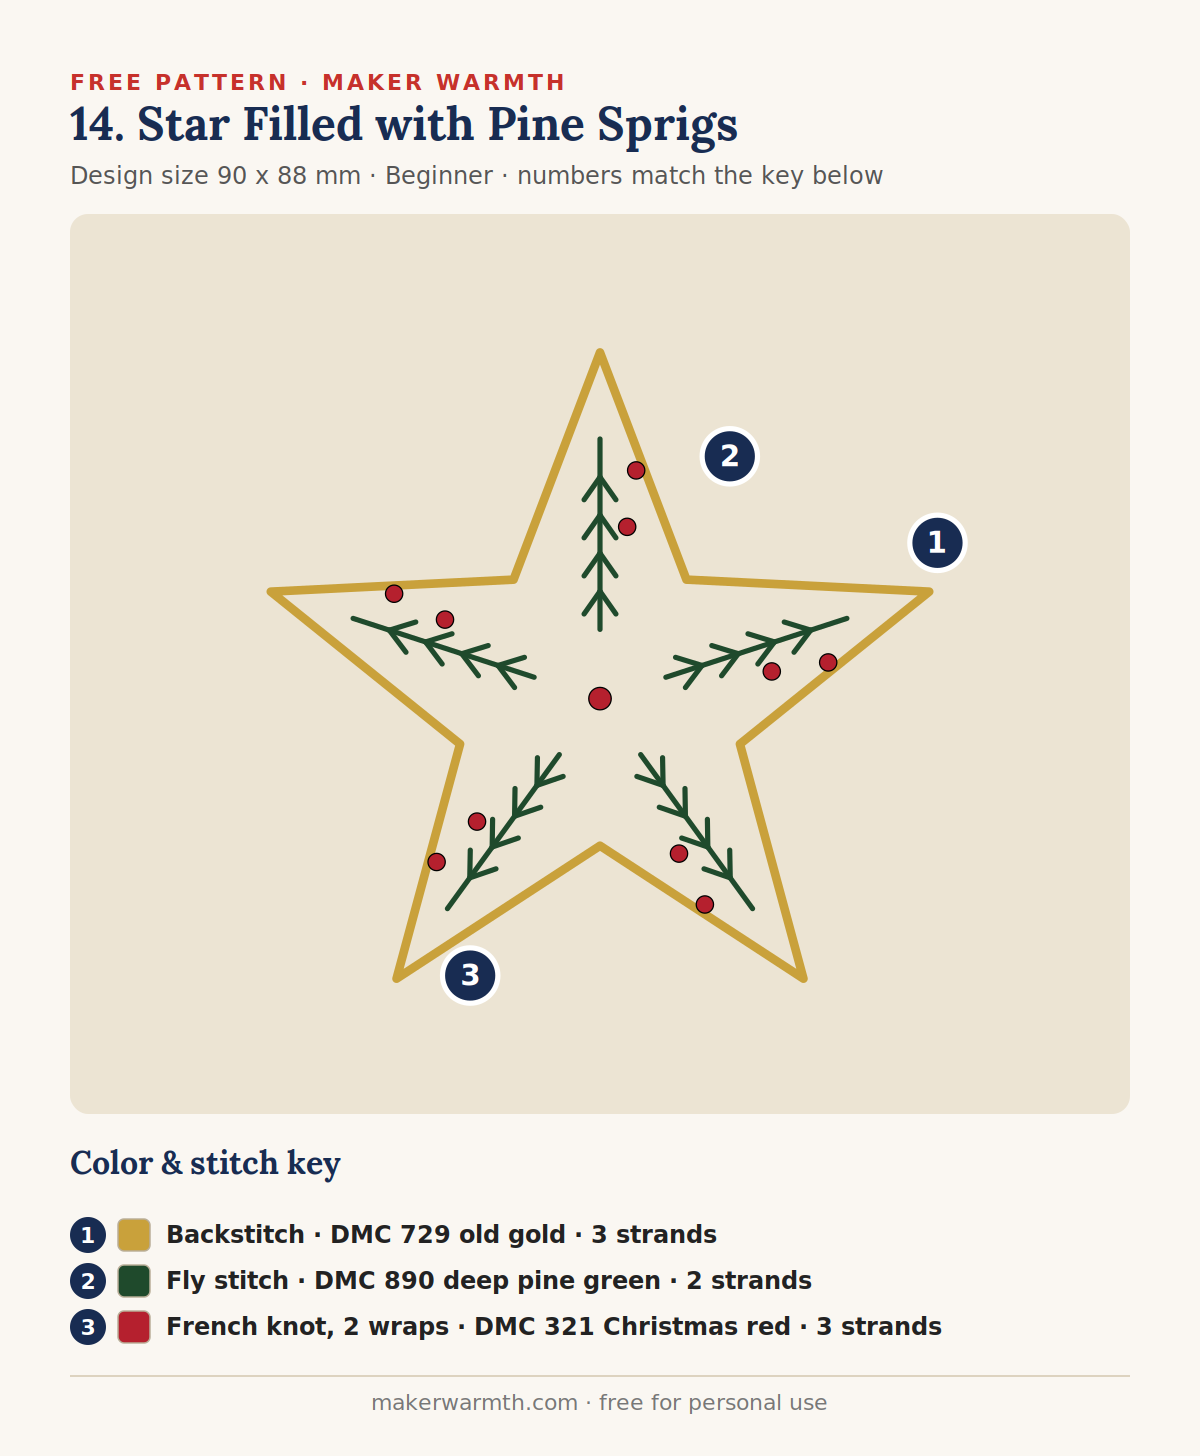
A five-pointed gold star with a pine sprig running down every point and red berries tucked beside them. Fly stitch builds the sprigs quickly, and the shape works as a tree topper ornament as well as on a sweater yoke.
Pattern details
- Design size: 90 x 88 mm
- Skill level: Beginner
- Fabric: cream, white or pale grey cotton-linen
- Colors: DMC 729 old gold, DMC 890 deep pine green, DMC 321 Christmas red
How to stitch it
- 1. Backstitch (DMC 729 old gold, 3 strands). Star outline. Short 2 mm stitches keep the points sharp.
- 2. Fly stitch (DMC 890 deep pine green, 2 strands). One sprig down the middle of each point: a stem with stacked fly stitches.
- 3. French knot, 2 wraps (DMC 321 Christmas red, 3 strands). Berries beside each sprig and one in the center.
Download the Free Printable PDF
15. Mini Christmas Icon Sampler

Twelve coin-size Christmas motifs in one grid: a star, a bauble, a snowflake, a Santa hat, a tree, a snowman, holly, a candy cane, a gift, a stocking, a gingerbread man and a bell. Stitch the whole sampler, or use the motifs one at a time on cuffs, collars and pockets.

Pattern details
- Design size: 90 x 68 mm
- Skill level: Beginner
- Fabric: cream, white or pale grey cotton-linen
- Colors: DMC 321 Christmas red, DMC 699 Christmas green, DMC 729 old gold, DMC B5200 snow white, DMC 435 gingerbread brown, DMC 310 black, DMC 666 bright red
How to stitch it
- 1. Satin stitch (DMC 321 Christmas red, 2 strands). Red fills: bauble, Santa hat, candy cane (stem stitch), gift ribbon, stocking, holly berries.
- 2. Satin stitch (DMC 699 Christmas green, 2 strands). Green fills: tree, gift box, holly leaves (lazy daisy).
- 3. Satin stitch (DMC 729 old gold, 2 strands). Gold: star, bauble cap, bell and its clapper knot.
- 4. Backstitch + satin stitch (DMC B5200 snow white, 2 strands). White: snowflake, snowman outline, hat brim, stocking cuff, pom-pom.
- 5. Backstitch (DMC 435 gingerbread brown, 2 strands). Gingerbread man outline and the little tree trunk.
- 6. French knot, 1 wrap (DMC 310 black, 1 strand). Snowman eyes.
- 7. Straight stitch (DMC 666 bright red, 1 strand). Snowman nose.
Download the Free Printable PDF
Finishing Your Christmas Embroidery
When the last French knot is in, rinse out any water-soluble pen or stabilizer in cool water and let the piece dry flat on a towel. Press it face down on a folded towel with a warm iron, so the stitches stay raised instead of getting flattened.
To finish a hoop, trim the fabric to about 1 inch outside the hoop, run a gathering stitch around the edge and pull it tight at the back, then glue a felt circle over it. Tie a ribbon through the hoop screw and it is ready to hang. For clothes, turn the garment inside out and wash it on a cold, gentle cycle, and skip the dryer for the pieces with beads and sequins.
Christmas Embroidery Patterns FAQ
Are these Christmas embroidery patterns really free?
Yes. All 15 patterns, the numbered keys and the actual-size templates are in one free PDF. They are for personal use, so you are welcome to stitch them as gifts; please share a link to this page instead of reposting the files.
What is the easiest Christmas embroidery pattern for a beginner?
Start with the wavy chain stitch tree (#2) or the scattered candy canes (#10). Each uses one main stitch and two colors, and small wobbles do not show.
Can I stitch these patterns on a sweater or sweatshirt?
Yes. Print the template onto wash-away stabilizer, stick it on the garment, hoop it and stitch through both layers. On knits, keep stitches short and avoid pulling the thread tight so the fabric does not pucker.
Which DMC colors do I need for Christmas embroidery?
Most of these patterns use DMC 321 Christmas red, 890 deep pine green, B5200 snow white and 729 old gold. Each design lists its full color set in the key.
How do I make my lettering look smooth?
Use short stitches of about 2 mm on curves. For the “ho ho ho” pattern, whip the backstitch with the same color; for “Merry Christmas”, use split stitch and add a second row on the thick parts of the letters.
Can I change the letter in the candy-cane monogram?
Of course. Write your initial in a chunky serif style at about 50 mm tall, draw diagonal lines across it at the same angle as the template, and fill the stripes in alternating red and white.
Pick one pattern for this weekend, print it at actual size and start with the numbered areas in order. By Christmas you could have a whole set of hoops for the tree, or a sweater nobody else will be wearing.