Bow Embroidery: 15 Sweet Ideas for Jeans, Sweaters and Shirts (+ How to Stitch One)
A tiny bow is the easiest way to make a plain pair of jeans look like you planned them. Two loops, two tails, and you have a motif that works on denim, knits, crisp cotton shirts and even socks. Below you will find 15 bow embroidery ideas, sorted by garment, plus two simple ways to stitch a bow: the classic lazy daisy bow and the fluffy bow you make by wrapping thread over a pen.
In This Post
- What You Will Need
- How to Embroider a Bow: 2 Easy Methods
- Bow Embroidery on Jeans and Denim
- 1. A Row of Tiny Bows on a Back Pocket
- 2. Bows Above the Jeans Hem
- 3. One Bold Bow on a Jeans Pocket
- 4. A Ribbon Bow with Long Tails Down the Leg
- 5. White Bows on a Denim Jacket Collar
- Bow Embroidery on Sweaters, Sweatshirts and Socks
- 6. Two Bows Under a Sweatshirt Neckline
- 7. Scattered Bows on a Cream Sweater
- 8. A Big Chain Stitch Bow on a Brown Sweater
- 9. A Filled Bow on a Ribbed Sock
- Bow Embroidery Designs for Shirts and Trousers
- 10. A Satin Stitch Bow on a White Shirt
- 11. A Tiny Navy Bow on a Collar Point
- 12. A Red Bow on a Shirt Cuff
- 13. Pink Bows on Gray Trousers
- Bows for Kids’ Clothes and Practice
- 14. Tiny Bows Beside Cardigan Buttons
- 15. A Bow Stitch Sampler
- How to Draw Your Own Bow Embroidery Pattern
- How to Wash Clothes with Embroidered Bows
- FAQ
What You Will Need
- Six-strand cotton embroidery floss in pink, red, navy or white. Split it into 2–3 strands for tiny bows and use all 6 for bold ones.
- Soft wool or tapestry yarn if you are stitching on chunky knits.
- Embroidery needles with a sharp point for denim and cotton, and a blunt tapestry needle for knits.
- A small embroidery hoop, 4 or 5 inches, for woven fabrics like denim and shirting.
- Stick-and-stitch stabilizer (printable, water-soluble) for sweaters, sweatshirts and socks, where you cannot draw on the fabric.
- A water-soluble fabric marker or a white chalk pencil for dark denim.
- Small sharp embroidery scissors.
- A slim pen or pencil for the fluffy wrapped bow.
How to Embroider a Bow: 2 Easy Methods
Almost every bow on this page is made with one of these two methods. Start with the lazy daisy bow: it is the one in most of the photos below and it takes a few minutes once you get the rhythm.
Method 1: The Lazy Daisy Bow
- Mark a small dot where the knot of the bow will sit. For a tiny bow, mark two more dots about 1 cm to the left and right, slightly higher than the center.
- Bring the needle up at the center dot, go back down right next to it, and bring the needle up at the left dot without pulling the thread through yet.
- Loop the thread under the needle tip and pull gently. You now have a teardrop loop. Anchor it with a tiny stitch over the end. That is your first lazy daisy loop.
- Repeat on the right side to make the second loop.
- For the tails, make two straight stitches from the center going down and outward, like an upside-down V.
- Add a small straight stitch or a French knot in the center to cover where the loops meet.
Method 2: The Fluffy Pen-Wrap Bow
This is the bow behind the most-saved embroidery bow tutorial videos on Pinterest. The loops are made over a pen, so they stand up off the fabric and look full and soft.
- Thread the needle with all 6 strands of floss and knot the end.
- Lay a slim pen across the fabric exactly where the bow will be.
- Bring the needle up just below the pen, carry the thread over the pen, and go down just above it. Repeat 8–10 times, using the same two holes each time.
- Slide the pen out. You now have a bundle of loose loops.
- Bring the needle up below the bundle at its center, wrap the thread tightly around the middle two or three times, and go down. The bundle pinches into two loops.
- Finish with two short straight stitches for the tails.
Want more stitches to play with? See the stitch sampler in idea 15 below.
From Maker Warmth
Looking for your next stitch project?
Every pattern on this blog is free to print, from tiny bows to full denim jacket designs. Save this one, then browse the whole collection.
See all free patterns →Bow Embroidery on Jeans and Denim
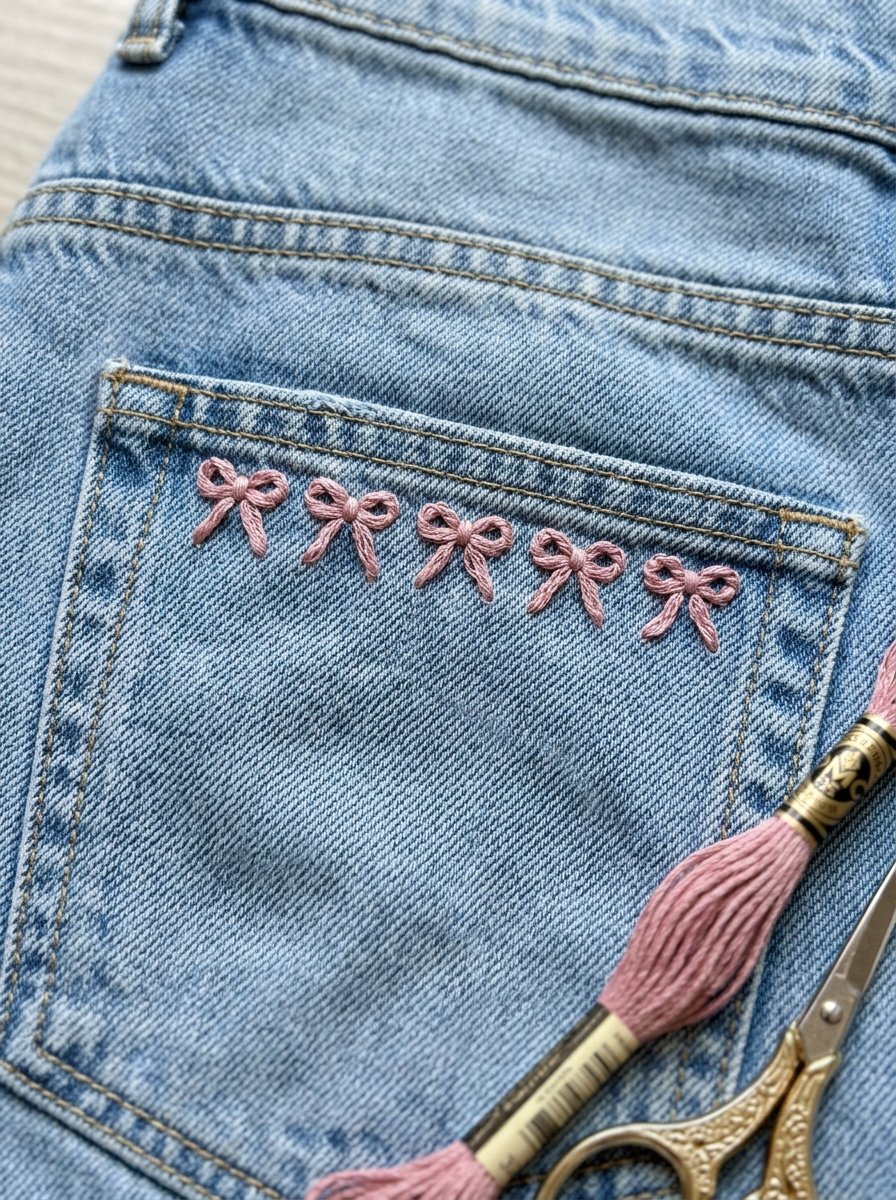
1. A Row of Tiny Bows on a Back Pocket
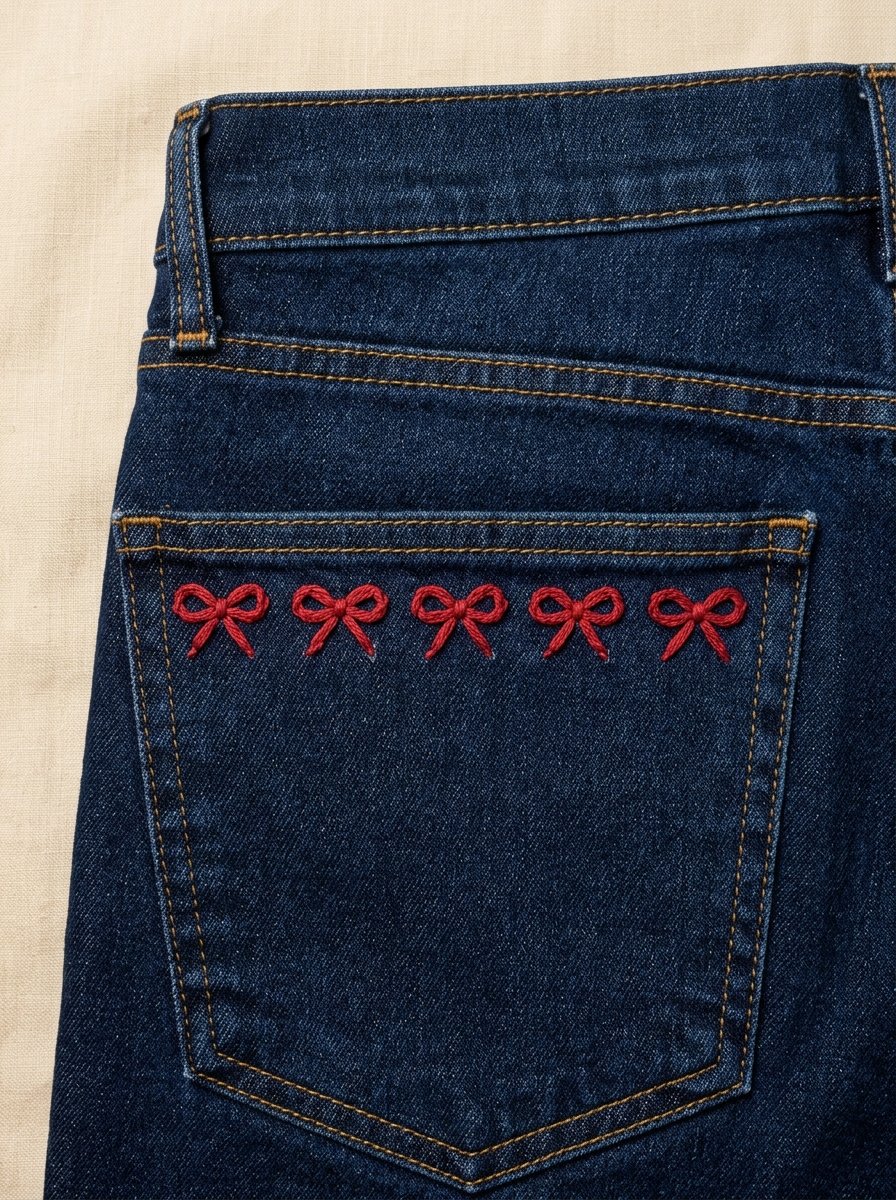
This is the bow embroidery on jeans that shows up again and again on Pinterest, and it is easy to see why. A straight line of small bows just under the pocket seam looks neat from across the room. Red on dark denim gives the strongest contrast.
Stitches: lazy daisy loops, straight-stitch tails. Tip: use the pocket topstitching as your ruler and mark the bows with equal spacing before you start.
2. Bows Above the Jeans Hem

Three soft pink bows just above the hem stitching peek out with every step. It is a quiet detail that works especially well on cropped or straight-leg jeans.
Stitches: lazy daisy loops, straight-stitch tails. Tip: stitch both legs at the same height. Measure up from the hem seam, not from the fabric edge.
3. One Bold Bow on a Jeans Pocket
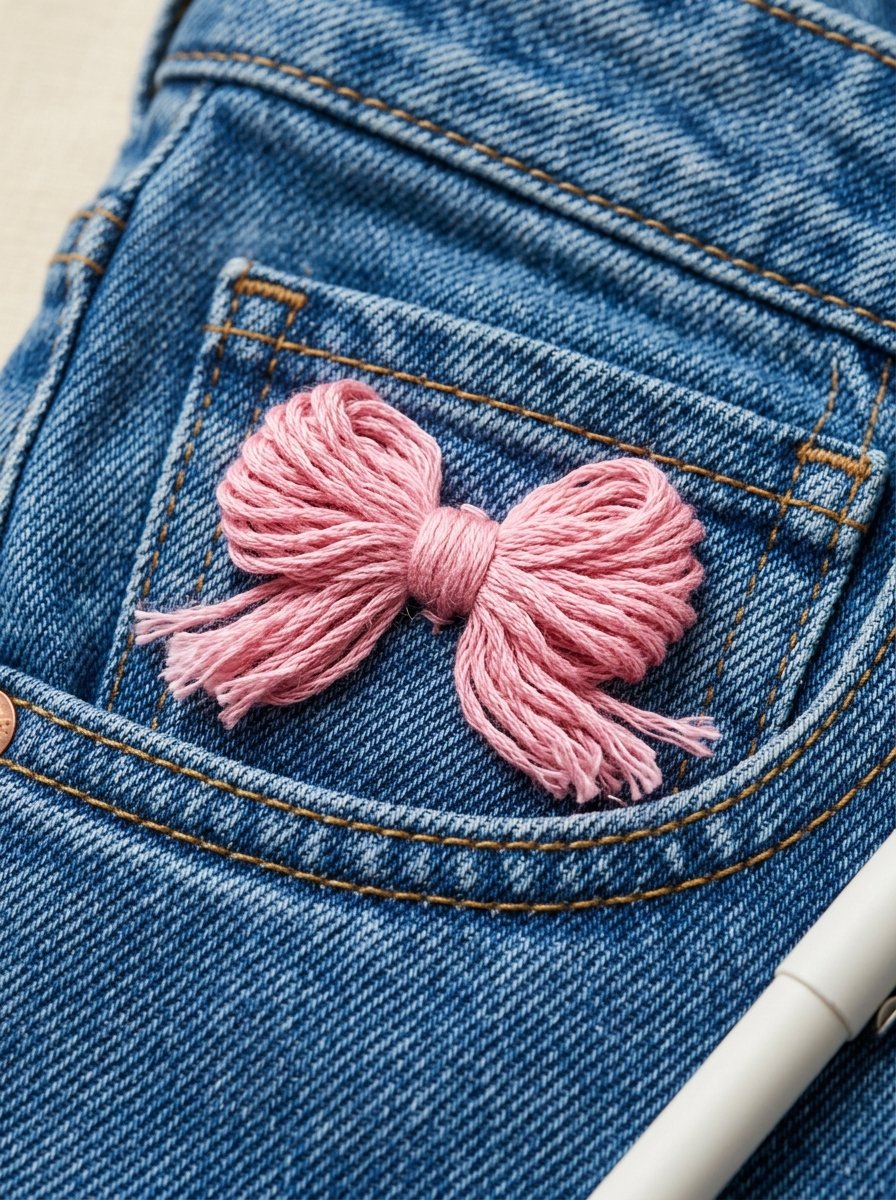
If you would rather have one statement bow than a row, put it on the front pocket. A raised bow filled with long smooth stitches catches the light and looks almost three-dimensional. For a softer, fluffier version, use the pen-wrap method from the tutorial above.
Stitches: padded satin stitch or the pen-wrap method. Tip: slip a piece of cardboard inside the pocket so you do not stitch it shut.
4. A Ribbon Bow with Long Tails Down the Leg

Long wavy tails turn a simple bow into a ribbon that seems to flutter down the jeans. This bow embroidery design is bigger than the others, but it is only lines, so it goes faster than it looks.
Stitches: stem stitch or chain stitch for the outline. Tip: draw the tails with one relaxed hand movement, so the curves look natural.
5. White Bows on a Denim Jacket Collar

White bows on a medium-wash collar look crisp and a little vintage. Three on each side is enough, and the collar is small, so this is a good weekend project.
Stitches: lazy daisy loops, straight-stitch tails. Tip: stitch through the top layer of the collar only, so the underside stays clean.
More ideas for jackets:
Denim Jacket Embroidery Ideas: 12 Free Printable Patterns
Bow Embroidery on Sweaters, Sweatshirts and Socks
6. Two Bows Under a Sweatshirt Neckline
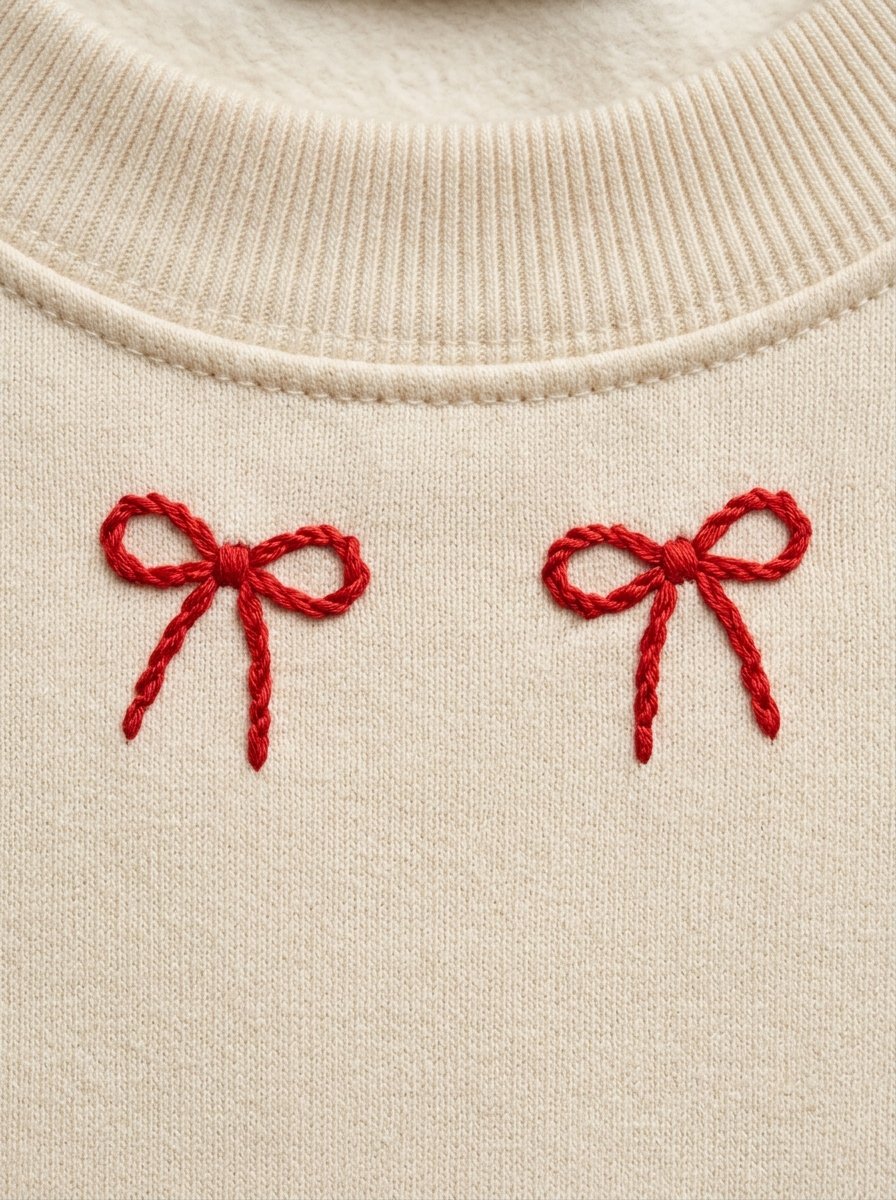
Two red bows placed like a pair of collar pins make a plain cream sweatshirt look finished. It is symmetrical, small and very quick.
Stitches: backstitch outline with straight-stitch tails. Tip: sweatshirt fabric stretches, so use stick-and-stitch stabilizer and do not pull the stitches tight.
7. Scattered Bows on a Cream Sweater
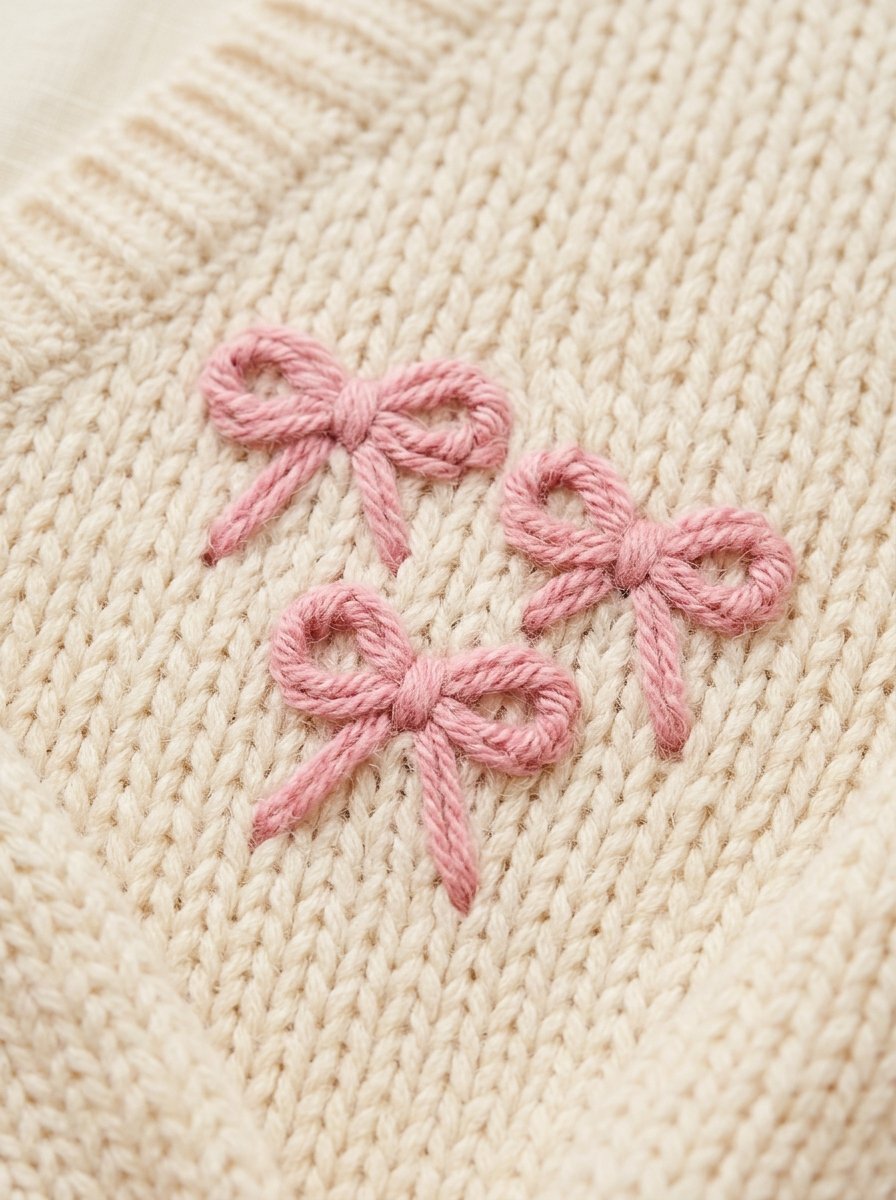
Soft pink bows scattered across a cream knit look sweet without trying too hard. Yarn sits nicely in the knit and fills the loops faster than floss.
Stitches: lazy daisy loops, straight-stitch tails. Tip: use a blunt tapestry needle that slides between the knit loops instead of splitting them.
8. A Big Chain Stitch Bow on a Brown Sweater
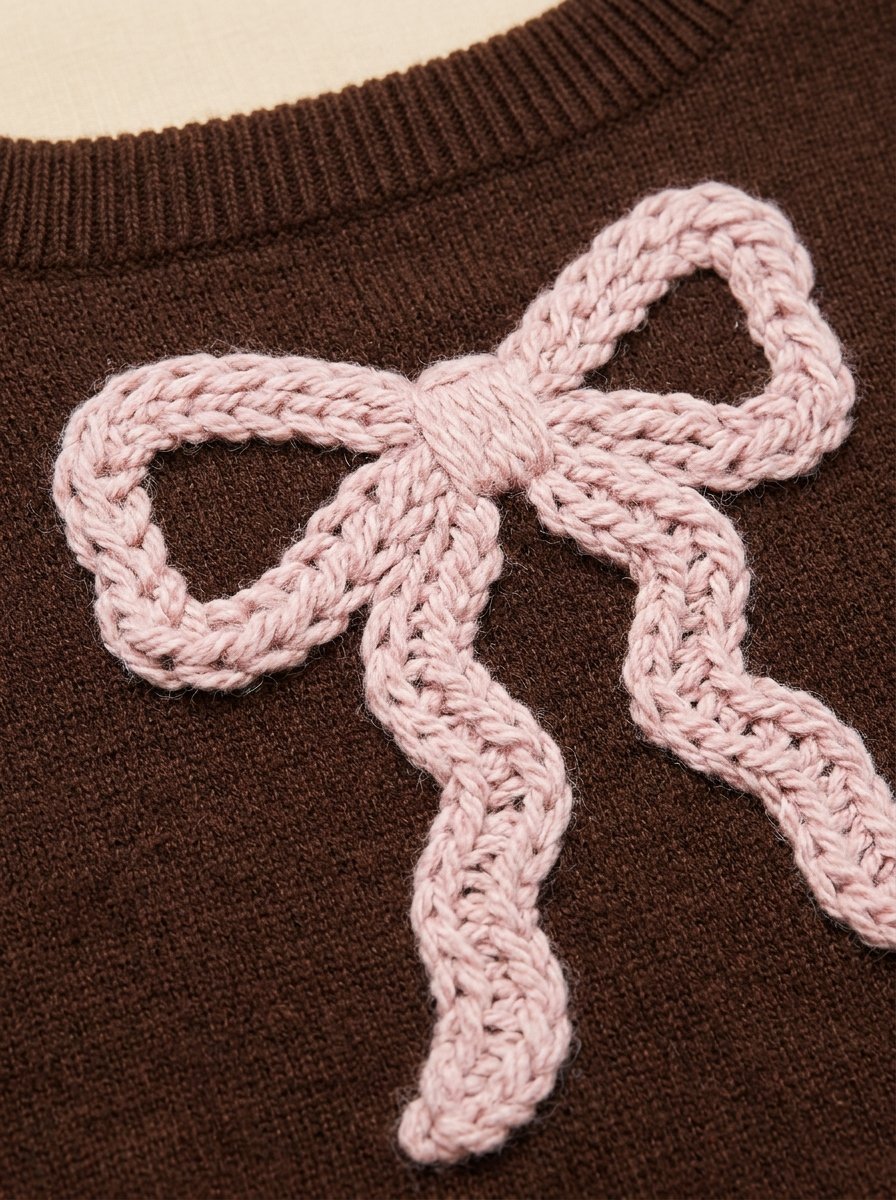
Pale pink on chocolate brown is one of the prettiest color pairs for a bow. Chunky chain stitch in wool yarn gives the outline a braided, cozy look.
Stitches: chain stitch. Tip: keep each chain link the same length, about the size of a grain of rice, for an even line.
9. A Filled Bow on a Ribbed Sock

A dusty rose bow on a cream sock cuff makes a lovely small gift. The ribs give you natural guidelines, so the bow is easy to keep straight.
Stitches: split stitch outline, satin stitch fill. Tip: slide a plastic cup or a rolled magazine inside the sock so you stitch through one layer only.
Bow Embroidery Designs for Shirts and Trousers
10. A Satin Stitch Bow on a White Shirt
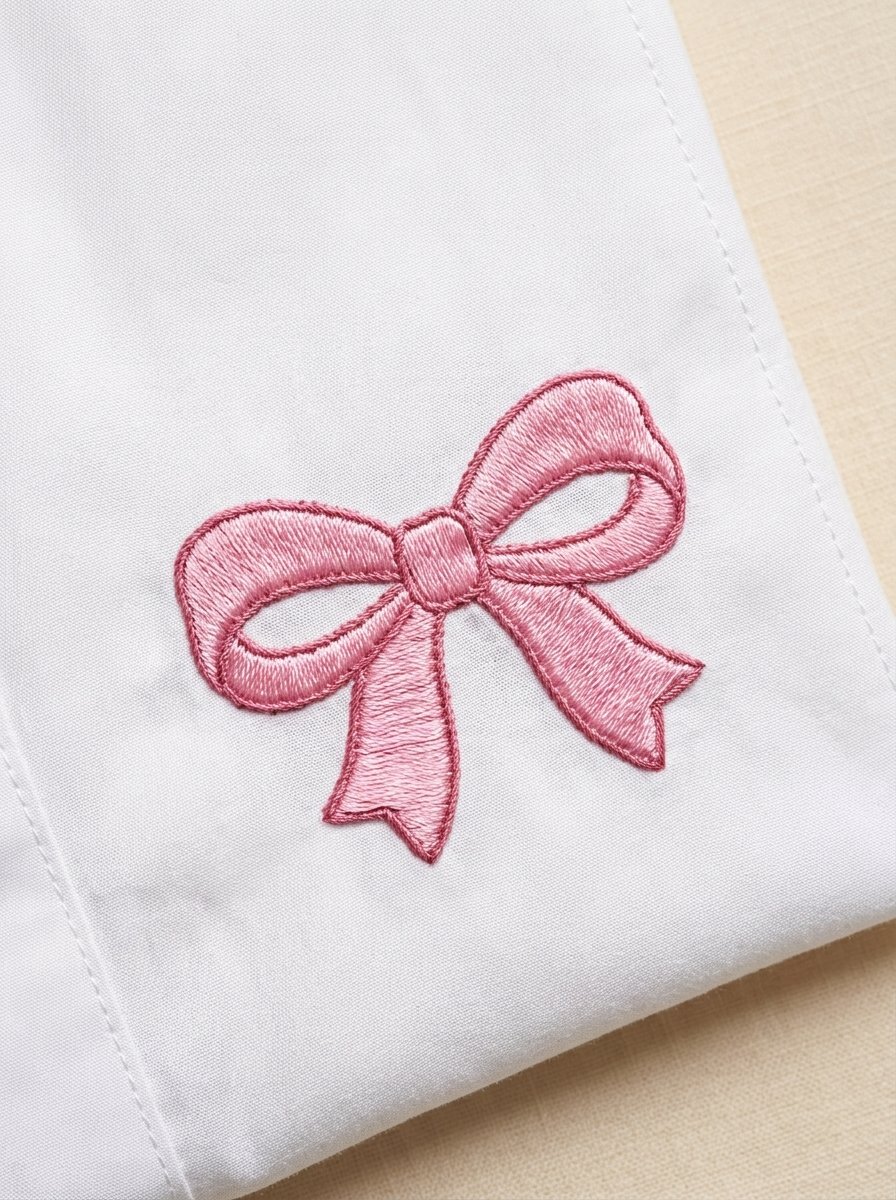
A smooth, glossy bow on the chest of a white shirt looks almost like a little brooch. This is the bow embroidery design shirt lovers save most, and it suits a plain cotton button-down perfectly.
Stitches: satin stitch fill with a split stitch outline. Tip: work each loop in one direction and the knot across it, so the light catches the thread differently.
11. A Tiny Navy Bow on a Collar Point

Navy on white is classic and easy to wear to work. Stitch one bow on each collar point, and the shirt suddenly looks custom made.
Stitches: lazy daisy loops, straight-stitch tails, 2 strands of floss. Tip: collars are stiff, so a hoop is not needed. Just hold the collar flat and stitch slowly.
12. A Red Bow on a Shirt Cuff

One red bow next to the cuff button is a detail only you might notice at first, and that is the charm. Pale blue oxford cloth makes the red really pop.
Stitches: backstitch outline, straight-stitch tails. Tip: leave enough space from the button so it still goes through the buttonhole.
13. Pink Bows on Gray Trousers

Tailored gray trousers are not the first thing people think to embroider, which is exactly why it works. Three pink bows in a loose diagonal soften a serious garment.
Stitches: lazy daisy loops, straight-stitch tails. Tip: wool can be thick, so pick a sharp needle with a large eye and use 3 strands of floss.
Love floral motifs too?
20 Flower Embroidery Designs to Stitch on Your Clothes
Bows for Kids’ Clothes and Practice
14. Tiny Bows Beside Cardigan Buttons
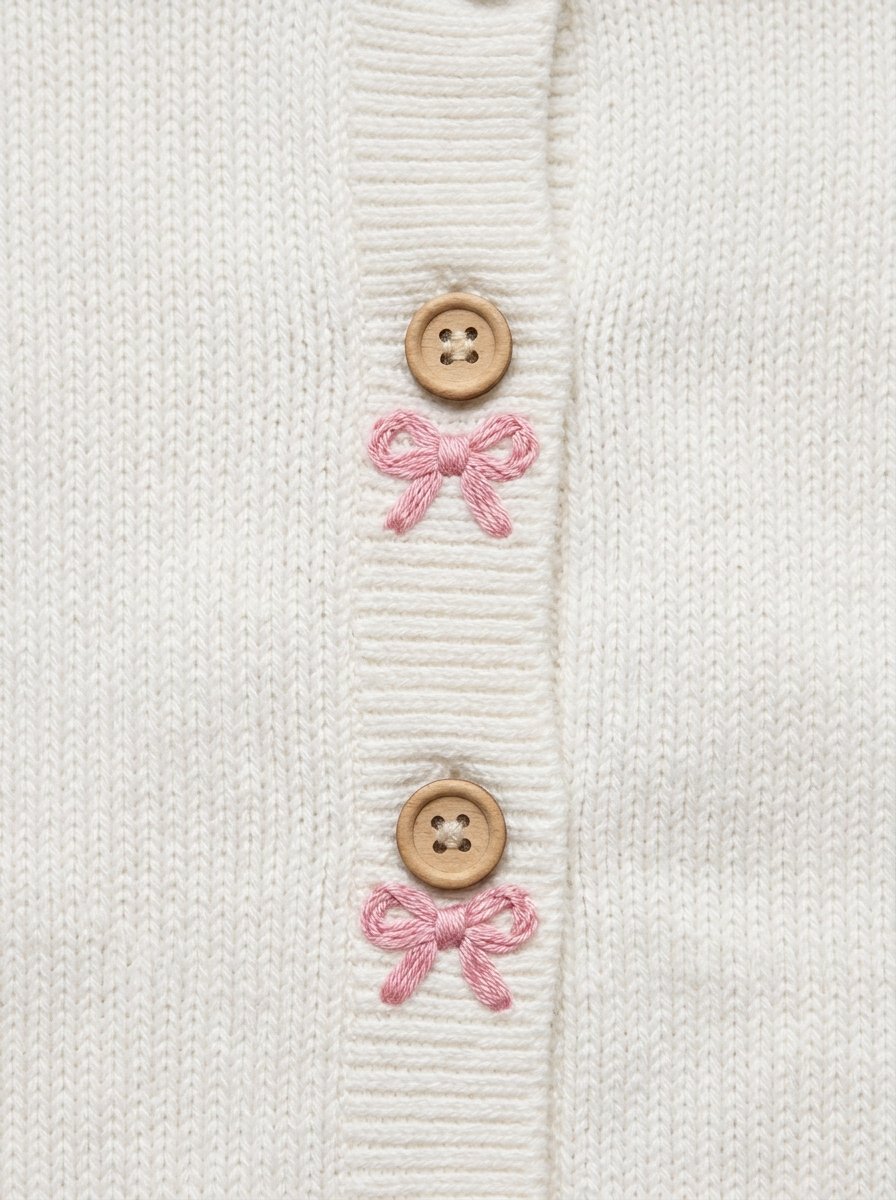
A tiny pink bow next to each button turns a plain baby cardigan into a keepsake. It also makes a sweet handmade baby shower gift.
Stitches: lazy daisy loops, straight-stitch tails, 2 strands of floss. Tip: secure the ends on the back with a few small stitches instead of big knots, so nothing scratches tiny skin.
15. A Bow Stitch Sampler
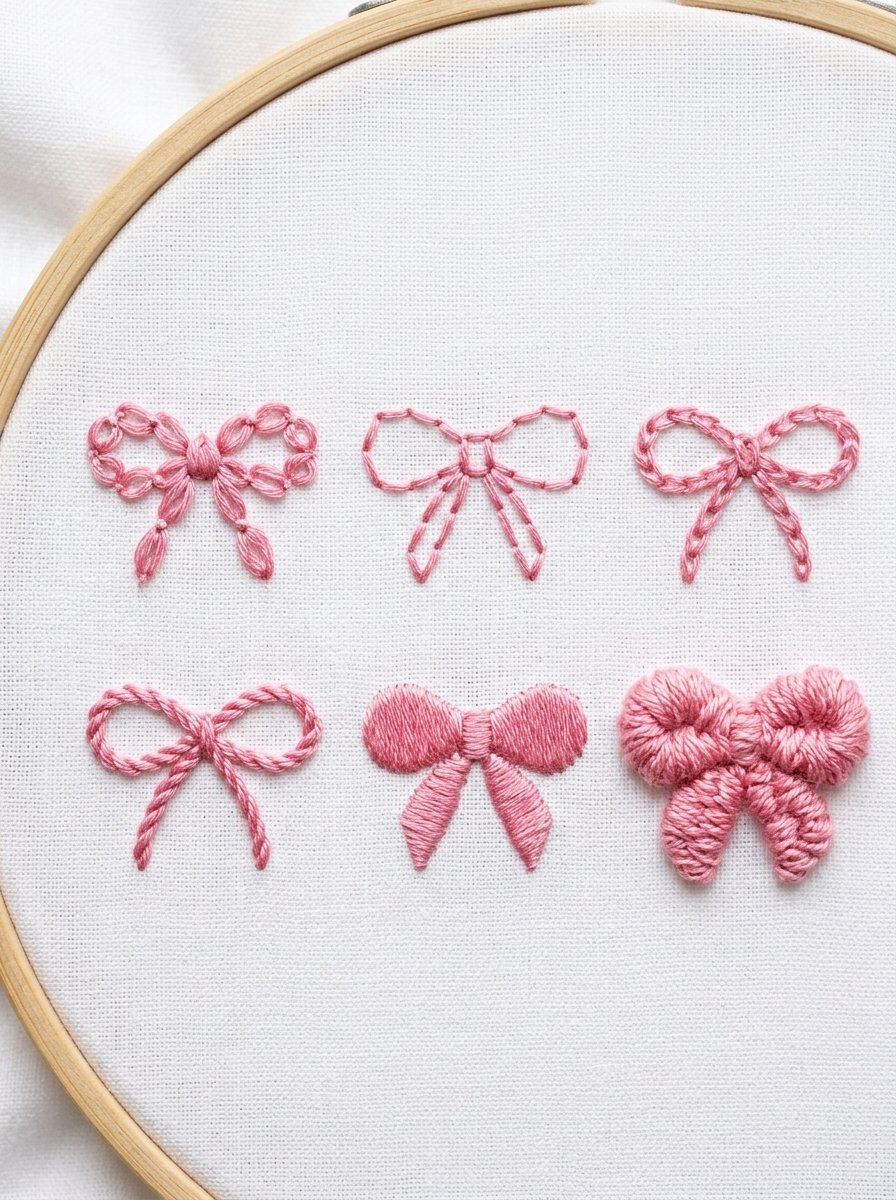
Not sure which bow suits your jeans? Stitch a sampler first. Six small bows in six different stitches show you how each one looks before you commit to a garment.
Stitches: lazy daisy, backstitch, chain stitch, stem stitch, satin stitch and the pen-wrap bow. Tip: use scrap cotton from an old pillowcase, so practice costs nothing.
How to Draw Your Own Bow Embroidery Pattern
You do not need a printed bow embroidery pattern for small bows. Draw a small dot for the knot, two rounded teardrops on each side for the loops, and two lines going down and outward for the tails. For a ribbon bow like idea 4, make the tails long and wavy. Draw with a water-soluble marker on light fabric, a white chalk pencil on dark denim, or on stick-and-stitch stabilizer for knits.
How to Wash Clothes with Embroidered Bows
Turn the garment inside out, wash it on a gentle cycle in cold water, and skip the dryer. Lay sweaters flat to dry. Iron embroidery from the wrong side on a towel, so the stitches stay raised instead of flattened.
More ideas for your clothes:
Sunflower Embroidery on Clothes: 8 Ideas for Denim, Shirts and Sweatshirts
FAQ
What is the easiest stitch for a bow?
The lazy daisy stitch. Two lazy daisy loops and two straight stitches make a complete bow, and you can learn it in a few minutes.
How many strands of floss should I use for bow embroidery?
Use 2–3 strands for tiny bows on collars and cuffs, 3–4 for bows on jeans, and all 6 for the fluffy pen-wrap bow.
Can I embroider a bow on stretchy fabric?
Yes. Use stick-and-stitch stabilizer on the front of sweaters and sweatshirts, keep your stitches relaxed, and do not stretch the fabric in a hoop.