20 Flower Embroidery Designs to Stitch on Your Clothes (Free Printable Patterns)
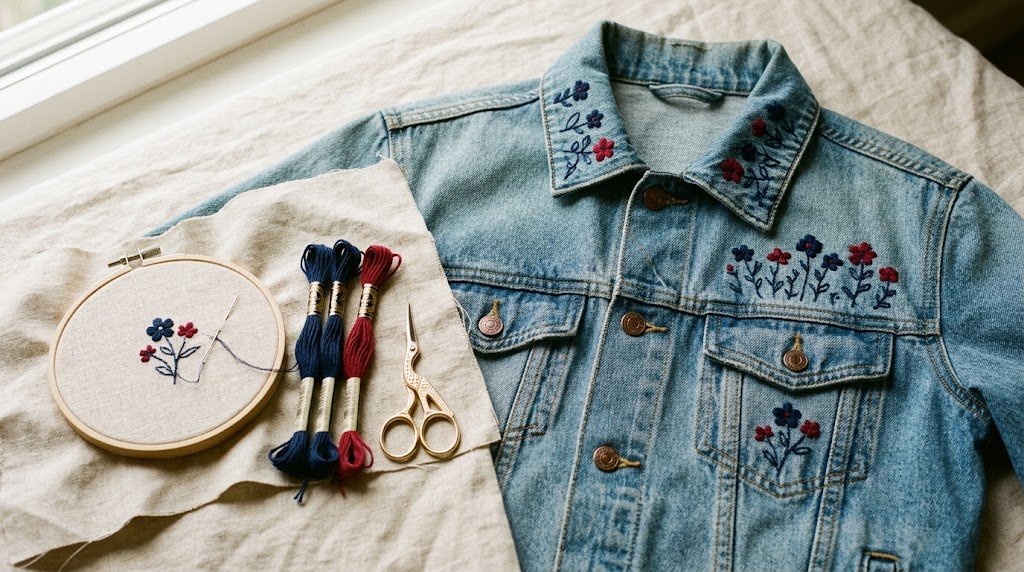
Flowers are the easiest way to make a plain piece of clothing feel like yours. A few lazy daisies on a collar, one rose on a pocket, a vine creeping down a sleeve: none of these need a pattern book or years of practice, just some floss, a hoop and an afternoon.
I gathered 20 flower embroidery designs for clothes in this post, from tiny one-color motifs to fuller floral pieces for the back of a denim jacket. For each idea you will find where it sits best on a garment, which stitches build it, a short step-by-step and a free printable pattern with a numbered DMC thread key, so you can pick the floral embroidery designs that match your skill level and actually stitch them.

In This Post
- What You Will Need
- Before You Start: Fabric, Transfer and Stabilizer
- The Stitches Behind These Designs
- 1. Lazy Daisy Chain on a Denim Collar
- 2. Wildflower Meadow Along a Jeans Hem
- 3. Single Red Rose on a Shirt Pocket
- 4. Sunflower on the Back of a Denim Jacket
- 5. Lavender Sprigs on a Linen Shirt Cuff
- 6. Forget-Me-Not Scatter on a White Tee
- 7. Woven Wheel Roses on a Cardigan
- 8. Cherry Blossom Branch Over the Shoulder
- 9. Poppy Border on a Skirt Hem
- 10. Tiny Daisies Around a Neckline
- 11. Tulip Trio on a Sweatshirt
- 12. Lily of the Valley on Collar Points
- 13. Wildflower Bouquet on a Back Pocket
- 14. One-Color Florals on a Chambray Shirt
- 15. French Knot Hydrangea on a Denim Pocket
- 16. Pressed-Flower Botanicals on a Dress Bodice
- 17. Bullion Knot Roses on a Sweater
- 18. Peony on a Sweatshirt Chest
- 19. Floral Vine Down a Sleeve
- 20. Daisy Cluster Over a Hole or Stain
- Caring for Embroidered Clothes
- FAQ
What You Will Need
Every design in this list can be stitched with the same small kit. Nothing here is fancy; most of it fits in a pencil case.
- Embroidery hoop – a 5 or 6 inch hoop covers most pocket, collar and chest designs; a 7 or 8 inch hoop helps with jacket backs.
- Six-strand cotton embroidery floss – in the flower and leaf colors you like, plus one neutral for stems.
- Embroidery needles – a pack of crewel (embroidery) needles in mixed sizes; a milliner needle is handy for bullion knots.
- Small sharp embroidery scissors – for clean thread ends close to the fabric.
- Water-soluble fabric pen – for drawing or tracing the design straight onto the garment.
- Stabilizer – tear-away or wash-away, needed for T-shirts, sweatshirts and other stretchy knits.
- Printable transfer sheets (optional) – stick-and-stitch sheets that dissolve in water, useful on denim where pen lines are hard to see.
- Thimble (optional) – helps push the needle through thick seams and denim.
Before You Start: Fabric, Transfer and Stabilizer
Wash and dry the garment first, so it does its shrinking before you stitch, not after. Then decide how the design will get onto the fabric. On light cotton and linen a water-soluble pen is enough. On denim, a stick-and-stitch transfer sheet is usually the easier route, because you simply stitch through the printed sheet and rinse it away.
Every design below comes with a free printable PDF. Print it at 100% (Actual size) and check the 1-inch square on the page, so the flower comes out at the size shown on its pattern card. You can trace it with a pen or print it straight onto a stick-and-stitch sheet.
Stretchy fabrics need one extra step. Iron or stick a piece of stabilizer to the back of the area before hooping, otherwise the knit pulls and the flowers pucker. Keep the fabric drum-tight in the hoop, but do not stretch a knit while hooping it, or the design will shrink back and wrinkle once you take it out.
For most floral embroidery designs, two or three strands of floss look neat on shirts and tees, while denim and sweatshirts can take three to six strands for a bolder line.
The Stitches Behind These Designs
All 20 ideas below are built from a handful of stitches. Learn these once and every design on this list becomes a matter of arranging them.
Lazy daisy (detached chain). Come up where the petal starts and go back down into the same hole, leaving a small loop on top. Come up at the tip of the petal inside the loop, then go down just outside the loop to tack it in place. Five or six of these around one point make a flower.
French knot. Come up, wrap the thread once or twice around the needle, then put the needle back into the fabric right next to where it came up, not in the same hole. Hold the wraps snug with your other hand while you pull the needle through.
Satin stitch. Fill a shape with straight stitches laid side by side, each one going from edge to edge. Outline the shape in split stitch first and stitch over that outline for a smooth, raised edge.
Stem stitch. Work along a line with small slanted stitches, bringing the needle up halfway along the previous stitch and always keeping the thread on the same side. It makes a rope-like line, perfect for stems and branches.
Woven wheel rose. Stitch an odd number of straight spokes from a center point, usually five. Come up near the center and weave over and under the spokes in a spiral, without going through the fabric, until the spokes are hidden.
Long-and-short stitch. For the first row, alternate long and short stitches along the outer edge of a petal. Fill the following rows with long stitches that split into the row before, switching to a lighter or darker shade for soft shading.
Bullion knot. Come up at point A, go down at point B and come back up at A without pulling the needle through. Wrap the thread around the needle until the wraps cover the distance from A to B, hold them, pull the needle through and lay the coil down, then go down at B.
From Maker Warmth
Looking for your next stitch project?
Every pattern on this blog is free to print, from tiny bows to full denim jacket designs. Save this one, then browse the whole collection.
1. Lazy Daisy Chain on a Denim Collar

If you are completely new, start here. Each petal is a single lazy daisy stitch, and five or six of them around a yellow French knot make a full flower. A line of small daisies along both collar points makes a denim jacket look finished and thoughtful.
The collar is also a forgiving spot: it is small, flat and easy to hoop, and nobody inspects it from close up.
Stitches: lazy daisy, French knot
Floss: 3 strands, white and yellow
Level: beginner
How to stitch it
- Mark a dot for each flower center along the collar point with a water-soluble pen, about half an inch apart.
- Around each dot, stitch five or six lazy daisy petals in white, working around the center like clock hands.
- Fill each center with one yellow French knot, wrapping the thread twice around the needle.
- Repeat on the second collar point, then rinse away the pen marks once the stitching is done.
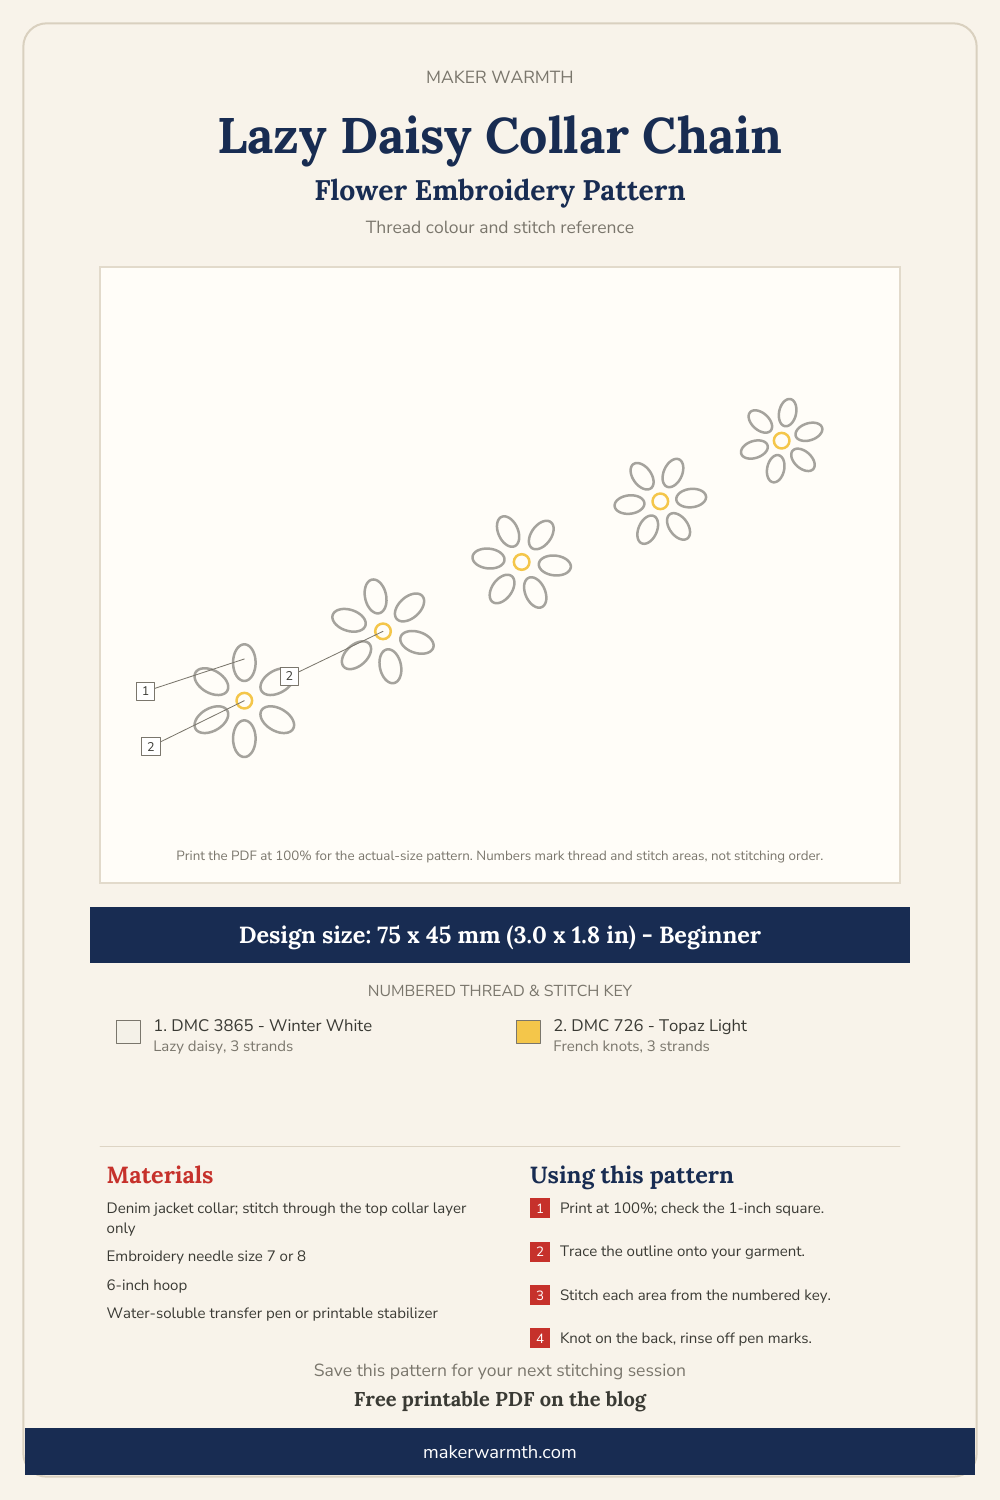
Download the Free Printable PDF
2. Wildflower Meadow Along a Jeans Hem
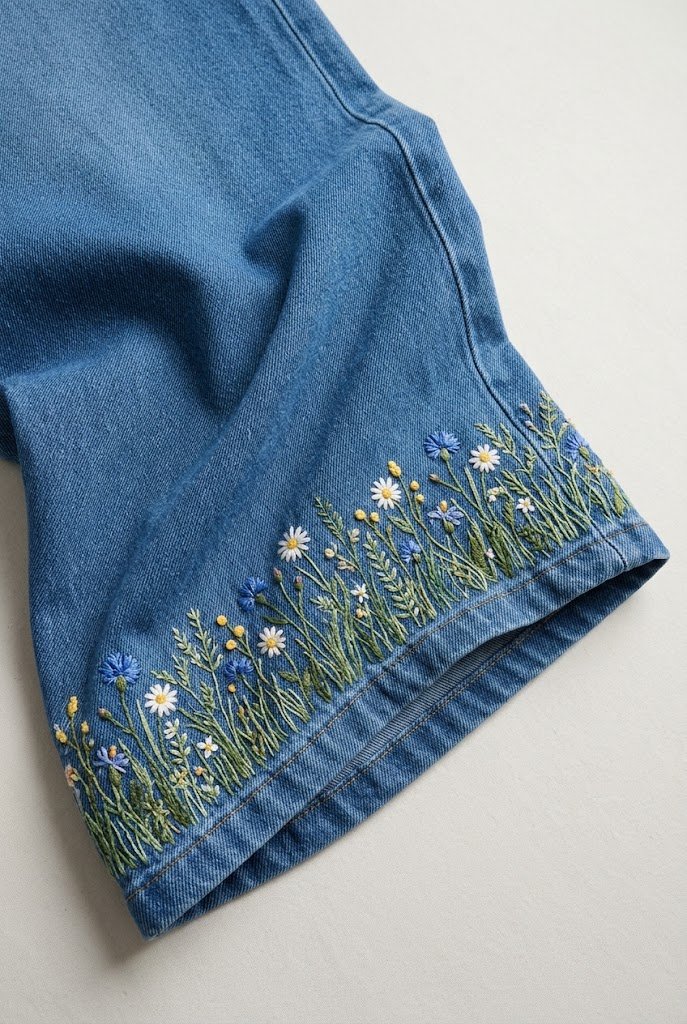
A low strip of mixed wildflowers running around the bottom of each leg is one of the most loved hand embroidery flower designs for jeans. Vary the heights: tall straight-stitch grasses, French knot buds, a few lazy daisies and a cornflower or two.
Wide-leg jeans give you more room to work with than slim ones, and because it is a random meadow, small mistakes simply disappear into the mix.
Stitches: straight stitch, stem stitch, French knot, lazy daisy
Floss: 3 strands, several flower colors plus a muted green
Level: beginner (mostly time)
How to stitch it
- Draw a soft wavy baseline about an inch above the hem and sketch stems of different heights rising from it.
- Stitch the stems in stem stitch and add grasses as single straight stitches fanning upward.
- Add flowers on top: lazy daisies, small straight-stitch cornflowers in blue and French knot buds in yellow.
- Work one leg at a time and move the hoop along the hem as you go.
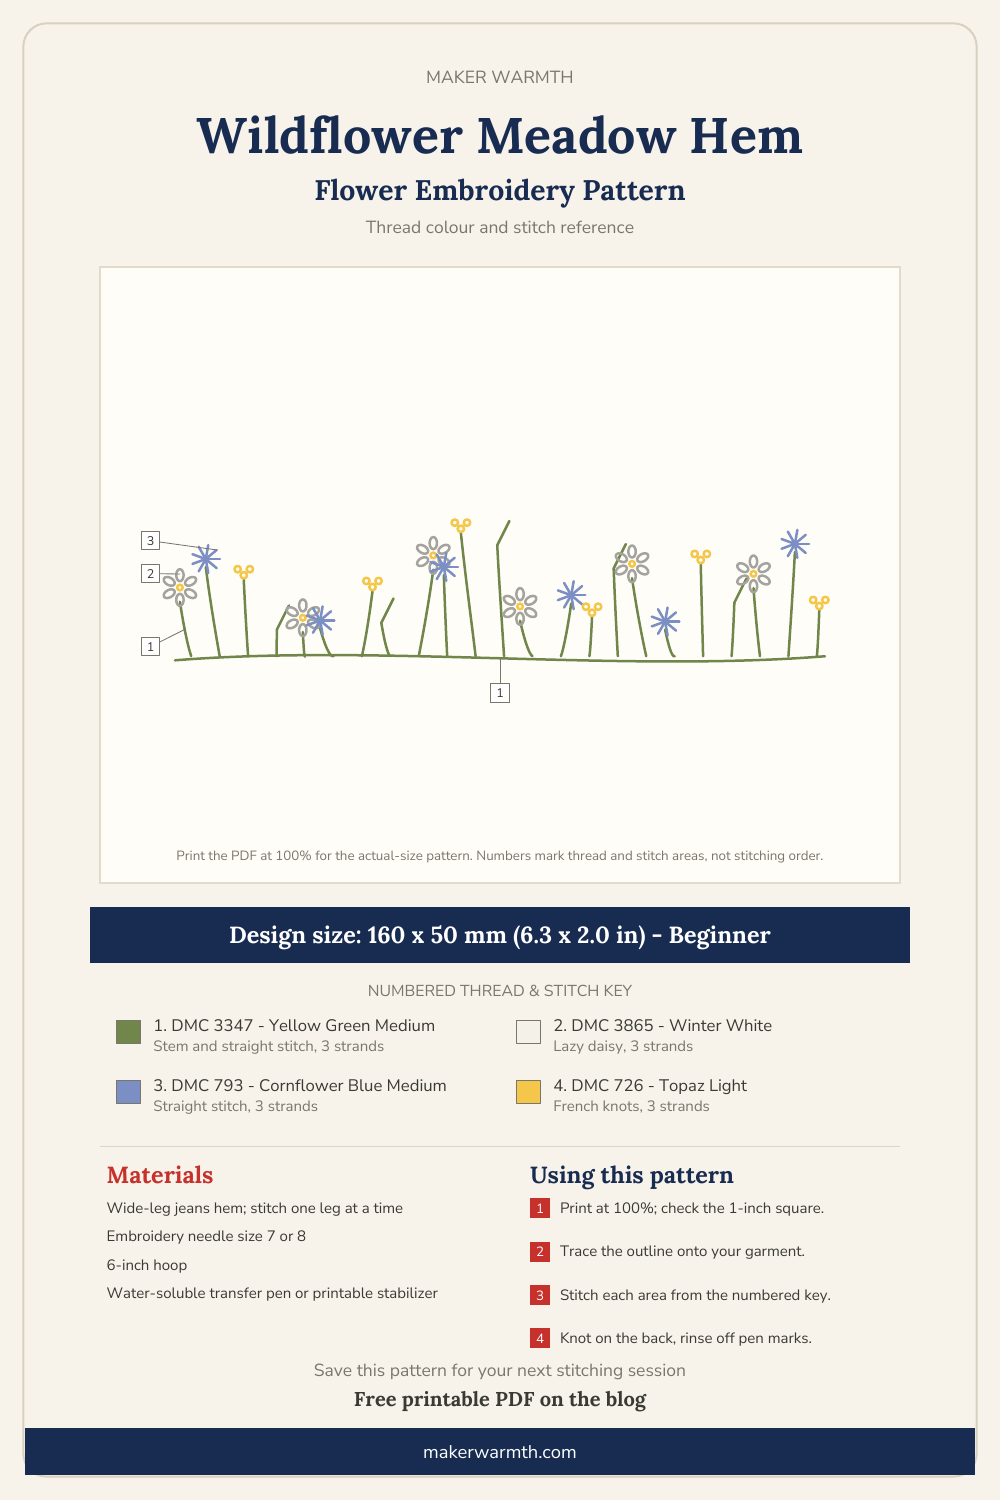
Download the Free Printable PDF
3. Single Red Rose on a Shirt Pocket
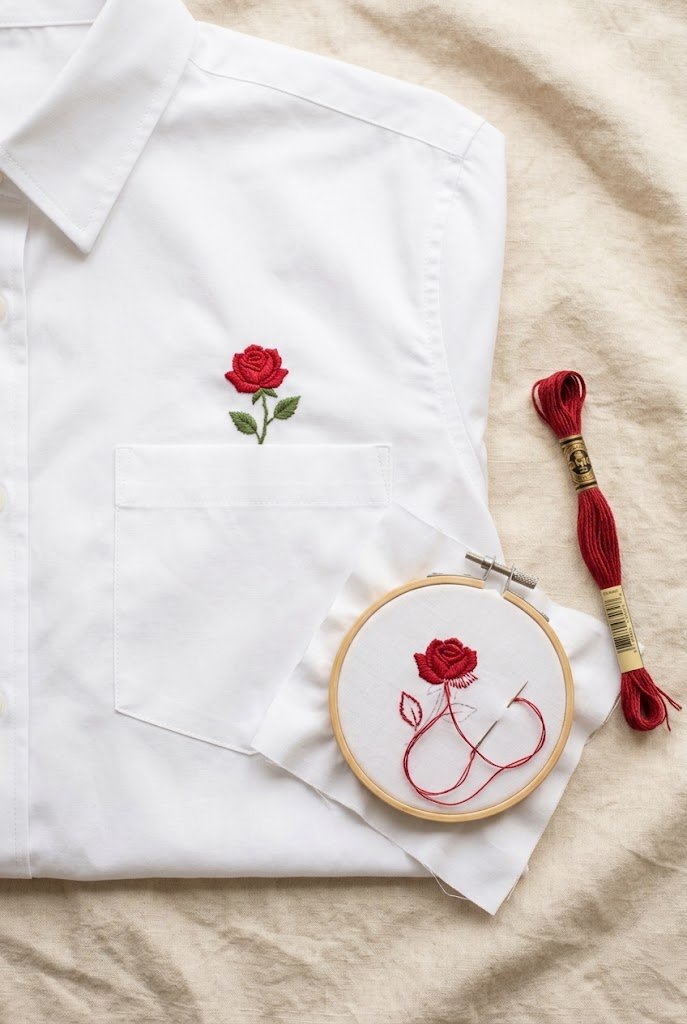
One flower, placed well, can say more than a whole garden. A small red rose peeking out of a breast pocket works on a white button-down, a chambray shirt or a plain tee.
Satin stitch gives a smooth, polished rose; a woven wheel rose gives a softer, rounder look if satin stitch feels intimidating.
Stitches: satin stitch, stem stitch, fishbone stitch
Floss: 2 strands, red, darker red and green
Level: beginner to intermediate
How to stitch it
- Draw a small rose head just above the pocket edge and a short stem disappearing into the pocket.
- Outline each petal in split stitch, then fill it with satin stitch, using the darker red for the inner petals.
- Stitch the stem in stem stitch and fill two small leaves with fishbone stitch.
- Stitch through the shirt front only, not through the pocket, so the pocket still opens.

Download the Free Printable PDF
4. Sunflower on the Back of a Denim Jacket

A big sunflower is the classic statement piece for a jacket back. The yellow petals pop against blue denim, and a dense center of brown and black French knots gives the flower real texture.
On a cropped jacket the back panel is shorter, so one large flower fills it nicely without needing extra leaves or stems.
Stitches: long-and-short stitch, French knot, split stitch
Floss: 3 strands, two yellows, brown and black
Level: intermediate
How to stitch it
- Draw a circle for the center and long pointed petals around it; a stick-and-stitch transfer sheet makes this easy on denim.
- Fill each petal with long-and-short stitch, darker yellow near the center and lighter at the tips.
- Cover the center with French knots, packing them tightly, darker at the middle and lighter toward the petals.
- Use the larger hoop and move it between sections rather than squeezing finished petals inside the ring.

Download the Free Printable PDF
Want more ideas for this flower?
Sunflower Embroidery on Clothes
5. Lavender Sprigs on a Linen Shirt Cuff
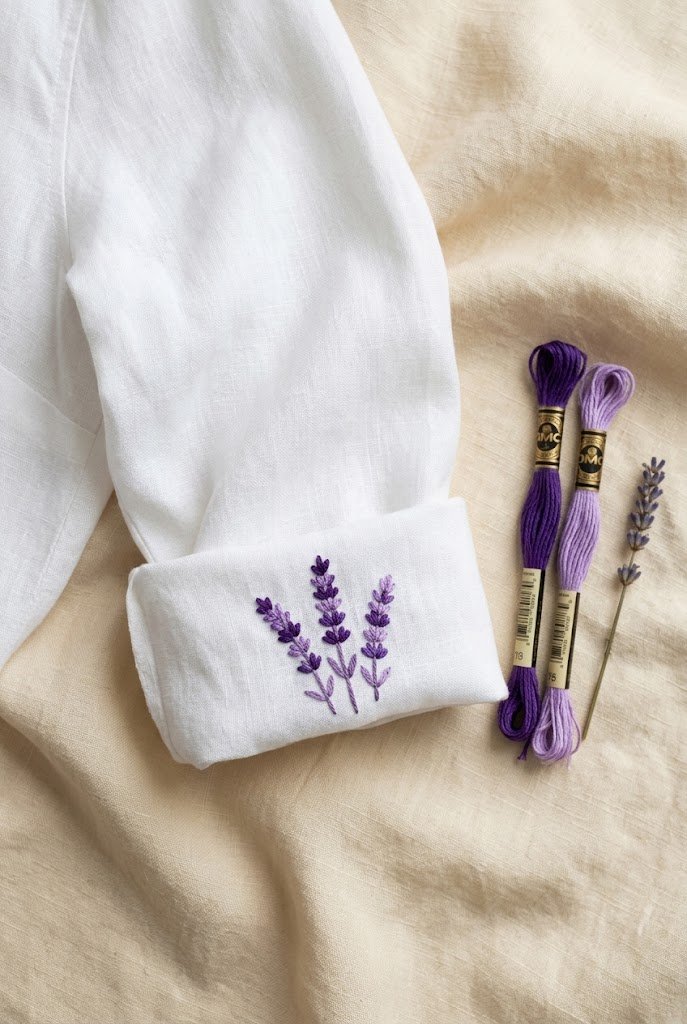
Lavender is one of the quickest flowers you can stitch: a long stem and a column of small buds in two shades of purple. Two or three sprigs on a rolled-up cuff are a quiet detail that people notice only up close.
Stitches: stem stitch, lazy daisy or French knot
Floss: 2 strands, two purples and a soft green
Level: beginner
How to stitch it
- Draw three slim stems of slightly different heights on the cuff, angled like a little bunch.
- Stitch the stems in stem stitch in green.
- Cover the top third of each stem with tiny lazy daisy buds pointing upward, alternating the two purples.
- Add a few single French knots at the very tips to make the sprigs look lighter.
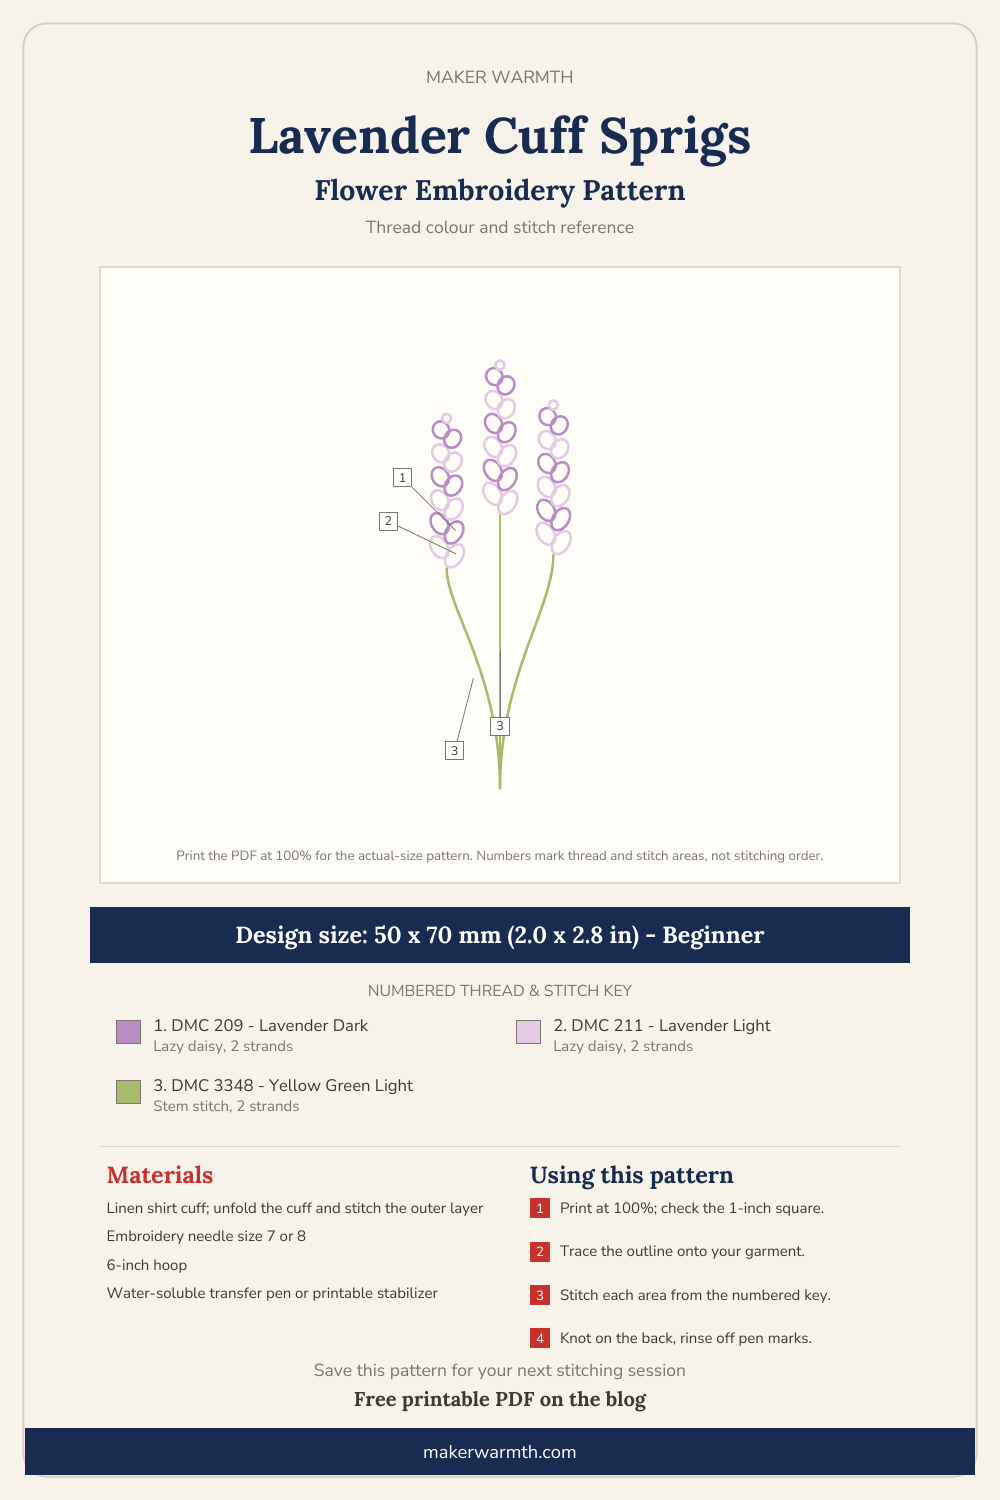
Download the Free Printable PDF
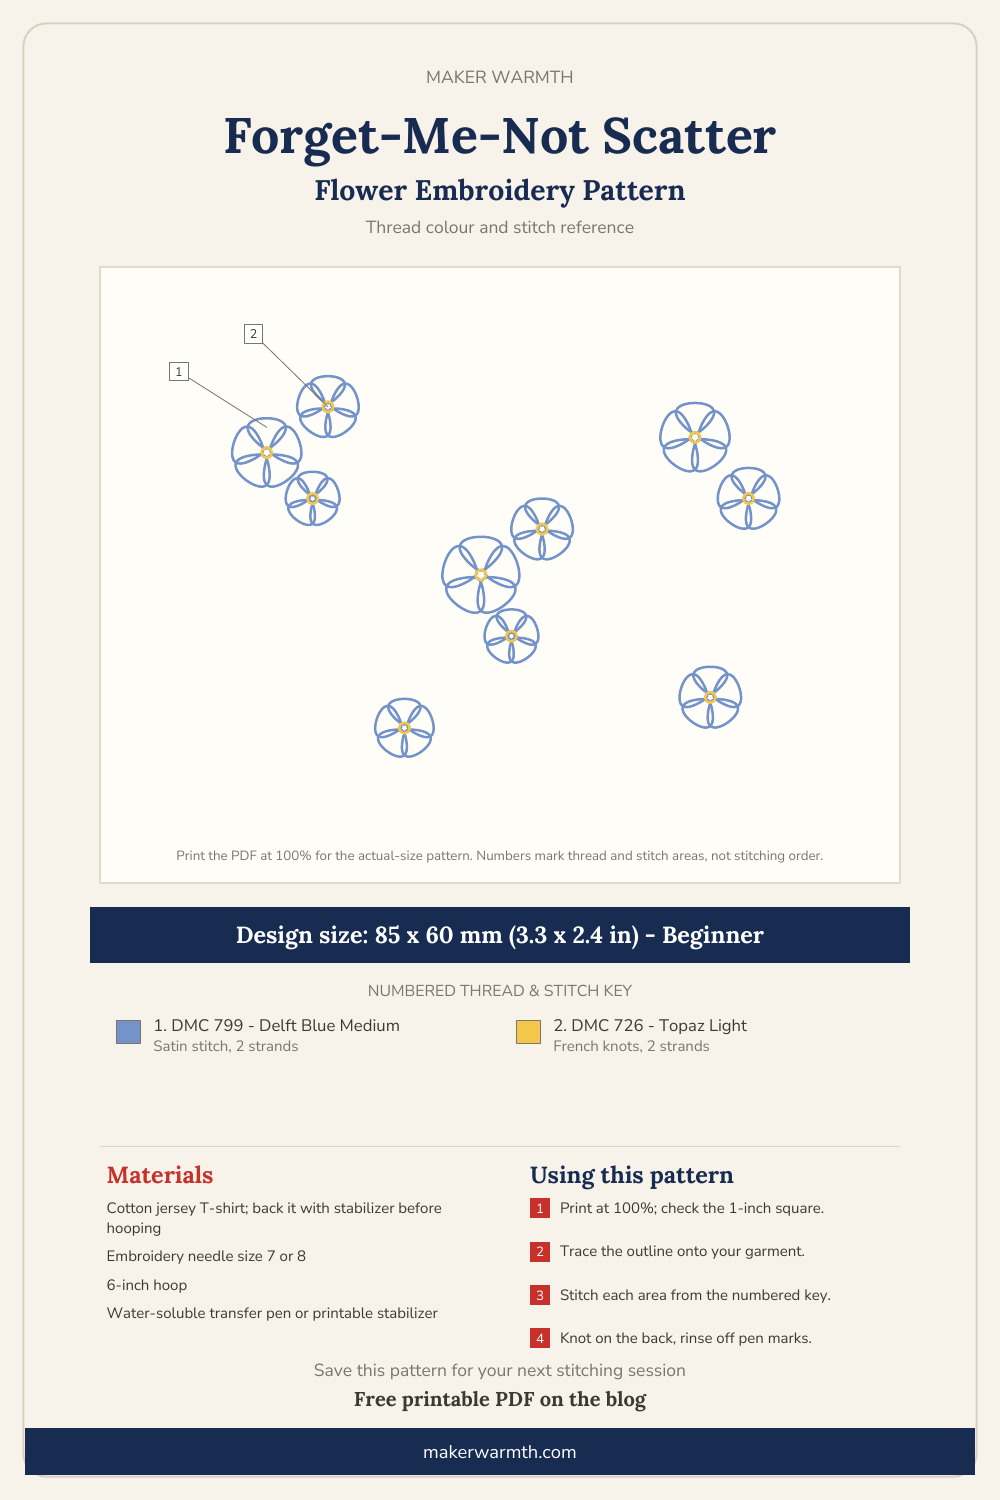
6. Forget-Me-Not Scatter on a White Tee

Tiny blue five-petal flowers with yellow centers, scattered loosely across one shoulder or the front of a tee. Each forget-me-not is only five short petals, so you can stitch a handful in an evening.
Stitches: satin stitch, French knot
Floss: 2 strands, blue and yellow
Level: beginner
How to stitch it
- Back the shoulder area with stabilizer before hooping; T-shirt jersey stretches.
- Mark small dots for the flower centers, scattered unevenly, some in clusters of two or three.
- Stitch five tiny rounded petals around each dot, each petal made of two or three satin stitches.
- Finish every center with a yellow French knot, then trim or rinse away the stabilizer.
Download the Free Printable PDF
7. Woven Wheel Roses on a Cardigan

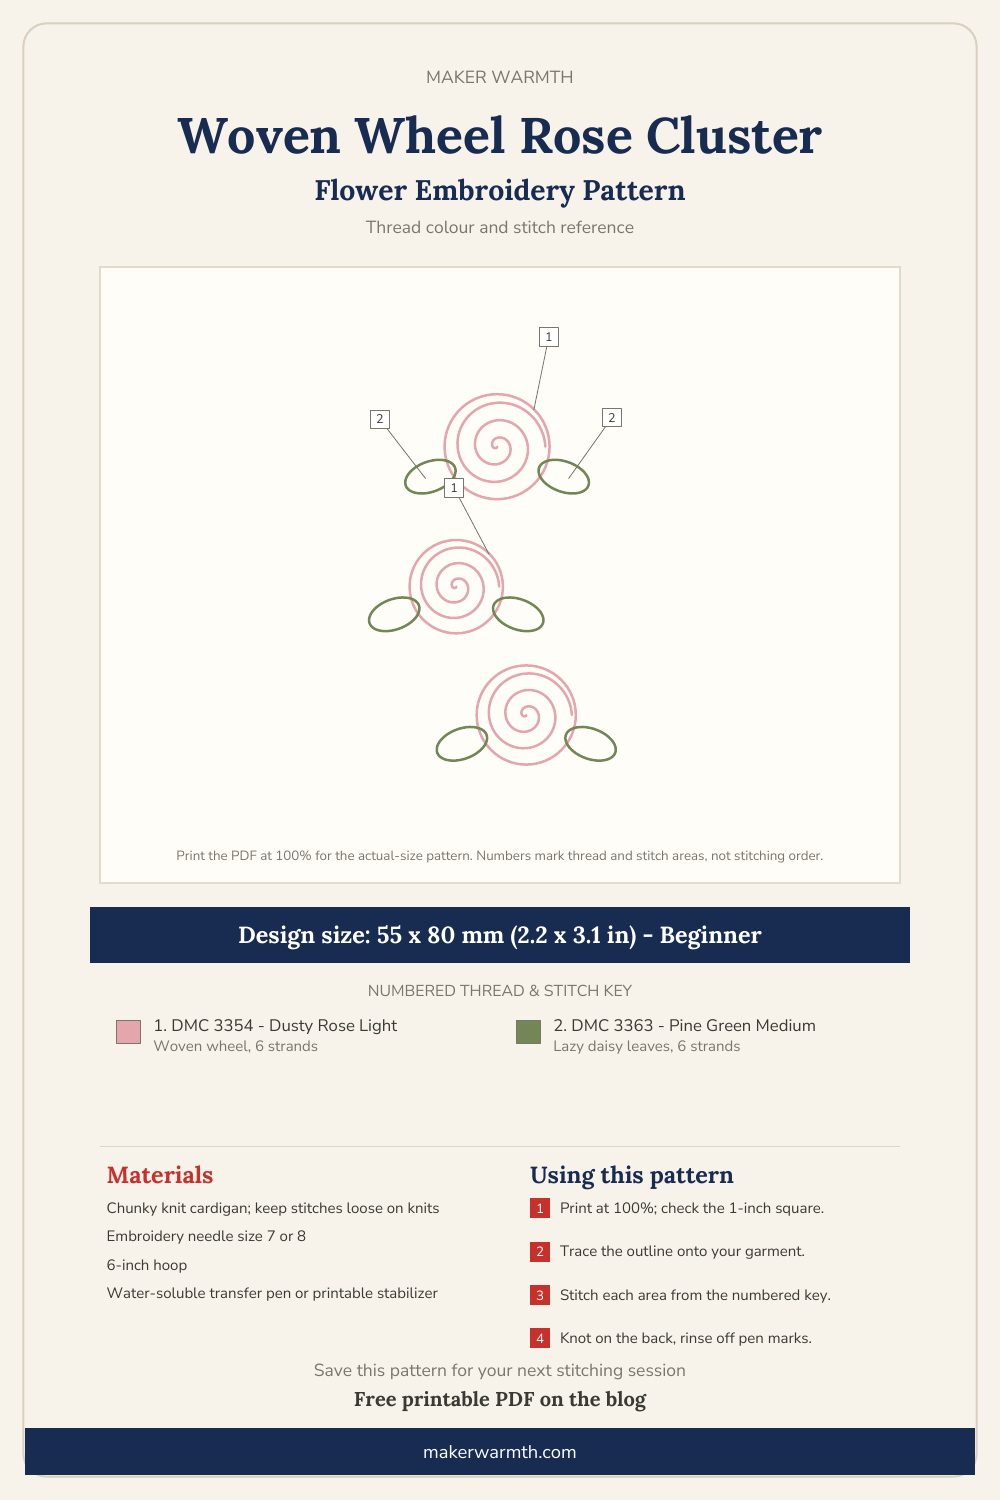
Woven wheel roses look complicated but follow a simple trick, and on a chunky cardigan they sit up from the knit like little buttons. A cluster of three by the button band or on the shoulder is enough.
Stitches: woven wheel rose, lazy daisy
Floss: 6 strands or a soft wool thread, pink and green
Level: beginner
How to stitch it
- Choose three spots near the button band and mark a center for each rose.
- Stitch five spokes from each center, about a quarter inch long.
- Bring the pink thread up near the center and weave over and under the spokes until they are covered.
- Add two lazy daisy leaves in green beside each rose. Do not pull tight; knits need slightly loose stitches.
Download the Free Printable PDF
8. Cherry Blossom Branch Over the Shoulder
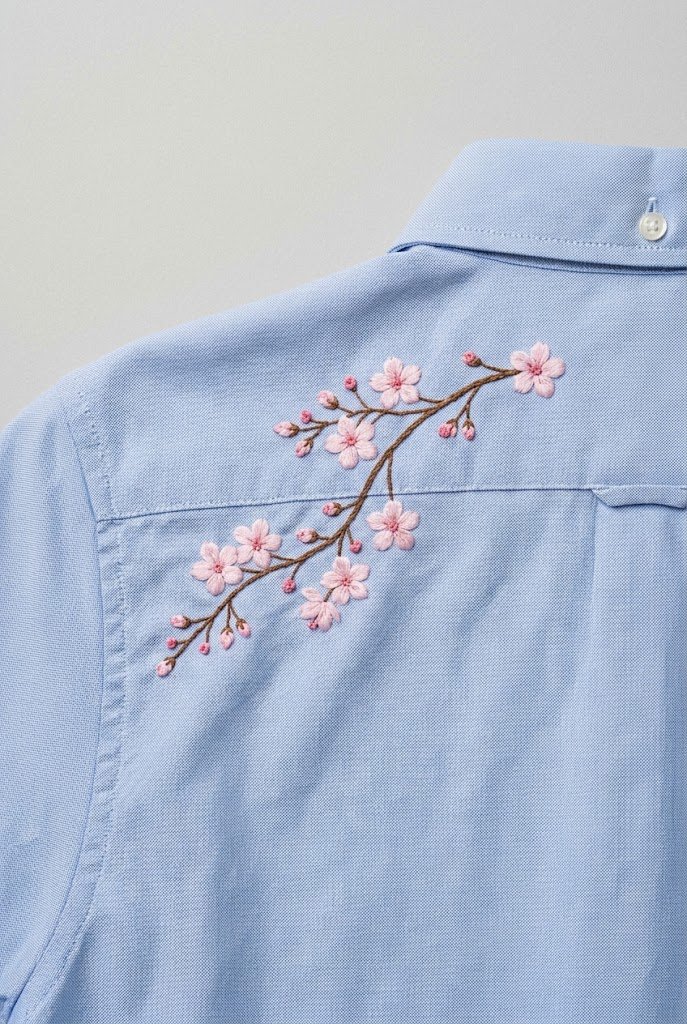
A dark branch curving from the back over the shoulder, with pale pink blossoms dotted along it, is an elegant way to break up a plain shirt or blouse.
Stitches: split stitch, satin stitch, French knot
Floss: 2 strands, brown, pale pink and deeper pink
Level: intermediate
How to stitch it
- Draw the branch crossing the shoulder seam, thicker at the back and thinning toward the front, with a few side twigs.
- Stitch the branch in split stitch, adding a second row where it is thickest.
- Add five-petal blossoms along the branch in pale pink satin stitch, with a deeper pink French knot in each center.
- Scatter a few single French knot buds near the twig ends.

Download the Free Printable PDF
9. Poppy Border on a Skirt Hem

Bright red poppies with black centers make a bold border for a linen or cotton skirt. Stitch them at slightly different heights with thin wavy stems so the border moves when you walk.
Stitches: long-and-short or satin stitch, French knot, stem stitch
Floss: 3 strands, two reds, black and green
Level: intermediate
How to stitch it
- Sketch poppies along the hem, spaced a few inches apart and at different heights, with thin wavy stems down to the hem.
- Fill the petals with long-and-short stitch in two reds, or with simple satin stitch for a quicker version.
- Pack the centers with black French knots.
- Stitch the stems in stem stitch and add a few closed buds on some of them.

Download the Free Printable PDF
10. Tiny Daisies Around a Neckline
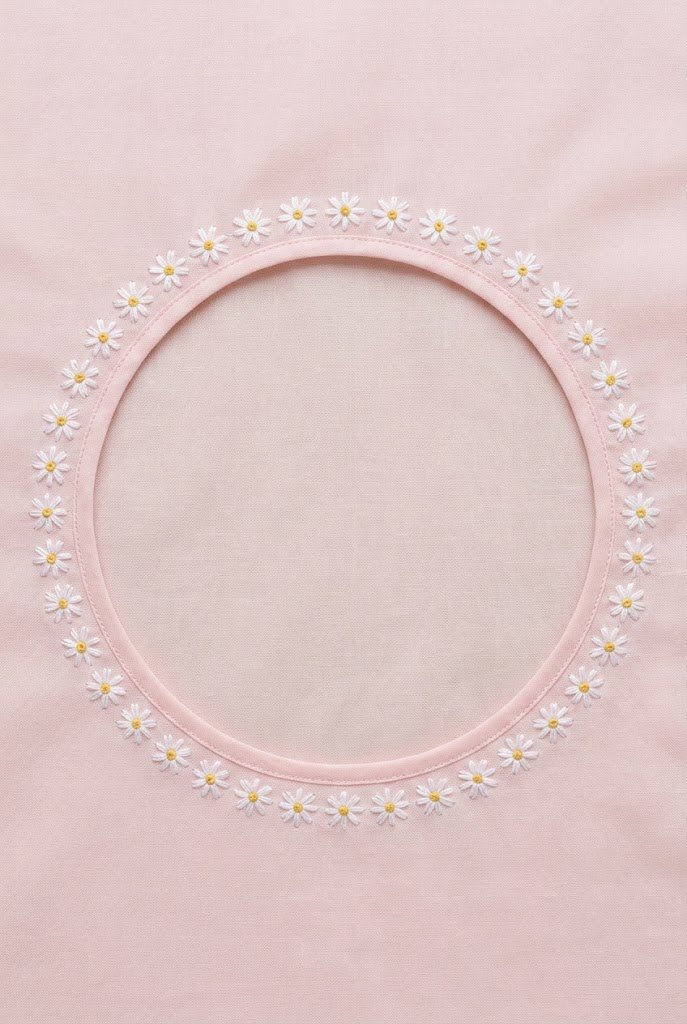
A ring of very small daisies around a round neckline turns a basic top into something you would expect to find in a boutique. Keep the flowers small and evenly spaced so the neckline still lies flat.
Stitches: lazy daisy, French knot
Floss: 2 strands, white and yellow
Level: beginner
How to stitch it
- Mark dots about half an inch below the neckline seam and the same distance apart all the way around.
- Stitch five short lazy daisy petals around each dot.
- Add a single yellow French knot in each center.
- Use a small hoop and keep the stitches short so they do not stiffen the curve.

Download the Free Printable PDF
11. Tulip Trio on a Sweatshirt
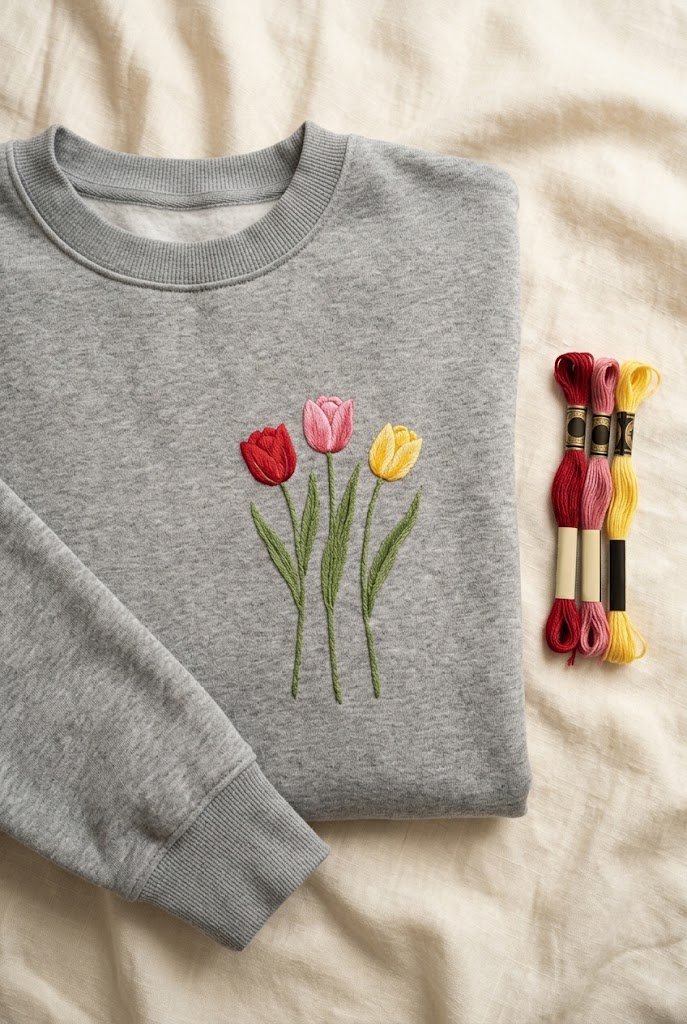
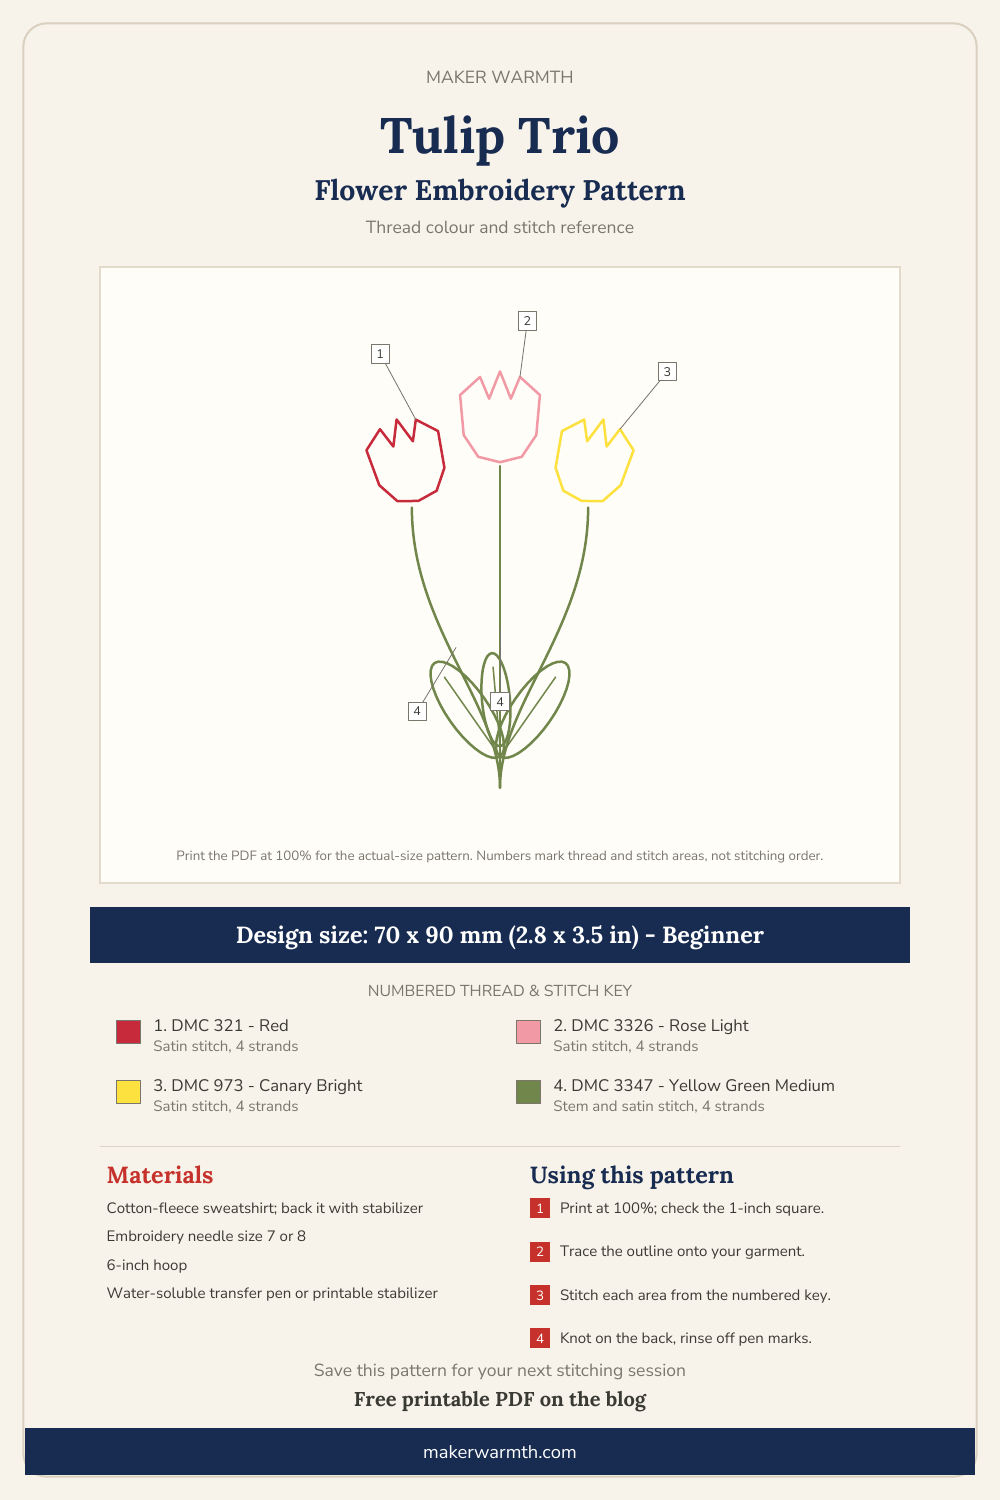
Three tulips on long stems sit perfectly in the center of a crewneck sweatshirt. Tulips are basically three rounded petals, so they are forgiving shapes for satin stitch.
Stitches: satin stitch, stem stitch
Floss: 4 to 6 strands, red, pink, yellow and green
Level: beginner to intermediate
How to stitch it
- Back the chest area with stabilizer and draw three tulip heads with stems meeting at the bottom.
- Fill each tulip with satin stitch, working the side petals first and the middle petal last so it sits on top.
- Stitch the stems in stem stitch and fill one long leaf for each tulip with satin stitch.
- Use more strands than on a shirt; fleece swallows thin thread.
Download the Free Printable PDF
12. Lily of the Valley on Collar Points
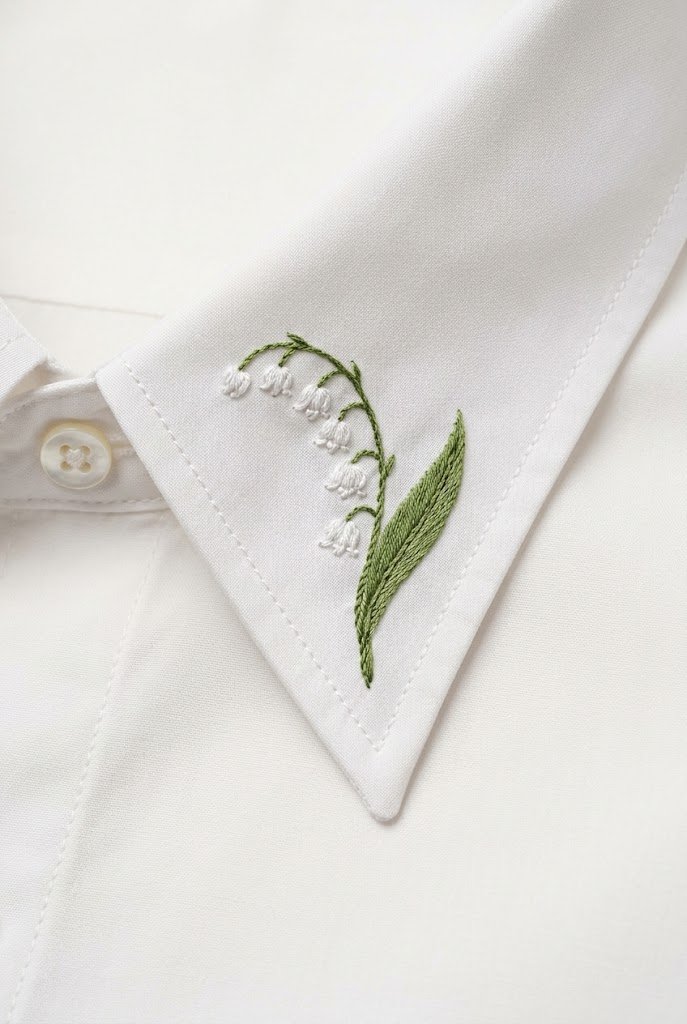
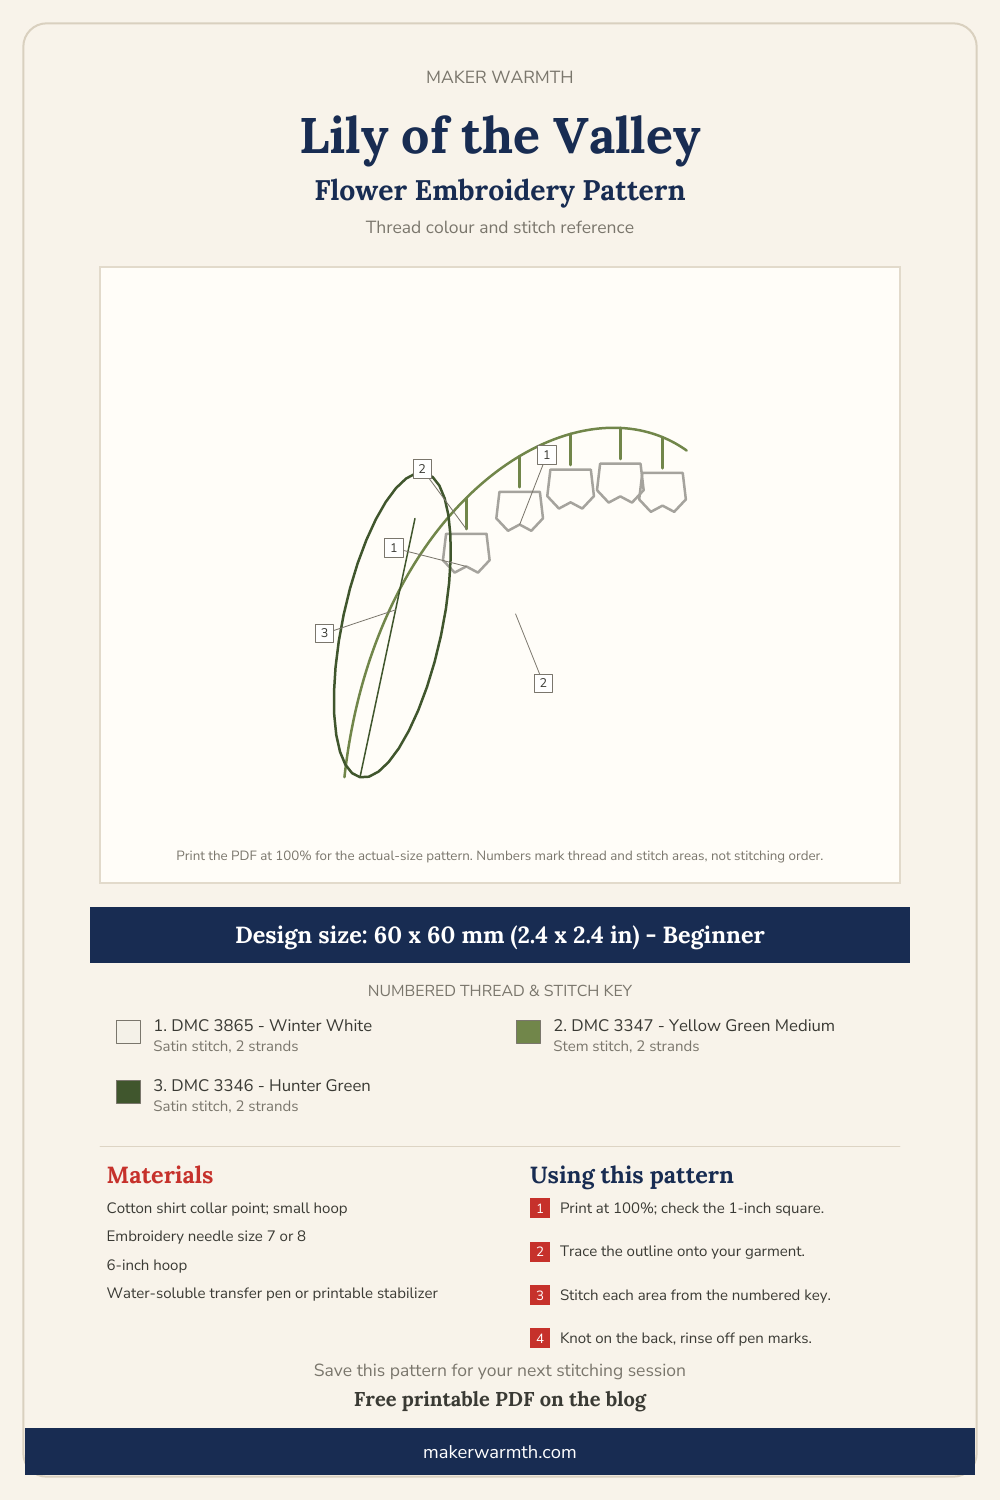
Arched stems with little white bells hanging from them fit naturally into the triangle of a shirt collar. It is a delicate detail for a white shirt.
Stitches: stem stitch, satin stitch
Floss: 2 strands, white and green
Level: beginner to intermediate
How to stitch it
- Draw one arched stem in the collar point and four or five small oval bells hanging from it.
- Stitch the stem in stem stitch in green.
- Fill each bell with tiny white satin stitches and link it to the stem with one short straight stitch.
- Add one long leaf curving behind the stem in satin stitch.
Download the Free Printable PDF
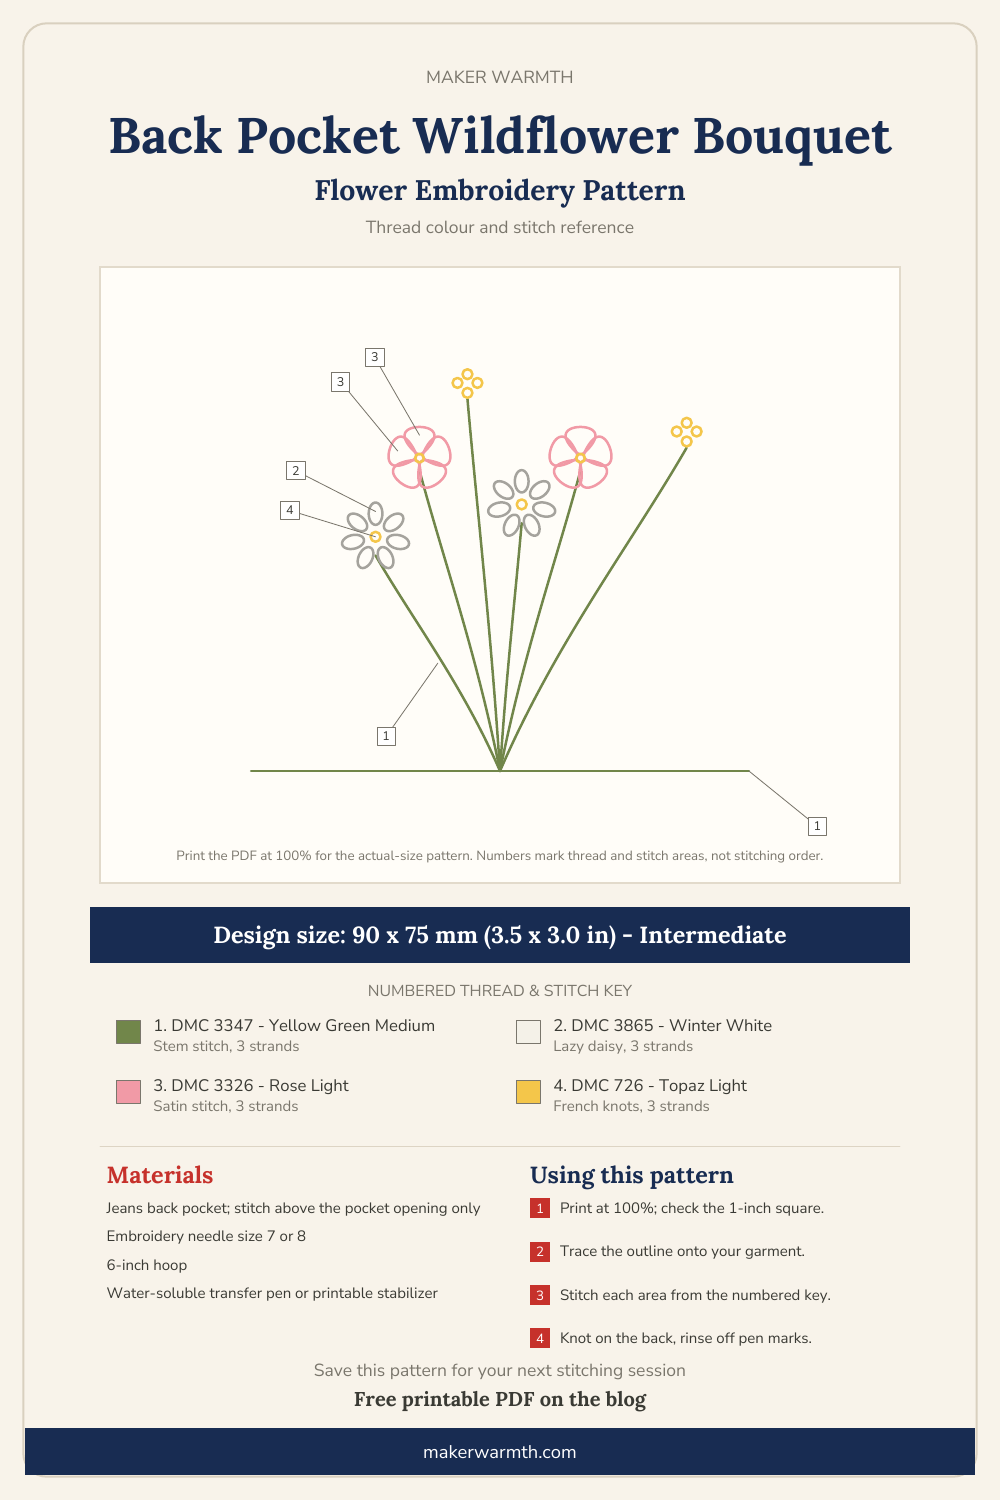
13. Wildflower Bouquet on a Back Pocket

A small mixed bouquet that looks like it is growing out of a back pocket. Stitch the stems first, starting at the pocket opening, then add the blooms on top.
Stitches: stem stitch, lazy daisy, French knot, satin stitch
Floss: 3 strands, white, pink, yellow and green
Level: intermediate
How to stitch it
- Draw five to seven stems rising from the pocket opening and fanning out.
- Stitch through the jeans above the pocket only, so you do not sew the pocket shut.
- Work the stems in stem stitch, then add lazy daisies, small satin-stitch blooms and French knot buds at the tops.
- Finish with a few stems peeking just above the pocket edge.
Download the Free Printable PDF
14. One-Color Florals on a Chambray Shirt

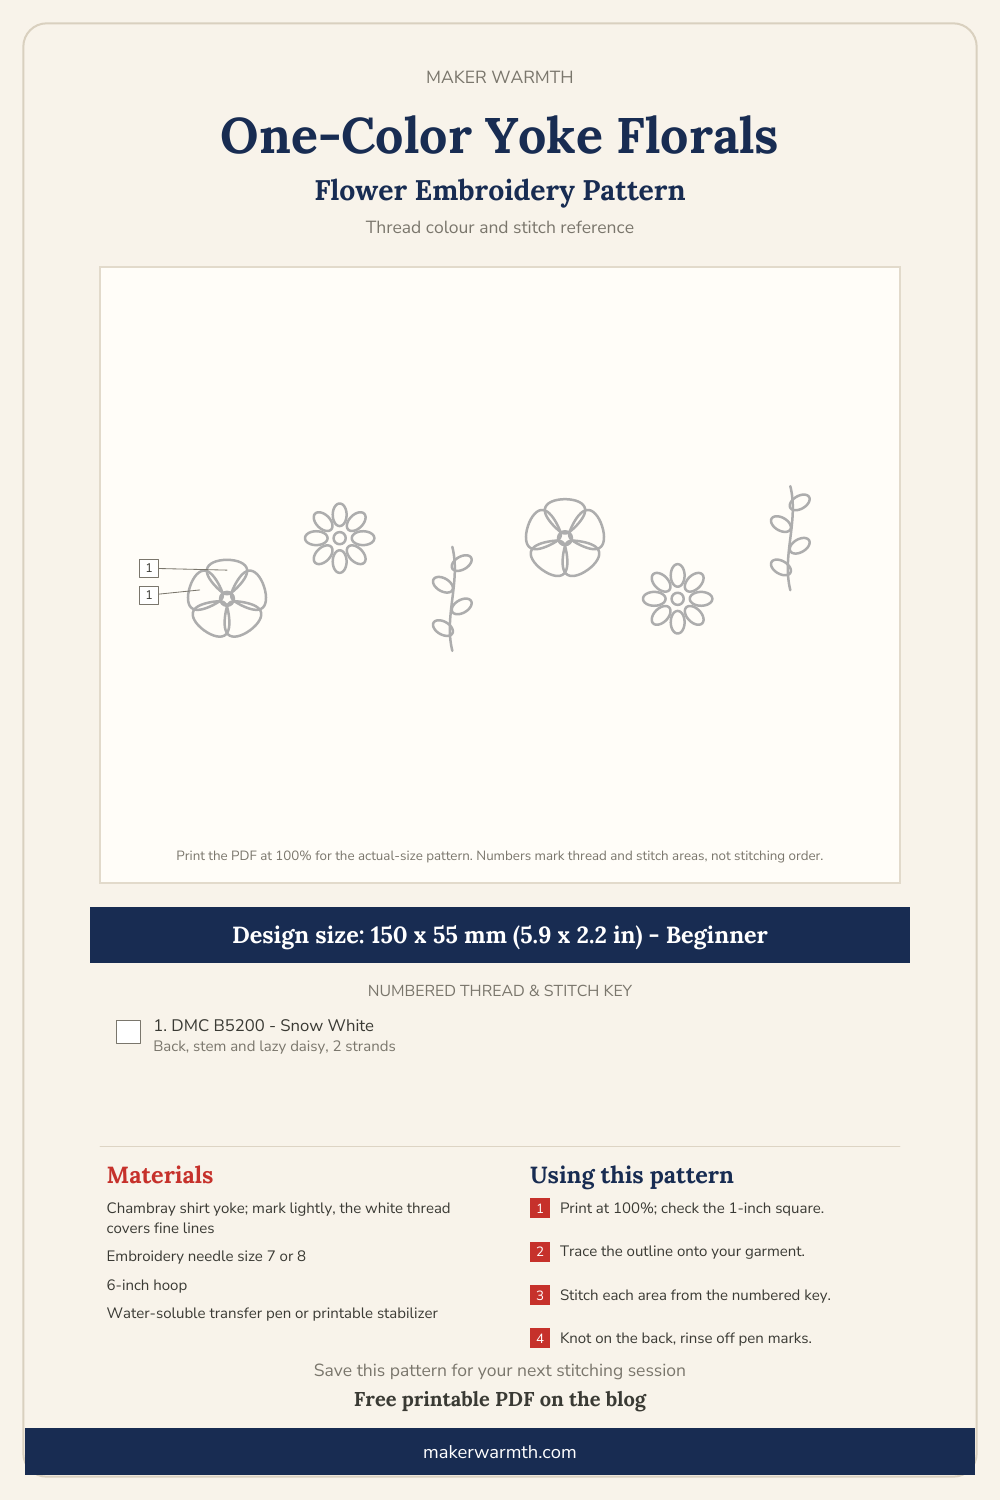
Not every floral design needs a full palette. Outline flowers and leaves in white thread only and spread them across the yoke. It feels modern and calm, and choosing colors is no longer a problem.
Stitches: back stitch, stem stitch, lazy daisy
Floss: 2 strands, white
Level: beginner
How to stitch it
- Draw simple line flowers and leaves across the yoke, leaving space between them.
- Outline the petals in back stitch with short, even stitches.
- Stitch stems in stem stitch and add a few lazy daisy leaves.
- Keep every stitch white; the contrast with chambray does all the work.
Download the Free Printable PDF
15. French Knot Hydrangea on a Denim Pocket

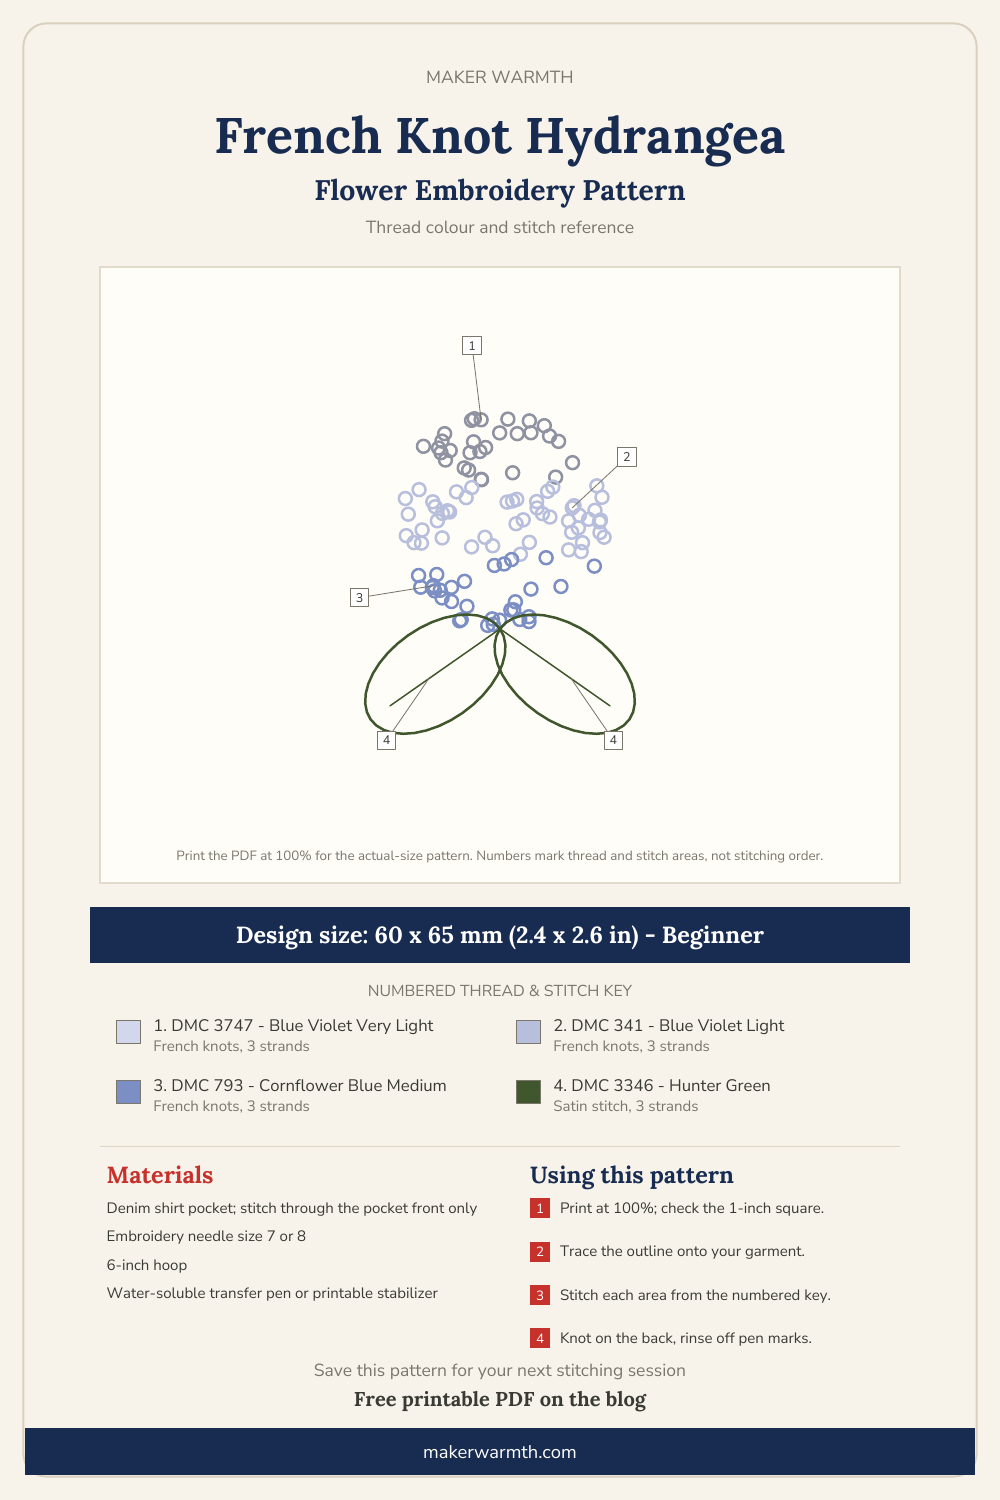
A hydrangea is basically a dome of tiny flowers, and French knots are the perfect way to build it. It is slow but meditative, and the texture is very satisfying.
Stitches: French knot, satin stitch
Floss: 3 strands, three or four shades of blue and lilac, green
Level: beginner (needs patience)
How to stitch it
- Draw a circle about an inch wide on the pocket and two large leaves below it.
- Fill the bottom of the circle with French knots in the darkest shade.
- Move up through the middle shades and finish the top with the lightest one, packing the knots closely.
- Fill the leaves with satin stitch, angled toward a center vein.
Download the Free Printable PDF
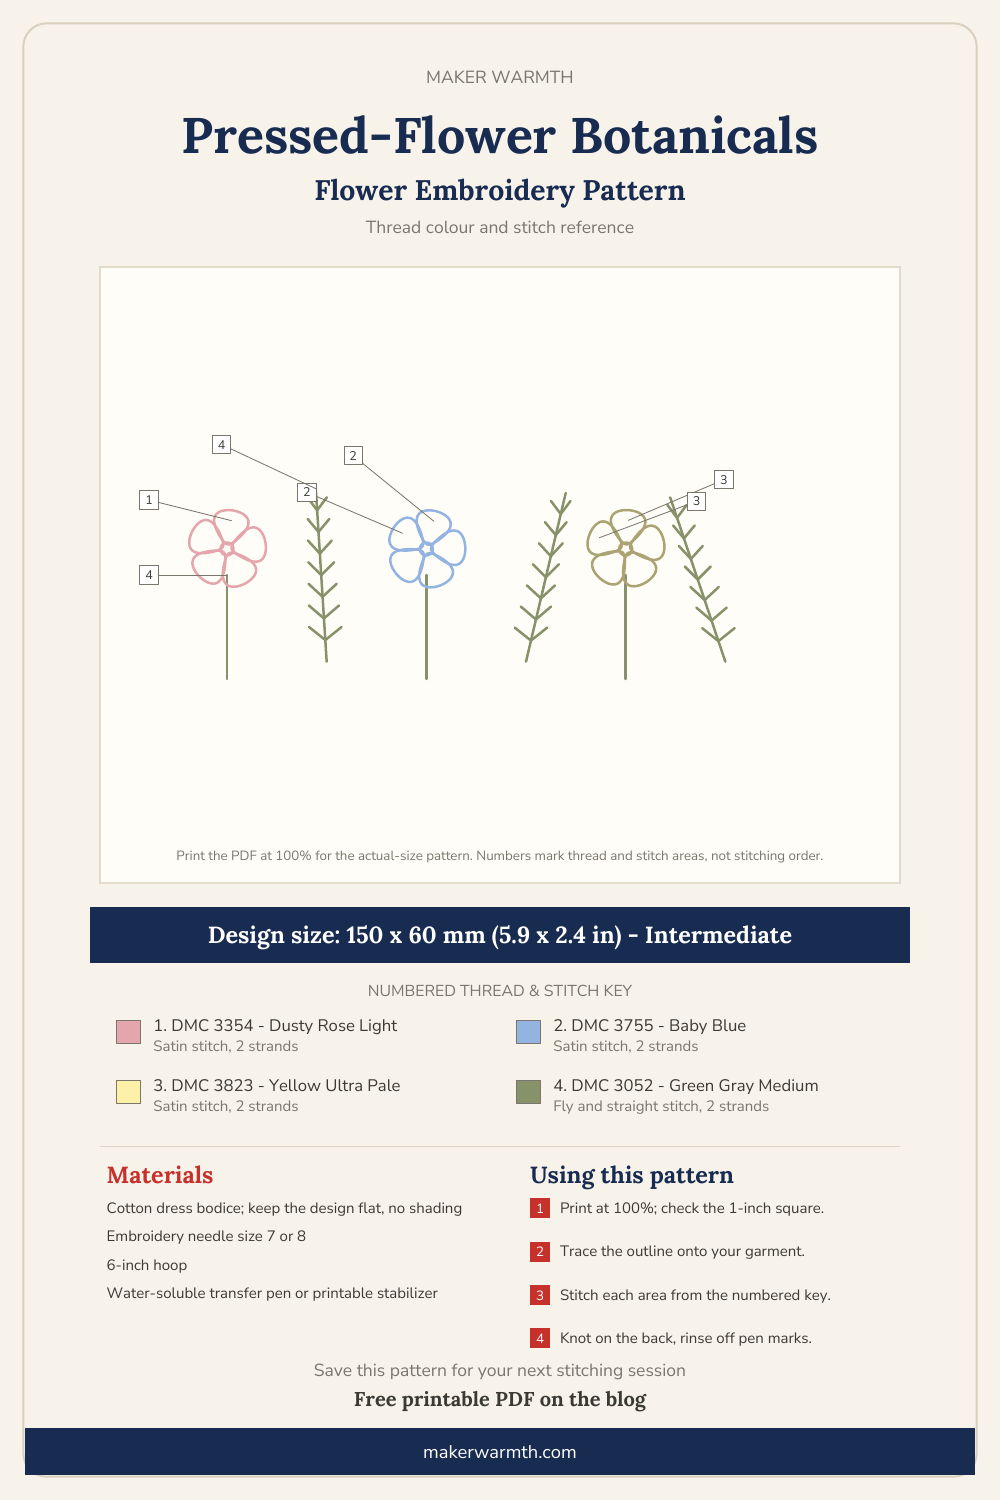
16. Pressed-Flower Botanicals on a Dress Bodice
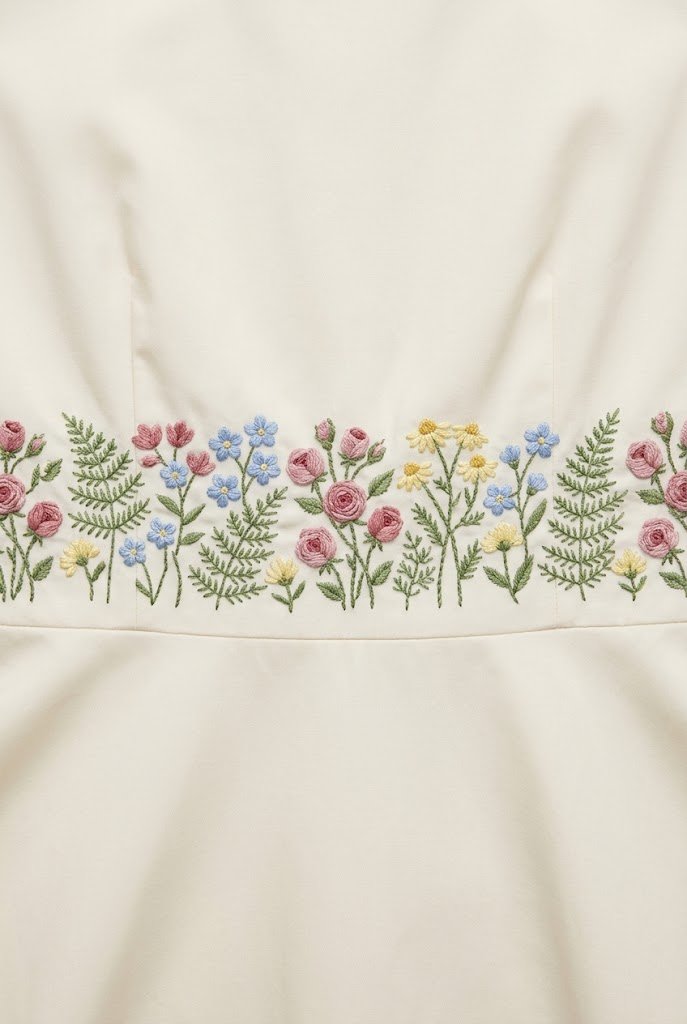
Inspired by pressed flowers in an old book: flat, slightly faded blooms and ferns laid side by side. Muted pinks, dusty blues and soft yellows keep it vintage.
Stitches: satin stitch, fly stitch, straight stitch
Floss: 2 strands, dusty pink, soft blue, pale yellow and sage
Level: intermediate
How to stitch it
- Draw a loose row of small flat flowers and fern sprigs across the bodice, laid at slightly different angles.
- Fill the flowers with flat satin stitch, no shading, to keep the pressed look.
- Stitch the ferns with fly stitch: a V-shaped stitch tacked at the bottom, repeated down a center line.
- Add thin straight-stitch stems last.
Download the Free Printable PDF
17. Bullion Knot Roses on a Sweater

Curl several bullion knots around each other and you get a tiny raised rose. They take practice, so try a few on scrap fabric first, then scatter them along a sweater neckline.
Stitches: bullion knot, lazy daisy
Floss: 3 strands, pink, cream and green; milliner needle
Level: intermediate to advanced
How to stitch it
- Mark small dots along the neckline for each rose.
- Stitch two short bullion knots side by side in the darker pink for the rose center.
- Wrap three or four longer, curved bullion knots in lighter pink or cream around them.
- Add two lazy daisy leaves to each rose. A milliner needle makes the wrapping much easier because its eye is no wider than the shaft.

Download the Free Printable PDF
18. Peony on a Sweatshirt Chest

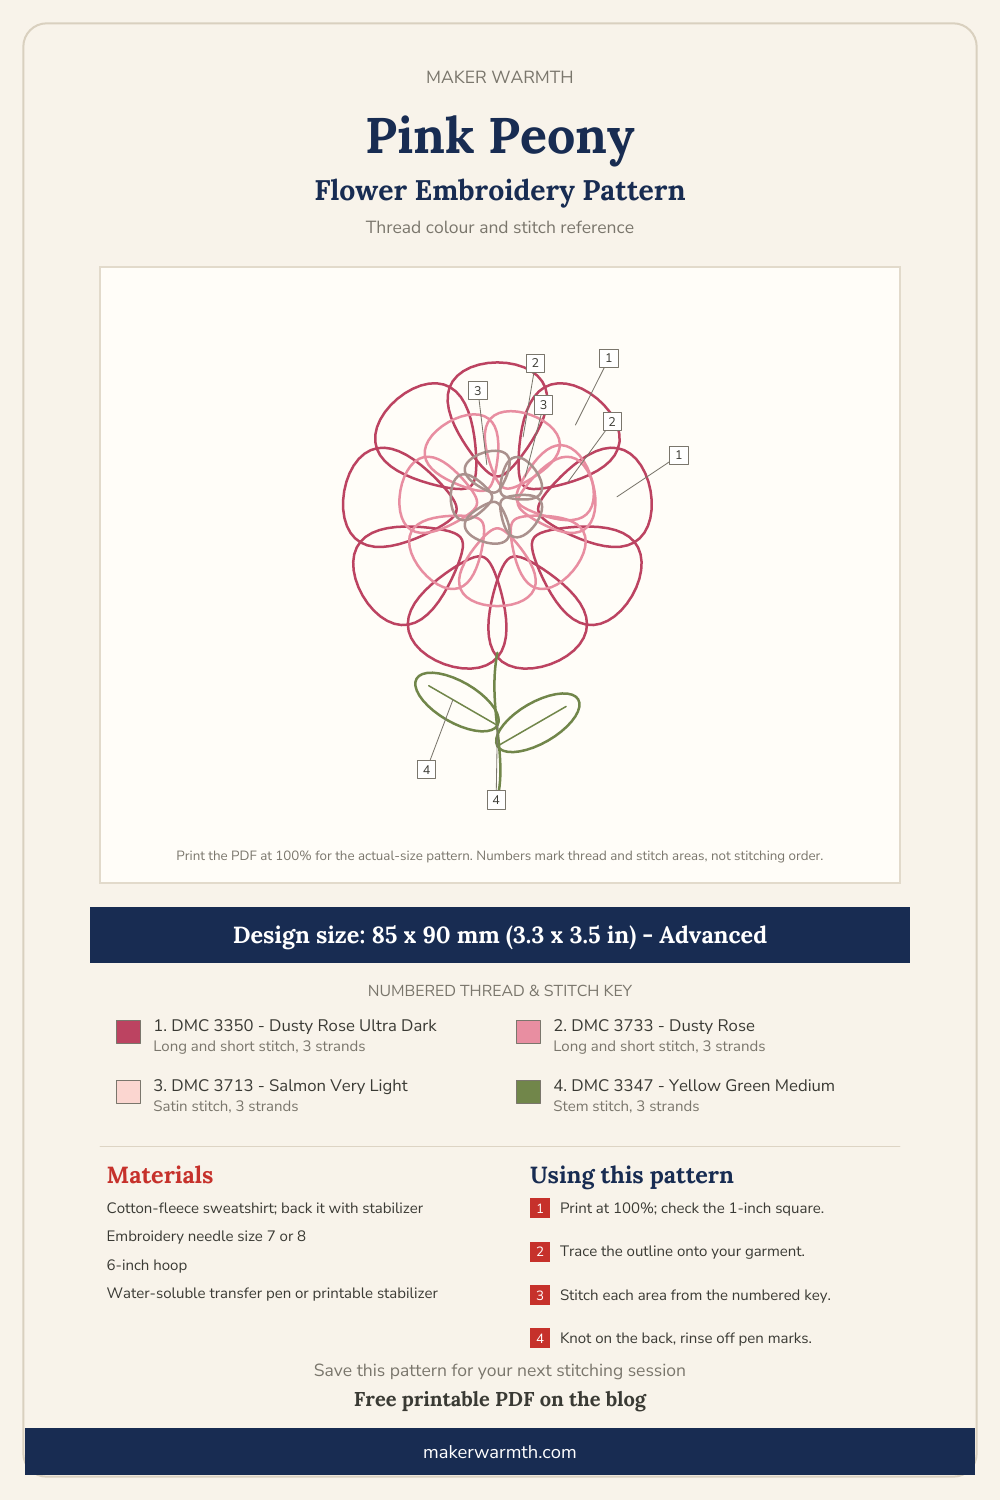
A full pink peony with layered petals is a showstopper on a cream sweatshirt. If shading feels like too much for now, outline the petals in two pinks for a lighter, sketch-like version.
Stitches: long-and-short stitch, satin stitch, stem stitch
Floss: 3 strands, three pinks and green
Level: intermediate to advanced
How to stitch it
- Back the area with stabilizer and draw the peony with back petals, middle petals and a small cupped center.
- Stitch the back petals first in long-and-short stitch, deep pink at the base fading to pale pink at the edges.
- Work forward petal by petal so each new petal overlaps the one behind it.
- Finish with the center petals in satin stitch and add the stem in stem stitch.
Download the Free Printable PDF
19. Floral Vine Down a Sleeve
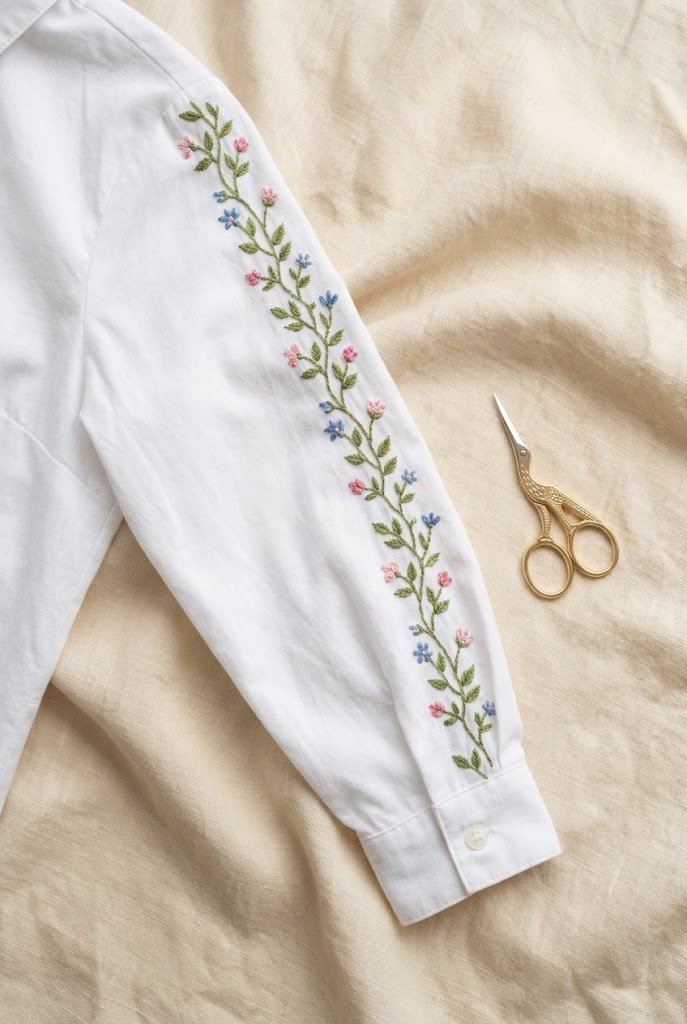
A thin vine running from shoulder to wrist, with small leaves and flowers growing off it, follows the shape of the body and looks graceful in movement.
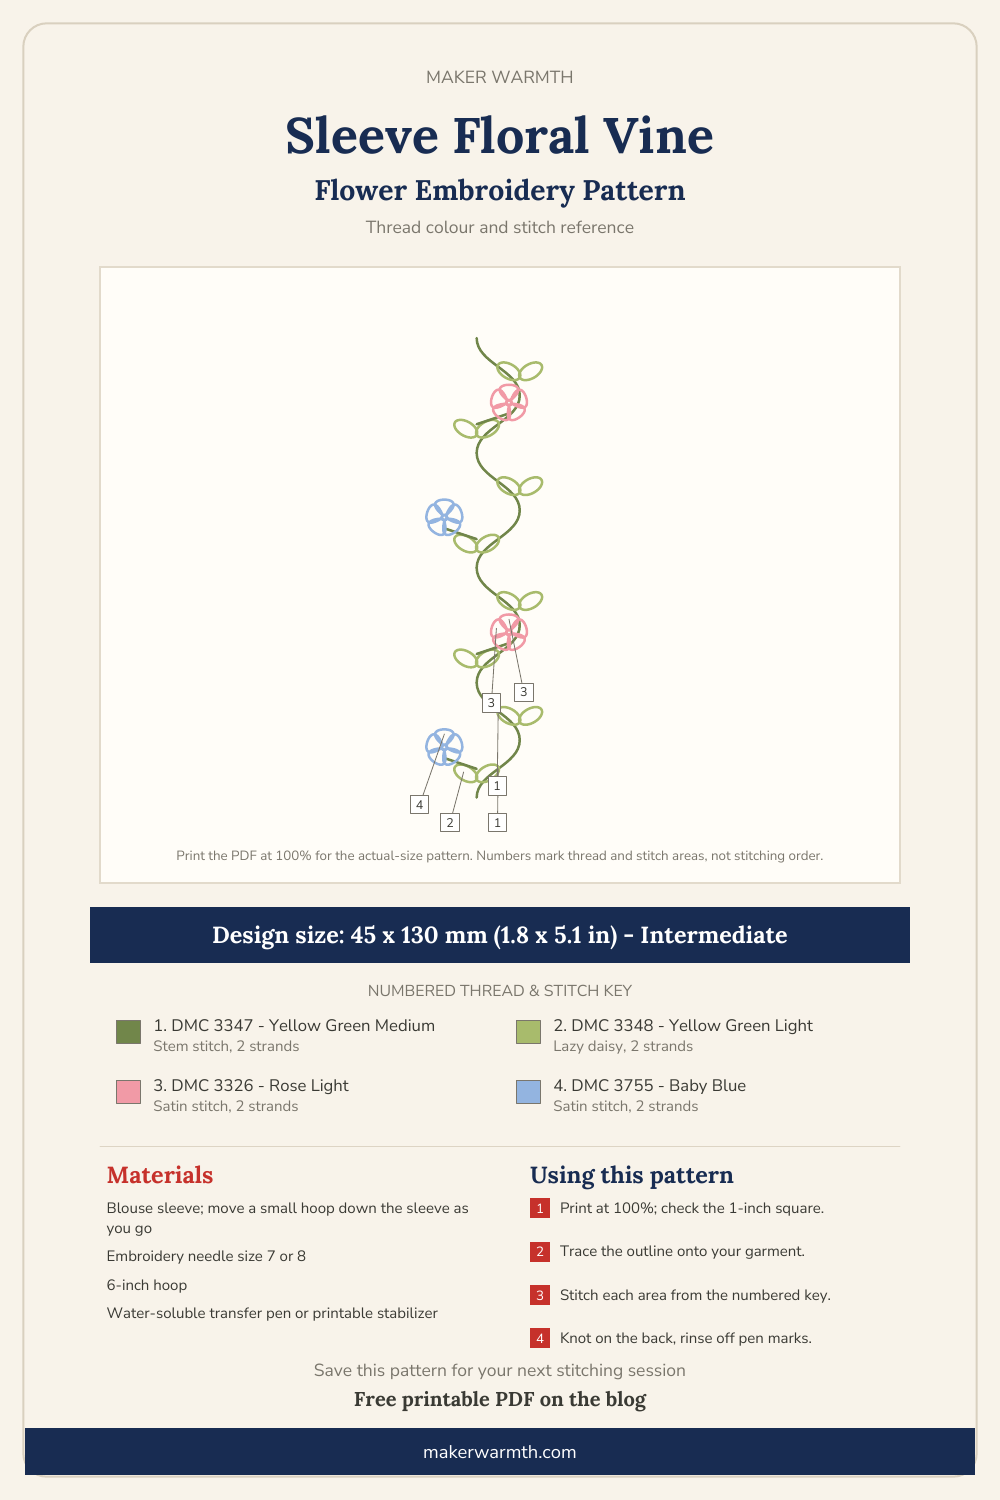
Stitches: stem stitch, lazy daisy, satin stitch, French knot
Floss: 2 strands, green, pink and blue
Level: intermediate
How to stitch it
- Draw one gently wavy line from shoulder seam to cuff along the outside of the sleeve.
- Stitch the vine in stem stitch, moving a small hoop down the sleeve as you go.
- Add pairs of lazy daisy leaves along the vine.
- Place a small satin-stitch flower every few inches, alternating pink and blue, with a French knot center.
Download the Free Printable PDF
20. Daisy Cluster Over a Hole or Stain
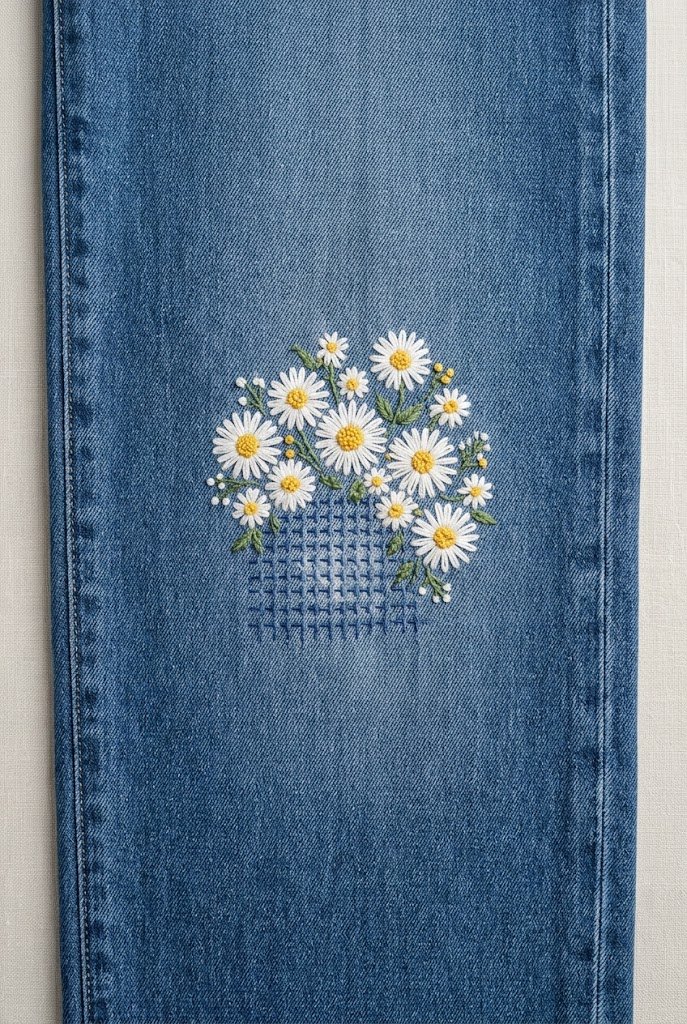
Flowers are a lovely way to save clothes. A small hole or a stain that will not wash out can disappear under a cluster of daisies.
Stitches: darning, lazy daisy, French knot
Floss: 3 strands, white and yellow; matching thread for darning
Level: beginner
How to stitch it
- For a hole, darn it first or back it with a small fabric patch on the inside.
- Draw three to five daisies of different sizes so they cover the repair completely.
- Stitch the petals with lazy daisy, going through both the jeans and the patch so the flowers also hold the repair.
- Finish the centers with yellow French knots.
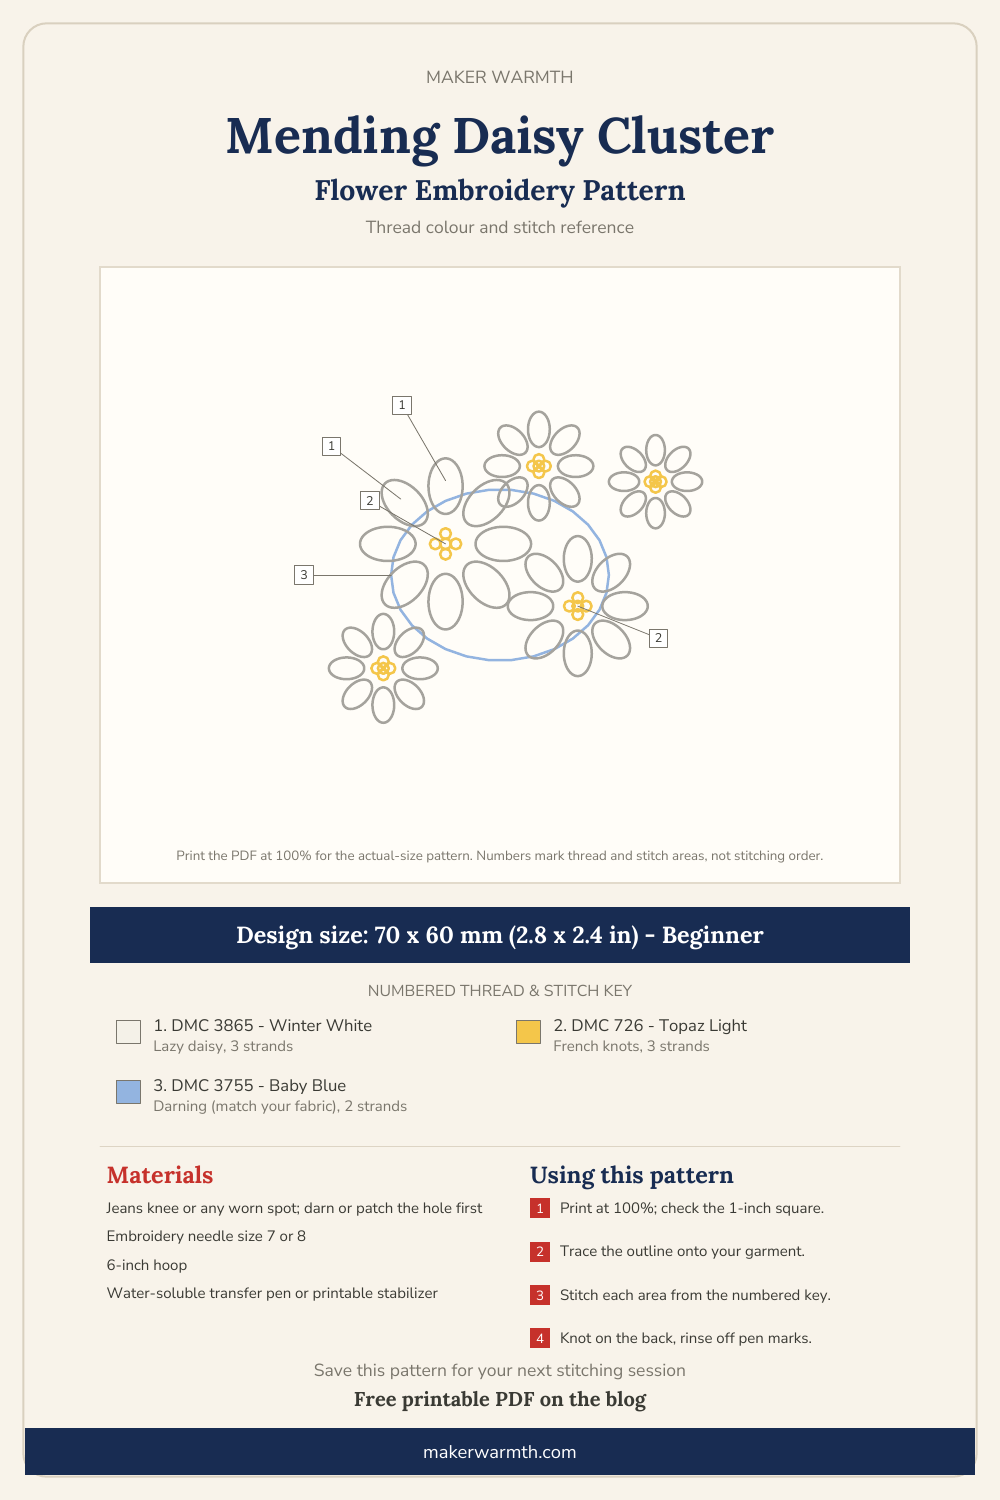
Download the Free Printable PDF
Caring for Embroidered Clothes
Hand embroidery is sturdier than it looks, but a little care keeps the colors bright and the stitches flat. Turn the garment inside out before washing, choose a cold, gentle cycle or wash by hand, and skip the dryer when you can. Iron on the reverse side over a towel, so the stitches are not crushed. Before you stitch, check that your floss is labeled colorfast, especially reds, which are the most likely to bleed onto light fabric.
FAQ
What is the easiest flower to embroider on clothes?
The lazy daisy. Each petal is one detached chain stitch, and a whole flower takes a few minutes. Woven wheel roses and French knot flowers are also very beginner-friendly.
Can you hand embroider on a stretchy T-shirt?
Yes, as long as you use stabilizer on the back of the fabric and do not stretch the knit while hooping. Keep the design fairly small and use fewer strands of floss so the area stays soft.
How many strands of floss should I use for floral embroidery designs?
Two or three strands work for most shirts, tees and fine details. Denim, canvas and sweatshirts can take three to six strands for bolder, more visible flowers.
How do I transfer a flower design onto denim?
Pen lines are hard to see on denim, so a water-soluble stick-and-stitch transfer sheet is usually the simplest option: stick it on, stitch through it, then rinse it away.
How do I print the free flower embroidery patterns at the right size?
Open the PDF and print it at 100% or “Actual size”, not “Fit to page”. Then measure the square at the top of the page: if it is exactly 1 inch, the flower is printed at the size shown on its pattern card.
Pick one flower from this list, a garment you already own, and start small. A single daisy on a collar is still a finished project, and it is often the one that makes you want to stitch the next.